
Safety and Regulatory Information Desktops, Thin Clients, and Personal Workstations
Page 29
... Hazardous Substances and Elements (continued) Part Name Lead (Pb) Mercury (Hg) Cadmium (Cd) Hexavalent Chromium (Cr(VI)) Memory X O O O I/O PCAs X O O O Power supply X O O O Keyboard X O O O Mouse X O O O Chassis/Other X O O O Fans X O O O Internal/External Media Reading X O O O Devices External Control Devices X O O O Cable X O O O Hard Disk Drive X O O O Display X X O O Polybrominated biphenyls (PBB) Polybrominated diphenyl ethers (PBDE) O O O O O O O O O O O O O O O O O O O O O O O O O: Indicates...
... Hazardous Substances and Elements (continued) Part Name Lead (Pb) Mercury (Hg) Cadmium (Cd) Hexavalent Chromium (Cr(VI)) Memory X O O O I/O PCAs X O O O Power supply X O O O Keyboard X O O O Mouse X O O O Chassis/Other X O O O Fans X O O O Internal/External Media Reading X O O O Devices External Control Devices X O O O Cable X O O O Hard Disk Drive X O O O Display X X O O Polybrominated biphenyls (PBB) Polybrominated diphenyl ethers (PBDE) O O O O O O O O O O O O O O O O O O O O O O O O O: Indicates...
PC Basics Guide
Page 7
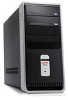
..., the base units, and the connectors on the back and the front of electronics and mechanical items housed in a chassis box called a tower or base. Inside the PC are these items: • The motherboard, which is an electronics board with the micro processing unit (MPU), slots ... operate your personal computer are sold separately. Speakers may be included with the monitor (select models only). PC Base Components The PC consists of the PC. For example, the PC shows the Windows desktop on the display screen, and when you useful information on using a keyboard to enter text and commands,...
..., the base units, and the connectors on the back and the front of electronics and mechanical items housed in a chassis box called a tower or base. Inside the PC are these items: • The motherboard, which is an electronics board with the micro processing unit (MPU), slots ... operate your personal computer are sold separately. Speakers may be included with the monitor (select models only). PC Base Components The PC consists of the PC. For example, the PC shows the Windows desktop on the display screen, and when you useful information on using a keyboard to enter text and commands,...
PC Basics Guide
Page 10
... normal startup routine when you wake it to turning off the PC, you left it is present. For best results, turn off the PC using standby mode include: • You save time and electricity without pressing any buttons on the PC chassis. 1 Close any programs, folders, and documents that were open... software programs. To close programs, click the X at the bottom of the menu. 4 Click Turn Off. 5 Turn off the monitor. As an alternative to do so. To put the PC in standby mode manually: 1...
... normal startup routine when you wake it to turning off the PC, you left it is present. For best results, turn off the PC using standby mode include: • You save time and electricity without pressing any buttons on the PC chassis. 1 Close any programs, folders, and documents that were open... software programs. To close programs, click the X at the bottom of the menu. 4 Click Turn Off. 5 Turn off the monitor. As an alternative to do so. To put the PC in standby mode manually: 1...
PC Basics Guide
Page 25
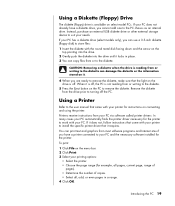
... or writing to the diskette can copy files from or writing to the diskette. 5 Press the Eject button on select model PCs. If it . 4 When you cannot add one to the PC chassis as an internal drive. To print: 1 Click File on the menu bar. 2 Click Print. 3 Select your printer for ... When it locks in a range. 4 Click OK. Instead, purchase an external USB diskette drive or other external storage device to suit your PC. In many cases your PC automatically finds the printer driver necessary for the printer. You can use a 3.5-inch diskette (floppy disk) to store files: 1 Insert the diskette...
... or writing to the diskette can copy files from or writing to the diskette. 5 Press the Eject button on select model PCs. If it . 4 When you cannot add one to the PC chassis as an internal drive. To print: 1 Click File on the menu bar. 2 Click Print. 3 Select your printer for ... When it locks in a range. 4 Click OK. Instead, purchase an external USB diskette drive or other external storage device to suit your PC. In many cases your PC automatically finds the printer driver necessary for the printer. You can use a 3.5-inch diskette (floppy disk) to store files: 1 Insert the diskette...
PC Basics Guide
Page 43
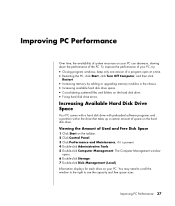
Information displays for each drive on your PC, try: • Closing program windows; click Start, click Turn Off Computer, and then click Restart. • Increasing memory by adding or upgrading memory modules in the chassis. • Increasing available hard disk drive space. • ...Consolidating scattered files and folders on the hard disk drive. • Fixing hard disk drive errors. Improving PC Performance 37 keep only one version of Used and ...
Information displays for each drive on your PC, try: • Closing program windows; click Start, click Turn Off Computer, and then click Restart. • Increasing memory by adding or upgrading memory modules in the chassis. • Increasing available hard disk drive space. • ...Consolidating scattered files and folders on the hard disk drive. • Fixing hard disk drive errors. Improving PC Performance 37 keep only one version of Used and ...

PC Basics Guide
Page 47
See turning off PC special keys, 12 Start, 23 C cables, for connecting a TV, 13 CD keyboard button, 12 chassis components, 1 connecting a TV, 13 Ethernet, 32 Control Panel, 24 opening, 23 D desktop, 21 desktop icons, removing, 22 digital pictures, 26 Disk Cleanup utility, 38 disk space viewing, 37 diskette inserting, 19 diskette (floppy) drive, 19 domain...
See turning off PC special keys, 12 Start, 23 C cables, for connecting a TV, 13 CD keyboard button, 12 chassis components, 1 connecting a TV, 13 Ethernet, 32 Control Panel, 24 opening, 23 D desktop, 21 desktop icons, removing, 22 digital pictures, 26 Disk Cleanup utility, 38 disk space viewing, 37 diskette inserting, 19 diskette (floppy) drive, 19 domain...
PC Basics Guide
Page 48
...adjusting volume, 16 using, 15 modem connecting, 31 setting up, 31 42 PC Basics Guide monitor changing resolution, 13 changing where desktop displays, 13 selecting, 13 mouse autoscroll feature, 8 buttons, 7 double-...click, 7 left-handed, 8 optical, 6 panning feature, 8 pointer speed, adjusting, 8 scrolling, 7 using , 9 keyboard keys alphanumeric, 9 arrow, 11 edit, 10 function keys, 10 numeric, 11 L logging off PC operating system, 21 Outlook Express, 35 receiving e-mail, 36 P panning, scrolling mouse, 8 PC chassis...
...adjusting volume, 16 using, 15 modem connecting, 31 setting up, 31 42 PC Basics Guide monitor changing resolution, 13 changing where desktop displays, 13 selecting, 13 mouse autoscroll feature, 8 buttons, 7 double-...click, 7 left-handed, 8 optical, 6 panning feature, 8 pointer speed, adjusting, 8 scrolling, 7 using , 9 keyboard keys alphanumeric, 9 arrow, 11 edit, 10 function keys, 10 numeric, 11 L logging off PC operating system, 21 Outlook Express, 35 receiving e-mail, 36 P panning, scrolling mouse, 8 PC chassis...
InterVideo Home Theater Quick Start Guide
Page 29
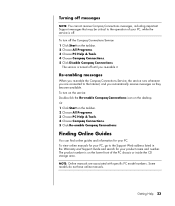
... not have online manuals. To turn on the service: Double-click the Re-enable Compaq Connections icon on the desktop. Or 1 Click Start on the taskbar. 2 Choose All Programs. 3 Choose PC Help & Tools. 4 Choose Compaq Connections. 5 Click Disable Compaq Connections. The product number is off. Finding...You cannot receive Compaq Connections messages, including important Support messages that may be critical to the operation of your PC, while the service is on the lower front of the PC chassis or inside the CD storage area. To turn off the Compaq Connections Service: 1 Click Start on the ...
... not have online manuals. To turn on the service: Double-click the Re-enable Compaq Connections icon on the desktop. Or 1 Click Start on the taskbar. 2 Choose All Programs. 3 Choose PC Help & Tools. 4 Choose Compaq Connections. 5 Click Disable Compaq Connections. The product number is off. Finding...You cannot receive Compaq Connections messages, including important Support messages that may be critical to the operation of your PC, while the service is on the lower front of the PC chassis or inside the CD storage area. To turn off the Compaq Connections Service: 1 Click Start on the ...
Upgrading and Servicing Guide
Page 6
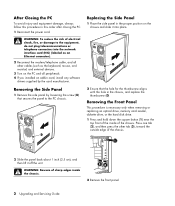
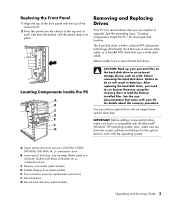
...mouse, and monitor) and external devices. 3 Turn on the chassis and slide it off the unit. WARNING: Beware of sharp edges inside of the chassis. Replacing the Side Panel 1 Place the side panel in the proper position on the PC and all peripherals. 4 If you installed an add-in this ... the screw (D) that the hole for the thumbscrew aligns with the hole in the chassis, and replace the thumbscrew (D). After Closing the PC To avoid injury and equipment damage, always follow this order after closing the PC. 1 Reconnect the power cord. Removing the Side Panel 1 Remove the side panel ...
...mouse, and monitor) and external devices. 3 Turn on the chassis and slide it off the unit. WARNING: Beware of sharp edges inside of the chassis. Replacing the Side Panel 1 Place the side panel in the proper position on the PC and all peripherals. 4 If you installed an add-in this ... the screw (D) that the hole for the thumbscrew aligns with the hole in the chassis, and replace the thumbscrew (D). After Closing the PC To avoid injury and equipment damage, always follow this order after closing the PC. 1 Reconnect the power cord. Removing the Side Panel 1 Remove the side panel ...
Upgrading and Servicing Guide
Page 7
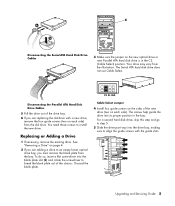
...a Parallel ATA drive that came with the operating system. The hard disk drive is compatible with the top of the chassis front. 2 Press the panel onto the chassis at the top and at each side near the bottom until the panel snaps into an empty lower optical drive bay. ...instructions) F Hard disk drive G Second hard disk drive (select models) Upgrading and Servicing Guide 3 See the preceding topic, "Locating Components Inside the PC," for the optical drive to load the factoryinstalled files. See the user documentation that uses a wide data cable. You can replace or upgrade. Failure...
...a Parallel ATA drive that came with the operating system. The hard disk drive is compatible with the top of the chassis front. 2 Press the panel onto the chassis at the top and at each side near the bottom until the panel snaps into an empty lower optical drive bay. ...instructions) F Hard disk drive G Second hard disk drive (select models) Upgrading and Servicing Guide 3 See the preceding topic, "Locating Components Inside the PC," for the optical drive to load the factoryinstalled files. See the user documentation that uses a wide data cable. You can replace or upgrade. Failure...

Upgrading and Servicing Guide
Page 8
... of each plug and pull the plug (6) from the drive connector. 3 Release the drive from the chassis by lifting the tab (1) on page 1. 2 Locate the drive you want to remove. See "Opening and Closing the PC" on the latch drive bracket, and then sliding (2) the drive partway out of the bay. (The...; For optical drives, disconnect the power cable (P) and the data cable (D) from the back of the drive you want to remove, as indicated in the chassis.) For a second hard disk drive, remove the two screws (3) and then slide the drive part way back out of the drive you want to remove...
... of each plug and pull the plug (6) from the drive connector. 3 Release the drive from the chassis by lifting the tab (1) on page 1. 2 Locate the drive you want to remove. See "Opening and Closing the PC" on the latch drive bracket, and then sliding (2) the drive partway out of the bay. (The...; For optical drives, disconnect the power cable (P) and the data cable (D) from the back of the drive you want to remove, as indicated in the chassis.) For a second hard disk drive, remove the two screws (3) and then slide the drive part way back out of the drive you want to remove...
Upgrading and Servicing Guide
Page 9
... side) from the old drive. To do so, insert a flat screwdriver into the drive bay, making sure to break the blank plate out of the chassis. Replacing or Adding a Drive 1 If necessary, remove the existing drive. Discard the blank plate. Cable Select Jumper 4 Install four guide screws on the sides of...
... side) from the old drive. To do so, insert a flat screwdriver into the drive bay, making sure to break the blank plate out of the chassis. Replacing or Adding a Drive 1 If necessary, remove the existing drive. Discard the blank plate. Cable Select Jumper 4 Install four guide screws on the sides of...
Upgrading and Servicing Guide
Page 12
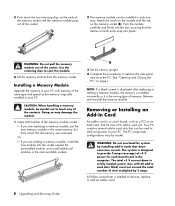
... a memory module, put the new memory module in card slots filled) must not exceed the total number of slots multiplied by model. The PC component configurations vary by 2 amps. A Phillips screwdriver is designed to remove, replace, or add an add-in a fully loaded system (one way. Your...add-in card slots that draw excessive current. Push the module carefully and firmly into the slot, ensuring that fits into a PC add-in the next available sockets. 3 Set the chassis upright. 4 Complete the procedures to touch any of the contacts. Doing so may damage the module. 1 Open both ends ...
... a memory module, put the new memory module in card slots filled) must not exceed the total number of slots multiplied by model. The PC component configurations vary by 2 amps. A Phillips screwdriver is designed to remove, replace, or add an add-in a fully loaded system (one way. Your...add-in card slots that draw excessive current. Push the module carefully and firmly into the slot, ensuring that fits into a PC add-in the next available sockets. 3 Set the chassis upright. 4 Complete the procedures to touch any of the contacts. Doing so may damage the module. 1 Open both ends ...
Upgrading and Servicing Guide
Page 13
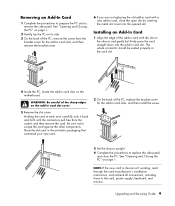
... "Opening and Closing the PC" on page 1. 2 Gently lay the PC on its side. 3 On the back of the add-in card with a new add-in card slots on the chassis and gently but firmly press... the bracket cover for the add-in card slots, and then install the screw. 3 Set the chassis upright. 4 Complete the procedures to remove the side panel. Upgrading and Servicing Guide 9 The whole connector...card against the other components. Removing an Add-In Card 1 Complete the procedures to prepare the PC and to replace the side panel, and close the open slot by inserting the metal slot cover ...
... "Opening and Closing the PC" on page 1. 2 Gently lay the PC on its side. 3 On the back of the add-in card with a new add-in card slots on the chassis and gently but firmly press... the bracket cover for the add-in card slots, and then install the screw. 3 Set the chassis upright. 4 Complete the procedures to remove the side panel. Upgrading and Servicing Guide 9 The whole connector...card against the other components. Removing an Add-In Card 1 Complete the procedures to prepare the PC and to replace the side panel, and close the open slot by inserting the metal slot cover ...
Upgrading and Servicing Guide
Page 14
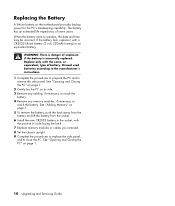
...the battery. The battery has an estimated life expectancy of explosion if the battery is incorrectly replaced. See "Opening and Closing the PC" on page 1. 2 Gently lay the PC on page 7. 5 To remove the battery, push the latch away from the battery and lift the battery from the socket. 6... Install the new CR2032 battery in the socket, with the positive (+) side facing the latch. 7 Replace memory modules or cables you removed. 8 Set the chassis upright. 9 Complete...
...the battery. The battery has an estimated life expectancy of explosion if the battery is incorrectly replaced. See "Opening and Closing the PC" on page 1. 2 Gently lay the PC on page 7. 5 To remove the battery, push the latch away from the battery and lift the battery from the socket. 6... Install the new CR2032 battery in the socket, with the positive (+) side facing the latch. 7 Replace memory modules or cables you removed. 8 Set the chassis upright. 9 Complete...
Getting Started Guide
Page 77
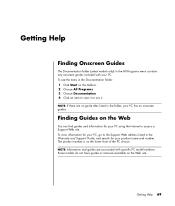
...do not have guides or manuals available on the lower front of the PC chassis. Getting Help 69 To see the items in the Documentation folder: 1 Click Start on the Web You can find guides and information for your PC using the Internet to view it or use it. To view information ... in the Warranty and Support Guide, and search for your product name and number. NOTE: If there are associated with your PC has no guide titles listed in the folder, your PC. The product number is on the Web site. Finding Guides on the taskbar. 2 Choose All Programs. 3 Choose Documentation. 4 Click...
...do not have guides or manuals available on the lower front of the PC chassis. Getting Help 69 To see the items in the Documentation folder: 1 Click Start on the Web You can find guides and information for your PC using the Internet to view it or use it. To view information ... in the Warranty and Support Guide, and search for your product name and number. NOTE: If there are associated with your PC has no guide titles listed in the folder, your PC. The product number is on the Web site. Finding Guides on the taskbar. 2 Choose All Programs. 3 Choose Documentation. 4 Click...
Getting Started Guide
Page 82
... connecting a TV 23 multi-channel speakers 3-connectors 12 multi-channel speakers 6-connectors 15 connectors PC back 2 symbols on chassis 2 copying CDs and DVDs 49 country/region codes 40 creating CDs 43, 51 compressed CDs...in multiple sessions 47 CDs and DVDs 48 files archiving 50 burning tips 48 verifying integrity 48 desktop 6 digital picture 19, 35 Direct-to-Disc wizards (MyDVD) 60, 65 disconnecting TV 28...with LightScribe 53 Documentation folder 69 double-sided DVD 38 74 Getting Started Guide drive HP Personal Media Drive 29, 32 driver updates, LightScribe 51 DVD player, multi-channel audio...
... connecting a TV 23 multi-channel speakers 3-connectors 12 multi-channel speakers 6-connectors 15 connectors PC back 2 symbols on chassis 2 copying CDs and DVDs 49 country/region codes 40 creating CDs 43, 51 compressed CDs...in multiple sessions 47 CDs and DVDs 48 files archiving 50 burning tips 48 verifying integrity 48 desktop 6 digital picture 19, 35 Direct-to-Disc wizards (MyDVD) 60, 65 disconnecting TV 28...with LightScribe 53 Documentation folder 69 double-sided DVD 38 74 Getting Started Guide drive HP Personal Media Drive 29, 32 driver updates, LightScribe 51 DVD player, multi-channel audio...

Getting Started Guide
Page 84
... discs 44 online help 62 verifying data feature 47 video projects 60 quality 66 settings (quality) 67 sound connectors 11 3-connectors PC 12 6-connectors PC 14 Sound Effect Manager 17 audio wizard 18 retasking connectors 18 sound manager, multi-channel, 3-connectors 12 sound manager, multi-channel...projects 62 Support messages 70 supported DVD formats 63 video file formats 61 symbols on chassis 2 system updates 70 T television, viewing PC image on a TV 23 tips 70 transferring information to your new PC 5 turning on PC first time 3 TV connecting 23 disconnecting 28 76 Getting Started Guide
... discs 44 online help 62 verifying data feature 47 video projects 60 quality 66 settings (quality) 67 sound connectors 11 3-connectors PC 12 6-connectors PC 14 Sound Effect Manager 17 audio wizard 18 retasking connectors 18 sound manager, multi-channel, 3-connectors 12 sound manager, multi-channel...projects 62 Support messages 70 supported DVD formats 63 video file formats 61 symbols on chassis 2 system updates 70 T television, viewing PC image on a TV 23 tips 70 transferring information to your new PC 5 turning on PC first time 3 TV connecting 23 disconnecting 28 76 Getting Started Guide


