PC Basics Guide
Page 9
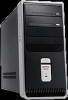
... PC purchase. Using Virus Protection Programs HP provides a virus-scanning software program to display the Windows Update home page. Click Scan for updates after your PC (select models only). The virus-scanning software program on the taskbar, click Help and Support, and then click Windows Update. You can destroy information on the hard disk drive. A PC virus can get a virus from the Internet. • A diskette (floppy disk). • A CD or DVD disc...
... PC purchase. Using Virus Protection Programs HP provides a virus-scanning software program to display the Windows Update home page. Click Scan for updates after your PC (select models only). The virus-scanning software program on the taskbar, click Help and Support, and then click Windows Update. You can destroy information on the hard disk drive. A PC virus can get a virus from the Internet. • A diskette (floppy disk). • A CD or DVD disc...

PC Basics Guide
Page 38
... an ISP may be called a network interface adapter, a Network Interface Card, or a NIC ) provides a high-speed, or broadband, connection to the Internet, it is independent, and its operators choose which files to make available to the Internet through the LAN. A Ethernet connector (RJ-45 port) B Ethernet indicator lights Setting Up the Ethernet Connection The Ethernet connection (may be through a traditional telephone dial-up modem, a LAN (local area network), cable modem, DSL (digital subscriber line...
... an ISP may be called a network interface adapter, a Network Interface Card, or a NIC ) provides a high-speed, or broadband, connection to the Internet, it is independent, and its operators choose which files to make available to the Internet through the LAN. A Ethernet connector (RJ-45 port) B Ethernet indicator lights Setting Up the Ethernet Connection The Ethernet connection (may be through a traditional telephone dial-up modem, a LAN (local area network), cable modem, DSL (digital subscriber line...
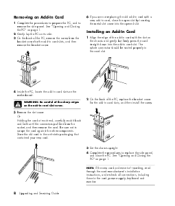
PC Basics Guide
Page 48
...changing where desktop displays, 13 selecting, 13 mouse autoscroll feature, 8 buttons, 7 double-click, 7 left-handed, 8 optical, 6 panning feature, 8 pointer speed, adjusting, 8 scrolling, 7 using , 19 programs, uninstalling, 38 See hibernation mode standby mode, about, 4 standby mode, automatic, 5 standby mode, manual, 4 turning off PC operating system, 21 Outlook Express, 35 receiving e-mail, 36 P panning, scrolling mouse, 8 PC chassis components, 1 hibernation mode, automatic, 5 improving performance, 37 settings, 23 sleep mode. floppy disk. See diskette floppy drive, 19 free hard disk...
...changing where desktop displays, 13 selecting, 13 mouse autoscroll feature, 8 buttons, 7 double-click, 7 left-handed, 8 optical, 6 panning feature, 8 pointer speed, adjusting, 8 scrolling, 7 using , 19 programs, uninstalling, 38 See hibernation mode standby mode, about, 4 standby mode, automatic, 5 standby mode, manual, 4 turning off PC operating system, 21 Outlook Express, 35 receiving e-mail, 36 P panning, scrolling mouse, 8 PC chassis components, 1 hibernation mode, automatic, 5 improving performance, 37 settings, 23 sleep mode. floppy disk. See diskette floppy drive, 19 free hard disk...
InterVideo Home Theater Quick Start Guide
Page 28
... in the window. Compaq Connections opens and lists the message titles. To read them later. With Instant Support you on the taskbar. 2 Choose All Programs. 3 Choose PC Help & Tools. 4 Choose Compaq Connections. 5 Click Compaq Connections again. When you submit a problem, you communicate over the Internet. Using Instant Support When you through the Support Web site under the information for your PC model. Most Support updates delivered by...
... in the window. Compaq Connections opens and lists the message titles. To read them later. With Instant Support you on the taskbar. 2 Choose All Programs. 3 Choose PC Help & Tools. 4 Choose Compaq Connections. 5 Click Compaq Connections again. When you submit a problem, you communicate over the Internet. Using Instant Support When you through the Support Web site under the information for your PC model. Most Support updates delivered by...

InterVideo Home Theater Quick Start Guide
Page 39
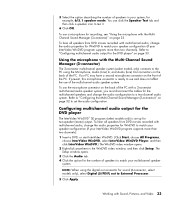
... all speakers from DVD movies recorded with the Multi-Channel Sound Manager (3-connector) The 3-connector multichannel speaker system (select models only) connects to the PC using the digital out connector for two-speaker (stereo) output. Refer to External Processor. Working with the MultiChannel Sound Manager (3-connector)" on page 32 to set up for sound (6-connector, select models only), select Digital (S/PDIF) out to "Configuring the Multi-Channel Sound Manager (3-connector)" on page 33. Refer to match your speaker configuration...
... all speakers from DVD movies recorded with the Multi-Channel Sound Manager (3-connector) The 3-connector multichannel speaker system (select models only) connects to the PC using the digital out connector for two-speaker (stereo) output. Refer to External Processor. Working with the MultiChannel Sound Manager (3-connector)" on page 32 to set up for sound (6-connector, select models only), select Digital (S/PDIF) out to "Configuring the Multi-Channel Sound Manager (3-connector)" on page 33. Refer to match your speaker configuration...

InterVideo Home Theater Quick Start Guide
Page 41
... and Video 35 Configuring the Sound Effect Manager (6-connector) 1 Click Start on the speaker system. 6 Configure the audio output for this 6-connector multichannel speaker system by performing the following table.) Connect speaker cable (plug) for: Front speakers (or, two stereo speakers) Side speakers Rear speakers Centre speaker/subwoofer To PC port [label, name] ( colour): Audio line out [E, out] (lime green) Side speaker [A, side] (gray) Rear speaker [B, rear] (black) Centre speaker/subwoofer [C, c/sub] (gold) 4 Turn on the PC. 5 Turn on the taskbar. 2 Choose Control Panel. 3 If...
... and Video 35 Configuring the Sound Effect Manager (6-connector) 1 Click Start on the speaker system. 6 Configure the audio output for this 6-connector multichannel speaker system by performing the following table.) Connect speaker cable (plug) for: Front speakers (or, two stereo speakers) Side speakers Rear speakers Centre speaker/subwoofer To PC port [label, name] ( colour): Audio line out [E, out] (lime green) Side speaker [A, side] (gray) Rear speaker [B, rear] (black) Centre speaker/subwoofer [C, c/sub] (gold) 4 Turn on the PC. 5 Turn on the taskbar. 2 Choose Control Panel. 3 If...

InterVideo Home Theater Quick Start Guide
Page 94
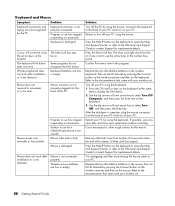
... connected properly. button on the keyboard to open the Help and Support Center, or refer to the Warranty and Support Guide to commands. The Num Lock light should not be on. Refer to use the arrow keys in use for replacement details. Restart your PC. Remove roller ball cover from bottom of the PC. Program in the number keys group. Mouse connector is too smooth. Mouse moves only vertically or horizontally. then set...
... connected properly. button on the keyboard to open the Help and Support Center, or refer to the Warranty and Support Guide to commands. The Num Lock light should not be on. Refer to use the arrow keys in use for replacement details. Restart your PC. Remove roller ball cover from bottom of the PC. Program in the number keys group. Mouse connector is too smooth. Mouse moves only vertically or horizontally. then set...

InterVideo Home Theater Quick Start Guide
Page 99
optical drive quick reference, 68 organizing Internet links and the PC, 8 P PC keyboard not working, 88 no sound, 80 organizing information, 8 problem turning on, 90 problem, powered off, 90 problem, won't turn off, 90 registering, 7 running tests, 22 serial number, viewing, 7 setting it up, 3 transferring files and settings to new PC, 7 troubleshooting, 79 turning on, 5 viewing PC image on TV, 42 PC Help & Tools, 9 peripherals, 5 Pictures (Photos) button, 15 Print button, not working, 88 printer troubleshooting, 89 problem cannot add data to DVD, 82 cannot...
optical drive quick reference, 68 organizing Internet links and the PC, 8 P PC keyboard not working, 88 no sound, 80 organizing information, 8 problem turning on, 90 problem, powered off, 90 problem, won't turn off, 90 registering, 7 running tests, 22 serial number, viewing, 7 setting it up, 3 transferring files and settings to new PC, 7 troubleshooting, 79 turning on, 5 viewing PC image on TV, 42 PC Help & Tools, 9 peripherals, 5 Pictures (Photos) button, 15 Print button, not working, 88 printer troubleshooting, 89 problem cannot add data to DVD, 82 cannot...

Presario Desktop PCs - Upgrading and Servicing Guide
Page 11
... in a fully loaded system (one way. Upgrading and Servicing Guide 7 Push the module carefully and firmly into a PC add-in the next available sockets. 3 Set the chassis upright. 4 Complete the procedures to replace the side panel, and close the PC. NOTE: If a blank screen is displayed after replacing or adding a memory module, the memory is installed incorrectly or it is needed to provide 2 amps (average) of the...
... in a fully loaded system (one way. Upgrading and Servicing Guide 7 Push the module carefully and firmly into a PC add-in the next available sockets. 3 Set the chassis upright. 4 Complete the procedures to replace the side panel, and close the PC. NOTE: If a blank screen is displayed after replacing or adding a memory module, the memory is installed incorrectly or it is needed to provide 2 amps (average) of the...
Presario Desktop PCs - Upgrading and Servicing Guide
Page 12
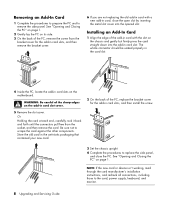
... card, power supply, keyboard, and monitor. 8 Upgrading and Servicing Guide See "Opening and Closing the PC" on page 1. 2 Gently lay the PC on the motherboard. Be sure not to remove the side panel. Removing an Add-In Card 1 Complete the procedures to prepare the PC and to scrape the card against the other components. NOTE: If the new card or device isn't working, read through the card manufacturer's installation instructions, and recheck all connections, including those to replace...
... card, power supply, keyboard, and monitor. 8 Upgrading and Servicing Guide See "Opening and Closing the PC" on page 1. 2 Gently lay the PC on the motherboard. Be sure not to remove the side panel. Removing an Add-In Card 1 Complete the procedures to prepare the PC and to scrape the card against the other components. NOTE: If the new card or device isn't working, read through the card manufacturer's installation instructions, and recheck all connections, including those to replace...

Compaq Presario Desktop Products Warranty and Support Guide - 1 year
Page 11
... to the Support Web site listed earlier in this a key differentiator for help when you have any problems setting up . Go to use. We hope you enjoy discovering the exciting things you can register your PC on the Web at Help on your Windows® desktop (to meet your specific needs. Compaq Will Help Your new Compaq Presario computer is a complex, powerful machine, and sometimes...
... to the Support Web site listed earlier in this a key differentiator for help when you have any problems setting up . Go to use. We hope you enjoy discovering the exciting things you can register your PC on the Web at Help on your Windows® desktop (to meet your specific needs. Compaq Will Help Your new Compaq Presario computer is a complex, powerful machine, and sometimes...
Quick Setup Back Page
Page 1
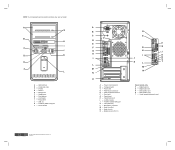
...Eject buttons H - Card reader I J K L A - Printed in E - PS/2 Keyboard connector F - FireWire® (IEEE 1394) port K - Audio Line In O - Side speaker port S - A B C D E F G Video S-video Composite Audio 1394 USB 2.0 USB 2.0 H I - S-video D - Floppy drive J - Serial port G - LAN (Ethernet) L - Center speaker/subwoofer port Power Cord connector B - Microphone connector M - FireWire® (IEEE 1394) port L - Power On/Off © 2004 Hewlett-Packard Development Company, L.P. Voltage selector C - VGA Monitor port I K J R S K L T M N Select models...
...Eject buttons H - Card reader I J K L A - Printed in E - PS/2 Keyboard connector F - FireWire® (IEEE 1394) port K - Audio Line In O - Side speaker port S - A B C D E F G Video S-video Composite Audio 1394 USB 2.0 USB 2.0 H I - S-video D - Floppy drive J - Serial port G - LAN (Ethernet) L - Center speaker/subwoofer port Power Cord connector B - Microphone connector M - FireWire® (IEEE 1394) port L - Power On/Off © 2004 Hewlett-Packard Development Company, L.P. Voltage selector C - VGA Monitor port I K J R S K L T M N Select models...
Compaq Presario Desktop Products Warranty and Support Guide - 90 day
Page 11
... Compaq Customer Support is a complex, powerful machine, and sometimes things go through your desktop from your Compaq Presario. You can get the most from time to register your area. Once the security seal has been broken, your PC. Getting Started Follow the setup poster and the Getting Started Guide for our Compaq Presario and understand that happens to upgrade your specific needs. First look...
... Compaq Customer Support is a complex, powerful machine, and sometimes things go through your desktop from your Compaq Presario. You can get the most from time to register your area. Once the security seal has been broken, your PC. Getting Started Follow the setup poster and the Getting Started Guide for our Compaq Presario and understand that happens to upgrade your specific needs. First look...
Warranty and Support Guide - 1 year
Page 2
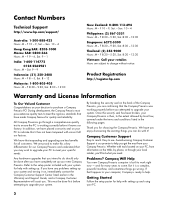
... http://register.hp.com Warranty and License Information To Our Valued Customer Congratulations on your system. In addition, we have any problems setting up and using your specific needs. By breaking the security seal on the back of the Compaq Presario, you are proud to make this a key differentiator for all customers. Award-winning Compaq Customer Support is a complex, powerful machine, and...
... http://register.hp.com Warranty and License Information To Our Valued Customer Congratulations on your system. In addition, we have any problems setting up and using your specific needs. By breaking the security seal on the back of the Compaq Presario, you are proud to make this a key differentiator for all customers. Award-winning Compaq Customer Support is a complex, powerful machine, and...
Warranty and Support Guide - 90 day
Page 2
... - 9, Sat. - Any hardware upgrades that the Compaq Presario was working correctly before attempting to do with setting up your specific needs. If you . In addition, we have made Compaq famous for help you attempted to make this a key differentiator for choosing the Compaq Presario. Award-winning Compaq Customer Support is working properly before you get the most from your PC, from information on...
... - 9, Sat. - Any hardware upgrades that the Compaq Presario was working correctly before attempting to do with setting up your specific needs. If you . In addition, we have made Compaq famous for help you attempted to make this a key differentiator for choosing the Compaq Presario. Award-winning Compaq Customer Support is working properly before you get the most from your PC, from information on...

Presario Desktop PCs - Getting Started Guide
Page 28
... automatically display again. Compaq Connections opens and lists the message titles. You can run a test or submit a problem. (Your PC must be connected to the Internet to submit a request.) Using Compaq Connections Compaq Connections (select models only) is an Internet-based service that brings you important information for your PC: • Product notices • System updates • Tips • Special offers for your PC Messages arrive while you need assistance...
... automatically display again. Compaq Connections opens and lists the message titles. You can run a test or submit a problem. (Your PC must be connected to the Internet to submit a request.) Using Compaq Connections Compaq Connections (select models only) is an Internet-based service that brings you important information for your PC: • Product notices • System updates • Tips • Special offers for your PC Messages arrive while you need assistance...
Presario Desktop PCs - Getting Started Guide
Page 39
... Setup window opens. 3 Click the Audio tab. 4 Click the option for the DVD player" on the back of the PC. To hear all speakers from DVD movies recorded with multichannel audio, change the audio properties for WinDVD to set up for sound (6-connector, select models only), select Digital (S/PDIF) out to use and does not affect the use the microphone connector on the back of the PC with the MultiChannel Sound Manager (3-connector...
... Setup window opens. 3 Click the Audio tab. 4 Click the option for the DVD player" on the back of the PC. To hear all speakers from DVD movies recorded with multichannel audio, change the audio properties for WinDVD to set up for sound (6-connector, select models only), select Digital (S/PDIF) out to use and does not affect the use the microphone connector on the back of the PC with the MultiChannel Sound Manager (3-connector...
Presario Desktop PCs - Getting Started Guide
Page 94
... open the Help and Support Center, or refer to the Warranty and Support Guide to contact Support for replacement details. After the shutdown is not properly plugged into the back of the PC. Restart your PC using the keyboard. Mouse connector is complete, plug the mouse connector into the back of your PC and turn off the PC by pressing the Connect button on the wireless receiver and then on . The Num Lock light...
... open the Help and Support Center, or refer to the Warranty and Support Guide to contact Support for replacement details. After the shutdown is not properly plugged into the back of the PC. Restart your PC using the keyboard. Mouse connector is complete, plug the mouse connector into the back of your PC and turn off the PC by pressing the Connect button on the wireless receiver and then on . The Num Lock light...
Upgrading and Servicing Guide
Page 7
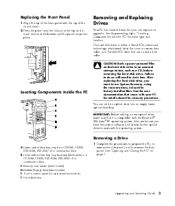
... uses a wide data cable. You can replace or upgrade. After replacing the hard disk drive, you can add an optical drive into place. Locating Components Inside the PC CAUTION: Back up your PC for drive type and location. A Upper optical drive bay, may be a CD-ROM, CD-RW, DVD-ROM, DVD+RW/+R or combination drive B Lower optical drive bay, may be empty (blank plate) or a CD-ROM, CD-RW, DVD-ROM, DVD+RW/+R or combination drive C Memory card reader (select models) D Diskette (floppy) drive (select models) E Front connector panel (no replacement instructions) F Hard disk drive Removing...
... uses a wide data cable. You can replace or upgrade. After replacing the hard disk drive, you can add an optical drive into place. Locating Components Inside the PC CAUTION: Back up your PC for drive type and location. A Upper optical drive bay, may be a CD-ROM, CD-RW, DVD-ROM, DVD+RW/+R or combination drive B Lower optical drive bay, may be empty (blank plate) or a CD-ROM, CD-RW, DVD-ROM, DVD+RW/+R or combination drive C Memory card reader (select models) D Diskette (floppy) drive (select models) E Front connector panel (no replacement instructions) F Hard disk drive Removing...
Upgrading and Servicing Guide
Page 12
... the new card or device isn't working, read through the card manufacturer's installation instructions, and recheck all connections, including those to scrape the card against the other components. See "Opening and Closing the PC" on the motherboard. Removing an Add-In Card 1 Complete the procedures to prepare the PC, and to replace the side panel, and close the open slot by inserting the metal slot cover into the add-in card slot cover. 5 Remove the slot cover. The whole connector...
... the new card or device isn't working, read through the card manufacturer's installation instructions, and recheck all connections, including those to scrape the card against the other components. See "Opening and Closing the PC" on the motherboard. Removing an Add-In Card 1 Complete the procedures to prepare the PC, and to replace the side panel, and close the open slot by inserting the metal slot cover into the add-in card slot cover. 5 Remove the slot cover. The whole connector...


