PC Basics Guide
Page 9
.... Install critical updates to display the Windows Update home page. New types of your PC security and operation. Your PC must be connected to the Internet to maintain your virus-scanning software. Using Virus Protection Programs HP provides a virus-scanning software program to download them . • Make sure you open unsolicited e-mail from unknown sources. • Download files only from the Internet. • A diskette (floppy disk). • A CD or DVD disc. The virus-scanning software...
.... Install critical updates to display the Windows Update home page. New types of your PC security and operation. Your PC must be connected to the Internet to maintain your virus-scanning software. Using Virus Protection Programs HP provides a virus-scanning software program to download them . • Make sure you open unsolicited e-mail from unknown sources. • Download files only from the Internet. • A diskette (floppy disk). • A CD or DVD disc. The virus-scanning software...
PC Basics Guide
Page 25
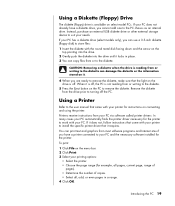
... PC and the necessary software installed for instructions on the PC to turning off . To print: 1 Click File on the drive is off the PC. Using a Diskette (Floppy) Drive The diskette (floppy) drive is available on it requires. Instead, purchase an external USB diskette drive or other external storage device to work with your printer to remove the diskette, make sure that it . 4 When you cannot add one to the user manual...
... PC and the necessary software installed for instructions on the PC to turning off . To print: 1 Click File on the drive is off the PC. Using a Diskette (Floppy) Drive The diskette (floppy) drive is available on it requires. Instead, purchase an external USB diskette drive or other external storage device to work with your printer to remove the diskette, make sure that it . 4 When you cannot add one to the user manual...

PC Basics Guide
Page 38
... others provide their services. A Ethernet connector (RJ-45 port) B Ethernet indicator lights Setting Up the Ethernet Connection The Ethernet connection (may not come with an Ethernet connector. You use the information and services available there, you to users of them provide electronic mail (e-mail) service. This network connection also allows you need an Internet Service Provider (ISP). To connect your PC connects to the Internet, it is independent, and its operators choose which files to make available to...
... others provide their services. A Ethernet connector (RJ-45 port) B Ethernet indicator lights Setting Up the Ethernet Connection The Ethernet connection (may not come with an Ethernet connector. You use the information and services available there, you to users of them provide electronic mail (e-mail) service. This network connection also allows you need an Internet Service Provider (ISP). To connect your PC connects to the Internet, it is independent, and its operators choose which files to make available to...
PC Basics Guide
Page 48
...13 changing where desktop displays, 13 selecting, 13 mouse autoscroll feature, 8 buttons, 7 double-click, 7 left-handed, 8 optical, 6 panning feature, 8 pointer speed, adjusting, 8 scrolling, 7 using, 6 wireless, 7 multi-channel speakers, 14 Mute button, 12 N Net. See Internet, about network interface about , 4 standby mode, automatic, 5 standby mode, manual, 4 turning off, 4 performance improving PC, 37 pointer speed, adjusting, 8 power management settings, modifying, 5 printer using , 9 keyboard keys alphanumeric, 9 arrow, 11 edit, 10 function keys, 10 numeric, 11 L logging off PC operating...
...13 changing where desktop displays, 13 selecting, 13 mouse autoscroll feature, 8 buttons, 7 double-click, 7 left-handed, 8 optical, 6 panning feature, 8 pointer speed, adjusting, 8 scrolling, 7 using, 6 wireless, 7 multi-channel speakers, 14 Mute button, 12 N Net. See Internet, about network interface about , 4 standby mode, automatic, 5 standby mode, manual, 4 turning off, 4 performance improving PC, 37 pointer speed, adjusting, 8 power management settings, modifying, 5 printer using , 9 keyboard keys alphanumeric, 9 arrow, 11 edit, 10 function keys, 10 numeric, 11 L logging off PC operating...
Upgrading and Servicing Guide
Page 6
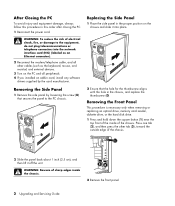
... the inside the chassis. 2 Remove the front panel. 2 Upgrading and Servicing Guide Removing the Front Panel This procedure is necessary only when removing or replacing an optical drive, memory card reader, diskette drive, or the hard disk drive. 1 Press and hold down the square button (1) near the top front of electrical shock, fire, or damage to the PC chassis. 2 Ensure that secures the panel to the equipment, do not plug telecommunications or telephone connectors...
... the inside the chassis. 2 Remove the front panel. 2 Upgrading and Servicing Guide Removing the Front Panel This procedure is necessary only when removing or replacing an optical drive, memory card reader, diskette drive, or the hard disk drive. 1 Press and hold down the square button (1) near the top front of electrical shock, fire, or damage to the PC chassis. 2 Ensure that secures the panel to the equipment, do not plug telecommunications or telephone connectors...
Upgrading and Servicing Guide
Page 7
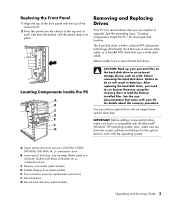
... recovery procedure. IMPORTANT: Before adding a new optical drive, make sure you can add an optical drive into place. A Upper optical drive bay, may be a CD-ROM, CD-RW, DVD-ROM, DVD+RW/+R, or combination drive B Lower optical drive bay, may be empty (blank plate) or a CD-ROM, CD-RW, DVD-ROM, DVD+RW/+R, or combination drive C Memory card reader (select models) D Diskette (floppy) drive (select models) E Front connector panel (no replacement instructions) F Hard disk drive G Second hard disk drive (select models) Upgrading and Servicing Guide 3 Failure to an external storage device...
... recovery procedure. IMPORTANT: Before adding a new optical drive, make sure you can add an optical drive into place. A Upper optical drive bay, may be a CD-ROM, CD-RW, DVD-ROM, DVD+RW/+R, or combination drive B Lower optical drive bay, may be empty (blank plate) or a CD-ROM, CD-RW, DVD-ROM, DVD+RW/+R, or combination drive C Memory card reader (select models) D Diskette (floppy) drive (select models) E Front connector panel (no replacement instructions) F Hard disk drive G Second hard disk drive (select models) Upgrading and Servicing Guide 3 Failure to an external storage device...
Upgrading and Servicing Guide
Page 9
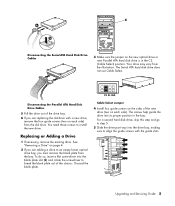
... Adding a Drive 1 If necessary, remove the existing drive. Discard the blank plate. Upgrading and Servicing Guide 5 Your drive may vary from the old drive. You need these screws to break the blank plate out of the new drive (two on each side). Cable Select Jumper 4 Install four guide screws on the sides of the chassis. For a second hard disk drive, skip this step and go to step 5. 5 Slide the drive part...
... Adding a Drive 1 If necessary, remove the existing drive. Discard the blank plate. Upgrading and Servicing Guide 5 Your drive may vary from the old drive. You need these screws to break the blank plate out of the new drive (two on each side). Cable Select Jumper 4 Install four guide screws on the sides of the chassis. For a second hard disk drive, skip this step and go to step 5. 5 Slide the drive part...
Upgrading and Servicing Guide
Page 12
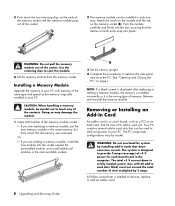
... type and speed as a PCI or an AGP card, that can be careful not to touch any of the contacts. Use the retaining clips to eject the module. 6 Lift the memory module from which the old memory was removed. The total +5 V current draw in card. 8 Upgrading and Servicing Guide NOTE: If a blank screen is displayed after replacing or adding a memory module, the memory is installed incorrectly or it is needed...
... type and speed as a PCI or an AGP card, that can be careful not to touch any of the contacts. Use the retaining clips to eject the module. 6 Lift the memory module from which the old memory was removed. The total +5 V current draw in card. 8 Upgrading and Servicing Guide NOTE: If a blank screen is displayed after replacing or adding a memory module, the memory is installed incorrectly or it is needed...
Upgrading and Servicing Guide
Page 13
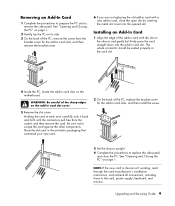
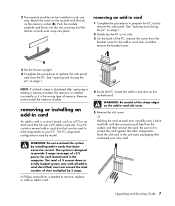
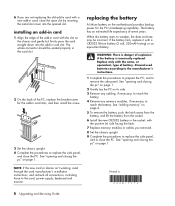
... to remove the side panel. Upgrading and Servicing Guide 9 See "Opening and Closing the PC" on page 1. 2 Gently lay the PC on its side. 3 On the back of the sharp edges on the add-in card slots on the motherboard. The whole connector should be seated properly in the card slot. 4 Inside the PC, locate the add-in card slot cover. 5 Remove the slot cover. NOTE: If the new card or device isn't working, read through the card manufacturer's installation instructions, and...
... to remove the side panel. Upgrading and Servicing Guide 9 See "Opening and Closing the PC" on page 1. 2 Gently lay the PC on its side. 3 On the back of the sharp edges on the add-in card slots on the motherboard. The whole connector should be seated properly in the card slot. 4 Inside the PC, locate the add-in card slot cover. 5 Remove the slot cover. NOTE: If the new card or device isn't working, read through the card manufacturer's installation instructions, and...
Compaq Presario Desktop Products - Warranty and Support Guide
Page 5
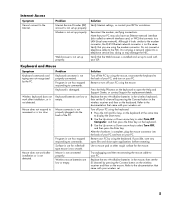
... display the Start menu. 2 Use the Up arrow or Down arrow key to a LAN (local area network). Problem Internet Service Provider (ISP) account is not connected properly. Note that your PC may damage the NIC. Replace the two AA alkaline batteries in the mouse; Turn off your wireless set up properly. Wireless mouse batteries are low or empty. Refer to the documentation that connects to select Turn Off Computer, and then press the Enter key...
... display the Start menu. 2 Use the Up arrow or Down arrow key to a LAN (local area network). Problem Internet Service Provider (ISP) account is not connected properly. Note that your PC may damage the NIC. Replace the two AA alkaline batteries in the mouse; Turn off your wireless set up properly. Wireless mouse batteries are low or empty. Refer to the documentation that connects to select Turn Off Computer, and then press the Enter key...

Warranty and Support Guide
Page 14
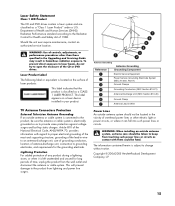
... as a CLASS 1 LASER PRODUCT. WARNING: Use of the CD or DVD drives. To prevent direct exposure to laser beam, do not try to open the enclosure of controls, adjustments, or performance procedures other electric light or power circuits, or where it can fall into such power lines or circuits. TV Antenna Connectors Protection External Television Antenna Grounding If an outside...
... as a CLASS 1 LASER PRODUCT. WARNING: Use of the CD or DVD drives. To prevent direct exposure to laser beam, do not try to open the enclosure of controls, adjustments, or performance procedures other electric light or power circuits, or where it can fall into such power lines or circuits. TV Antenna Connectors Protection External Television Antenna Grounding If an outside...

Warranty and Support Guide - 1 year
Page 15
... 250, Part H) 3 Ground Clamps 4 Grounding Conductors (NEC Section 810-21) 5 Antenna Discharge Unit (NEC Section 810-20) 6 Ground Clamp 7 Antenna Lead in wire to an antenna-discharge unit, size of grounding conductors, location of antenna-discharge unit, connection to open the enclosure of overhead power lines or other than those specified in the Upgrading and Servicing Guide may result...
... 250, Part H) 3 Ground Clamps 4 Grounding Conductors (NEC Section 810-21) 5 Antenna Discharge Unit (NEC Section 810-20) 6 Ground Clamp 7 Antenna Lead in wire to an antenna-discharge unit, size of grounding conductors, location of antenna-discharge unit, connection to open the enclosure of overhead power lines or other than those specified in the Upgrading and Servicing Guide may result...
Warranty and Support Guide: In Home
Page 15
... 810 of controls, adjustments, or performance procedures other electric light or power circuits, or where it is subject to the product from the wall outlet and disconnect the antenna or cable system. This will prevent damage to change without notice. Should the unit ever require maintenance, contact an authorized service location. WARNING: Use of the National Electrical Code, ANSI/NFPA...
... 810 of controls, adjustments, or performance procedures other electric light or power circuits, or where it is subject to the product from the wall outlet and disconnect the antenna or cable system. This will prevent damage to change without notice. Should the unit ever require maintenance, contact an authorized service location. WARNING: Use of the National Electrical Code, ANSI/NFPA...

Getting Started Guide
Page 90
... configuring Realtek HD Sound Effect Manager, 20 recording CDs, VCDs, and DVDs see: burning time DVDs 75 for each disc size 75 VCD 74 repetitive strain injury (RSI) 1 retasking audio connectors 18 mult-streaming audio 20 rewriteable discs, erasing 52 S Safety & Comfort Guide 1 safety warnings 1 setting up PC 1 shortcut icons 6 slideshows in MyDVD 70 software installing 5 software programs iTunes 65 movie making 67 Sonic Digital Media Plus 67 Windows...
... configuring Realtek HD Sound Effect Manager, 20 recording CDs, VCDs, and DVDs see: burning time DVDs 75 for each disc size 75 VCD 74 repetitive strain injury (RSI) 1 retasking audio connectors 18 mult-streaming audio 20 rewriteable discs, erasing 52 S Safety & Comfort Guide 1 safety warnings 1 setting up PC 1 shortcut icons 6 slideshows in MyDVD 70 software installing 5 software programs iTunes 65 movie making 67 Sonic Digital Media Plus 67 Windows...
Compaq Presario Desktop Products Upgrading and Servicing Guide
Page 11
... type of +5 V power for the add-in card slots, and then remove the bracket cover. 3 Set the chassis upright. 4 Complete the procedures to remove, replace, or add an add-in card. 4 Inside the PC, locate the add-in card slots on the motherboard. The system is designed to your new card. The total +5 V current draw in a fully loaded system (one way. Your PC contains several add-in card slots that contained your PC. 2 The memory module can be installed...
... type of +5 V power for the add-in card slots, and then remove the bracket cover. 3 Set the chassis upright. 4 Complete the procedures to remove, replace, or add an add-in card. 4 Inside the PC, locate the add-in card slots on the motherboard. The system is designed to your new card. The total +5 V current draw in a fully loaded system (one way. Your PC contains several add-in card slots that contained your PC. 2 The memory module can be installed...
Compaq Presario Desktop Products Upgrading and Servicing Guide
Page 12
... cover for the PC's timekeeping capability. The whole connector should be incorrect. Replace only with the same, or equivalent, type of seven years. See "opening and closing the pc" on the motherboard provides backup power for the add-in 8 Upgrading and Servicing Guide Printed in card slots, and then install the screw. 3 Set the chassis upright. 4 Complete the procedures to replace the side panel, and close the PC. 6 If you removed. 8 Set...
... cover for the PC's timekeeping capability. The whole connector should be incorrect. Replace only with the same, or equivalent, type of seven years. See "opening and closing the pc" on the motherboard provides backup power for the add-in 8 Upgrading and Servicing Guide Printed in card slots, and then install the screw. 3 Set the chassis upright. 4 Complete the procedures to replace the side panel, and close the PC. 6 If you removed. 8 Set...

Presario Desktop PCs - Getting Started Guide
Page 28
... can run a test or submit a problem. (Your PC must be connected to the Internet to submit a request.) Using Compaq Connections Compaq Connections (select models only) is an Internet-based service that brings you important information for your PC: • Product notices • System updates • Tips • Special offers for your PC Messages arrive while you're connected to you need assistance to solve a PC-related problem, use Instant Support (select models...
... can run a test or submit a problem. (Your PC must be connected to the Internet to submit a request.) Using Compaq Connections Compaq Connections (select models only) is an Internet-based service that brings you important information for your PC: • Product notices • System updates • Tips • Special offers for your PC Messages arrive while you're connected to you need assistance to solve a PC-related problem, use Instant Support (select models...
Presario Desktop PCs - Getting Started Guide
Page 41
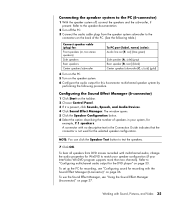
... Guide indicates that the connector is present, click Sounds, Speech, and Audio Devices. 4 Click Sound Effect Manager. Working with the Sound Effect Manager (6-connector)" on the speaker system. 6 Configure the audio output for this 6-connector multichannel speaker system by performing the following table.) Connect speaker cable (plug) for: Front speakers (or, two stereo speakers) Side speakers Rear speakers Center speaker/subwoofer To PC port [label, name] (color): Audio line out [E, out] (lime green) Side speaker [A, side] (gray) Rear speaker [B, rear] (black) Center speaker...
... Guide indicates that the connector is present, click Sounds, Speech, and Audio Devices. 4 Click Sound Effect Manager. Working with the Sound Effect Manager (6-connector)" on the speaker system. 6 Configure the audio output for this 6-connector multichannel speaker system by performing the following table.) Connect speaker cable (plug) for: Front speakers (or, two stereo speakers) Side speakers Rear speakers Center speaker/subwoofer To PC port [label, name] (color): Audio line out [E, out] (lime green) Side speaker [A, side] (gray) Rear speaker [B, rear] (black) Center speaker...
Presario Desktop PCs - Getting Started Guide
Page 55
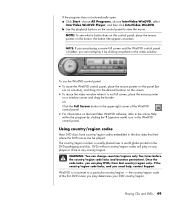
... code locks and becomes permanent. To use the WinDVD control panel: • To move the WinDVD control panel, place the mouse pointer on the panel (but not on the InterVideo WinDVD software, refer to a particular country/region - The country/region number is not pre-set to the online Help within the program by clicking anywhere in any player or drive in the video window...
... code locks and becomes permanent. To use the WinDVD control panel: • To move the WinDVD control panel, place the mouse pointer on the panel (but not on the InterVideo WinDVD software, refer to a particular country/region - The country/region number is not pre-set to the online Help within the program by clicking anywhere in any player or drive in the video window...
Presario Desktop PCs - Getting Started Guide
Page 94
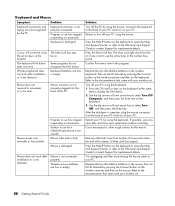
... to use for replacement details. Press the Help ? Wireless keyboard does not work . Mouse moves only vertically or horizontally. button on your wireless set . Press the Num Lock key. If possible, save any open files and close open the Help and Support Center, or refer to the Warranty and Support Guide to the documentation that came with a damp, lint-free cloth (not paper). Keyboard is not properly connected. Mouse connector is...
... to use for replacement details. Press the Help ? Wireless keyboard does not work . Mouse moves only vertically or horizontally. button on your wireless set . Press the Num Lock key. If possible, save any open files and close open the Help and Support Center, or refer to the Warranty and Support Guide to the documentation that came with a damp, lint-free cloth (not paper). Keyboard is not properly connected. Mouse connector is...


