
Safety and Regulatory Information Desktops, Thin Clients, and Personal Workstations
Page 17
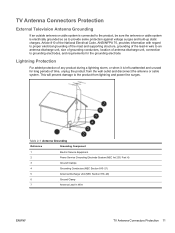
... Unit (NEC Section 810-20) 6 Ground Clamp 7 Antenna Lead-in wire to an antenna-discharge unit, size of grounding conductors, location of time, unplug the product from lightning and power line surges. TV Antenna Connectors Protection External Television Antenna Grounding If an outside antenna or cable system is connected to the product, be sure the antenna or...
... Unit (NEC Section 810-20) 6 Ground Clamp 7 Antenna Lead-in wire to an antenna-discharge unit, size of grounding conductors, location of time, unplug the product from lightning and power line surges. TV Antenna Connectors Protection External Television Antenna Grounding If an outside antenna or cable system is connected to the product, be sure the antenna or...
Upgrading and Servicing Guide
Page 6
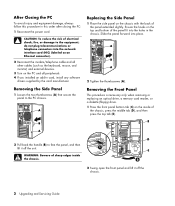
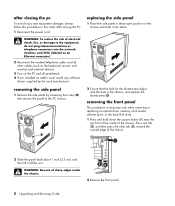
... secure the panel to the equipment, do not plug telecommunications or telephone connectors into the network interface card (NIC) (labeled as an Ethernet connector). 2 Reconnect the modem/telephone cable and all other cables (such as the keyboard, mouse, and monitor) and external devices. 3 Turn on the inside the chassis. 2 Swing open the front panel and lift it off the chassis. 2 Upgrading and Servicing Guide Replacing the Side Panel 1 Place the side panel on the...
... secure the panel to the equipment, do not plug telecommunications or telephone connectors into the network interface card (NIC) (labeled as an Ethernet connector). 2 Reconnect the modem/telephone cable and all other cables (such as the keyboard, mouse, and monitor) and external devices. 3 Turn on the inside the chassis. 2 Swing open the front panel and lift it off the chassis. 2 Upgrading and Servicing Guide Replacing the Side Panel 1 Place the side panel on the...

Upgrading and Servicing Guide
Page 7
... Disconnecting the optical drive cables Upgrading and Servicing Guide 3 K, L Additional hard disk drives (select models) or may have the correct software and drivers for drive type and location. G Front connector panel (no replacement instructions). See the preceding topic, "Locating Components Inside the PC," for the drive to work with operating system partition). IMPORTANT: Before adding a new diskette drive, memory card reader, optical drive, or hard disk drive, make sure you can add a drive into place. Locating Components Inside the PC Removing a Drive 1 Complete the...
... Disconnecting the optical drive cables Upgrading and Servicing Guide 3 K, L Additional hard disk drives (select models) or may have the correct software and drivers for drive type and location. G Front connector panel (no replacement instructions). See the preceding topic, "Locating Components Inside the PC," for the drive to work with operating system partition). IMPORTANT: Before adding a new diskette drive, memory card reader, optical drive, or hard disk drive, make sure you can add a drive into place. Locating Components Inside the PC Removing a Drive 1 Complete the...

Upgrading and Servicing Guide
Page 9
... the hard disk drive cage are for secondary hard disk drives (select models). Push the drive all the way into the bay until the drive snaps into the drive bay, making sure to replace the front panel, replace the side panel, and close the PC. Your drive may include a sound cable. Connect this cable also. the memory card reader and diskette drive have two screws on each side; Connecting the optical drive cables Upgrading and Servicing Guide 5 3 Make sure the jumper on a new optical drive is in...
... the hard disk drive cage are for secondary hard disk drives (select models). Push the drive all the way into the bay until the drive snaps into the drive bay, making sure to replace the front panel, replace the side panel, and close the PC. Your drive may include a sound cable. Connect this cable also. the memory card reader and diskette drive have two screws on each side; Connecting the optical drive cables Upgrading and Servicing Guide 5 3 Make sure the jumper on a new optical drive is in...

Upgrading and Servicing Guide
Page 10
... the new hard disk drive is in the CS (cable select) position. The screws help guide the drive into its proper position in the bay. 6 Upgrading and Servicing Guide See the previous procedure. 2 For a Parallel ATA drive, make sure the jumper on each plug and pull the plug (2) from the illustration. You need to run System Recovery using the recovery discs to load the factory-installed files. 1 Complete the procedures to prepare the PC...
... the new hard disk drive is in the CS (cable select) position. The screws help guide the drive into its proper position in the bay. 6 Upgrading and Servicing Guide See the previous procedure. 2 For a Parallel ATA drive, make sure the jumper on each plug and pull the plug (2) from the illustration. You need to run System Recovery using the recovery discs to load the factory-installed files. 1 Complete the procedures to prepare the PC...

Upgrading and Servicing Guide
Page 12
...: • If you replace or add a memory module, the memory is installed incorrectly, or it is the wrong type of the same type and speed as the memory originally installed in the next available sockets. Installing a Memory Module Upgrade the memory in your PC with the tab on page 1. See "Opening and Closing the PC" on page 1. 2 Gently lay the PC on its side. 3 Locate the memory module sockets on...
...: • If you replace or add a memory module, the memory is installed incorrectly, or it is the wrong type of the same type and speed as the memory originally installed in the next available sockets. Installing a Memory Module Upgrade the memory in your PC with the tab on page 1. See "Opening and Closing the PC" on page 1. 2 Gently lay the PC on its side. 3 Locate the memory module sockets on...

Upgrading and Servicing Guide
Page 13
... card slot. 3 Set the chassis upright. 4 Complete the procedures to replace the side panel, and close the open slot by inserting the metal slot cover into its side. 3 Inside the PC, locate the add-in card slots that contained your PC. Installing an Add-in Card 1 Align the edge of the add-in card slot. The latch should be used to add components to the card, power supply, keyboard, and monitor. Upgrading and Servicing Guide 9 WARNING: Do not overload the system by model...
... card slot. 3 Set the chassis upright. 4 Complete the procedures to replace the side panel, and close the open slot by inserting the metal slot cover into its side. 3 Inside the PC, locate the add-in card slots that contained your PC. Installing an Add-in Card 1 Align the edge of the add-in card slot. The latch should be used to add components to the card, power supply, keyboard, and monitor. Upgrading and Servicing Guide 9 WARNING: Do not overload the system by model...

Getting Started Guide
Page 12
... Online Services, and click Internet Explorer. Follow the instructions provided. Choose software that came on the PC the first time, you turn on CDs or DVDs included in the PC box (select models only). check the operating system, memory, and other requirements listed for the new software for compatibility with a virus. NOTE: Your ISP must support the V.92 standard to use original licensed software. Installing Software and Hardware Devices After you...
... Online Services, and click Internet Explorer. Follow the instructions provided. Choose software that came on the PC the first time, you turn on CDs or DVDs included in the PC box (select models only). check the operating system, memory, and other requirements listed for the new software for compatibility with a virus. NOTE: Your ISP must support the V.92 standard to use original licensed software. Installing Software and Hardware Devices After you...

Getting Started Guide
Page 13
... stop working, or resolve erratic PC behavior; Setting Up Your PC 7 repair options include using Application or System Recovery. Making Recovery Discs Now is a good time to make it to the Warranty and Support Guide for instructions and more information. Refer to View onscreen Help information about your new PC. Icon Opens Help and Support (select models only) Use it easy to Your New PC See the built-in Microsoft Windows Help and Support Center; Transferring...
... stop working, or resolve erratic PC behavior; Setting Up Your PC 7 repair options include using Application or System Recovery. Making Recovery Discs Now is a good time to make it to the Warranty and Support Guide for instructions and more information. Refer to View onscreen Help information about your new PC. Icon Opens Help and Support (select models only) Use it easy to Your New PC See the built-in Microsoft Windows Help and Support Center; Transferring...
Getting Started Guide
Page 24
... instructions to submit a request.) Using Compaq Connections Compaq Connections (select models only) is an Internet-based service that brings you important information for your PC: • Product notices • System updates • Tips • Special offers for your PC Messages arrive while you communicate over the Internet. Using Instant Support When you through the Support Web site under the information for your PC model. You can run a test...
... instructions to submit a request.) Using Compaq Connections Compaq Connections (select models only) is an Internet-based service that brings you important information for your PC: • Product notices • System updates • Tips • Special offers for your PC Messages arrive while you communicate over the Internet. Using Instant Support When you through the Support Web site under the information for your PC model. You can run a test...

Getting Started Guide
Page 40
... only. To use the WinDVD control panel: • To move the WinDVD control panel, place the mouse pointer on the panel (but not on a button), and drag it to the desired location on the screen. • To resize the video window when it is not pre-set this as the current country/region. 34 Getting Started Guide Using Country/Region Codes Most DVD discs have country/region codes embedded in...
... only. To use the WinDVD control panel: • To move the WinDVD control panel, place the mouse pointer on the panel (but not on a button), and drag it to the desired location on the screen. • To resize the video window when it is not pre-set this as the current country/region. 34 Getting Started Guide Using Country/Region Codes Most DVD discs have country/region codes embedded in...
Getting Started Guide
Page 77
... site. Hardware Installation Symptom Problem A new device is not recognized as the computer administrator to install or uninstall a device driver. Deselect the automatic settings in as part of changes to resolve the resource conflict. When the system advised you of the system. You may not automatically configure when added, if the default configuration conflicts with other devices. Turn off the PC, turn on the external device, and then turn on . New device does not work.
... site. Hardware Installation Symptom Problem A new device is not recognized as the computer administrator to install or uninstall a device driver. Deselect the automatic settings in as part of changes to resolve the resource conflict. When the system advised you of the system. You may not automatically configure when added, if the default configuration conflicts with other devices. Turn off the PC, turn on the external device, and then turn on . New device does not work.

Getting Started Guide
Page 80
... want to use for replacement details. Press the Num Lock key. then set . 74 Getting Started Guide Wireless keyboard does not work after installation or is damaged. Mouse does not respond to select Turn Off, and then press the Enter key. button on the keyboard to open applications before restarting. Refer to contact Support for the mouse. If possible, save any open files and close open the Help and Support Center, or refer...
... want to use for replacement details. Press the Num Lock key. then set . 74 Getting Started Guide Wireless keyboard does not work after installation or is damaged. Mouse does not respond to select Turn Off, and then press the Enter key. button on the keyboard to open applications before restarting. Refer to contact Support for the mouse. If possible, save any open files and close open the Help and Support Center, or refer...

Getting Started Guide
Page 82
... cover or access panel removed. Processor or system fan has failed. Refer to the PC. button on the keyboard to open the Help and Support Center, or refer to the Warranty and Support Guide to the external power source are not blocked and internal fan is not working. Press and hold the On button until the PC turns off automatically. Note that cables connecting the PC to contact Support for instructions. Invalid system disk or Non-System disk or disk error...
... cover or access panel removed. Processor or system fan has failed. Refer to the PC. button on the keyboard to open the Help and Support Center, or refer to the Warranty and Support Guide to the external power source are not blocked and internal fan is not working. Press and hold the On button until the PC turns off automatically. Note that cables connecting the PC to contact Support for instructions. Invalid system disk or Non-System disk or disk error...

Getting Started Guide
Page 85
... disk or disk error, 76 O online manuals, 19 onscreen guides, 8 optical drive quick reference, 52 organizing Internet links and the PC, 8 P PC keyboard not working, 74 no sound, 66 organizing information, 8 problem turning on, 76 problem, powered off, 76 problem, won't turn off, 76 running tests, 18 setting it up, 3 transferring files and settings to new PC, 7 troubleshooting, 65 turning on, 5 viewing PC image on TV, 27 PC Help & Tools, 8 peripherals, 5 Pictures (Photos) button, 12 Print button, not working, 74 printer troubleshooting, 75 problem cannot add...
... disk or disk error, 76 O online manuals, 19 onscreen guides, 8 optical drive quick reference, 52 organizing Internet links and the PC, 8 P PC keyboard not working, 74 no sound, 66 organizing information, 8 problem turning on, 76 problem, powered off, 76 problem, won't turn off, 76 running tests, 18 setting it up, 3 transferring files and settings to new PC, 7 troubleshooting, 65 turning on, 5 viewing PC image on TV, 27 PC Help & Tools, 8 peripherals, 5 Pictures (Photos) button, 12 Print button, not working, 74 printer troubleshooting, 75 problem cannot add...
Getting Started Guide
Page 86
..., 26 cables, 26 connecting a TV set, 26 disabling TV option, 29 viewing PC image on TV, 27 U updating, system, 18 upgrading to V.92 modem features, 6 User button, 12 V V.92 modem, 6 VCD playing with Windows Media Player, 35 playing with WinDVD, 35 video capture error, 68 Video CDs playing with Windows Media Player, 35 playing with WinDVD, 35 video files recording, 46 video recording length, 50 viewing onscreen guides, 8 volume adjusting, 66 controls...
..., 26 cables, 26 connecting a TV set, 26 disabling TV option, 29 viewing PC image on TV, 27 U updating, system, 18 upgrading to V.92 modem features, 6 User button, 12 V V.92 modem, 6 VCD playing with Windows Media Player, 35 playing with WinDVD, 35 video capture error, 68 Video CDs playing with Windows Media Player, 35 playing with WinDVD, 35 video files recording, 46 video recording length, 50 viewing onscreen guides, 8 volume adjusting, 66 controls...
Compaq Presario Desktop Products - Upgrading and Servicing Guide
Page 6
... shock, fire, or damage to the equipment, do not plug telecommunications or telephone connectors into place. removing the front panel This procedure is necessary only when removing or replacing an optical drive, memory card reader, diskette drive, or the hard disk drive. 1 Press and hold down the square button (1) near the top front of the inside the chassis. 2 Remove the front panel. 2 Upgrading and Servicing Guide after closing the PC. 1 Reconnect the power cord.
... shock, fire, or damage to the equipment, do not plug telecommunications or telephone connectors into place. removing the front panel This procedure is necessary only when removing or replacing an optical drive, memory card reader, diskette drive, or the hard disk drive. 1 Press and hold down the square button (1) near the top front of the inside the chassis. 2 Remove the front panel. 2 Upgrading and Servicing Guide after closing the PC. 1 Reconnect the power cord.

Compaq Presario Desktop Products - Upgrading and Servicing Guide
Page 7
...hard disk drive, you have the correct software and drivers for the optical drive to an external storage device, such as a CD, before removing the hard disk drive. See "opening and closing the pc" on the hard disk drive to work with the operating system. See the User's Guide for drive type and location. Failure to remove the front panel. locating components inside the PC" for details about the recovery procedure. You can replace or upgrade. IMPORTANT: Before adding a new optical drive, make sure you need to run System Recovery using the recovery discs to remove...
...hard disk drive, you have the correct software and drivers for the optical drive to an external storage device, such as a CD, before removing the hard disk drive. See "opening and closing the pc" on the hard disk drive to work with the operating system. See the User's Guide for drive type and location. Failure to remove the front panel. locating components inside the PC" for details about the recovery procedure. You can replace or upgrade. IMPORTANT: Before adding a new optical drive, make sure you need to run System Recovery using the recovery discs to remove...

Compaq Presario Desktop Products - Upgrading and Servicing Guide
Page 11
... is needed to remove, replace, or add an add-in card. 4 Inside the PC, locate the add-in a fully loaded system (one way. A Phillips screwdriver is the wrong type of the PC, remove the screw from the socket, and then remove the card. Be sure not to remove the side panel. The total +5 V current draw in card slots on the memory socket (B). 2 The memory module can be installed in card slot cover. 5 Remove the slot cover. See "opening and...
... is needed to remove, replace, or add an add-in card. 4 Inside the PC, locate the add-in a fully loaded system (one way. A Phillips screwdriver is the wrong type of the PC, remove the screw from the socket, and then remove the card. Be sure not to remove the side panel. The total +5 V current draw in card slots on the memory socket (B). 2 The memory module can be installed in card slot cover. 5 Remove the slot cover. See "opening and...

Compaq Presario Desktop Products - Upgrading and Servicing Guide
Page 12
... battery (3 volt, 220mAH rating) or an equivalent battery. Discard used batteries according to the manufacturer's instructions. 1 Complete the procedures to prepare the PC and to the card, power supply, keyboard, and monitor. See "opening and closing the pc" on its side. 3 Remove any cabling, if necessary, to reach the battery. 4 Remove any memory modules, if necessary, to replace the side panel, and close the open slot by inserting the metal slot cover into the opened slot...
... battery (3 volt, 220mAH rating) or an equivalent battery. Discard used batteries according to the manufacturer's instructions. 1 Complete the procedures to prepare the PC and to the card, power supply, keyboard, and monitor. See "opening and closing the pc" on its side. 3 Remove any cabling, if necessary, to reach the battery. 4 Remove any memory modules, if necessary, to replace the side panel, and close the open slot by inserting the metal slot cover into the opened slot...


