Quick Start Guide
Page 5
... your camera 8 Install the batteries 8 Turn on the camera 8 Choose the language 9 Set the region 9 Set the date and time 9 Install and format an optional memory card 10 Install the software 11 3 Taking pictures and recording video clips 12 Take a picture 12 Record a video clip 12 4 Reviewing and deleting images and video...
... your camera 8 Install the batteries 8 Turn on the camera 8 Choose the language 9 Set the region 9 Set the date and time 9 Install and format an optional memory card 10 Install the software 11 3 Taking pictures and recording video clips 12 Take a picture 12 Record a video clip 12 4 Reviewing and deleting images and video...
Quick Start Guide
Page 9
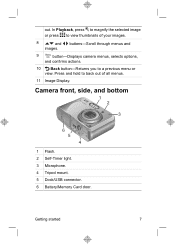
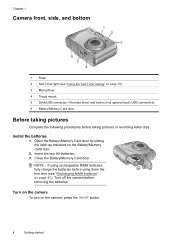
buttons-Scroll through menus and 9 button-Displays camera menus, selects options, and confirms actions. 10 Back button-Returns you to view thumbnails of all menus. 11 Image Display. Getting started 7 Camera front, side, and bottom 1 2 3 6 5 4 1 Flash. 2 Self-Timer light. 3 Microphone. 4 Tripod mount. 5 Dock/USB connector. 6 Battery/Memory Card door. In Playback, press to magnify the selected image or press to a previous menu or view. Press and hold to back out of your images. 8 and images. out.
buttons-Scroll through menus and 9 button-Displays camera menus, selects options, and confirms actions. 10 Back button-Returns you to view thumbnails of all menus. 11 Image Display. Getting started 7 Camera front, side, and bottom 1 2 3 6 5 4 1 Flash. 2 Self-Timer light. 3 Microphone. 4 Tripod mount. 5 Dock/USB connector. 6 Battery/Memory Card door. In Playback, press to magnify the selected image or press to a previous menu or view. Press and hold to back out of your images. 8 and images. out.
Quick Start Guide
Page 10
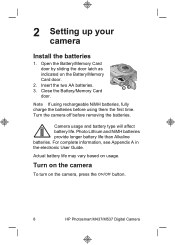
.... Actual battery life may vary based on the camera, press the button. 8 HP Photosmart M437/M537 Digital Camera For complete information, see Appendix A in the electronic User Guide. Open the Battery/Memory Card door by sliding the door latch as indicated on the Battery/Memory Card door. 2. Camera usage and battery type will affect battery life. 2 Setting...
.... Actual battery life may vary based on the camera, press the button. 8 HP Photosmart M437/M537 Digital Camera For complete information, see Appendix A in the electronic User Guide. Open the Battery/Memory Card door by sliding the door latch as indicated on the Battery/Memory Card door. 2. Camera usage and battery type will affect battery life. 2 Setting...
Quick Start Guide
Page 12
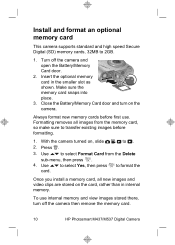
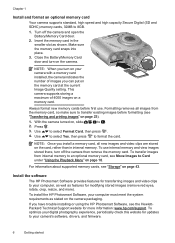
... on , slide to . 2. To use . Install and format an optional memory card This camera supports standard and high speed Secure Digital (SD) memory cards, 32MB to format the card. With the camera turned on the camera. Turn off the camera then remove the memory card. 10 HP Photosmart M437/M537 Digital Camera Formatting removes all new images and video clips...
... on , slide to . 2. To use . Install and format an optional memory card This camera supports standard and high speed Secure Digital (SD) memory cards, 32MB to format the card. With the camera turned on the camera. Turn off the camera then remove the memory card. 10 HP Photosmart M437/M537 Digital Camera Formatting removes all new images and video clips...
User Guide
Page 3
... taking pictures...4 Install the batteries...4 Turn on the camera...4 Choose the language...5 Set the region...5 Set the date and time...5 Install and format an optional memory card 6 Install the software...6 Using your camera...7 2 Taking pictures and recording video clips Taking pictures...8 Recording video clips...9 Instant Review...9 Auto focus and exposure...9 Focusing on...
... taking pictures...4 Install the batteries...4 Turn on the camera...4 Choose the language...5 Set the region...5 Set the date and time...5 Install and format an optional memory card 6 Install the software...6 Using your camera...7 2 Taking pictures and recording video clips Taking pictures...8 Recording video clips...9 Instant Review...9 Auto focus and exposure...9 Focusing on...
User Guide
Page 4
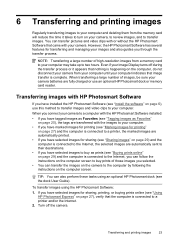
6 Transferring and printing images Transferring images with HP Photosmart Software 23 Transferring images without HP Photosmart Software 24 Connecting to the computer 24 Using a memory card reader 25 Printing images directly to a printer 25 7 Using HP Photosmart Express Using the Photosmart Express Menu 27 Marking images for printing...27 Buying prints online...29 Sharing images...29 ... using batteries 39 Power indicators...40 Number of shots per battery type 40 Battery performance...41 Recharging NiMH batteries...41 B Specifications Memory capacity...43 Image quality...43 Index...45 2
6 Transferring and printing images Transferring images with HP Photosmart Software 23 Transferring images without HP Photosmart Software 24 Connecting to the computer 24 Using a memory card reader 25 Printing images directly to a printer 25 7 Using HP Photosmart Express Using the Photosmart Express Menu 27 Marking images for printing...27 Buying prints online...29 Sharing images...29 ... using batteries 39 Power indicators...40 Number of shots per battery type 40 Battery performance...41 Recharging NiMH batteries...41 B Specifications Memory capacity...43 Image quality...43 Index...45 2
User Guide
Page 6
... 15). 3 Microphone. 4 Tripod mount. 5 Dock/USB connector-Provides direct and indirect (via optional dock) USB connectivity. 6 Battery/Memory Card door. Close the Battery/Memory Card door. Turn off the camera before using rechargeable NiMH batteries, fully charge the batteries before removing the batteries. Open the Battery.../Memory Card door by sliding the latch as indicated on the camera, press the button. 4 Getting started Before taking pictures...
... 15). 3 Microphone. 4 Tripod mount. 5 Dock/USB connector-Provides direct and indirect (via optional dock) USB connectivity. 6 Battery/Memory Card door. Close the Battery/Memory Card door. Turn off the camera before using rechargeable NiMH batteries, fully charge the batteries before removing the batteries. Open the Battery.../Memory Card door by sliding the latch as indicated on the camera, press the button. 4 Getting started Before taking pictures...
User Guide
Page 8
... must meet the system requirements as features for updates to . 3. Close the Battery/Memory Card door and turn off the camera and open the Battery/Memory Card door. 2. Install the software The HP Photosmart Software provides features for more ). To install the HP Photosmart Software, your computer, as well as stated on the camera. Use to select Yes...
... must meet the system requirements as features for updates to . 3. Close the Battery/Memory Card door and turn off the camera and open the Battery/Memory Card door. 2. Install the software The HP Photosmart Software provides features for more ). To install the HP Photosmart Software, your computer, as well as stated on the camera. Use to select Yes...
User Guide
Page 10
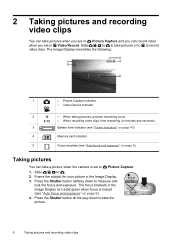
... pictures or to to Picture Capture. 1. Frame the subject for your picture in minutes and seconds). 3 Battery level indicator (see "Power indicators" on page 40). 4 Memory card indicator. 5 Focus brackets (see "Auto focus and exposure" on page 9). The focus brackets in the Image Display turn solid green when focus is set to...
... pictures or to to Picture Capture. 1. Frame the subject for your picture in minutes and seconds). 3 Battery level indicator (see "Power indicators" on page 40). 4 Memory card indicator. 5 Focus brackets (see "Auto focus and exposure" on page 9). The focus brackets in the Image Display turn solid green when focus is set to...
User Guide
Page 19
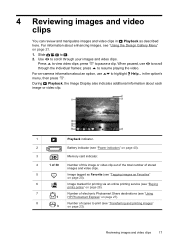
...20). 6 Image marked for printing via an online printing service (see "Buying prints online" on page 29). 7 Number of electronic Photosmart Share destinations (see "Using 1 HP Photosmart Express" on page 27). 8 Number of stored images and video clips. 5 Image tagged as Favorite (see "Tagging images as ...3 on -camera information about each image or video clip. 1 Playback indicator. 2 Battery indicator (see "Power indicators" on page 40). 3 Memory card indicator. 4 1 of 30 Number of this image or video clip out of the total number of copies to scroll For on page 23).
...20). 6 Image marked for printing via an online printing service (see "Buying prints online" on page 29). 7 Number of electronic Photosmart Share destinations (see "Using 1 HP Photosmart Express" on page 27). 8 Number of stored images and video clips. 5 Image tagged as Favorite (see "Tagging images as ...3 on -camera information about each image or video clip. 1 Playback indicator. 2 Battery indicator (see "Power indicators" on page 40). 3 Memory card indicator. 4 1 of 30 Number of this image or video clip out of the total number of copies to scroll For on page 23).
User Guide
Page 20
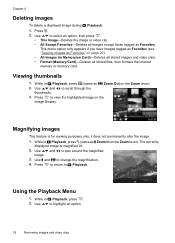
... Favorites" on page 20). • All Images (in Playback, press (same as Zoom In on Card)-Deletes all stored images and video clips. • Format (Memory/Card)-Deletes all images except those tagged as Zoom Out on the Image Display. it does not permanently alter ... . • This Image-Deletes the image or video clip. • All Except Favorites-Deletes all stored files, then formats the internal memory or memory card. While in Playback, press . 2. Press . 2. Viewing thumbnails 1. The currently displayed image is for viewing purposes only; Use to highlight...
... Favorites" on page 20). • All Images (in Playback, press (same as Zoom In on Card)-Deletes all stored images and video clips. • Format (Memory/Card)-Deletes all images except those tagged as Zoom Out on the Image Display. it does not permanently alter ... . • This Image-Deletes the image or video clip. • All Except Favorites-Deletes all stored files, then formats the internal memory or memory card. While in Playback, press . 2. Press . 2. Viewing thumbnails 1. The currently displayed image is for viewing purposes only; Use to highlight...
User Guide
Page 21
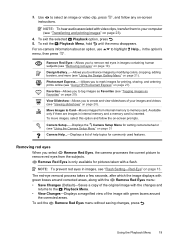
... on -screen instructions. NOTE: To hear audio associated with video clips, transfer them to mark images for setting camera behavior (see "Using HP Photosmart Express" on -camera information about an option, use menu, then press . To exit the selected Playback option, press . 5. in the... the image with a flash. To exit the Remove Red Eyes menu without saving changes, press . Photosmart Express...-Allows you to remove red eyes in internal memory and a memory card is only available for pictures taken with green boxes around corrected areas, along with the Remove Red Eyes...
... on -screen instructions. NOTE: To hear audio associated with video clips, transfer them to mark images for setting camera behavior (see "Using HP Photosmart Express" on -camera information about an option, use menu, then press . To exit the selected Playback option, press . 5. in the... the image with a flash. To exit the Remove Red Eyes menu without saving changes, press . Photosmart Express...-Allows you to remove red eyes in internal memory and a memory card is only available for pictures taken with green boxes around corrected areas, along with the Remove Red Eyes...
User Guide
Page 25
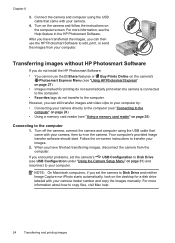
...tags are automatically sent to their destinations. • If you have installed the HP Photosmart Software (see "Install the software" on page 6), use an optional HP Photosmart dock or memory card reader. However, the HP Photosmart Software has several features for sharing (see "Sharing images" on page 29) ... the computer is connected to the Internet, the selected images are transferred with HP Photosmart Software If you have selected images to buy prints of high-resolution images from a memory card to your computer may take up to transfer images. When transferring a large number...
...tags are automatically sent to their destinations. • If you have installed the HP Photosmart Software (see "Install the software" on page 6), use an optional HP Photosmart dock or memory card reader. However, the HP Photosmart Software has several features for sharing (see "Sharing images" on page 29) ... the computer is connected to the Internet, the selected images are transferred with HP Photosmart Software If you have selected images to buy prints of high-resolution images from a memory card to your computer may take up to transfer images. When transferring a large number...
User Guide
Page 26
... your images. 2. If you set the camera's USB Configuration to Disk Drive (see "Using a memory card reader" on the camera's Photosmart Express Menu (see the Help feature in the HP Photosmart Software. After you can then use the Share features or Buy Prints Online on page 25) Connecting to... the images manually. However, you have finished transferring images, disconnect the camera from your camera. 4. For more information, see "Using HP Photosmart Express" on page 31) and reconnect to copy files, visit Mac help. 24 Transferring and printing images Turn on the camera and...
... your images. 2. If you set the camera's USB Configuration to Disk Drive (see "Using a memory card reader" on the camera's Photosmart Express Menu (see the Help feature in the HP Photosmart Software. After you can then use the Share features or Buy Prints Online on page 25) Connecting to... the images manually. However, you have finished transferring images, disconnect the camera from your camera. 4. For more information, see "Using HP Photosmart Express" on page 31) and reconnect to copy files, visit Mac help. 24 Transferring and printing images Turn on the camera and...
User Guide
Page 27
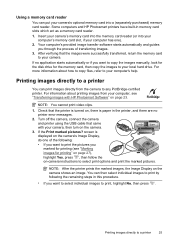
... directly to a printer You can put your camera's optional memory card into your computer's memory card slot, if your computer has one of the following the remaining steps in memory card slots which act as a memory card reader. 1. screen is turned on the camera shows an image. Some computers and HP Photosmart printers have built-in this procedure. • If...
... directly to a printer You can put your camera's optional memory card into your computer's memory card slot, if your computer has one of the following the remaining steps in memory card slots which act as a memory card reader. 1. screen is turned on the camera shows an image. Some computers and HP Photosmart printers have built-in this procedure. • If...
User Guide
Page 34
...Hewlett-Packard Technical Support website (www.hp.com/support) for at least 5 seconds. 3. Turn on page 32) Resetting the camera If your camera's software, drivers, and firmware. If the camera still does not turn off the camera. 2. Remove the memory card and batteries for updates to your ... camera (see "Set the date and time" on page 5). 5. Use the Buy Prints Online feature on the Photosmart Express Menu (see "Install the batteries" on page 4). If so, remove the memory card and turn on. • Install new or recharged batteries, ensuring that the camera works without an optional...
...Hewlett-Packard Technical Support website (www.hp.com/support) for at least 5 seconds. 3. Turn on page 32) Resetting the camera If your camera's software, drivers, and firmware. If the camera still does not turn off the camera. 2. Remove the memory card and batteries for updates to your ... camera (see "Set the date and time" on page 5). 5. Use the Buy Prints Online feature on the Photosmart Express Menu (see "Install the batteries" on page 4). If so, remove the memory card and turn on. • Install new or recharged batteries, ensuring that the camera works without an optional...
User Guide
Page 35
...camera; Wait a few seconds for the camera to turn on page 11). • Use a tripod to your computer, then format the internal memory or the memory card (see "Extending battery life" on page 6). I have to recharge the NiMH batteries frequently. • New batteries or batteries that have not ... used the batteries for two months or longer, recharge them. • For tips on conserving battery life, see "Install and format an optional memory card" on page 6). Having a large number of the camera buttons do not respond when the camera is connected to a computer (directly or through...
...camera; Wait a few seconds for the camera to turn on page 11). • Use a tripod to your computer, then format the internal memory or the memory card (see "Extending battery life" on page 6). I have to recharge the NiMH batteries frequently. • New batteries or batteries that have not ... used the batteries for two months or longer, recharge them. • For tips on conserving battery life, see "Install and format an optional memory card" on page 6). Having a large number of the camera buttons do not respond when the camera is connected to a computer (directly or through...

User Guide
Page 36
...camera is outside the flash range (see Flash working distance under "Specifications" on page 6). • If your memory card in internal memory. If so, transfer the images to the memory card (see Move Images to Card under "Using the Playback Menu" on my camera. My image is too dark. • Wait for natural ..."Setting the flash" on page 13), or add indirect lighting. • If the subject you want to keep, then format the memory card (see "Install and format an optional memory card" on page 42), turn off (see "Setting the flash" on page 14). • Set the flash to Auto Flash or ...
...camera is outside the flash range (see Flash working distance under "Specifications" on page 6). • If your memory card in internal memory. If so, transfer the images to the memory card (see Move Images to Card under "Using the Playback Menu" on my camera. My image is too dark. • Wait for natural ..."Setting the flash" on page 13), or add indirect lighting. • If the subject you want to keep, then format the memory card (see "Install and format an optional memory card" on page 42), turn off (see "Setting the flash" on page 14). • Set the flash to Auto Flash or ...
User Guide
Page 37
...the Image Quality setting. Replace your memory card with a memory card installed, the camera indicates the number of images stored on a memory card. Video recording terminates abruptly and the video will not play back. • Remove the memory card and see "Install and format an optional memory card" on page 32). The camera... This is shorter than expected. The Power light is on but it is normal. If so, transfer the video to a memory card (see Move Images to Card under "Using the Playback Menu" on page 18) or to reactivate the Image Display. • Reset the camera (see ...
...the Image Quality setting. Replace your memory card with a memory card installed, the camera indicates the number of images stored on a memory card. Video recording terminates abruptly and the video will not play back. • Remove the memory card and see "Install and format an optional memory card" on page 32). The camera... This is shorter than expected. The Power light is on but it is normal. If so, transfer the video to a memory card (see Move Images to Card under "Using the Playback Menu" on page 18) or to reactivate the Image Display. • Reset the camera (see ...
User Guide
Page 38
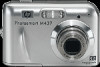
...Packard Technical Support website: www.hp.com/support. If you can look up to the HP Photosmart M437 digital camera. A power surge or electrostatic discharge may have affected the camera. I am having a problem installing or using your camera, you have on your card, the longer it is ... as a Disk Drive (see "Resetting the camera" on it takes for the HP Photosmart Software to the HP Photosmart M537 digital camera. 36 Troubleshooting Having a large number of files stored on an optional memory card affects the amount of images stored on page 32). I cannot transfer images from...
...Packard Technical Support website: www.hp.com/support. If you can look up to the HP Photosmart M437 digital camera. A power surge or electrostatic discharge may have affected the camera. I am having a problem installing or using your camera, you have on your card, the longer it is ... as a Disk Drive (see "Resetting the camera" on it takes for the HP Photosmart Software to the HP Photosmart M537 digital camera. 36 Troubleshooting Having a large number of files stored on an optional memory card affects the amount of images stored on page 32). I cannot transfer images from...


