User Guide
Page 3
...Using your camera 9 2 Taking pictures and recording video clips 11 Taking still pictures 11 Recording video clips 12 Instant Review...12 Auto focus and exposure 12 Using zoom...14 Setting the flash...15 Using the shooting modes 15 Using the Capture Menu 17 3 Reviewing images and video clips 20 Deleting images...21 Viewing thumbnails 21 Magnifying images 21 4 Using the Design Gallery Menu 22 Removing red eyes 22 Modifying colors...23 Adding borders...23 Recording audio...23 5 Transferring and printing images 25 Transferring images with HP Photosmart Software 25 Transferring images...
...Using your camera 9 2 Taking pictures and recording video clips 11 Taking still pictures 11 Recording video clips 12 Instant Review...12 Auto focus and exposure 12 Using zoom...14 Setting the flash...15 Using the shooting modes 15 Using the Capture Menu 17 3 Reviewing images and video clips 20 Deleting images...21 Viewing thumbnails 21 Magnifying images 21 4 Using the Design Gallery Menu 22 Removing red eyes 22 Modifying colors...23 Adding borders...23 Recording audio...23 5 Transferring and printing images 25 Transferring images with HP Photosmart Software 25 Transferring images...
User Guide
Page 5
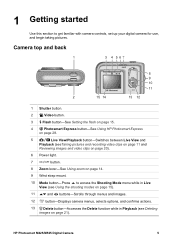
... Mode button-Press to get familiar with camera controls, set up your digital camera for use, and begin taking pictures. Camera top and back 1 3 4 567 2 15 14 8 9 10 11 13 12 1 Shutter button. 2 Video button. 3 Flash button-See Setting the flash on page 15. 4 Photosmart Express button-See Using HP Photosmart Express on page 28. 5 Live View/Playback button-Switches between Live View and Playback (seeTaking pictures and recording video clips on page 11 and Reviewing images and video clips on page 20). 6 Power light. 7 button. 8 Zoom lever-See Using zoom on...
... Mode button-Press to get familiar with camera controls, set up your digital camera for use, and begin taking pictures. Camera top and back 1 3 4 567 2 15 14 8 9 10 11 13 12 1 Shutter button. 2 Video button. 3 Flash button-See Setting the flash on page 15. 4 Photosmart Express button-See Using HP Photosmart Express on page 28. 5 Live View/Playback button-Switches between Live View and Playback (seeTaking pictures and recording video clips on page 11 and Reviewing images and video clips on page 20). 6 Power light. 7 button. 8 Zoom lever-See Using zoom on...

User Guide
Page 8
... the Language setting, the Region setting determines the default date format and the format of the Image Display. Use to format the card. Turn off the camera and open the Battery/Memory card door. 2. Close the Battery/Memory card door and turn on the card, rather than in Playback. 2. Use to select Yes, then press to adjust the highlighted value. 2. To transfer images from internal memory to an optional memory card, see Using the Setup Menu on page 43. Install the software The HP Photosmart Software provides features for transferring images and video...
... the Language setting, the Region setting determines the default date format and the format of the Image Display. Use to format the card. Turn off the camera and open the Battery/Memory card door. 2. Close the Battery/Memory card door and turn on the card, rather than in Playback. 2. Use to select Yes, then press to adjust the highlighted value. 2. To transfer images from internal memory to an optional memory card, see Using the Setup Menu on page 43. Install the software The HP Photosmart Software provides features for transferring images and video...
User Guide
Page 9
... 9). 1. Double-click the CD icon on page 9. Macintosh 1. See Using HP Photosmart Express on page 20 HP Photosmart M425/M525 Digital Camera 9 For information on taking still pictures and See Taking still pictures on page 11 capturing video clips and Recording video clips on page 12 For information on reviewing images and See Reviewing images and video clips video clips on the camera on page 28. ● HP Photosmart Essential Software (for Windows 98, 98SE, Me, and...
... 9). 1. Double-click the CD icon on page 9. Macintosh 1. See Using HP Photosmart Express on page 20 HP Photosmart M425/M525 Digital Camera 9 For information on taking still pictures and See Taking still pictures on page 11 capturing video clips and Recording video clips on page 12 For information on reviewing images and See Reviewing images and video clips video clips on the camera on page 28. ● HP Photosmart Essential Software (for Windows 98, 98SE, Me, and...
User Guide
Page 11
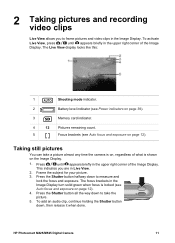
... Shutter button down to frame pictures and video clips in the Image Display. This indicates you to measure and lock the focus and exposure. The focus brackets in the Image Display turn solid green when focus is shown on the Image Display. 1. To activate Live View, press until appears briefly in the upper right corner of the Image Display. HP Photosmart M425/M525 Digital Camera 11 Press the Shutter button halfway down , then release it when done. 2 Taking pictures and recording video...
... Shutter button down to frame pictures and video clips in the Image Display. This indicates you to measure and lock the focus and exposure. The focus brackets in the Image Display turn solid green when focus is shown on the Image Display. 1. To activate Live View, press until appears briefly in the upper right corner of the Image Display. HP Photosmart M425/M525 Digital Camera 11 Press the Shutter button halfway down , then release it when done. 2 Taking pictures and recording video...
User Guide
Page 12
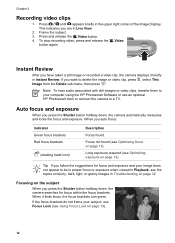
... HP Photosmart Software or use Focus Lock (see Optimizing focus on page 32. If you press the Shutter button halfway down , the camera searches for focus and exposure and your image does not appear to delete the image or video clip, press , select This Image from the Delete sub-menu, then press . When it briefly in the upper right corner of the Image Display. This indicates you auto focus: Indicator Green focus brackets Red focus brackets (shaking hand icon) Description Focus...
... HP Photosmart Software or use Focus Lock (see Optimizing focus on page 32. If you press the Shutter button halfway down , the camera searches for focus and exposure and your image does not appear to delete the image or video clip, press , select This Image from the Delete sub-menu, then press . When it briefly in the upper right corner of the Image Display. This indicates you auto focus: Indicator Green focus brackets Red focus brackets (shaking hand icon) Description Focus...
User Guide
Page 14
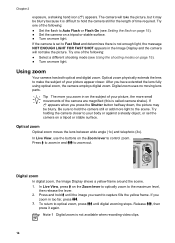
... zoom to control zoom. Chapter 2 exposure, a shaking hand icon ( ) appears. Using zoom Your camera has both optical and digital zoom. Digital zoom uses no moving lens parts. Try holding the camera closer to Auto Flash or Flash On (see Using the shooting modes on page 15). ● Turn on a tripod or stable surface. If appears when you press the Shutter button halfway down, the picture may be blurry. Press to zoom in the Image Display and the camera will take the picture...
... zoom to control zoom. Chapter 2 exposure, a shaking hand icon ( ) appears. Using zoom Your camera has both optical and digital zoom. Digital zoom uses no moving lens parts. Try holding the camera closer to Auto Flash or Flash On (see Using the shooting modes on page 15). ● Turn on a tripod or stable surface. If appears when you press the Shutter button halfway down, the picture may be blurry. Press to zoom in the Image Display and the camera will take the picture...
User Guide
Page 15
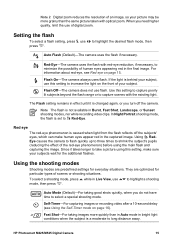
... the possibility of your subjects wait for everyday situations. Red-Eye-The camera uses the flash with optical zoom. If the light is not available in Burst, Fast Shot, Landscape, or Sunset shooting modes, nor while recording video clips. Note The flash is behind your subject, use this setting, make human eyes appear red in Live View, use of digital zoom. Fast Shot-For taking good shots quickly, when you need higher quality, limit the use mode, then press .
... the possibility of your subjects wait for everyday situations. Red-Eye-The camera uses the flash with optical zoom. If the light is not available in Burst, Fast Shot, Landscape, or Sunset shooting modes, nor while recording video clips. Note The flash is behind your subject, use this setting, make human eyes appear red in Live View, use of digital zoom. Fast Shot-For taking good shots quickly, when you need higher quality, limit the use mode, then press .
User Guide
Page 17
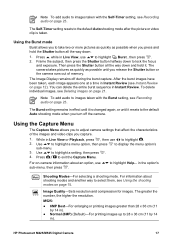
... picture or video clip is changed again, or until it is taken. HP Photosmart M425/M525 Digital Camera 17 Press to lock the focus and exposure. Then press the Shutter button all the way down and hold it resets to highlight Help... Image Quality-Sets resolution and compression for images. The Self-Timer setting resets to select them, see Using the shooting modes on -camera information about an option, use to adjust camera settings that affect the characteristics of memory. The camera takes pictures...
... picture or video clip is changed again, or until it is taken. HP Photosmart M425/M525 Digital Camera 17 Press to lock the focus and exposure. Then press the Shutter button all the way down and hold it resets to highlight Help... Image Quality-Sets resolution and compression for images. The Self-Timer setting resets to select them, see Using the shooting modes on -camera information about an option, use to adjust camera settings that affect the characteristics of memory. The camera takes pictures...
User Guide
Page 19
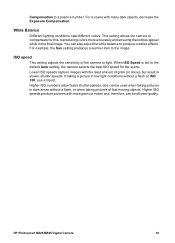
... final image. HP Photosmart M425/M525 Digital Camera 19 This setting allows the camera to light. White Balance Different lighting conditions cast different colors. If taking pictures of grain (or noise), but result in low light conditions without a flash, or when taking a picture in slower shutter speeds. Higher ISO numbers allow faster shutter speeds, and can be of the camera to compensate for the scene. For example, the Sun setting produces a warmer look to the default Auto setting, the camera selects...
... final image. HP Photosmart M425/M525 Digital Camera 19 This setting allows the camera to light. White Balance Different lighting conditions cast different colors. If taking pictures of grain (or noise), but result in low light conditions without a flash, or when taking a picture in slower shutter speeds. Higher ISO numbers allow faster shutter speeds, and can be of the camera to compensate for the scene. For example, the Sun setting produces a warmer look to the default Auto setting, the camera selects...
User Guide
Page 26
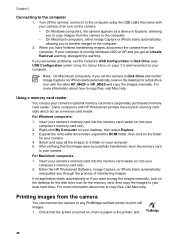
... is turned on the camera. - Insert your camera's memory card into the memory card reader (or into your desktop, then select Explore. 3. Either the HP Photosmart Software, Image Capture, or iPhoto starts automatically and guides you have built-in the printer, and 26 Turn off the camera, connect it to the computer 1. Chapter 5 Connecting to the computer using the USB cable that came with the label HP_M425 or HP_M525 and copy the images manually.
... is turned on the camera. - Insert your camera's memory card into the memory card reader (or into your desktop, then select Explore. 3. Either the HP Photosmart Software, Image Capture, or iPhoto starts automatically and guides you have built-in the printer, and 26 Turn off the camera, connect it to the computer 1. Chapter 5 Connecting to the computer using the USB cable that came with the label HP_M425 or HP_M525 and copy the images manually.

User Guide
Page 27
... customer support for non-HP printers. HP Photosmart M425/M525 Digital Camera 27 Note If you connect the camera to the printer, the Print Setup Menu displays on the camera to begin printing. When the camera is set to Digital Camera (see USB Configuration under Using the Setup Menu on the camera. 4. there are no printer error messages. 2. Verify that came with printing, contact your camera, then turn on page 31). 3. Connect the camera and printer using the USB cable that the camera's USB Configuration is connected to a nonHP printer and encounter problems...
... customer support for non-HP printers. HP Photosmart M425/M525 Digital Camera 27 Note If you connect the camera to the printer, the Print Setup Menu displays on the camera to begin printing. When the camera is set to Digital Camera (see USB Configuration under Using the Setup Menu on the camera. 4. there are no printer error messages. 2. Verify that came with printing, contact your camera, then turn on page 31). 3. Connect the camera and printer using the USB cable that the camera's USB Configuration is connected to a nonHP printer and encounter problems...
User Guide
Page 31
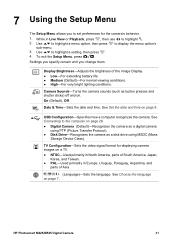
...-Adjusts the brightness of Asia. (Language)-Sets the language. See Set the date and time on page 26. ● Digital Camera (Default)-Recognizes the camera as a digital camera using PTP (Picture Transfer Protocol). ● Disk Drive-Recognizes the camera as button presses and shutter clicks) off and on page 7. USB Configuration-Specifies how a computer recognizes the camera. See Connecting to highlight . 2. HP Photosmart M425/M525 Digital Camera 31 See Choose the language on . Date & Time-Sets the date and time. 7 Using the Setup Menu The Setup Menu allows you change...
...-Adjusts the brightness of Asia. (Language)-Sets the language. See Set the date and time on page 26. ● Digital Camera (Default)-Recognizes the camera as a digital camera using PTP (Picture Transfer Protocol). ● Disk Drive-Recognizes the camera as button presses and shutter clicks) off and on page 7. USB Configuration-Specifies how a computer recognizes the camera. See Connecting to highlight . 2. HP Photosmart M425/M525 Digital Camera 31 See Choose the language on . Date & Time-Sets the date and time. 7 Using the Setup Menu The Setup Menu allows you change...

User Guide
Page 32
... camera returns all settings to reach full capacity. ● If you press buttons, reset the camera. 1. Problems and solutions Use this section to the camera (directly or through an optional dock) and is the proper type (see Install and format an optional memory card on page 7). if the camera turns on, format the memory card (see Storage on , format the memory card using a memory card reader, or replace the memory card. Remove the memory card and batteries, and disconnect the camera from AC power...
... camera returns all settings to reach full capacity. ● If you press buttons, reset the camera. 1. Problems and solutions Use this section to the camera (directly or through an optional dock) and is the proper type (see Install and format an optional memory card on page 7). if the camera turns on, format the memory card (see Storage on , format the memory card using a memory card reader, or replace the memory card. Remove the memory card and batteries, and disconnect the camera from AC power...
User Guide
Page 33
..., replace the memory card. ● Format the internal memory and/or the memory card (see Using Focus Lock on page 13). ● Use a tripod to hold the camera steady, or improve lighting conditions. ● Set the flash to Auto Flash or Flash On and set the shooting mode to AC power, then disconnect, then reconnect. ● Insert batteries into a different electrical outlet. HP Photosmart M425/M525 Digital Camera 33 Press any camera button to finish processing the last image before taking another picture. The camera...
..., replace the memory card. ● Format the internal memory and/or the memory card (see Using Focus Lock on page 13). ● Use a tripod to hold the camera steady, or improve lighting conditions. ● Set the flash to Auto Flash or Flash On and set the shooting mode to AC power, then disconnect, then reconnect. ● Insert batteries into a different electrical outlet. HP Photosmart M425/M525 Digital Camera 33 Press any camera button to finish processing the last image before taking another picture. The camera...

User Guide
Page 35
...). Then, restart the image transfer process (see Transferring images with HP Photosmart Software on page 30). Use the Buy Prints Online feature on the Photosmart Express Menu (see Buying prints online on page 25). How can I get an error message when transferring images to the HP Customer Care website: www.hp.com/support. HP Photosmart M425/M525 Digital Camera 35 My camera stalls when establishing a connection to the computer. ● Ensure that does not fix the problem, reset the camera (see Resetting the camera on...
...). Then, restart the image transfer process (see Transferring images with HP Photosmart Software on page 30). Use the Buy Prints Online feature on the Photosmart Express Menu (see Buying prints online on page 25). How can I get an error message when transferring images to the HP Customer Care website: www.hp.com/support. HP Photosmart M425/M525 Digital Camera 35 My camera stalls when establishing a connection to the computer. ● Ensure that does not fix the problem, reset the camera (see Resetting the camera on...
User Guide
Page 39
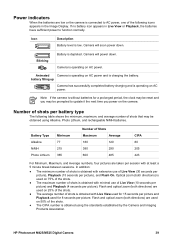
... no battery icon appears in the Image Display. Camera will soon power down . battery filling up Camera has successfully completed battery charging and is obtained with extensive use of Live View (10 seconds per picture) and Playback (4 seconds per picture). In addition: ● The minimum number of shots is operating on 25% of the shots. ● The average number of shots is low. HP Photosmart M425/M525 Digital Camera 39 Icon Description Battery level is obtained with Live View used...
... no battery icon appears in the Image Display. Camera will soon power down . battery filling up Camera has successfully completed battery charging and is obtained with extensive use of Live View (10 seconds per picture) and Playback (4 seconds per picture). In addition: ● The minimum number of shots is operating on 25% of the shots. ● The average number of shots is low. HP Photosmart M425/M525 Digital Camera 39 Icon Description Battery level is obtained with Live View used...
User Guide
Page 45
...digital zoom 14 dimensions 43 direct print 26 Display Brightness 31 dock insert 6 E e-mail images 28 exposure 13 Exposure Compensation 18 F F-number 42 Fast Shot mode 15 flash red-eye reduction 15 working range 42 Flash button 5 focal length 42 focus auto focus 12 brackets 12 focus lock 13 optimizing 13 settings 42 format memory card 8 G getting assistance 36 H HP AC power adapter 6 HP Photosmart Express 28 HP Photosmart Software 8, 9 I Image Display 6 Image Quality 17, 44 images Date & Time Imprint 18 Image Quality 17 magnifying 21 number remaining 11 per battery 39 sending 29 shooting modes...
...digital zoom 14 dimensions 43 direct print 26 Display Brightness 31 dock insert 6 E e-mail images 28 exposure 13 Exposure Compensation 18 F F-number 42 Fast Shot mode 15 flash red-eye reduction 15 working range 42 Flash button 5 focal length 42 focus auto focus 12 brackets 12 focus lock 13 optimizing 13 settings 42 format memory card 8 G getting assistance 36 H HP AC power adapter 6 HP Photosmart Express 28 HP Photosmart Software 8, 9 I Image Display 6 Image Quality 17, 44 images Date & Time Imprint 18 Image Quality 17 magnifying 21 number remaining 11 per battery 39 sending 29 shooting modes...

User Guide
Page 46
... reviewing images 20 transfer images 25 troubleshooting 32 turn on/off power 7 TV Configuration 31 U USB configuration 26, 31 USB connector 6 V Video button 5 video clips 12 viewing thumbnails 21 W weight 43 White Balance 18, 19 Z zoom 14, 42 Zoom lever 5 S safety precautions for batteries 38, 41 selecting images for destinations 29 Self-Timer light 6 Self-Timer mode 15, 16 sending individual images 29 set date and time 8 setting up destinations 28 Setup Menu 31 share pictures 28 shooting mode 15 Shutter button 5, 12 shutter speed 42 software install 8 solving problems 32 sounds of camera...
... reviewing images 20 transfer images 25 troubleshooting 32 turn on/off power 7 TV Configuration 31 U USB configuration 26, 31 USB connector 6 V Video button 5 video clips 12 viewing thumbnails 21 W weight 43 White Balance 18, 19 Z zoom 14, 42 Zoom lever 5 S safety precautions for batteries 38, 41 selecting images for destinations 29 Self-Timer light 6 Self-Timer mode 15, 16 sending individual images 29 set date and time 8 setting up destinations 28 Setup Menu 31 share pictures 28 shooting mode 15 Shutter button 5, 12 shutter speed 42 software install 8 solving problems 32 sounds of camera...
Quick Start Guide
Page 18
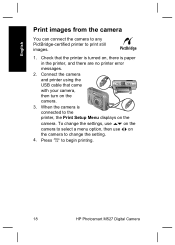
... print still images. 1. To change the setting. 4. Connect the camera and printer using the USB cable that the printer is turned on the camera to change the settings, use on the camera to select a menu option, then use on , there is connected to the printer, the Print Setup Menu displays on the camera. 3. English Print images from the camera You can connect the camera to any PictBridge-certified printer to begin printing. 18 HP Photosmart M527 Digital Camera When the camera is paper in the printer, and there are no printer error messages...
... print still images. 1. To change the setting. 4. Connect the camera and printer using the USB cable that the printer is turned on the camera to change the settings, use on the camera to select a menu option, then use on , there is connected to the printer, the Print Setup Menu displays on the camera. 3. English Print images from the camera You can connect the camera to any PictBridge-certified printer to begin printing. 18 HP Photosmart M527 Digital Camera When the camera is paper in the printer, and there are no printer error messages...


