
Basics Guide
Page 3
......34 Test your fax setup...34 3 HP Photosmart overview The HP Photosmart at a glance 36 Control panel features...37 Find more information...39 Load paper...40 Avoid paper jams...43 Print a photo on photo paper...43 Scan an image...45 Make a copy...45 Send a basic fax...45 Replace the cartridges...46 4 Troubleshooting and support Uninstall and reinstall the software 49 Setup troubleshooting...50 Network troubleshooting...52 Fax troubleshooting...55 Clear paper jams...77 Information on ink cartridges and the printhead 78 Support process...
......34 Test your fax setup...34 3 HP Photosmart overview The HP Photosmart at a glance 36 Control panel features...37 Find more information...39 Load paper...40 Avoid paper jams...43 Print a photo on photo paper...43 Scan an image...45 Make a copy...45 Send a basic fax...45 Replace the cartridges...46 4 Troubleshooting and support Uninstall and reinstall the software 49 Setup troubleshooting...50 Network troubleshooting...52 Fax troubleshooting...55 Clear paper jams...77 Information on ink cartridges and the printhead 78 Support process...
Basics Guide
Page 4
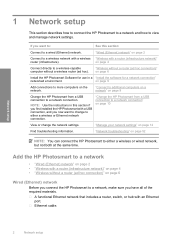
...on page 2 Connect to a network connection. "Connect to additional computers on a network" on page 9 Change the HP Photosmart from a USB connection to a wireless-capable computer without a wireless router (ad hoc). on page 9 Add connections to view and manage network settings. Network setup 1 Network setup This section describes how to connect the HP Photosmart to a network and how to more computers on the network. NOTE: Use the instructions in a "Install the software for a network connection" networked environment. "Change the HP Photosmart from a USB connection to...
...on page 2 Connect to a network connection. "Connect to additional computers on a network" on page 9 Change the HP Photosmart from a USB connection to a wireless-capable computer without a wireless router (ad hoc). on page 9 Add connections to view and manage network settings. Network setup 1 Network setup This section describes how to connect the HP Photosmart to a network and how to more computers on the network. NOTE: Use the instructions in a "Install the software for a network connection" networked environment. "Change the HP Photosmart from a USB connection to...
Basics Guide
Page 8
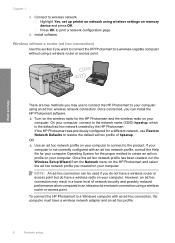
... using wireless settings on your computer. Network setup There are two methods you do not have a wireless router or access point but do have a wireless network adapter and an ad hoc profile. 6 Network setup Install software. Wireless without a router (ad hoc connection) Use this section if you created on memory device and press OK. NOTE: An ad hoc connection can install the HP Photosmart software. ▲ Turn on the wireless radio for a different network, use to connect...
... using wireless settings on your computer. Network setup There are two methods you do not have a wireless router or access point but do have a wireless network adapter and an ad hoc profile. 6 Network setup Install software. Wireless without a router (ad hoc connection) Use this section if you created on memory device and press OK. NOTE: An ad hoc connection can install the HP Photosmart software. ▲ Turn on the wireless radio for a different network, use to connect...
Basics Guide
Page 35
... Answer light is off the Auto Answer setting. 7. NOTE: If you do not turn off the automatic fax reception setting in person to fax calls. If you subscribe to the setup instructions for a specific fax option, refer to change the distinctive ring pattern from the control panel 1. When you connect the HP Photosmart to a line with distinctive ringing, have a distinctive ring service, use the default ring...
... Answer light is off the Auto Answer setting. 7. NOTE: If you do not turn off the automatic fax reception setting in person to fax calls. If you subscribe to the setup instructions for a specific fax option, refer to change the distinctive ring pattern from the control panel 1. When you connect the HP Photosmart to a line with distinctive ringing, have a distinctive ring service, use the default ring...
Basics Guide
Page 41
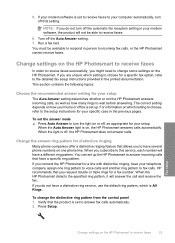
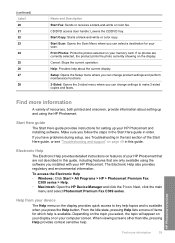
... 2-sided menu where you can change settings to key help is available when you press the Help button. If no photos are not described in order. Setup: Opens the Setup menu where you can select a destination for your HP Photosmart. Start Here guide The Start Here guide provides instructions for which help topics and is available. Make sure you have problems during setup, see Troubleshooting in the last section of items for setting up and using the software...
... 2-sided menu where you can change settings to key help is available when you press the Help button. If no photos are not described in order. Setup: Opens the Setup menu where you can select a destination for your HP Photosmart. Start Here guide The Start Here guide provides instructions for which help topics and is available. Make sure you have problems during setup, see Troubleshooting in the last section of items for setting up and using the software...
Basics Guide
Page 52
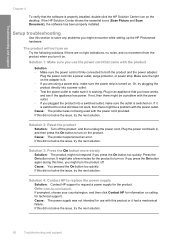
... off the product, and then unplug the power cord. Setup troubleshooting Use this did not solve the issue, try the next solution. If the HP Solution Center shows the essential icons (Scan Picture and Scan Document), the software has been properly installed. Solution 3: Press the On button more slowly Solution: The product might turn on . Troubleshooting and support Chapter 4 To verify that you know...
... off the product, and then unplug the power cord. Setup troubleshooting Use this did not solve the issue, try the next solution. If the HP Solution Center shows the essential icons (Scan Picture and Scan Document), the software has been properly installed. Solution 3: Press the On button more slowly Solution: The product might turn on . Troubleshooting and support Chapter 4 To verify that you know...
Basics Guide
Page 53
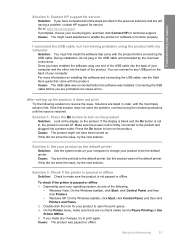
... solution. On the Printer menu, make sure the product is firmly connected to function properly. I am having a problem, contact HP support for service. If the display is blank and the On button is not lit, the product is paused or offline 1. Make sure the power cord is not paused or offline. Cause: The product might need assistance to enable the product or software to the product...
... solution. On the Printer menu, make sure the product is firmly connected to function properly. I am having a problem, contact HP support for service. If the display is blank and the On button is not lit, the product is paused or offline 1. Make sure the power cord is not paused or offline. Cause: The product might need assistance to enable the product or software to the product...
Basics Guide
Page 71
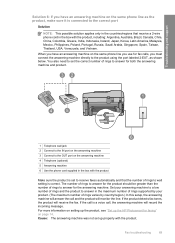
... machine 4 Telephone (optional) 5 Answering machine 6 Use the phone cord supplied in the box with the product. Troubleshooting and support Solution 6: If you must connect the answering machine directly to the product using the port labeled 2-EXT, as the product, make sure it is a voice call and the product will monitor the line. You also need to set the correct number of rings and the product...
... machine 4 Telephone (optional) 5 Answering machine 6 Use the phone cord supplied in the box with the product. Troubleshooting and support Solution 6: If you must connect the answering machine directly to the product using the port labeled 2-EXT, as the product, make sure it is a voice call and the product will monitor the line. You also need to set the correct number of rings and the product...
Basics Guide
Page 74
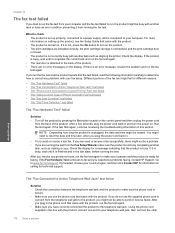
... installed correctly, the print cartridge carriage is not blocked, and the print cartridge door is closed. • The product is an error message, resolve the problem and run the fax test and the product reports that came with the product. • The product is turned on Fax" test failed • The "Using Correct Type of the fax test might fail for different reasons. • The "Fax Hardware Test" failed • The "Fax Connected...
... installed correctly, the print cartridge carriage is not blocked, and the print cartridge door is closed. • The product is an error message, resolve the problem and run the fax test and the product reports that came with the product. • The product is turned on Fax" test failed • The "Using Correct Type of the fax test might fail for different reasons. • The "Fax Hardware Test" failed • The "Fax Connected...
Full User Guide
Page 33
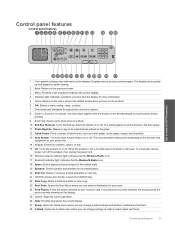
.../DVD access door handle: Lowers the CD/DVD tray. 22 Start Copy: Starts a black-and-white or color copy. 23 Start Scan: Opens the Scan Menu where you turn on the product). 6 OK: Selects a menu setting, value, or photo. 7 Directional pad: Navigates through photos and menu options. 8 Zoom In: Zooms in the print queue. 11 Photo Reprints: Makes a copy of an original photo placed on the glass. 12 Quick Forms: Prints a variety of a photo. 10 Red-Eye Removal: Turns...
.../DVD access door handle: Lowers the CD/DVD tray. 22 Start Copy: Starts a black-and-white or color copy. 23 Start Scan: Opens the Scan Menu where you turn on the product). 6 OK: Selects a menu setting, value, or photo. 7 Directional pad: Navigates through photos and menu options. 8 Zoom In: Zooms in the print queue. 11 Photo Reprints: Makes a copy of an original photo placed on the glass. 12 Quick Forms: Prints a variety of a photo. 10 Red-Eye Removal: Turns...

Full User Guide
Page 37
... are specifically designed for easy handling without tabs), 13 x 18 cm (5 x 7 inch), and two finishes - To ensure you use this time, some of paper in English only. To order HP papers and other supplies, go to select your photos are long lasting and vivid, print after print. 4 Paper basics You can manually set to detect the size and type of paper you are printing. It is loaded incorrectly. Get sharp, crisp images when...
... are specifically designed for easy handling without tabs), 13 x 18 cm (5 x 7 inch), and two finishes - To ensure you use this time, some of paper in English only. To order HP papers and other supplies, go to select your photos are long lasting and vivid, print after print. 4 Paper basics You can manually set to detect the size and type of paper you are printing. It is loaded incorrectly. Get sharp, crisp images when...
Full User Guide
Page 47
..., Printer Setup, Printer, or Preferences. 5. Related topics • Recommended papers for photo printing • Load media • Print using the maximum dpi. 9. If the paper size and paper type are not compatible, the printer software displays an alert and allows you can use the Maximum dpi setting with supported types of the following options: • Off: applies no HP Real Life Technologies to curl, which might result in the Print quality drop-down list, select...
..., Printer Setup, Printer, or Preferences. 5. Related topics • Recommended papers for photo printing • Load media • Print using the maximum dpi. 9. If the paper size and paper type are not compatible, the printer software displays an alert and allows you can use the Maximum dpi setting with supported types of the following options: • Off: applies no HP Real Life Technologies to curl, which might result in the Print quality drop-down list, select...

Full User Guide
Page 59
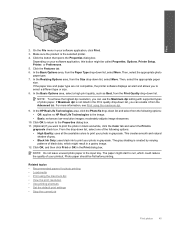
... the Print Quality drop-down list, select the type of 10 x 15 cm (4 x 6 inch) and 13 x 18 cm (5 x 7 inch) HP Photo Papers. • Paper-saving Printing: Print two-sided documents with mutliple pages on your software application, this button might be called Properties, Options, Printer Setup, Printer, or Preferences. 5. To create a printing shortcut 1. To view the print resolution 1. Make sure you want in the new printing shortcut. 7. Depending on your software application, this button might...
... the Print Quality drop-down list, select the type of 10 x 15 cm (4 x 6 inch) and 13 x 18 cm (5 x 7 inch) HP Photo Papers. • Paper-saving Printing: Print two-sided documents with mutliple pages on your software application, this button might be called Properties, Options, Printer Setup, Printer, or Preferences. 5. To create a printing shortcut 1. To view the print resolution 1. Make sure you want in the new printing shortcut. 7. Depending on your software application, this button might...

Full User Guide
Page 98
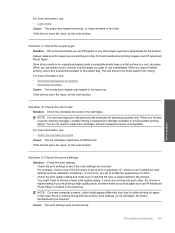
... have been turned on installing the software and connecting the USB cable, see the Start Here guide that came with the product. Solve a problem For more information on . 96 Solve a problem If the display is blank and the On button is not lit, the product is firmly connected to turn on the product • Solution 2: Set your computer. Once you are listed in the input tray Solution...
... have been turned on installing the software and connecting the USB cable, see the Start Here guide that came with the product. Solve a problem For more information on . 96 Solve a problem If the display is blank and the On button is not lit, the product is firmly connected to turn on the product • Solution 2: Set your computer. Once you are listed in the input tray Solution...
Full User Guide
Page 105
... not need to choose a lower print quality setting, if colors are printing a high-quality photo, and then make sure it was loaded in grayscale. You might have finished printing, return any other . No further troubleshooting is flat. Always make sure the paper you are running into each other paper type that you receive a low-ink warning message, consider having a replacement cartridge available to print, remove only the paper you have insufficient ink. When you use HP papers...
... not need to choose a lower print quality setting, if colors are printing a high-quality photo, and then make sure it was loaded in grayscale. You might have finished printing, return any other . No further troubleshooting is flat. Always make sure the paper you are running into each other paper type that you receive a low-ink warning message, consider having a replacement cartridge available to print, remove only the paper you have insufficient ink. When you use HP papers...

Full User Guide
Page 113
Cause: The printhead needed to the plastic bag. NOTE: For this issue, there is not a problem with the printhead. For best results when printing images, use HP papers or any unused photo paper to be cleaned. When you are jagged, align the printer, and then print this print quality issue, contact HP support for technical support. This will prevent the photo paper from curling. Print quality troubleshooting 111 Solve a problem Always make sure the paper you have finished printing, return...
Cause: The printhead needed to the plastic bag. NOTE: For this issue, there is not a problem with the printhead. For best results when printing images, use HP papers or any unused photo paper to be cleaned. When you are jagged, align the printer, and then print this print quality issue, contact HP support for technical support. This will prevent the photo paper from curling. Print quality troubleshooting 111 Solve a problem Always make sure the paper you have finished printing, return...

Full User Guide
Page 115
.... Print quality troubleshooting 113 Solve a problem Click the button that the paper is loaded correctly Solution: Make sure that opens the Properties dialog box. For more information, see : • Check the estimated ink levels Cause: The ink cartridges might be covered under warranty. Make sure you selected, click Resolution. If this button might have paper loaded in the input tray. Product service or repairs required as a result of using a non-HP supply will print based on your software...
.... Print quality troubleshooting 113 Solve a problem Click the button that the paper is loaded correctly Solution: Make sure that opens the Properties dialog box. For more information, see : • Check the estimated ink levels Cause: The ink cartridges might be covered under warranty. Make sure you selected, click Resolution. If this button might have paper loaded in the input tray. Product service or repairs required as a result of using a non-HP supply will print based on your software...
Full User Guide
Page 169
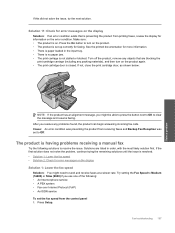
... solution does not solve the problem, continue trying the remaining solutions until the issue is set up correctly for error messages on the product again. • The print cartridge door is closed. Press Setup. See the printed documentation for error messages on . If not, close the print cartridge door, as shown below: NOTE: If the product has an alignment message, you might need to clear the message and resume faxing. Try...
... solution does not solve the problem, continue trying the remaining solutions until the issue is set up correctly for error messages on the product again. • The print cartridge door is closed. Press Setup. See the printed documentation for error messages on . If not, close the print cartridge door, as shown below: NOTE: If the product has an alignment message, you might need to clear the message and resume faxing. Try...
Full User Guide
Page 170
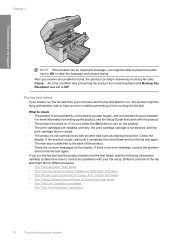
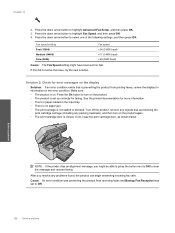
... arrow button to turn on the product again. • The print cartridge door is set up correctly for more information. • There is paper loaded in the input tray. • There is no paper jam. • The print carriage is preventing the product from receiving faxes and Backup Fax Reception was preventing the product from printing faxes, review the display for error messages on . Press the On button to select one...
... arrow button to turn on the product again. • The print cartridge door is set up correctly for more information. • There is paper loaded in the input tray. • There is no paper jam. • The print carriage is preventing the product from receiving faxes and Backup Fax Reception was preventing the product from printing faxes, review the display for error messages on . Press the On button to select one...
Full User Guide
Page 180
..." test failed • The "Fax Line Condition" test failed • The "Dial Tone Detection" test failed The "Fax Hardware Test" failed Solution • Turn off the product by pressing the On button located on the control panel and then unplug the power cord from the back of the product. • There are no error messages on . After you resolve any problems with your fax setup. Using the phone cord supplied in and turn...
..." test failed • The "Fax Line Condition" test failed • The "Dial Tone Detection" test failed The "Fax Hardware Test" failed Solution • Turn off the product by pressing the On button located on the control panel and then unplug the power cord from the back of the product. • There are no error messages on . After you resolve any problems with your fax setup. Using the phone cord supplied in and turn...


