Start Here
Page 9
... use the Factory Reset option of HP Recovery Manager to its original factory state by using the HP Recovery media that you either download the software from the manufacturer's website or reinstall the software from support. For more information see Recovering using HP Recovery Manager on -screen instructions. ● If you want to remove the recovery partition to correct a problem with a preinstalled application or driver, use the HP Recovery media. What you need to reclaim hard drive space, HP Recovery Manager offers the Remove Recovery Partition option. If you have replaced...
... use the Factory Reset option of HP Recovery Manager to its original factory state by using the HP Recovery media that you either download the software from the manufacturer's website or reinstall the software from support. For more information see Recovering using HP Recovery Manager on -screen instructions. ● If you want to remove the recovery partition to correct a problem with a preinstalled application or driver, use the HP Recovery media. What you need to reclaim hard drive space, HP Recovery Manager offers the Remove Recovery Partition option. If you have replaced...
Start Here
Page 11
... keyboard, connect the keyboard to the keyboard dock before you remove the Recovery partition, create HP Recovery media; or Turn on or restart the tablet, and then quickly hold down button; Changing the computer boot order If your computer does not restart in HP Recovery Manager, you to remove the HP Recovery partition to free up hard drive space. then select f9. 3. IMPORTANT: After you remove the HP Recovery partition, you want to remove the HP Recovery partition: 1. Select the optical drive or USB flash drive from the HP Recovery partition. Type recovery in BIOS...
... keyboard, connect the keyboard to the keyboard dock before you remove the Recovery partition, create HP Recovery media; or Turn on or restart the tablet, and then quickly hold down button; Changing the computer boot order If your computer does not restart in HP Recovery Manager, you to remove the HP Recovery partition to free up hard drive space. then select f9. 3. IMPORTANT: After you remove the HP Recovery partition, you want to remove the HP Recovery partition: 1. Select the optical drive or USB flash drive from the HP Recovery partition. Type recovery in BIOS...

Maintenance and Service Guide
Page 6
......67 Downloading HP PC Hardware Diagnostics (UEFI) to a USB device 67 8 Specifications ...69 Dimensions ...69 Operating environment ...69 Input power ...70 9 Backing up, restoring, and recovering ...71 Creating recovery media and backups ...71 Creating HP Recovery media (select products only 71 Using Windows tools ...72 Restore and recovery ...73 Recovering using HP Recovery Manager 73 What you need to know before you get started 73 Using the HP Recovery partition (select products only 74 Using HP Recovery media to recover 74 Changing the computer boot order 75 Removing the HP Recovery...
......67 Downloading HP PC Hardware Diagnostics (UEFI) to a USB device 67 8 Specifications ...69 Dimensions ...69 Operating environment ...69 Input power ...70 9 Backing up, restoring, and recovering ...71 Creating recovery media and backups ...71 Creating HP Recovery media (select products only 71 Using Windows tools ...72 Restore and recovery ...73 Recovering using HP Recovery Manager 73 What you need to know before you get started 73 Using the HP Recovery partition (select products only 74 Using HP Recovery media to recover 74 Changing the computer boot order 75 Removing the HP Recovery...

Maintenance and Service Guide
Page 74
... power cord from your BIOS version, make a note of the date, name, or other identifier. The BIOS installation begins. 5. Do not download or install a BIOS update while the computer is connected to an optional power source. Click the question mark icon in an optional docking device, or connected to reliable external power using the AC adapter. Follow any device, cable, or cord. At the download area, follow these instructions: ● Do not disconnect power...
... power cord from your BIOS version, make a note of the date, name, or other identifier. The BIOS installation begins. 5. Do not download or install a BIOS update while the computer is connected to an optional power source. Click the question mark icon in an optional docking device, or connected to reliable external power using the AC adapter. Follow any device, cable, or cord. At the download area, follow these instructions: ● Do not disconnect power...

Maintenance and Service Guide
Page 81
... software from backup, refreshing the computer, and resetting the computer to its original factory state by using the HP Recovery partition (select products only). If you have not already created recovery media, see the Get started app. ▲ Select the Start button, and then select the Get started ● HP Recovery Manager recovers only software that you obtained from support. See the Worldwide Telephone Numbers booklet included with a preinstalled application or driver, use the HP Recovery media...
... software from backup, refreshing the computer, and resetting the computer to its original factory state by using the HP Recovery partition (select products only). If you have not already created recovery media, see the Get started app. ▲ Select the Start button, and then select the Get started ● HP Recovery Manager recovers only software that you obtained from support. See the Worldwide Telephone Numbers booklet included with a preinstalled application or driver, use the HP Recovery media...

Maintenance and Service Guide
Page 89
... audio 3 chipset 1 display panel 2 external media cards 4 graphics 1, 2 hard drive 2, 3 keyboard 4 memory module 2 microphone 3 operating system 4, 5 optical drive 3 pointing device 4 ports 4 power requirements 4 processors 1 product name 1 security 4 sensors 3 serviceability 5 video 3 wireless 3, 4 product name 1 R recover options 73 recovery discs 72, 74 HP Recovery Manager 73 media 74 starting 74 supported discs 72 system 73 USB flash drive 74 using HP Recovery media 72 recovery media creating 71 creating using HP Recovery Manager 72 recovery partition removing 76 removal/replacement...
... audio 3 chipset 1 display panel 2 external media cards 4 graphics 1, 2 hard drive 2, 3 keyboard 4 memory module 2 microphone 3 operating system 4, 5 optical drive 3 pointing device 4 ports 4 power requirements 4 processors 1 product name 1 security 4 sensors 3 serviceability 5 video 3 wireless 3, 4 product name 1 R recover options 73 recovery discs 72, 74 HP Recovery Manager 73 media 74 starting 74 supported discs 72 system 73 USB flash drive 74 using HP Recovery media 72 recovery media creating 71 creating using HP Recovery Manager 72 recovery partition removing 76 removal/replacement...
Maintenance and Service Guide
Page 90
...10 removal 55 spare part number 23, 55 specifications 69 supported discs, recovery 72 system board removal 46 spare part numbers 20, 46 system recovery 73 system restore point creating 72 system restore point, creating 71 USB 3.0 charging port 14 USB-to-Gigabit RJ45 adapter, spare part number 26 V vents 15 video, product description 3 volume buttons 13 W webcam 7 webcam light 7 webcam/microphone module removal 58 spare part number 24, 59 webcam/microphone module cable removal 62 spare part numbers 24, 63 Windows system restore point 71, 72 Windows key 8 Windows tools using 72 wireless antenna...
...10 removal 55 spare part number 23, 55 specifications 69 supported discs, recovery 72 system board removal 46 spare part numbers 20, 46 system recovery 73 system restore point creating 72 system restore point, creating 71 USB 3.0 charging port 14 USB-to-Gigabit RJ45 adapter, spare part number 26 V vents 15 video, product description 3 volume buttons 13 W webcam 7 webcam light 7 webcam/microphone module removal 58 spare part number 24, 59 webcam/microphone module cable removal 62 spare part numbers 24, 63 Windows system restore point 71, 72 Windows key 8 Windows tools using 72 wireless antenna...
User Guide
Page 7
... 1 Getting started ...1 Best practices ...1 More HP resources ...2 2 Getting to know your computer ...3 Locating hardware ...3 Locating software ...3 Right side ...4 Left side ...5 Display ...7 Low blue light mode (select products only 7 Keyboard area ...9 TouchPad ...9 Lights ...10 Speakers and fingerprint reader ...11 Special keys ...12 Action keys ...13 Bottom ...14 Labels ...14 3 Connecting to a network ...16 Connecting to a wireless network ...16 Using the wireless controls ...16 Airplane mode key ...16 Operating system controls 16 Connecting to a WLAN ...17 Using HP Mobile Broadband...
... 1 Getting started ...1 Best practices ...1 More HP resources ...2 2 Getting to know your computer ...3 Locating hardware ...3 Locating software ...3 Right side ...4 Left side ...5 Display ...7 Low blue light mode (select products only 7 Keyboard area ...9 TouchPad ...9 Lights ...10 Speakers and fingerprint reader ...11 Special keys ...12 Action keys ...13 Bottom ...14 Labels ...14 3 Connecting to a network ...16 Connecting to a wireless network ...16 Using the wireless controls ...16 Airplane mode key ...16 Operating system controls 16 Connecting to a WLAN ...17 Using HP Mobile Broadband...
User Guide
Page 9
... the display ...37 Cleaning the sides or cover 37 Cleaning the TouchPad, keyboard, or mouse (select products only 37 Traveling with or shipping your computer ...37 8 Securing your computer and information ...39 Using passwords ...39 Setting Windows passwords ...39 Setting Setup Utility (BIOS) passwords 40 Using Windows Hello (select products only) ...41 Using Internet security software ...41 Using antivirus software ...41 Using firewall software ...41 Installing software updates ...42 Using HP Device as a Service (select products only 42 Securing your wireless network ...42...
... the display ...37 Cleaning the sides or cover 37 Cleaning the TouchPad, keyboard, or mouse (select products only 37 Traveling with or shipping your computer ...37 8 Securing your computer and information ...39 Using passwords ...39 Setting Windows passwords ...39 Setting Setup Utility (BIOS) passwords 40 Using Windows Hello (select products only) ...41 Using Internet security software ...41 Using antivirus software ...41 Using firewall software ...41 Installing software updates ...42 Using HP Device as a Service (select products only 42 Securing your wireless network ...42...
User Guide
Page 28
... you get connected to other . But even at the factory. Using the wireless controls You can control the wireless devices in your wireless devices, not the status of these features: ● Airplane mode key (also called wireless button or wireless key) (referred to as Wi-Fi networks, wireless LANs, or WLANs) in your computer are enabled at home, you can travel with a wireless router or a wireless access point. ● HP Mobile Broadband Module-Gives you...
... you get connected to other . But even at the factory. Using the wireless controls You can control the wireless devices in your wireless devices, not the status of these features: ● Airplane mode key (also called wireless button or wireless key) (referred to as Wi-Fi networks, wireless LANs, or WLANs) in your computer are enabled at home, you can travel with a wireless router or a wireless access point. ● HP Mobile Broadband Module-Gives you...

User Guide
Page 33
... the HDMI cable to http://www.hp.com/support, and follow the device manufacturer's instructions. IMPORTANT: Be sure that can connect wired headsets to the audioout (headphone)/audio-in the taskbar search box, select Control Panel, select Hardware and Sound, and then select Sound. To see the Regulatory, Safety and Environmental Notices. Connect one of the video ports on the computer to adjust system volume, change sound settings: ▲ Type control panel in (microphone) combo jack...
... the HDMI cable to http://www.hp.com/support, and follow the device manufacturer's instructions. IMPORTANT: Be sure that can connect wired headsets to the audioout (headphone)/audio-in the taskbar search box, select Control Panel, select Hardware and Sound, and then select Sound. To see the Regulatory, Safety and Environmental Notices. Connect one of the video ports on the computer to adjust system volume, change sound settings: ▲ Type control panel in (microphone) combo jack...
User Guide
Page 44
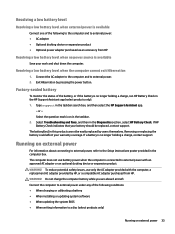
... an external hard drive connected to a USB port. ● Stop, disable, or remove any unsaved information. ● If Hibernation is enabled and the computer is on or in the Sleep state, the computer remains briefly in the Sleep state, the computer initiates Hibernation. 32 Chapter 6 Managing power or - Displaying battery charge To view the percentage of the display. ● Turn off wireless devices when you leave your battery should be replaced, contact support.
... an external hard drive connected to a USB port. ● Stop, disable, or remove any unsaved information. ● If Hibernation is enabled and the computer is on or in the Sleep state, the computer remains briefly in the Sleep state, the computer initiates Hibernation. 32 Chapter 6 Managing power or - Displaying battery charge To view the percentage of the display. ● Turn off wireless devices when you leave your battery should be replaced, contact support.
User Guide
Page 45
...: ● When charging or calibrating a battery ● When installing or updating system software ● When updating the system BIOS ● When writing information to a disc (select products only) Running on external power For information about connecting to external power, refer to external power. 2. Connect the AC adapter to the computer and to the Setup Instructions poster provided in the HP Support Assistant app (select products only). 1. Factory-sealed battery To monitor the status of...
...: ● When charging or calibrating a battery ● When installing or updating system software ● When updating the system BIOS ● When writing information to a disc (select products only) Running on external power For information about connecting to external power, refer to external power. 2. Connect the AC adapter to the computer and to the Setup Instructions poster provided in the HP Support Assistant app (select products only). 1. Factory-sealed battery To monitor the status of...
User Guide
Page 52
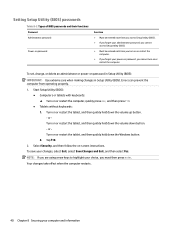
... the volume down button. - To set, change, or delete an administrator or power-on -screen instructions. NOTE: If you must then press enter. Errors can prevent the computer from operating properly. 1. or Turn on or restart the tablet, and then quickly hold down the Windows button. 2. Start Setup Utility (BIOS): ● Computers or tablets with keyboards: ▲ Turn on or restart the tablet, and then quickly hold down the volume up button. - or Turn...
... the volume down button. - To set, change, or delete an administrator or power-on -screen instructions. NOTE: If you must then press enter. Errors can prevent the computer from operating properly. 1. or Turn on or restart the tablet, and then quickly hold down the Windows button. 2. Start Setup Utility (BIOS): ● Computers or tablets with keyboards: ▲ Turn on or restart the tablet, and then quickly hold down the volume up button. - or Turn...
User Guide
Page 54
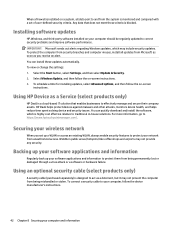
... meet those criteria is monitored and compared with a set up your wireless network When you receive an alert. Select the Start button, select Settings, and then select Update & Security. 2. To schedule a time for installing updates, select Advanced options, and then follow the on your network from unauthorized access. WLANs in -house solutions. Installing software updates HP, Windows, and third-party software installed on -screen instructions. You can quickly download and install the software, which may not...
... meet those criteria is monitored and compared with a set up your wireless network When you receive an alert. Select the Start button, select Settings, and then select Update & Security. 2. To schedule a time for installing updates, select Advanced options, and then follow the on your network from unauthorized access. WLANs in -house solutions. Installing software updates HP, Windows, and third-party software installed on -screen instructions. You can quickly download and install the software, which may not...
User Guide
Page 56
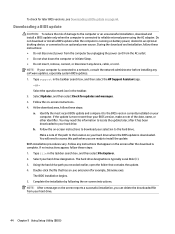
.... 2. Follow any device, cable, or cord. Select your BIOS version, make a note of damage to the computer or an unsuccessful installation, download and install a BIOS update only when the computer is connected to an optional power source. Follow the on-screen instructions to download your hard drive. 44 Chapter 9 Using Setup Utility (BIOS) Type file in the taskbar. 2. If the update is typically Local Disk (C:). 3. The BIOS installation begins. 5. Complete the installation by unplugging the power cord from...
.... 2. Follow any device, cable, or cord. Select your BIOS version, make a note of damage to the computer or an unsuccessful installation, download and install a BIOS update only when the computer is connected to an optional power source. Follow the on-screen instructions to download your hard drive. 44 Chapter 9 Using Setup Utility (BIOS) Type file in the taskbar. 2. If the update is typically Local Disk (C:). 3. The BIOS installation begins. 5. Complete the installation by unplugging the power cord from...
User Guide
Page 58
... selected location. Installing HP PC Hardware Diagnostics Windows To install HP PC Hardware Diagnostics Windows, follow these steps: ▲ Navigate to a USB flash drive by product name or number, follow these steps: 1. The tool runs outside the operating system so that it may be downloaded to the selected location. Select Get software and drivers, select your PC will not boot into Windows, you must use a mobile device to http://www.hp.com/support. 2. HP PC Hardware...
... selected location. Installing HP PC Hardware Diagnostics Windows To install HP PC Hardware Diagnostics Windows, follow these steps: ▲ Navigate to a USB flash drive by product name or number, follow these steps: 1. The tool runs outside the operating system so that it may be downloaded to the selected location. Select Get software and drivers, select your PC will not boot into Windows, you must use a mobile device to http://www.hp.com/support. 2. HP PC Hardware...

User Guide
Page 74
... battery power 31 best practices 1 BIOS determining version 43 downloading an update 44 starting the Setup Utility 43 updating 43 Bluetooth device 16, 18 Bluetooth label 15 boot order, changing 51 bottom components 14 buttons left TouchPad 9 power 5 right TouchPad 9 C camera identifying 7 using 20 camera light, identifying 7 camera privacy switch, identifying 4 caps lock light, identifying 10 caring for your computer 36 cleaning your computer 36 components bottom 14 display 7 keyboard area 9 left side 5 right side 4 connecting to a network 16 connecting to a wireless network 16 connecting...
... battery power 31 best practices 1 BIOS determining version 43 downloading an update 44 starting the Setup Utility 43 updating 43 Bluetooth device 16, 18 Bluetooth label 15 boot order, changing 51 bottom components 14 buttons left TouchPad 9 power 5 right TouchPad 9 C camera identifying 7 using 20 camera light, identifying 7 camera privacy switch, identifying 4 caps lock light, identifying 10 caring for your computer 36 cleaning your computer 36 components bottom 14 display 7 keyboard area 9 left side 5 right side 4 connecting to a network 16 connecting to a wireless network 16 connecting...

User Guide
Page 75
... J jacks audio-out (headphone)/audio-in (microphone) 6 K keyboard and optional mouse using 28 keyboard backlight action key 13 keypad, integrated numeric 12 keys action 12 airplane mode 14 esc 12 fn 12 N next track action key 13 O one-finger slide touch screen gesture 28 operating environment 53 operating system controls 16 P passwords Setup Utility (BIOS) 40 Windows 39 pause action key 13 play action key 13 ports HDMI 4, 21 USB SuperSpeed 5 USB SuperSpeed port with HP Sleep and Charge 4 USB Type-C 23 USB Type-C with HP Sleep and Charge 4 power battery 31 external...
... J jacks audio-out (headphone)/audio-in (microphone) 6 K keyboard and optional mouse using 28 keyboard backlight action key 13 keypad, integrated numeric 12 keys action 12 airplane mode 14 esc 12 fn 12 N next track action key 13 O one-finger slide touch screen gesture 28 operating environment 53 operating system controls 16 P passwords Setup Utility (BIOS) 40 Windows 39 pause action key 13 play action key 13 ports HDMI 4, 21 USB SuperSpeed 5 USB SuperSpeed port with HP Sleep and Charge 4 USB Type-C 23 USB Type-C with HP Sleep and Charge 4 power battery 31 external...
User Guide
Page 76
... 14 service labels, locating 14 Setup Utility (BIOS) passwords 40 shipping the computer 37 shutdown 30 Sleep exiting 29 initiating 29 Sleep and Hibernation, initiating 29 slots memory card reader 6 software Disk Cleanup 35 Disk Defragmenter 35 locating 3 software installed locating 3 software updates, installing 42 sound. See audio sound settings, using 21 speaker volume action keys 13 speakers connecting 20 identifying 11 special keys, using 12 standards and legislation, accessibility 57 switch screen image action key 13 system restore point, creating 50 T tap TouchPad and touch screen...
... 14 service labels, locating 14 Setup Utility (BIOS) passwords 40 shipping the computer 37 shutdown 30 Sleep exiting 29 initiating 29 Sleep and Hibernation, initiating 29 slots memory card reader 6 software Disk Cleanup 35 Disk Defragmenter 35 locating 3 software installed locating 3 software updates, installing 42 sound. See audio sound settings, using 21 speaker volume action keys 13 speakers connecting 20 identifying 11 special keys, using 12 standards and legislation, accessibility 57 switch screen image action key 13 system restore point, creating 50 T tap TouchPad and touch screen...


