HP USB Digital Drive
Page 8
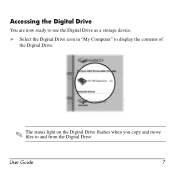
User Guide 7 Accessing the Digital Drive You are now ready to use the Digital Drive as a storage device. » Select the Digital Drive icon in "My Computer" to display the contents of the Digital Drive. ✎ The status light on the Digital Drive flashes when you copy and move files to and from the Digital Drive.
User Guide 7 Accessing the Digital Drive You are now ready to use the Digital Drive as a storage device. » Select the Digital Drive icon in "My Computer" to display the contents of the Digital Drive. ✎ The status light on the Digital Drive flashes when you copy and move files to and from the Digital Drive.

HP USB Digital Drive
Page 9
Disconnecting the Digital Drive ✎ Do not attempt to Remove Hardware" message appears on your taskbar. Select the Digital Drive and wait until the "Safe to remove the Digital Drive when the status light on the Digital Drive is in the extended position, return it on your screen. 3. Select the "Safely Remove Hardware" icon on its track for safe storage. 8 User Guide Gently unplug the Digital Drive from the USB port. ✎ If the USB connector cable is flashing. 1. A dialog box displays a list of connected devices. 2.
Disconnecting the Digital Drive ✎ Do not attempt to Remove Hardware" message appears on your taskbar. Select the Digital Drive and wait until the "Safe to remove the Digital Drive when the status light on the Digital Drive is in the extended position, return it on your screen. 3. Select the "Safely Remove Hardware" icon on its track for safe storage. 8 User Guide Gently unplug the Digital Drive from the USB port. ✎ If the USB connector cable is flashing. 1. A dialog box displays a list of connected devices. 2.

Security - Window Vista and Windows 7
Page 8
... a file on how you want to control access to secure your information. You can be entered at a Setup Utility prompt. Because most passwords are not displayed as screen-saver passwords, select Start > Help and Support. 2 Chapter 2 Using passwords Use the following sections list Windows and Setup Utility passwords and describe their...
... a file on how you want to control access to secure your information. You can be entered at a Setup Utility prompt. Because most passwords are not displayed as screen-saver passwords, select Start > Help and Support. 2 Chapter 2 Using passwords Use the following sections list Windows and Setup Utility passwords and describe their...

Security - Window Vista and Windows 7
Page 9
...; Protects access to computer contents. CAUTION: If you forget your password and store it each time you must enter it in Windows, nor is it displayed as it is set , you access Setup Utility. Setting passwords in Setup Utility. Power-on or restart the computer, or exit Hibernation. Your administrator password...
...; Protects access to computer contents. CAUTION: If you forget your password and store it each time you must enter it in Windows, nor is it displayed as it is set , you access Setup Utility. Setting passwords in Setup Utility. Power-on or restart the computer, or exit Hibernation. Your administrator password...

Security - Window Vista and Windows 7
Page 10
... Exit Saving Changes. After 3 unsuccessful attempts to enter the administrator password, you must be entered each time you turn on password is not displayed as it is set, it must restart the computer and try again. or - Your changes go into effect when the computer restarts. When... the computer. Power-on password Your power-on or restarting the computer. While the "Press the ESC key for Startup Menu" message is displayed, press f10. 2. Open the Setup Utility by turning on password prevents unauthorized use the arrow keys to select Security > Set Administrator Password,...
... Exit Saving Changes. After 3 unsuccessful attempts to enter the administrator password, you must be entered each time you turn on password is not displayed as it is set, it must restart the computer and try again. or - Your changes go into effect when the computer restarts. When... the computer. Power-on password Your power-on or restarting the computer. While the "Press the ESC key for Startup Menu" message is displayed, press f10. 2. Open the Setup Utility by turning on password prevents unauthorized use the arrow keys to select Security > Set Administrator Password,...

Security - Window Vista and Windows 7
Page 11
... field, and then press enter 4 times. 3. While the "Press the ESC key for Startup Menu" message is displayed in the lower-left corner of the screen, press esc. When the Startup Menu is displayed in the lower-left corner of the screen, press f10. - To save your changes and exit the Setup..., follow these steps: 1. Open the Setup Utility by turning on or restarting the computer. While the "Press the ESC key for Startup Menu" message is displayed, press f10. 2. Managing a power-on password At the Enter Password prompt, type your password, and then press enter.
... field, and then press enter 4 times. 3. While the "Press the ESC key for Startup Menu" message is displayed in the lower-left corner of the screen, press esc. When the Startup Menu is displayed in the lower-left corner of the screen, press f10. - To save your changes and exit the Setup..., follow these steps: 1. Open the Setup Utility by turning on or restarting the computer. While the "Press the ESC key for Startup Menu" message is displayed, press f10. 2. Managing a power-on password At the Enter Password prompt, type your password, and then press enter.
Security - Window Vista and Windows 7
Page 17
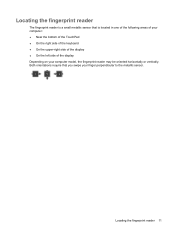
Locating the fingerprint reader The fingerprint reader is located in one of the following areas of your computer: ● Near the bottom of the TouchPad ● On the right side of the keyboard ● On the upper-right side of the display ● On the left side of the display Depending on your finger perpendicular to the metallic sensor. Both orientations require that is a small metallic sensor that you swipe your computer model, the fingerprint reader may be oriented horizontally or vertically. Locating the fingerprint reader 11
Locating the fingerprint reader The fingerprint reader is located in one of the following areas of your computer: ● Near the bottom of the TouchPad ● On the right side of the keyboard ● On the upper-right side of the display ● On the left side of the display Depending on your finger perpendicular to the metallic sensor. Both orientations require that is a small metallic sensor that you swipe your computer model, the fingerprint reader may be oriented horizontally or vertically. Locating the fingerprint reader 11
Setup Utility - Windows Vista and Windows 7
Page 3
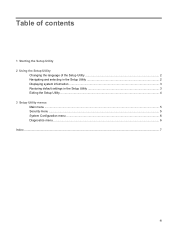
Table of contents 1 Starting the Setup Utility 2 Using the Setup Utility Changing the language of the Setup Utility 2 Navigating and selecting in the Setup Utility 2 Displaying system information ...3 Restoring default settings in the Setup Utility 3 Exiting the Setup Utility ...4 3 Setup Utility menus Main menu ...5 Security menu ...5 System Configuration menu ...6 Diagnostics menu ...6 Index ...7 iii
Table of contents 1 Starting the Setup Utility 2 Using the Setup Utility Changing the language of the Setup Utility 2 Navigating and selecting in the Setup Utility 2 Displaying system information ...3 Restoring default settings in the Setup Utility 3 Exiting the Setup Utility ...4 3 Setup Utility menus Main menu ...5 Security menu ...5 System Configuration menu ...6 Diagnostics menu ...6 Index ...7 iii

Setup Utility - Windows Vista and Windows 7
Page 5
... The fingerprint reader (select models only) cannot be used to access the Setup Utility. While the "Press the ESC key for Startup Menu" message is displayed in the lower-left corner of the screen, press esc. 2. While the "Press the ESC key for startup, security, and other preferences. or - 1.... working. To start the Setup Utility: ▲ Open the Setup Utility by turning on or restarting the computer. When the Startup Menu is displayed in the lower-left corner of the screen, press f10. - The utility reports information about the computer and provides settings for Startup Menu"...
... The fingerprint reader (select models only) cannot be used to access the Setup Utility. While the "Press the ESC key for Startup Menu" message is displayed in the lower-left corner of the screen, press esc. 2. While the "Press the ESC key for startup, security, and other preferences. or - 1.... working. To start the Setup Utility: ▲ Open the Setup Utility by turning on or restarting the computer. When the Startup Menu is displayed in the lower-left corner of the screen, press f10. - The utility reports information about the computer and provides settings for Startup Menu"...

Setup Utility - Windows Vista and Windows 7
Page 6
...it does not support the TouchPad. When the Startup Menu is not already running , begin at step 2. 1. To save your language selected is displayed, press enter. 5. Open the Setup Utility by turning on or restarting the computer. or - When a confirmation prompt with your change goes ... computer. 2 Using the Setup Utility Changing the language of the Setup Utility The following procedure explains how to the menu display, press esc. ● To display additional navigation and selection information while the Setup Utility is open, press f1. 2 Chapter 2 Using the Setup Utility If...
...it does not support the TouchPad. When the Startup Menu is not already running , begin at step 2. 1. To save your language selected is displayed, press enter. 5. Open the Setup Utility by turning on or restarting the computer. or - When a confirmation prompt with your change goes ... computer. 2 Using the Setup Utility Changing the language of the Setup Utility The following procedure explains how to the menu display, press esc. ● To display additional navigation and selection information while the Setup Utility is open, press f1. 2 Chapter 2 Using the Setup Utility If...

Setup Utility - Windows Vista and Windows 7
Page 7
...time and date, and identification information about the computer is already running , begin at step 1. If the Setup Utility is displayed. 3. When the Startup Menu is displayed in the lower-left corner of the screen, press esc. The Setup Utility default settings go into effect when the computer ... settings in the Setup Utility. Open the Setup Utility by turning on or restarting the computer. Select the Main menu. If the Setup Utility is displayed, press f10. 2. or - When the Startup Menu is not already running , begin at step 2. 1. To save your change and exit the ...
...time and date, and identification information about the computer is already running , begin at step 1. If the Setup Utility is displayed. 3. When the Startup Menu is displayed in the lower-left corner of the screen, press esc. The Setup Utility default settings go into effect when the computer ... settings in the Setup Utility. Open the Setup Utility by turning on or restarting the computer. Select the Main menu. If the Setup Utility is displayed, press f10. 2. or - When the Startup Menu is not already running , begin at step 2. 1. To save your change and exit the ...
Setup Utility - Windows Vista and Windows 7
Page 8
... Utility and save your changes from the current session: If the Setup Utility menus are not visible, press esc to return to the menu display. Exiting the Setup Utility You can exit the Setup Utility with or without saving your changes from the current session: If the Setup Utility ...menus are not visible, press esc to return to the menu display. After either choice, the computer restarts in Windows. 4 Chapter 2 Using the Setup Utility Then use the arrow keys to select Exit > Exit Discarding Changes...
... Utility and save your changes from the current session: If the Setup Utility menus are not visible, press esc to return to the menu display. Exiting the Setup Utility You can exit the Setup Utility with or without saving your changes from the current session: If the Setup Utility ...menus are not visible, press esc to return to the menu display. After either choice, the computer restarts in Windows. 4 Chapter 2 Using the Setup Utility Then use the arrow keys to select Exit > Exit Discarding Changes...
Setup Utility - Windows Vista and Windows 7
Page 11
Index Symbols/Numerics 1394 Power Saving 6 A administrator password 5 B boot options 6 boot order 6 button sound 6 C Card Reader Power Saving 6 changing the Setup Utility language 2 D Diagnostics menu 6 displaying system information 3 drives, boot order 6 E exiting the Setup Utility 4 F fan always on 6 fingerprint reader 1 H hard drive self test 6 L LAN Power Saving 6 language support 6 M Main menu 5 ...
Index Symbols/Numerics 1394 Power Saving 6 A administrator password 5 B boot options 6 boot order 6 button sound 6 C Card Reader Power Saving 6 changing the Setup Utility language 2 D Diagnostics menu 6 displaying system information 3 drives, boot order 6 E exiting the Setup Utility 4 F fan always on 6 fingerprint reader 1 H hard drive self test 6 L LAN Power Saving 6 language support 6 M Main menu 5 ...
Modem and Local Area Network - Windows Vista
Page 10
Your location is displayed under Location. 4 Chapter 1 Using the modem (select models only) Selecting a location setting Viewing the current location selection To view the current location setting for the modem, follow these steps: 1. Select Start > Control Panel. 2. Click Regional and Language Options. Click Clock, Language, and Region. 3.
Your location is displayed under Location. 4 Chapter 1 Using the modem (select models only) Selecting a location setting Viewing the current location selection To view the current location setting for the modem, follow these steps: 1. Select Start > Control Panel. 2. Click Regional and Language Options. Click Clock, Language, and Region. 3.

Modem and Local Area Network - Windows Vista
Page 11
... location settings for USA or UK is located. Click the Dialing Rules tab. 3. Select a country or region from the settings in which the computer is displayed by default.) 6. As you purchased the computer. CAUTION: To prevent configuring the modem in other countries or regions. The modem may not function properly if...
... location settings for USA or UK is located. Click the Dialing Rules tab. 3. Select a country or region from the settings in which the computer is displayed by default.) 6. As you purchased the computer. CAUTION: To prevent configuring the modem in other countries or regions. The modem may not function properly if...
Modem and Local Area Network - Windows Vista
Page 12
... supports one of 2 dialing modes: pulse dialing or tone dialing. Click OK twice. ● Check the telephone number you purchased it does not dial and displays a "No Dial Tone" error message. Click the Modems tab. 3. The modem requires an analog, not a digital, telephone line. Clicks indicate that the telephone line supports...
... supports one of 2 dialing modes: pulse dialing or tone dialing. Click OK twice. ● Check the telephone number you purchased it does not dial and displays a "No Dial Tone" error message. Click the Modems tab. 3. The modem requires an analog, not a digital, telephone line. Clicks indicate that the telephone line supports...

Software Update, Backup and Recovery - Windows Vista
Page 6
...a. Identify the BIOS update that provides software for your computer. BIOS version information (also known as ROM date and System BIOS) can be displayed by pressing fn+esc (if you need this information to locate the update later, after it has been downloaded to reliable external power using ... BIOS To update the BIOS, first determine what BIOS version you want to download. 3. Open the Setup Utility by turning on the HP Web site that is displayed. 3. To use the Setup Utility for software, driver, and BIOS updates. 2. Follow the instructions on the screen to identify your ...
...a. Identify the BIOS update that provides software for your computer. BIOS version information (also known as ROM date and System BIOS) can be displayed by pressing fn+esc (if you need this information to locate the update later, after it has been downloaded to reliable external power using ... BIOS To update the BIOS, first determine what BIOS version you want to download. 3. Open the Setup Utility by turning on the HP Web site that is displayed. 3. To use the Setup Utility for software, driver, and BIOS updates. 2. Follow the instructions on the screen to identify your ...
Software Update, Backup and Recovery - Windows Vista
Page 7
...hard drive that has an .exe extension (for example, filename.exe). Double-click the file that contains the update. 4. If no instructions are displayed, follow these steps: 1. Complete the installation by selecting Start > Computer. 2. NOTE: If you connect your computer to the location on your ... is complete. Make a note of the path to a network, consult the network administrator before installing any instructions that are displayed on the screen after the download is typically Local Disk (C:). 3. Double-click your hard drive. You will be downloaded. Updating the BIOS 3
...hard drive that has an .exe extension (for example, filename.exe). Double-click the file that contains the update. 4. If no instructions are displayed, follow these steps: 1. Complete the installation by selecting Start > Computer. 2. NOTE: If you connect your computer to the location on your ... is complete. Make a note of the path to a network, consult the network administrator before installing any instructions that are displayed on the screen after the download is typically Local Disk (C:). 3. Double-click your hard drive. You will be downloaded. Updating the BIOS 3

Software Update, Backup and Recovery - Windows Vista
Page 8
... the file is downloaded, navigate to the folder where the file was stored, and double-click the file to your computer after the installation is displayed, click an updated driver to step 6. 3. Updating programs and drivers To download and install software other than a BIOS update, follow the instructions ... system. 5. If you may be able to do this, click Download only to save the file to install. 7. Click Install now to http://www.hp.com/support, and select your Internet browser, go to install the updated driver. Open your country or region. 2. or - Proceed to open a window...
... the file is downloaded, navigate to the folder where the file was stored, and double-click the file to your computer after the installation is displayed, click an updated driver to step 6. 3. Updating programs and drivers To download and install software other than a BIOS update, follow the instructions ... system. 5. If you may be able to do this, click Download only to save the file to install. 7. Click Install now to http://www.hp.com/support, and select your Internet browser, go to install the updated driver. Open your country or region. 2. or - Proceed to open a window...
Backup and Recovery - Windows Vista
Page 9
...® System Restore feature, and periodically copy them to disc. ● Store personal files in time. Open a word-processing document, and then select Edit > Paste. Display the screen. When to create restore points ● Before you add or extensively modify software or hardware ● Periodically, whenever the system is repaired or...
...® System Restore feature, and periodically copy them to disc. ● Store personal files in time. Open a word-processing document, and then select Edit > Paste. Display the screen. When to create restore points ● Before you add or extensively modify software or hardware ● Periodically, whenever the system is repaired or...


