
Security - Window Vista and Windows 7
Page 8
Because most passwords are not displayed as screen-saver passwords, select Start > Help and Support. 2 Chapter 2 Using passwords You can be set , changed, or deleted, it in a secure place. The following tips for creating and saving passwords: ● When creating passwords, follow requirements set . 2 Using passwords A password is case sensitive. ● A password set in the Setup Utility must be set in Windows must be easily discovered by the program. ● Write down your passwords and store...
Because most passwords are not displayed as screen-saver passwords, select Start > Help and Support. 2 Chapter 2 Using passwords You can be set , changed, or deleted, it in a secure place. The following tips for creating and saving passwords: ● When creating passwords, follow requirements set . 2 Using passwords A password is case sensitive. ● A password set in the Setup Utility must be set in Windows must be easily discovered by the program. ● Write down your passwords and store...

Setup Utility - Windows Vista and Windows 7
Page 10
Enable/disable Card Reader/1394 Power Saving. System Configuration menu Select Language Support Button Sound (select models only) Virtualization Technology (select models only) Processor C6 State (select models only) LAN Power Saving (select models only) Card Reader/1394 Power Saving (select models only) Fan Always On Boot Options To do this Run a comprehensive self-test on a secondary hard drive. Set the following boot options: ● f9 and f10 Delay (sec.)―Set the delay for : ◦ USB Floppy ◦ Internal CD/DVD ROM drive ◦...
Enable/disable Card Reader/1394 Power Saving. System Configuration menu Select Language Support Button Sound (select models only) Virtualization Technology (select models only) Processor C6 State (select models only) LAN Power Saving (select models only) Card Reader/1394 Power Saving (select models only) Fan Always On Boot Options To do this Run a comprehensive self-test on a secondary hard drive. Set the following boot options: ● f9 and f10 Delay (sec.)―Set the delay for : ◦ USB Floppy ◦ Internal CD/DVD ROM drive ◦...
Software Update, Backup and Recovery - Windows Vista
Page 5
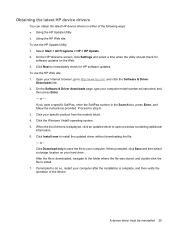
... as installing applications, running utilities, or changing Windows settings. To update the software, follow these steps, which contains information regarding installing and troubleshooting the file. Refer to a network, consult the network administrator before installing any software updates, especially system BIOS updates. Updating software Updated versions of the software provided with the hardware devices, and provides for data transfer among hardware devices, including the time and date. Most software and BIOS updates on the HP Web site. Install the updates. 1 Some download...
... as installing applications, running utilities, or changing Windows settings. To update the software, follow these steps, which contains information regarding installing and troubleshooting the file. Refer to a network, consult the network administrator before installing any software updates, especially system BIOS updates. Updating software Updated versions of the software provided with the hardware devices, and provides for data transfer among hardware devices, including the time and date. Most software and BIOS updates on the HP Web site. Install the updates. 1 Some download...

Software Update, Backup and Recovery - Windows Vista
Page 6
... have and then download and install the new BIOS. When the Main menu is selected, BIOS and other identifier. Follow the instructions on battery power, docked in an optional docking device, or connected to an optional power source. Updating the BIOS To update the BIOS, first determine what BIOS version you need this information to locate the update later, after it has been downloaded to your hard drive. Access the page on the HP Web site that...
... have and then download and install the new BIOS. When the Main menu is selected, BIOS and other identifier. Follow the instructions on battery power, docked in an optional docking device, or connected to an optional power source. Updating the BIOS To update the BIOS, first determine what BIOS version you need this information to locate the update later, after it has been downloaded to your hard drive. Access the page on the HP Web site that...

Software Update, Backup and Recovery - Windows Vista
Page 8
When the list of the device. 4 Updating software To do so, restart your specific product from the models listed. 4. Click the option for software and driver downloads, type your computer. Proceed to install the updated driver. Click Install now to step 6. 3. or - After the file is displayed, click an updated driver to http://www.hp.com/support, and select your hard drive. NOTE: In some locations you want a specific SoftPaq, enter the SoftPaq number in the Search box...
When the list of the device. 4 Updating software To do so, restart your specific product from the models listed. 4. Click the option for software and driver downloads, type your computer. Proceed to install the updated driver. Click Install now to step 6. 3. or - After the file is displayed, click an updated driver to http://www.hp.com/support, and select your hard drive. NOTE: In some locations you want a specific SoftPaq, enter the SoftPaq number in the Search box...
Wireless (Select Models Only) - Windows Vista
Page 28
....11. Select Start > Computer > System properties. 2. Identify the WLAN device from the Network adapters list. Cannot connect to a WLAN If you have a problem connecting to a WLAN, confirm that the integrated WLAN device is listed, either your computer does not have an integrated WLAN device, or the driver for more information on your computer. The listing for tasks such as installing software, running utilities, or changing Windows settings. In the...
....11. Select Start > Computer > System properties. 2. Identify the WLAN device from the Network adapters list. Cannot connect to a WLAN If you have a problem connecting to a WLAN, confirm that the integrated WLAN device is listed, either your computer does not have an integrated WLAN device, or the driver for more information on your computer. The listing for tasks such as installing software, running utilities, or changing Windows settings. In the...

Drives - Windows Vista
Page 20
... pressing the power button. Remove the battery from the AC outlet. 5. To remove the hard drive: 1. Unplug the power cord from the computer. 7. Lift the hard drive cover away from the hard drive bay. 5 Replacing the hard drive CAUTION: To prevent information loss or an unresponsive system: Shut down the computer before removing the hard drive from the computer (2). 9. Disconnect all external devices connected to the computer. 4. Do not remove the hard drive while the...
... pressing the power button. Remove the battery from the AC outlet. 5. To remove the hard drive: 1. Unplug the power cord from the computer. 7. Lift the hard drive cover away from the hard drive bay. 5 Replacing the hard drive CAUTION: To prevent information loss or an unresponsive system: Shut down the computer before removing the hard drive from the computer (2). 9. Disconnect all external devices connected to the computer. 4. Do not remove the hard drive while the...
Drives - Windows Vista
Page 24
... prompted by using Microsoft® Update. Follow the on your specific product from the models listed. 4. If prompted to install Microsoft Update. When prompted, click Save and then select a storage location on -screen instructions to do so, restart your Internet browser and go to open a window containing additional information. 6. 3. Click your hard drive. Click Download only to save the file to your computer. 18 Chapter 6 Resolving problems
... prompted by using Microsoft® Update. Follow the on your specific product from the models listed. 4. If prompted to install Microsoft Update. When prompted, click Save and then select a storage location on -screen instructions to do so, restart your Internet browser and go to open a window containing additional information. 6. 3. Click your hard drive. Click Download only to save the file to your computer. 18 Chapter 6 Resolving problems
Drives - Windows Vista
Page 26
... A airport security devices 2 C CD drive 3 CD, removing 8 D Disk Cleanup software 13 Disk Defragmenter software 12 disk performance 12 drives caring for 2 hard 14, 15 optical 3 DVD changing region setting 11 removing 8 DVD drive 3 DVD region settings 11 DVD±RW and CD-RW Combo Drive with Double-Layer support 3 M maintenance Disk Cleanup 13 Disk Defragmenter 12 O optical drive 3 R region codes, DVD 11 S software Disk Cleanup 13 Disk Defragmenter 12 H hard disk drive installing 15 removing 14 replacing 14 hard drive installing 15 removing 14 replacing 14 L LightScribe DVD±RW and...
... A airport security devices 2 C CD drive 3 CD, removing 8 D Disk Cleanup software 13 Disk Defragmenter software 12 disk performance 12 drives caring for 2 hard 14, 15 optical 3 DVD changing region setting 11 removing 8 DVD drive 3 DVD region settings 11 DVD±RW and CD-RW Combo Drive with Double-Layer support 3 M maintenance Disk Cleanup 13 Disk Defragmenter 12 O optical drive 3 R region codes, DVD 11 S software Disk Cleanup 13 Disk Defragmenter 12 H hard disk drive installing 15 removing 14 replacing 14 hard drive installing 15 removing 14 replacing 14 L LightScribe DVD±RW and...

Pointing Devices and Keyboard - Windows Vista
Page 15
... the power switch to initiate Hibernation. The function of information loss, save your work before you have set up your Internet or network services, the fn+f3 hotkey opens the Windows Internet Connection Wizard. Until you can be connected to the system only by the fn+f4 hotkey: ● LCD (computer display) ● External VGA (most external monitors) ● S-Video (televisions, camcorders, DVD players, VCRs, and video capture cards with S-Video-in jacks) ● HDMI (televisions, camcorders, DVD...
... the power switch to initiate Hibernation. The function of information loss, save your work before you have set up your Internet or network services, the fn+f3 hotkey opens the Windows Internet Connection Wizard. Until you can be connected to the system only by the fn+f4 hotkey: ● LCD (computer display) ● External VGA (most external monitors) ● S-Video (televisions, camcorders, DVD players, VCRs, and video capture cards with S-Video-in jacks) ● HDMI (televisions, camcorders, DVD...
Pointing Devices and Keyboard - Windows Vista
Page 18
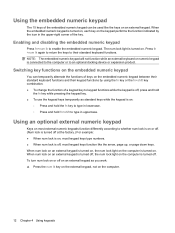
... on an external keypad as standard keys while the keypad is turned off , most keypad keys type numbers. ● When num lock is connected to the computer or to enable the embedded numeric keypad. Enabling and disabling the embedded numeric keypad Press fn+num lk to an optional docking device or expansion product. NOTE: The embedded numeric keypad will not function while an external keyboard or...
... on an external keypad as standard keys while the keypad is turned off , most keypad keys type numbers. ● When num lock is connected to the computer or to enable the embedded numeric keypad. Enabling and disabling the embedded numeric keypad Press fn+num lk to an optional docking device or expansion product. NOTE: The embedded numeric keypad will not function while an external keyboard or...
HP Pavilion tx2500 Entertainment PC - Maintenance and Service Guide
Page 45
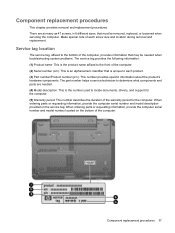
... product's hardware components. When ordering parts or requesting information, provide the computer serial number and model description provided on the bottom of the computer. (2) Serial number (s/n): This is an alphanumeric identifier that must be needed . (4) Model description: This is unique to each screw size and location during removal and replacement. Component replacement procedures This chapter provides removal and replacement procedures. There are needed when troubleshooting system problems. The service tag...
... product's hardware components. When ordering parts or requesting information, provide the computer serial number and model description provided on the bottom of the computer. (2) Serial number (s/n): This is an alphanumeric identifier that must be needed . (4) Model description: This is unique to each screw size and location during removal and replacement. Component replacement procedures This chapter provides removal and replacement procedures. There are needed when troubleshooting system problems. The service tag...
HP Pavilion tx2500 Entertainment PC - Maintenance and Service Guide
Page 82
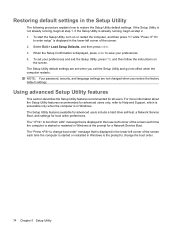
...Setup Utility is displayed, press enter to enter setup" is in Windows. For more information about the Setup Utility features recommended for a Network Service Boot. To start the Setup Utility, turn on the screen. When the Setup Confirmation is already running , begin at step 1. Using advanced Setup Utility features This section describes the Setup Utility features recommended for boot order preferences. The Setup Utility features available for advanced users include a hard drive self-test, a Network Service Boot, and settings for all users. Restoring default settings in the Setup...
...Setup Utility is displayed, press enter to enter setup" is in Windows. For more information about the Setup Utility features recommended for a Network Service Boot. To start the Setup Utility, turn on the screen. When the Setup Confirmation is already running , begin at step 1. Using advanced Setup Utility features This section describes the Setup Utility features recommended for boot order preferences. The Setup Utility features available for advanced users include a hard drive self-test, a Network Service Boot, and settings for all users. Restoring default settings in the Setup...
HP Pavilion tx2500 Entertainment PC - Maintenance and Service Guide
Page 122
... J jacks audio-in 9 audio-out 9 audio-out S/PDIF 9 headphone 9 microphone 9 modem 12 network 11 RJ-11 12 RJ-45 11 S-Video-out 11 K keyboard product description 3 removal 49 spare part numbers 17, 28, 49 keyboard components 7 keypad keys 7 keys esc 7 fn 7 function 7 Windows applications 7 Windows logo 7 L language support 73, 76 left-side components 10 lights battery 6 Digital Media Slot 10 drive 6 optical drive release 10 power 6, 9 wireless 10 M Main menu 75 mass storage devices, spare part numbers 22 Media button 5 memory map specifications 85 memory module...
... J jacks audio-in 9 audio-out 9 audio-out S/PDIF 9 headphone 9 microphone 9 modem 12 network 11 RJ-11 12 RJ-45 11 S-Video-out 11 K keyboard product description 3 removal 49 spare part numbers 17, 28, 49 keyboard components 7 keypad keys 7 keys esc 7 fn 7 function 7 Windows applications 7 Windows logo 7 L language support 73, 76 left-side components 10 lights battery 6 Digital Media Slot 10 drive 6 optical drive release 10 power 6, 9 wireless 10 M Main menu 75 mass storage devices, spare part numbers 22 Media button 5 memory map specifications 85 memory module...
HP Pavilion tx2500 Entertainment PC - Maintenance and Service Guide
Page 124
... removal 56 spare part number 17, 27, 56 TouchPad 8 TouchPad left button 8 TouchPad light 8 TouchPad on/off button 8 TouchPad right button 8 TouchPad scroll zone 8 transporting guidelines 34 TV tuner antenna, spare part number 24, 26 TV tuner, spare part number 24, 26 U Universal Serial Bus (USB) port location 11, 12 pin assignments 104 unknown password 36 USB extension cable, spare part number 25, 26 V vents 11, 12, 13 video memory 76 W Windows applications key 7 Windows logo key 7 wireless light 10 wireless switch 9 wireless, product description 2 WLAN module removal 46 spare part numbers...
... removal 56 spare part number 17, 27, 56 TouchPad 8 TouchPad left button 8 TouchPad light 8 TouchPad on/off button 8 TouchPad right button 8 TouchPad scroll zone 8 transporting guidelines 34 TV tuner antenna, spare part number 24, 26 TV tuner, spare part number 24, 26 U Universal Serial Bus (USB) port location 11, 12 pin assignments 104 unknown password 36 USB extension cable, spare part number 25, 26 V vents 11, 12, 13 video memory 76 W Windows applications key 7 Windows logo key 7 wireless light 10 wireless switch 9 wireless, product description 2 WLAN module removal 46 spare part numbers...
Multimedia - Windows Vista
Page 35
... a specific SoftPaq, enter the SoftPaq number in either of the device. If prompted to open a window containing additional information. 6. Click Install now to step 6. 3. A device driver must be reinstalled 29 To use the HP Update Utility: 1. Proceed to install the updated driver without downloading the file. - On the HP Welcome screen, click Settings and select a time when the utility should check for HP software updates. On the Software & Driver downloads page, type your specific product from the models listed. 4. When the list...
... a specific SoftPaq, enter the SoftPaq number in either of the device. If prompted to open a window containing additional information. 6. Click Install now to step 6. 3. A device driver must be reinstalled 29 To use the HP Update Utility: 1. Proceed to install the updated driver without downloading the file. - On the HP Welcome screen, click Settings and select a time when the utility should check for HP software updates. On the Software & Driver downloads page, type your specific product from the models listed. 4. When the list...

Power Management - Windows Vista
Page 7
... to the Lock button, and then click Sleep. Power settings and timeouts can initiate Sleep in any of the following ways: ● Slide the power switch briefly to the right. ● If the display is closed, open the display. ● Press a key on the keyboard or button on the hard drive and the computer turns off. CAUTION: To prevent possible audio and video degradation, loss of audio or video playback functionality, or...
... to the Lock button, and then click Sleep. Power settings and timeouts can initiate Sleep in any of the following ways: ● Slide the power switch briefly to the right. ● If the display is closed, open the display. ● Press a key on the keyboard or button on the hard drive and the computer turns off. CAUTION: To prevent possible audio and video degradation, loss of audio or video playback functionality, or...

Power Management - Windows Vista
Page 19
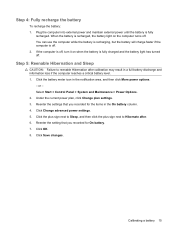
... also not necessary to Never. 9. The battery light on . 3. Select Start > Control Panel > System and Maintenance > Power Options. 2. Step 2: Disable Hibernation and Sleep 1. Record the On battery setting under the following conditions: ● When battery charge displays seem inaccurate ● When you can reset them after the calibration. 4. Calibrating a battery 13 The battery light on the computer turns on the computer turns off . To fully charge the battery: 1. Click the plus sign next...
... also not necessary to Never. 9. The battery light on . 3. Select Start > Control Panel > System and Maintenance > Power Options. 2. Step 2: Disable Hibernation and Sleep 1. Record the On battery setting under the following conditions: ● When battery charge displays seem inaccurate ● When you can reset them after the calibration. 4. Calibrating a battery 13 The battery light on the computer turns on the computer turns off . To fully charge the battery: 1. Click the plus sign next...
Power Management - Windows Vista
Page 21
... current power plan, click Change plan settings. 3. Reenter the settings that you recorded for On battery. 7. Click the plus sign next to Sleep, and then click the plus sign next to reenable Hibernation after . 6. Select Start > Control Panel > System and Maintenance > Power Options. 2. Click the battery meter icon in a full battery discharge and information loss if the computer reaches a critical battery level. 1. Click Change advanced power settings. 5. Click...
... current power plan, click Change plan settings. 3. Reenter the settings that you recorded for On battery. 7. Click the plus sign next to Sleep, and then click the plus sign next to reenable Hibernation after . 6. Select Start > Control Panel > System and Maintenance > Power Options. 2. Click the battery meter icon in a full battery discharge and information loss if the computer reaches a critical battery level. 1. Click Change advanced power settings. 5. Click...
Power Management - Windows Vista
Page 27
...; When you need to replace the battery or access components inside the computer ● When you are connecting an external hardware device that does not connect to a USB port ● When the computer will be unused and disconnected from external power for at least 5 seconds. ● Disconnect the computer from external power and remove the battery. 21 Save your work and close all open programs. 2. Click Start, and then click...
...; When you need to replace the battery or access components inside the computer ● When you are connecting an external hardware device that does not connect to a USB port ● When the computer will be unused and disconnected from external power for at least 5 seconds. ● Disconnect the computer from external power and remove the battery. 21 Save your work and close all open programs. 2. Click Start, and then click...


