
HP Notebook Hard Drives & Solid State Drives Identifying, Preventing, Diagnosing and Recovering from Drive Failures Care and Ma
Page 6
... RIS (Remote Installation Service) installation points include: • Adding SATA drivers to installation CDs, building an image, and switching to 150MB/sec transfer rate for disk traffic, and provides link power management with Serial ATA hard disk drives. The Intel Matrix Storage Technology solution technology provides improved performance and reliability, as well as support for the SATA Advanced Host Controller (AHCI) Interface. To download the latest...
... RIS (Remote Installation Service) installation points include: • Adding SATA drivers to installation CDs, building an image, and switching to 150MB/sec transfer rate for disk traffic, and provides link power management with Serial ATA hard disk drives. The Intel Matrix Storage Technology solution technology provides improved performance and reliability, as well as support for the SATA Advanced Host Controller (AHCI) Interface. To download the latest...

HP Pavilion m4 Notebook PC Maintenance and Service Guide
Page 18
...is using battery power. Enables airflow to cool internal components and prevent overheating. Connects a network cable. Connect optional USB 3.0 devices and provide enhanced USB power performance. 10 Chapter 2 External component identification Left side Item (1) (2) Component Power connector AC adapter light (3) Vent (4) External monitor port (5) RJ-45 (network) jack (6) HDMI port (7) USB 3.0 ports (2) Description Connects an AC adapter. ● White: The AC adapter is connected and the battery is charged. ● Amber: The AC adapter is connected and the battery is charging...
...is using battery power. Enables airflow to cool internal components and prevent overheating. Connects a network cable. Connect optional USB 3.0 devices and provide enhanced USB power performance. 10 Chapter 2 External component identification Left side Item (1) (2) Component Power connector AC adapter light (3) Vent (4) External monitor port (5) RJ-45 (network) jack (6) HDMI port (7) USB 3.0 ports (2) Description Connects an AC adapter. ● White: The AC adapter is connected and the battery is charged. ● Amber: The AC adapter is connected and the battery is charging...

HP Pavilion m4 Notebook PC Maintenance and Service Guide
Page 37
... your computer, including model, serial number, product key, and length of warranty, are as many as 5 screws that must be removed, replaced, and/or loosened when servicing Customer Self-Repair parts. Component replacement procedures 29 Installing a part not supported by the Customer Self-Repair program may void your computer. There are on page 16 for Customer Self-Repair parts. See Service tag on the service tag at the...
... your computer, including model, serial number, product key, and length of warranty, are as many as 5 screws that must be removed, replaced, and/or loosened when servicing Customer Self-Repair parts. Component replacement procedures 29 Installing a part not supported by the Customer Self-Repair program may void your computer. There are on page 16 for Customer Self-Repair parts. See Service tag on the service tag at the...
HP Pavilion m4 Notebook PC Maintenance and Service Guide
Page 44
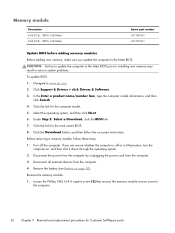
Click Support & Drivers > click Drivers & Software. 3. Under Step 2: Select a Download, click the BIOS link. 7. Before removing a memory module, follow the on-screen instructions. Disconnect all external devices from the computer. 3. Remove the battery (see Battery on , and then shut it down through the operating system. 2. Remove the memory module: 1. Loosen the Phillips PM2.5×4.5 captive screw (1) that secures the memory module service cover to installing new memory may result in Hibernation, turn the computer on page 30). Click the...
Click Support & Drivers > click Drivers & Software. 3. Under Step 2: Select a Download, click the BIOS link. 7. Before removing a memory module, follow the on-screen instructions. Disconnect all external devices from the computer. 3. Remove the battery (see Battery on , and then shut it down through the operating system. 2. Remove the memory module: 1. Loosen the Phillips PM2.5×4.5 captive screw (1) that secures the memory module service cover to installing new memory may result in Hibernation, turn the computer on page 30). Click the...
HP Pavilion m4 Notebook PC Maintenance and Service Guide
Page 80
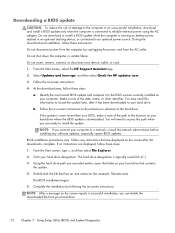
... power cord from your hard drive. 72 Chapter 7 Using Setup Utility (BIOS) and System Diagnostics From the Start screen, select the HP Support Assistant app. 2. Follow the on-screen instructions to download your selection to the BIOS version currently installed on your computer. If no instructions are ready to install the update. If the update is more recent than your BIOS, make a note of the path to reliable external power using the AC adapter. You will need...
... power cord from your hard drive. 72 Chapter 7 Using Setup Utility (BIOS) and System Diagnostics From the Start screen, select the HP Support Assistant app. 2. Follow the on-screen instructions to download your selection to the BIOS version currently installed on your computer. If no instructions are ready to install the update. If the update is more recent than your BIOS, make a note of the path to reliable external power using the AC adapter. You will need...
HP Pavilion m4 Notebook PC Maintenance and Service Guide
Page 88
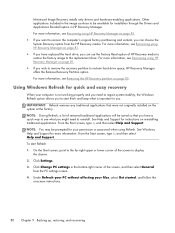
... and keep what you might need to regain system stability, the Windows Refresh option allows you have replaced the hard drive, you can use the Factory Reset option of the screen to the replacement drive. Minimized Image Recovery installs only drivers and hardware-enabling applications. For more information. See Help and Support for your permission or password when using HP Recovery Manager on reinstalling traditional applications. From the Start screen, type h, and then select Help and Support. Click Settings. 3.
... and keep what you might need to regain system stability, the Windows Refresh option allows you have replaced the hard drive, you can use the Factory Reset option of the screen to the replacement drive. Minimized Image Recovery installs only drivers and hardware-enabling applications. For more information. See Help and Support for your permission or password when using HP Recovery Manager on reinstalling traditional applications. From the Start screen, type h, and then select Help and Support. Click Settings. 3.
HP Pavilion m4 Notebook PC Maintenance and Service Guide
Page 91
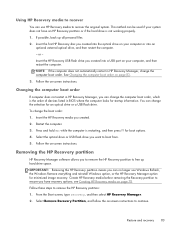
... boot order. Create HP Recovery media before removing the Recovery partition to ensure you created into an optional external optical drive, and then restart the computer. - Follow the on -screen instructions. Follow these steps to remove the HP Recovery partition: 1. This method can be used if your computer, and then restart the computer. Insert the HP Recovery USB flash drive you created. 2. see Creating HP Recovery media on your system does not have recovery options; From the Start screen, type recovery, and then select HP Recovery Manager. 2. or - See Changing...
... boot order. Create HP Recovery media before removing the Recovery partition to ensure you created into an optional external optical drive, and then restart the computer. - Follow the on -screen instructions. Follow these steps to remove the HP Recovery partition: 1. This method can be used if your computer, and then restart the computer. Insert the HP Recovery USB flash drive you created. 2. see Creating HP Recovery media on your system does not have recovery options; From the Start screen, type recovery, and then select HP Recovery Manager. 2. or - See Changing...

HP Pavilion m4 Notebook PC Maintenance and Service Guide
Page 95
... action keys 7 antenna locations 5 removal 70 spare part number 19, 22, 70 Antenna Kit, spare part number 19, 22 audio, product description 2 audio-in jack 11 audio-out jack 11 audio/USB board removal 54 spare part number 23, 54 B base enclosure, spare part number 17, 22 battery removal 30 spare part number 18, 22, 30 battery bay 13 battery lock 13 battery release latch 13 bottom components 13 button components 6 buttons optical drive eject 12 power 6 TouchPad 9 TouchPad on/off 9 C cables, service considerations 25 caps lock light...
... action keys 7 antenna locations 5 removal 70 spare part number 19, 22, 70 Antenna Kit, spare part number 19, 22 audio, product description 2 audio-in jack 11 audio-out jack 11 audio/USB board removal 54 spare part number 23, 54 B base enclosure, spare part number 17, 22 battery removal 30 spare part number 18, 22, 30 battery bay 13 battery lock 13 battery release latch 13 bottom components 13 button components 6 buttons optical drive eject 12 power 6 TouchPad 9 TouchPad on/off 9 C cables, service considerations 25 caps lock light...

HP Pavilion m4 Notebook PC Maintenance and Service Guide
Page 96
...jacks audio-in 11 audio-out 11 headphone 11 microphone 11 network 10 RJ-45 (network) 10 mute 8 power 8, 11 TouchPad 9 webcam 5 wireless 8 M mass storage device illustrated 20 precautions 25 spare part numbers 20 memory module product description 2 removal 36 spare part numbers 18, 22, 36 memory module service cover 13 removal 36 spare part number 37 microphone location 6 product description 2 microphone jack 11 model name 1 monitor port 10 mute light 8 N network jack 10 K key components 7 keyboard product description 3 removal 42 spare part numbers 17, 22, 42 keys action 7 esc 7 fn 7 Windows...
...jacks audio-in 11 audio-out 11 headphone 11 microphone 11 network 10 RJ-45 (network) 10 mute 8 power 8, 11 TouchPad 9 webcam 5 wireless 8 M mass storage device illustrated 20 precautions 25 spare part numbers 20 memory module product description 2 removal 36 spare part numbers 18, 22, 36 memory module service cover 13 removal 36 spare part number 37 microphone location 6 product description 2 microphone jack 11 model name 1 monitor port 10 mute light 8 N network jack 10 K key components 7 keyboard product description 3 removal 42 spare part numbers 17, 22, 42 keys action 7 esc 7 fn 7 Windows...
User Guide - Windows 8
Page 5
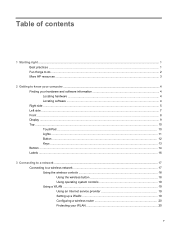
...1 Starting right ...1 Best practices ...1 Fun things to do ...2 More HP resources ...3 2 Getting to know your computer ...4 Finding your hardware and software information 4 Locating hardware ...4 Locating software ...4 Right side ...5 Left side ...7 Front ...8 Display ...9 Top ...10 TouchPad ...10 Lights ...11 Button ...12 Keys ...13 Bottom ...14 Labels ...16 3 Connecting to a network ...17 Connecting to a wireless network ...17 Using the wireless controls 18 Using the wireless button 18 Using operating system controls 19 Using a WLAN ...19 Using an Internet service provider 19 Setting up...
...1 Starting right ...1 Best practices ...1 Fun things to do ...2 More HP resources ...3 2 Getting to know your computer ...4 Finding your hardware and software information 4 Locating hardware ...4 Locating software ...4 Right side ...5 Left side ...7 Front ...8 Display ...9 Top ...10 TouchPad ...10 Lights ...11 Button ...12 Keys ...13 Bottom ...14 Labels ...16 3 Connecting to a network ...17 Connecting to a wireless network ...17 Using the wireless controls 18 Using the wireless button 18 Using operating system controls 19 Using a WLAN ...19 Using an Internet service provider 19 Setting up...

User Guide - Windows 8
Page 8
Replacing a hard drive ...61 Using HP 3D DriveGuard (select models only 62 Using Disk Defragmenter 62 Using Disk Cleanup ...63 Adding or replacing memory modules 63 Updating programs and drivers ...67 Cleaning your computer ...67 Cleaning the display, sides, and cover 67 Cleaning the TouchPad and keyboard 67 Traveling with or shipping your computer 68 9 Securing your computer and information 69 Using passwords ...70 Setting Windows passwords 70 Setting Setup Utility (BIOS) passwords 71 Using Internet security software ...72 Using antivirus software ...72 Using firewall software ...72...
Replacing a hard drive ...61 Using HP 3D DriveGuard (select models only 62 Using Disk Defragmenter 62 Using Disk Cleanup ...63 Adding or replacing memory modules 63 Updating programs and drivers ...67 Cleaning your computer ...67 Cleaning the display, sides, and cover 67 Cleaning the TouchPad and keyboard 67 Traveling with or shipping your computer 68 9 Securing your computer and information 69 Using passwords ...70 Setting Windows passwords 70 Setting Setup Utility (BIOS) passwords 71 Using Internet security software ...72 Using antivirus software ...72 Using firewall software ...72...

User Guide - Windows 8
Page 17
...Left side 7 It is using DC power. Enable airflow to cool internal components and prevent overheating. Connects an optional video or audio device, such as a high-definition television, any compatible digital or audio component, or a high-speed HDMI device. Connect optional USB 3.0 devices and provide enhanced USB power performance. Connects a network cable. Left side Component (1) (2) Power connector AC adapter light (3) Vent (4) External monitor port (5) RJ-45 (network) jack (6) HDMI port (7) USB 3.0 ports (2) Description Connects an AC adapter. ● White: The AC...
...Left side 7 It is using DC power. Enable airflow to cool internal components and prevent overheating. Connects an optional video or audio device, such as a high-definition television, any compatible digital or audio component, or a high-speed HDMI device. Connect optional USB 3.0 devices and provide enhanced USB power performance. Connects a network cable. Left side Component (1) (2) Power connector AC adapter light (3) Vent (4) External monitor port (5) RJ-45 (network) jack (6) HDMI port (7) USB 3.0 ports (2) Description Connects an AC adapter. ● White: The AC...
User Guide - Windows 8
Page 34
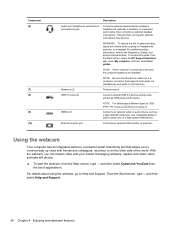
..., adjust the volume before putting on page 51 HDMI port Connects an optional video or audio device, such as a high-definition television, any compatible digital or audio component, or a high-speed HDMI device. This jack does not support optional microphone-only devices. Using the webcam Your computer has an integrated webcam, a powerful social networking tool that supports both audio-out (headphone) and audio-in (microphone) jack Connects optional powered stereo speakers, headphones, earbuds, a headset, or a television audio cable. NOTE: When a device is connected to...
..., adjust the volume before putting on page 51 HDMI port Connects an optional video or audio device, such as a high-definition television, any compatible digital or audio component, or a high-speed HDMI device. This jack does not support optional microphone-only devices. Using the webcam Your computer has an integrated webcam, a powerful social networking tool that supports both audio-out (headphone) and audio-in (microphone) jack Connects optional powered stereo speakers, headphones, earbuds, a headset, or a television audio cable. NOTE: When a device is connected to...

User Guide - Windows 8
Page 50
... to a disc or an external media card. CAUTION: To reduce the risk of possible audio and video degradation, loss of audio or video playback functionality, or loss of information, do not initiate Sleep while reading from or writing to initiate the Hibernation state, you want to select the Sleep state. Rapid Start Technology manages your work . If you must enable Hibernation using Power Options. Initiating and exiting Sleep With...
... to a disc or an external media card. CAUTION: To reduce the risk of possible audio and video degradation, loss of audio or video playback functionality, or loss of information, do not initiate Sleep while reading from or writing to initiate the Hibernation state, you want to select the Sleep state. Rapid Start Technology manages your work . If you must enable Hibernation using Power Options. Initiating and exiting Sleep With...
User Guide - Windows 8
Page 73
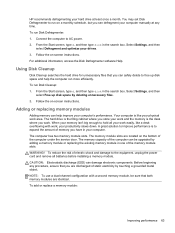
...: To use a dual-channel configuration with work easily, like your computer's performance. To run Disk Defragmenter: 1. The hard drive is the filing cabinet where you can safely delete to hold all batteries before installing a memory module. The computer has two memory module slots. Follow the on -screen instructions. Before beginning any time. You may set Disk Defragmenter to AC power. 2. To run Disk Cleanup: 1. From the Start screen, type d, and then type disk in the...
...: To use a dual-channel configuration with work easily, like your computer's performance. To run Disk Defragmenter: 1. The hard drive is the filing cabinet where you can safely delete to hold all batteries before installing a memory module. The computer has two memory module slots. Follow the on -screen instructions. Before beginning any time. You may set Disk Defragmenter to AC power. 2. To run Disk Cleanup: 1. From the Start screen, type d, and then type disk in the...

User Guide - Windows 8
Page 82
... disable programs, utilities, or the operating system, or cause them , and in most cases, repair any damage they have become available after the computer left the factory. Microsoft sends out alerts regarding critical updates. Installing software updates HP, Microsoft Windows, and third-party software installed on your computer should be a combination of both hardware and software. For more information, see Updating programs and drivers on the network. Using antivirus software...
... disable programs, utilities, or the operating system, or cause them , and in most cases, repair any damage they have become available after the computer left the factory. Microsoft sends out alerts regarding critical updates. Installing software updates HP, Microsoft Windows, and third-party software installed on your computer should be a combination of both hardware and software. For more information, see Updating programs and drivers on the network. Using antivirus software...

User Guide - Windows 8
Page 86
... hard drive. BIOS installation procedures vary. Double-click the file that are ready to reliable external power using the AC adapter. NOTE: After a message on the screen reports a successful installation, you recorded earlier, open the folder on -screen instructions. Do not insert, remove, connect, or disconnect any instructions that has an .exe extension (for HP updates now. 3. Follow the on the screen after it to your computer. From the Start screen, type...
... hard drive. BIOS installation procedures vary. Double-click the file that are ready to reliable external power using the AC adapter. NOTE: After a message on the screen reports a successful installation, you recorded earlier, open the folder on -screen instructions. Do not insert, remove, connect, or disconnect any instructions that has an .exe extension (for HP updates now. 3. Follow the on the screen after it to your computer. From the Start screen, type...

User Guide - Windows 8
Page 91
... models only) or HP Recovery media. Windows creates system restore points automatically during a Windows update and other system maintenance events. Other applications included in HP Recovery Manager. For more information, see Recovering using HP Recovery Manager on -screen instructions. ● If you want to recover the computer's original factory partitioning and content, you need to restore your personal files and data, you can choose the System Recovery option from the HP Recovery media. From the Start screen, type h, and then select Help and Support...
... models only) or HP Recovery media. Windows creates system restore points automatically during a Windows update and other system maintenance events. Other applications included in HP Recovery Manager. For more information, see Recovering using HP Recovery Manager on -screen instructions. ● If you want to recover the computer's original factory partitioning and content, you need to restore your personal files and data, you can choose the System Recovery option from the HP Recovery media. From the Start screen, type h, and then select Help and Support...
User Guide - Windows 8
Page 99
... battery level 45 CyberLink PowerDVD 28 D deleted files restoring 81 digital card inserting 53 Digital Media Card Reader, identifying 8 Disk Cleanup software 63 Disk Defragmenter software 62 E electrostatic discharge 88 esc key, identifying 13 external AC power, using 47 external monitor port 26 external monitor port, identifying 7, 24 F firewall software 72 fn key, identifying 13, 38 Fun things to do 2 H hard drive HP 3D DriveGuard 62 hard drive light 5 hard drive, identifying 15 HDMI configuring audio 28 HDMI port, connecting 27 HDMI port, identifying 7, 24 headphone jack, identifying...
... battery level 45 CyberLink PowerDVD 28 D deleted files restoring 81 digital card inserting 53 Digital Media Card Reader, identifying 8 Disk Cleanup software 63 Disk Defragmenter software 62 E electrostatic discharge 88 esc key, identifying 13 external AC power, using 47 external monitor port 26 external monitor port, identifying 7, 24 F firewall software 72 fn key, identifying 13, 38 Fun things to do 2 H hard drive HP 3D DriveGuard 62 hard drive light 5 hard drive, identifying 15 HDMI configuring audio 28 HDMI port, connecting 27 HDMI port, identifying 7, 24 headphone jack, identifying...

User Guide - Windows 8
Page 100
... 65 removing 64 replacing 63 memory module service door, removing 64 microphone jack, identifying 5 microphone, connecting 25 minimized image creating 83 minimized image recovery 83 mouse, external setting preferences 30 mute light, identifying 11 N network jack, identifying 7 O operating environment 87 optical disc inserting 55 removing 55 optical drive eject button, identifying 6 optical drive, identifying 5, 23 original system recovery 83 90 Index P passwords Setup Utility (BIOS) 71 Windows 70 pinching TouchPad gesture 32 ports external monitor 7, 24, 26 HDMI 7, 24, 27 USB 2.0 5, 23 USB...
... 65 removing 64 replacing 63 memory module service door, removing 64 microphone jack, identifying 5 microphone, connecting 25 minimized image creating 83 minimized image recovery 83 mouse, external setting preferences 30 mute light, identifying 11 N network jack, identifying 7 O operating environment 87 optical disc inserting 55 removing 55 optical drive eject button, identifying 6 optical drive, identifying 5, 23 original system recovery 83 90 Index P passwords Setup Utility (BIOS) 71 Windows 70 pinching TouchPad gesture 32 ports external monitor 7, 24, 26 HDMI 7, 24, 27 USB 2.0 5, 23 USB...


