
Backup and Recovery - Windows Vista
Page 6
...to its original factory state if you can go to the next step. 3. Click Advanced Options. 2 Creating recovery discs HP recommends that you can restore your computer from the HP Web site. The software allows the creation of only one set of recovery discs. Recovery Manager opens. 2. NOTE: ...If you will need high-quality DVD-R, double-layer DVD-R, DVD+R, double-layer DVD+R, BD-R (writable Blu-ray), or CD-R discs. Follow the on battery power, you...
...to its original factory state if you can go to the next step. 3. Click Advanced Options. 2 Creating recovery discs HP recommends that you can restore your computer from the HP Web site. The software allows the creation of only one set of recovery discs. Recovery Manager opens. 2. NOTE: ...If you will need high-quality DVD-R, double-layer DVD-R, DVD+R, double-layer DVD+R, BD-R (writable Blu-ray), or CD-R discs. Follow the on battery power, you...

Software Update, Backup and Recovery - Windows Vista
Page 6
...this information to locate the update later, after it has been downloaded to your selection to select the Main menu. Access the page on the HP Web site that is displayed. 3. b. Open the Setup Utility by unplugging the power cord from the computer by turning on the computer, ...device, cable, or cord. Identify the BIOS update that provides software for Startup Menu" message is connected to download. 3. Follow the instructions on battery power, docked in an optional docking device, or connected to download your hard drive. When the Main menu is running on the screen to ...
...this information to locate the update later, after it has been downloaded to your selection to select the Main menu. Access the page on the HP Web site that is displayed. 3. b. Open the Setup Utility by unplugging the power cord from the computer by turning on the computer, ...device, cable, or cord. Identify the BIOS update that provides software for Startup Menu" message is connected to download. 3. Follow the instructions on battery power, docked in an optional docking device, or connected to download your hard drive. When the Main menu is running on the screen to ...
Wireless (Select Models Only) - Windows Vista
Page 18
... phone voice coverage. For information on a label inside the battery bay of a subscriber identity module (SIM). Coverage for Mobile Communications (GSM) telecommunications standard. ● EV-DO (Evolution Data Optimized), which in the HP Mobile Broadband information provided with mobile network operator service, HP Mobile Broadband gives you the freedom to stay connected to...
... phone voice coverage. For information on a label inside the battery bay of a subscriber identity module (SIM). Coverage for Mobile Communications (GSM) telecommunications standard. ● EV-DO (Evolution Data Optimized), which in the HP Mobile Broadband information provided with mobile network operator service, HP Mobile Broadband gives you the freedom to stay connected to...
Wireless (Select Models Only) - Windows Vista
Page 19
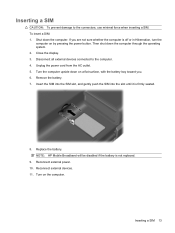
To insert a SIM: 1. Close the display. 3. Remove the battery. 7. Turn on a flat surface, with the battery bay toward you are not sure whether the computer is firmly seated. 8. Inserting a SIM 13 Shut down the computer through the operating system. 2. ... Reconnect external power. 10. Then shut down the computer. If you . 6. Unplug the power cord from the AC outlet. 5. NOTE: HP Mobile Broadband will be disabled if the battery is not replaced. 9. Turn the computer upside down on the computer. Reconnect external devices. 11. Inserting a SIM CAUTION: To prevent damage to...
To insert a SIM: 1. Close the display. 3. Remove the battery. 7. Turn on a flat surface, with the battery bay toward you are not sure whether the computer is firmly seated. 8. Inserting a SIM 13 Shut down the computer through the operating system. 2. ... Reconnect external power. 10. Then shut down the computer. If you . 6. Unplug the power cord from the AC outlet. 5. NOTE: HP Mobile Broadband will be disabled if the battery is not replaced. 9. Turn the computer upside down on the computer. Reconnect external devices. 11. Inserting a SIM CAUTION: To prevent damage to...
Wireless (Select Models Only) - Windows Vista
Page 20
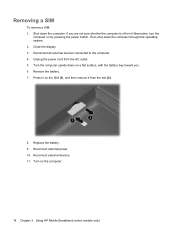
... the operating system. 2. Turn the computer upside down on the SIM (1), and then remove it from the AC outlet. 5. Remove the battery. 7. Replace the battery. 9. Then shut down the computer. Unplug the power cord from the slot (2). 8. Press in on a flat surface, with the... battery bay toward you are not sure whether the computer is off or in Hibernation, turn the computer on the computer. 14 Chapter 3 Using HP Mobile Broadband (select models only) Reconnect external devices. 11. Removing a SIM To remove...
... the operating system. 2. Turn the computer upside down on the SIM (1), and then remove it from the AC outlet. 5. Remove the battery. 7. Replace the battery. 9. Then shut down the computer. Unplug the power cord from the slot (2). 8. Press in on a flat surface, with the... battery bay toward you are not sure whether the computer is off or in Hibernation, turn the computer on the computer. 14 Chapter 3 Using HP Mobile Broadband (select models only) Reconnect external devices. 11. Removing a SIM To remove...

HP Mini Remote Control (Select Models Only) - Windows Vista
Page 3
Table of contents 1 Component functions 2 Button quick reference 3 Inserting or replacing the battery 4 Troubleshooting Index ...8 iii
Table of contents 1 Component functions 2 Button quick reference 3 Inserting or replacing the battery 4 Troubleshooting Index ...8 iii
HP Mini Remote Control (Select Models Only) - Windows Vista
Page 9
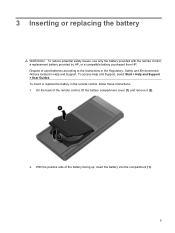
... compartment (1). 5 With the positive side of the remote control, lift the battery compartment cover (1) and remove it (2). 2. To reduce potential safety issues, use only the battery provided with the remote control, a replacement battery provided by HP, or a compatible battery purchased from HP. Dispose of used batteries according to the instructions in the Regulatory, Safety and Environmental Notices...
... compartment (1). 5 With the positive side of the remote control, lift the battery compartment cover (1) and remove it (2). 2. To reduce potential safety issues, use only the battery provided with the remote control, a replacement battery provided by HP, or a compatible battery purchased from HP. Dispose of used batteries according to the instructions in the Regulatory, Safety and Environmental Notices...
HP Mini Remote Control (Select Models Only) - Windows Vista
Page 10
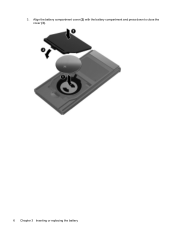
Align the battery compartment cover (2) with the battery compartment and press down to close the cover (3). 6 Chapter 3 Inserting or replacing the battery 3.
Align the battery compartment cover (2) with the battery compartment and press down to close the cover (3). 6 Chapter 3 Inserting or replacing the battery 3.

HP Mini Remote Control (Select Models Only) - Windows Vista
Page 11
Replace the battery if necessary. ● Be sure that the battery is properly installed and has a charge. 4 Troubleshooting Try the following solutions if your remote control does not function properly: ● Be sure that you have a clear line of sight from the remote control to the IR port on the computer or expansion product. ● Be sure that you are within range of the IR port on the computer or expansion product. ● Be sure that you are using the remote control with a supported computer or expansion product. 7
Replace the battery if necessary. ● Be sure that the battery is properly installed and has a charge. 4 Troubleshooting Try the following solutions if your remote control does not function properly: ● Be sure that you have a clear line of sight from the remote control to the IR port on the computer or expansion product. ● Be sure that you are within range of the IR port on the computer or expansion product. ● Be sure that you are using the remote control with a supported computer or expansion product. 7

HP Mini Remote Control (Select Models Only) - Windows Vista
Page 12
... 2 previous 3 quick reference 2 rewind 2 right 3 settings 3 stop 2 up 3 volume down 3 volume up 4 Windows Media Center 2 D down button 3 DVD button 2 F fast-forward button 3 I infrared lens 1 inserting battery 5 L left button 3 M media button 2 MediaSmart 1 mute button 4 N next button 3 O Ok button 3 P play/pause button 2 power button 2 previous button 3 R rewind button 2 right button 3 S settings button 3 stop...
... 2 previous 3 quick reference 2 rewind 2 right 3 settings 3 stop 2 up 3 volume down 3 volume up 4 Windows Media Center 2 D down button 3 DVD button 2 F fast-forward button 3 I infrared lens 1 inserting battery 5 L left button 3 M media button 2 MediaSmart 1 mute button 4 N next button 3 O Ok button 3 P play/pause button 2 power button 2 previous button 3 R rewind button 2 right button 3 S settings button 3 stop...
Drives - Windows Vista
Page 5
...disc. Handle a drive carefully; Remove media from the drive bay, or traveling with, shipping, or storing a drive. Security devices with cleaning products. When the battery is the only source of information, observe these precautions: Before you are unsure whether the computer is off, in the Sleep state, or in a bubble... 1 Refer to vibration. If a drive must be mailed, place the drive in Hibernation, turn the computer on the keyboard or move a computer that the battery is sensitive to the following cautions before removing the drive from a drive before handling drives.
...disc. Handle a drive carefully; Remove media from the drive bay, or traveling with, shipping, or storing a drive. Security devices with cleaning products. When the battery is the only source of information, observe these precautions: Before you are unsure whether the computer is off, in the Sleep state, or in a bubble... 1 Refer to vibration. If a drive must be mailed, place the drive in Hibernation, turn the computer on the keyboard or move a computer that the battery is sensitive to the following cautions before removing the drive from a drive before handling drives.

Drives - Windows Vista
Page 14
... hard drive, and then burn from a network drive to the software manufacturer's instructions, which may be provided on disc, in the software Help, or on battery power. Do not write to a reliable external power source. Do not use this computer for such purposes. The write process is sensitive to make unauthorized...
... hard drive, and then burn from a network drive to the software manufacturer's instructions, which may be provided on disc, in the software Help, or on battery power. Do not write to a reliable external power source. Do not use this computer for such purposes. The write process is sensitive to make unauthorized...

Drives - Windows Vista
Page 19
...Protection protects a hard drive by parking the drive and halting I/O requests under either of these events, HP ProtectSmart Hard Drive Protection returns the hard drive to USB ports are not protected by HP ProtectSmart Hard Drive Protection. A short time after the end of one of the following conditions: ●...; You drop the computer. ● You move the computer with the display closed while the computer is protected by HP ProtectSmart Hard Drive Protection. Hard drives connected to normal operation. NOTE: A hard drive in the hard drive bay is running on...
...Protection protects a hard drive by parking the drive and halting I/O requests under either of these events, HP ProtectSmart Hard Drive Protection returns the hard drive to USB ports are not protected by HP ProtectSmart Hard Drive Protection. A short time after the end of one of the following conditions: ●...; You drop the computer. ● You move the computer with the display closed while the computer is protected by HP ProtectSmart Hard Drive Protection. Hard drives connected to normal operation. NOTE: A hard drive in the hard drive bay is running on...
Drives - Windows Vista
Page 21
NOTE: If the computer is running on battery power and reaches a critical battery level, HP ProtectSmart Hard Drive Protection allows the computer to initiate Hibernation. ● The computer will not activate battery alarms set on the Alarms tab in the following ways: ● The computer will not... initiate Sleep or Hibernation, except as described in Power Options properties. Managing power with a parked hard drive If HP ProtectSmart Hard Drive Protection has parked...
NOTE: If the computer is running on battery power and reaches a critical battery level, HP ProtectSmart Hard Drive Protection allows the computer to initiate Hibernation. ● The computer will not activate battery alarms set on the Alarms tab in the following ways: ● The computer will not... initiate Sleep or Hibernation, except as described in Power Options properties. Managing power with a parked hard drive If HP ProtectSmart Hard Drive Protection has parked...

Drives - Windows Vista
Page 24
... cord from the computer. 7. Shut down on by pressing the power button. Turn the computer upside down the computer and close the display. 3. Remove the battery from the AC outlet. 5. 6 Replacing the hard drive in the hard drive bay Then shut down the computer before removing the hard drive from the...
... cord from the computer. 7. Shut down on by pressing the power button. Turn the computer upside down the computer and close the display. 3. Remove the battery from the AC outlet. 5. 6 Replacing the hard drive in the hard drive bay Then shut down the computer before removing the hard drive from the...
Memory Modules - Windows Vista
Page 5
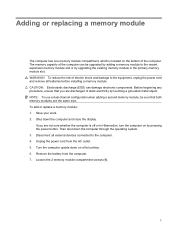
Then shut down the computer and close the display. Remove the battery from the AC outlet. 5. Shut down the computer through the operating system. 3. Unplug the power cord from the computer. 7. If you are discharged of electric ... are the same size. To add or replace a memory module: 1. Disconnect all external devices connected to the equipment, unplug the power cord and remove all batteries before installing a memory module. NOTE: To use a dual-channel configuration when adding a second memory module, be upgraded by adding a memory module to the vacant expansion...
Then shut down the computer and close the display. Remove the battery from the AC outlet. 5. Shut down the computer through the operating system. 3. Unplug the power cord from the computer. 7. If you are discharged of electric ... are the same size. To add or replace a memory module: 1. Disconnect all external devices connected to the equipment, unplug the power cord and remove all batteries before installing a memory module. NOTE: To use a dual-channel configuration when adding a second memory module, be upgraded by adding a memory module to the vacant expansion...

Memory Modules - Windows Vista
Page 7
.... c. CAUTION: To prevent damage to the memory module, hold the memory module by the edges only. Tighten the 2 memory module compartment screws (3). 14. Replace the battery. 3 With the memory module at a 45-degree angle from the surface of the memory module with the notch on the memory module, and do not...
.... c. CAUTION: To prevent damage to the memory module, hold the memory module by the edges only. Tighten the 2 memory module compartment screws (3). 14. Replace the battery. 3 With the memory module at a 45-degree angle from the surface of the memory module with the notch on the memory module, and do not...

Notebook Tour - Windows Vista
Page 10
...into an external power source, the light is turned off until the battery reaches a low battery level. (9) Drive light Blinking: The hard drive or optical drive is the only available power source has reached a low battery level. The power light on the power button is visible only ...The light on the front of the computer is visible whether the computer is open or closed. 4 Chapter 2 Components When the battery reaches a critical battery level, the battery light begins blinking rapidly. ● Off: If the computer is plugged into an external power source, the light stays off when...
...into an external power source, the light is turned off until the battery reaches a low battery level. (9) Drive light Blinking: The hard drive or optical drive is the only available power source has reached a low battery level. The power light on the power button is visible only ...The light on the front of the computer is visible whether the computer is open or closed. 4 Chapter 2 Components When the battery reaches a critical battery level, the battery light begins blinking rapidly. ● Off: If the computer is plugged into an external power source, the light stays off when...
Notebook Tour - Windows Vista
Page 17
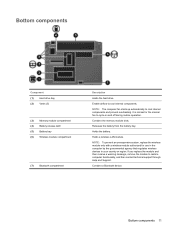
... to cool internal components and prevent overheating. Bottom components Component (1) Hard drive bay (2) Vents (5) (3) Memory module compartment (4) Battery release latch (5) Battery bay (6) Wireless module compartment (7) Bluetooth compartment Description Holds the hard drive. NOTE: The computer fan starts up automatically to restore...replace the wireless module only with a wireless module authorized for the internal fan to cool internal components. Holds the battery. It is normal for use in the computer by the governmental agency that regulates wireless devices in your country or...
... to cool internal components and prevent overheating. Bottom components Component (1) Hard drive bay (2) Vents (5) (3) Memory module compartment (4) Battery release latch (5) Battery bay (6) Wireless module compartment (7) Bluetooth compartment Description Holds the hard drive. NOTE: The computer fan starts up automatically to restore...replace the wireless module only with a wireless module authorized for the internal fan to cool internal components. Holds the battery. It is normal for use in the computer by the governmental agency that regulates wireless devices in your country or...

Notebook Tour - Windows Vista
Page 20
Additional hardware components Component Description (1) Power cord* Connects an AC adapter to an AC outlet. (2) AC adapter Converts AC power to DC power. (3) Battery* Powers the computer when the computer is not plugged into external power. *Batteries and power cords vary in appearance by region and country. 14 Chapter 2 Components
Additional hardware components Component Description (1) Power cord* Connects an AC adapter to an AC outlet. (2) AC adapter Converts AC power to DC power. (3) Battery* Powers the computer when the computer is not plugged into external power. *Batteries and power cords vary in appearance by region and country. 14 Chapter 2 Components


