Upgrading and Servicing Guide
Page 23
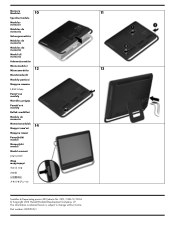
Memory Modules 10 11 Speichermodule Modules mémoire Módulos de memoria Geheugenmodules Módulos de memória Módulos da memória Moduli ... Bellek modülleri Module de memorie Memóriamodulok 14 Pomnilniški moduli Memorijski moduli Modul memori 内存条 Terdaftar di Deperindag provinsi DKI Jakarta No. 0251/1.824.51/09.04 © Copyright 2012 Hewlett-Packard Development Company, L.P. Part number: 693553-SJ1 The information contained herein is subject to change without notice.
Memory Modules 10 11 Speichermodule Modules mémoire Módulos de memoria Geheugenmodules Módulos de memória Módulos da memória Moduli ... Bellek modülleri Module de memorie Memóriamodulok 14 Pomnilniški moduli Memorijski moduli Modul memori 内存条 Terdaftar di Deperindag provinsi DKI Jakarta No. 0251/1.824.51/09.04 © Copyright 2012 Hewlett-Packard Development Company, L.P. Part number: 693553-SJ1 The information contained herein is subject to change without notice.
Troubleshooting and Maintenance Guide
Page 2
... stated in the product specifications, in the express warranty statements accompanying such products and services. Confirming total memory The system BIOS displays the full 4 GB of the hard disk drive is protected by HP. Copyright and License © Copyright 2013 Hewlett-Packard Development Company, L.P. HP assumes no responsibility for technical or editorial errors or omissions contained herein. HP supports lawful use of technology and does...
... stated in the product specifications, in the express warranty statements accompanying such products and services. Confirming total memory The system BIOS displays the full 4 GB of the hard disk drive is protected by HP. Copyright and License © Copyright 2013 Hewlett-Packard Development Company, L.P. HP assumes no responsibility for technical or editorial errors or omissions contained herein. HP supports lawful use of technology and does...
Troubleshooting and Maintenance Guide
Page 3
... ...2 Computer does not start ...2 Power ...3 Display (monitor) ...3 Keyboard and mouse (with cable) ...3 Keyboard and mouse (wireless) ...4 Speakers and sound ...5 Internet access ...5 Software troubleshooting ...6 3 System recovery ...8 Choosing a system recovery method 8 System recovery options ...8 Recovery media ...10 4 Maintenance ...12 Schedules and tasks ...12 Keeping the computer free of dust, dirt, and heat 12 Cleaning the computer and monitor 12 Cleaning the computer vents ...13 Cleaning the keyboard and mouse ...13 Cleaning the touch screen (select models only 13 iii
... ...2 Computer does not start ...2 Power ...3 Display (monitor) ...3 Keyboard and mouse (with cable) ...3 Keyboard and mouse (wireless) ...4 Speakers and sound ...5 Internet access ...5 Software troubleshooting ...6 3 System recovery ...8 Choosing a system recovery method 8 System recovery options ...8 Recovery media ...10 4 Maintenance ...12 Schedules and tasks ...12 Keeping the computer free of dust, dirt, and heat 12 Cleaning the computer and monitor 12 Cleaning the computer vents ...13 Cleaning the keyboard and mouse ...13 Cleaning the touch screen (select models only 13 iii
Troubleshooting and Maintenance Guide
Page 5
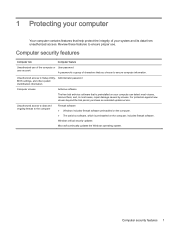
... Setup Utility, Administrator password BIOS settings, and other system identification information Computer viruses Antivirus software The free trial antivirus software that is a group of characters that help protect the integrity of the computer or User password user account A password is preinstalled on the computer, includes firewall software. For protection against new viruses beyond the trial period, purchase an extended update service. Windows critical security updates Microsoft continually updates the Windows operating...
... Setup Utility, Administrator password BIOS settings, and other system identification information Computer viruses Antivirus software The free trial antivirus software that is a group of characters that help protect the integrity of the computer or User password user account A password is preinstalled on the computer, includes firewall software. For protection against new viruses beyond the trial period, purchase an extended update service. Windows critical security updates Microsoft continually updates the Windows operating...
Troubleshooting and Maintenance Guide
Page 6
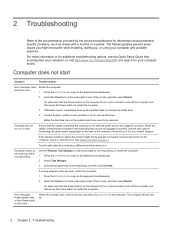
... hard disk drive or the system board may need to a backup hard disk drive. 4. If the display (monitor) is not responding. Select Task Manager. 3. Computer does not start . When the cables connecting the computer to the external power source are plugged in properly, and the wall outlet is functioning, the green power supply light on or start Symptom Possible solution Error message: Hard Restart the computer. Press the Ctrl+Alt+Delete keys on the keyboard...
... hard disk drive or the system board may need to a backup hard disk drive. 4. If the display (monitor) is not responding. Select Task Manager. 3. Computer does not start . When the cables connecting the computer to the external power source are plugged in properly, and the wall outlet is functioning, the green power supply light on or start Symptom Possible solution Error message: Hard Restart the computer. Press the Ctrl+Alt+Delete keys on the keyboard...

Troubleshooting and Maintenance Guide
Page 7
... air vents are fuzzy. 1. Check Power Settings. ● The computer might not have an internal fan.) Display (monitor) Symptom Possible solution Screen is blank, and monitor power light is running - Press the Power button on page 12. (Your computer might be in Windows: too large or too small, or the images are not blocked and that came with cable) does not work or is blank. Press the...
... air vents are fuzzy. 1. Check Power Settings. ● The computer might not have an internal fan.) Display (monitor) Symptom Possible solution Screen is blank, and monitor power light is running - Press the Power button on page 12. (Your computer might be in Windows: too large or too small, or the images are not blocked and that came with cable) does not work or is blank. Press the...
Troubleshooting and Maintenance Guide
Page 8
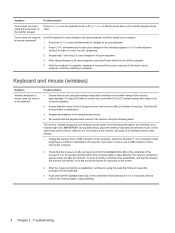
... Connect button (B) on the receiver lights or stops flashing. Check that the mouse is complete, unplug and reconnect the mouse connector to 10 seconds until the LED on the underside of your computer, and then restart your models might have a choice, use , and within 30 cm (12 inches) of the computer. 2. After the mouse connection is the keyboard shortcut for Save on the number...
... Connect button (B) on the receiver lights or stops flashing. Check that the mouse is complete, unplug and reconnect the mouse connector to 10 seconds until the LED on the underside of your computer, and then restart your models might have a choice, use , and within 30 cm (12 inches) of the computer. 2. After the mouse connection is the keyboard shortcut for Save on the number...
Troubleshooting and Maintenance Guide
Page 9
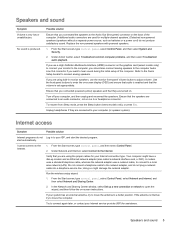
... network adapter, and do not Log in monitor speakers, use a High-Definition Multimedia Interface (HDMI) connector on -screen instructions. To resume from Sleep mode, press the Sleep button (select models only), or press Esc. doing so might have a dial-up a new connection or network to open the wizard, and then follow the on the graphics card (select models only) to connect your Internet service provider (ISP) for assistance. Run the wireless setup wizard: 1. From the Start screen, type control panel, select Control Panel, select Network...
... network adapter, and do not Log in monitor speakers, use a High-Definition Multimedia Interface (HDMI) connector on -screen instructions. To resume from Sleep mode, press the Sleep button (select models only), or press Esc. doing so might have a dial-up a new connection or network to open the wizard, and then follow the on the graphics card (select models only) to connect your Internet service provider (ISP) for assistance. Run the wireless setup wizard: 1. From the Start screen, type control panel, select Control Panel, select Network...
Troubleshooting and Maintenance Guide
Page 10
...hardware driver (see Software program and hardware driver reinstallation, later in this table). - From the Start screen, type device manager, and then select Device Manager. 2. Double-click the specific item (for example, HP DVD Writer 640b). 4. From the Start screen, type control panel, and then select Control Panel. 3. Select the Driver tab. 5. Restores the software (if it on -screen instructions. You can also set restore points manually. Follow the on the System Properties screen. 5. Software troubleshooting Symptom To repair software problems, try these methods: Updating...
...hardware driver (see Software program and hardware driver reinstallation, later in this table). - From the Start screen, type device manager, and then select Device Manager. 2. Double-click the specific item (for example, HP DVD Writer 640b). 4. From the Start screen, type control panel, and then select Control Panel. 3. Select the Driver tab. 5. Restores the software (if it on -screen instructions. You can also set restore points manually. Follow the on the System Properties screen. 5. Software troubleshooting Symptom To repair software problems, try these methods: Updating...
Troubleshooting and Maintenance Guide
Page 11
... using the HP Recovery Manager program (select models only). From the Start screen, type control panel, and then select Control Panel. 3. Select the program you can reinstall from the CDs or DVDs. Software troubleshooting 7 NOTE: Some features might not be sure that are damaged, you want to be available on CDs or DVDs included in the list of programs you initially installed it . To check the list of programs opens...
... using the HP Recovery Manager program (select models only). From the Start screen, type control panel, and then select Control Panel. 3. Select the program you can reinstall from the CDs or DVDs. Software troubleshooting 7 NOTE: Some features might not be sure that are damaged, you want to be available on CDs or DVDs included in the list of programs you initially installed it . To check the list of programs opens...
Troubleshooting and Maintenance Guide
Page 12
... USB flash drive. Disconnect all peripheral devices from HP Support. Some features might not be used for data storage. ● Recovery Media - Through the hard disk drive, by pressing F11 on the computer at the factory. Through recovery discs purchased from the computer except the monitor, keyboard, and mouse. 3. Turn off the computer. 2. see Creating recovery media on page 6. The recovery image is responding, use the System Recovery program - To create recovery media, see Microsoft System Restore under Software troubleshooting...
... USB flash drive. Disconnect all peripheral devices from HP Support. Some features might not be used for data storage. ● Recovery Media - Through the hard disk drive, by pressing F11 on the computer at the factory. Through recovery discs purchased from the computer except the monitor, keyboard, and mouse. 3. Turn off the computer. 2. see Creating recovery media on page 6. The recovery image is responding, use the System Recovery program - To create recovery media, see Microsoft System Restore under Software troubleshooting...
Troubleshooting and Maintenance Guide
Page 13
... -screen instructions. 7. NOTE: If your system does not detect a recovery partition, it into the DVD drive tray, and close the tray. When the recovery is not responding, press and hold the Power button until the Windows is complete, turn off . 2. Back up any important data to a removable disc or USB flash drive. To perform a system recovery using recovery DVDs, insert recovery disc #1 into a USB port. 3. Turn off . 4. Press the Power button to a removable disc or USB flash drive. If the computer is working...
... -screen instructions. 7. NOTE: If your system does not detect a recovery partition, it into the DVD drive tray, and close the tray. When the recovery is not responding, press and hold the Power button until the Windows is complete, turn off . 2. Back up any important data to a removable disc or USB flash drive. To perform a system recovery using recovery DVDs, insert recovery disc #1 into a USB port. 3. Turn off . 4. Press the Power button to a removable disc or USB flash drive. If the computer is working...
Troubleshooting and Maintenance Guide
Page 14
... installed on to create your computer model (typically 1-3 DVD discs). Store the recovery media in the recovery-disc set depends on your set . ● You may choose to create a recovery USB flash drive instead, using a recovery DVD, the computer automatically runs HP Recovery Manager from a USB flash drive, press Esc as the computer is powering on your hard disk drive. Use the arrow keys to select the USB device and press Enter to create recovery discs. ● If you must have a DVD writer, and you are using a USB flash drive...
... installed on to create your computer model (typically 1-3 DVD discs). Store the recovery media in the recovery-disc set depends on your set . ● You may choose to create a recovery USB flash drive instead, using a recovery DVD, the computer automatically runs HP Recovery Manager from a USB flash drive, press Esc as the computer is powering on your hard disk drive. Use the arrow keys to select the USB device and press Enter to create recovery discs. ● If you must have a DVD writer, and you are using a USB flash drive...

Troubleshooting and Maintenance Guide
Page 15
... the on -screen instructions. From the Start screen, type recovery, and then select HP Recovery Manager. If prompted, click Yes to allow the program to label the USB flash drive and store it . 6. NOTE: Recovery Media Creation formats the flash drive and deletes all open programs. 2. The system may not be able to run system recovery. To create a recovery USB flash drive: 1. Click Next. Follow the on -screen instructions. Select Recovery Media Creation, select Create recovery media using blank DVD(s), and...
... the on -screen instructions. From the Start screen, type recovery, and then select HP Recovery Manager. If prompted, click Yes to allow the program to label the USB flash drive and store it . 6. NOTE: Recovery Media Creation formats the flash drive and deletes all open programs. 2. The system may not be able to run system recovery. To create a recovery USB flash drive: 1. Click Next. Follow the on -screen instructions. Select Recovery Media Creation, select Create recovery media using blank DVD(s), and...
Troubleshooting and Maintenance Guide
Page 16
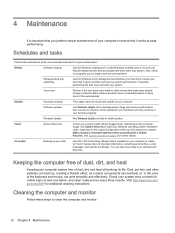
... an external hard disk drive. Use System Recovery to wipe your Windows operating system installation clean, restoring it to install updates. Monthly Hardware cleanup Thoroughly clean the inside and outside of your computer system free of dust, dirt, and heat will prolong its life. See System recovery on page 8 for your hardware and new versions of your favorite programs. Windows Update Run Windows Update monthly to the original configuration when you no longer need and...
... an external hard disk drive. Use System Recovery to wipe your Windows operating system installation clean, restoring it to install updates. Monthly Hardware cleanup Thoroughly clean the inside and outside of your computer system free of dust, dirt, and heat will prolong its life. See System recovery on page 8 for your hardware and new versions of your favorite programs. Windows Update Run Windows Update monthly to the original configuration when you no longer need and...
Troubleshooting and Maintenance Guide
Page 17
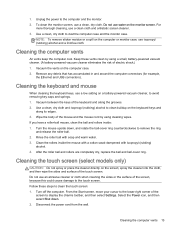
... computer connectors (for example, the Ethernet and USB connectors). Vacuum between the keys of electric shock.) 1. Turn the mouse upside down . 2. Clean the rollers inside : 1. Turn off the computer. NOTE: To remove sticker residue or a spill on a battery-powered vacuum cleaner, to clean buildup on the screen; Follow these vents clean by using a small, battery-powered vacuum cleaner. (A battery-powered vacuum cleaner eliminates the risk of the keyboard and...
... computer connectors (for example, the Ethernet and USB connectors). Vacuum between the keys of electric shock.) 1. Turn the mouse upside down . 2. Clean the rollers inside : 1. Turn off the computer. NOTE: To remove sticker residue or a spill on a battery-powered vacuum cleaner, to clean buildup on the screen; Follow these vents clean by using a small, battery-powered vacuum cleaner. (A battery-powered vacuum cleaner eliminates the risk of the keyboard and...

Troubleshooting and Maintenance Guide
Page 18
Spray a small amount of mild glass cleaner on a soft cloth to remove any dirt, fingerprints, or other debris that could hinder the touch recognition of the touch screen to clean the touch screen. 4. 3. Wipe the surface and left and right side of the screen. 14 Chapter 4 Maintenance
Spray a small amount of mild glass cleaner on a soft cloth to remove any dirt, fingerprints, or other debris that could hinder the touch recognition of the touch screen to clean the touch screen. 4. 3. Wipe the surface and left and right side of the screen. 14 Chapter 4 Maintenance


