
HP Notebook Hard Drives & Solid State Drives Identifying, Preventing, Diagnosing and Recovering from Drive Failures Care and Mai
Page 6
.../c01600726.pdf. Updates to the Intel Matrix Storage Manager driver are configured with Intel® Application Accelerator drivers. Intel Matrix Storage Manager Driver provides support for the SATA Advanced Host Controller (AHCI) Interface. To download the latest version of the Intel Matrix Storage Technology driver: http://www8.hp.com/us/en/support-drivers.html Installing SATA drivers SATA Native Mode is a storage interface technology that could affect hard disk drive performance...
.../c01600726.pdf. Updates to the Intel Matrix Storage Manager driver are configured with Intel® Application Accelerator drivers. Intel Matrix Storage Manager Driver provides support for the SATA Advanced Host Controller (AHCI) Interface. To download the latest version of the Intel Matrix Storage Technology driver: http://www8.hp.com/us/en/support-drivers.html Installing SATA drivers SATA Native Mode is a storage interface technology that could affect hard disk drive performance...

HP Pavilion TouchSmart 11 Notebook PC - Maintenance and Service Guide
Page 34
... Customer SelfRepair parts NOTE: The Customer Self-Repair program is supported in all locations. Check your warranty to access and replace Customer SelfRepair parts successfully. This chapter provides removal and replacement procedures for Customer Self-Repair parts There are on page 13 for details. Make special note of your location. Installing a part not supported by the Customer Self-Repair program may void your computer, including model, serial number, product key, and...
... Customer SelfRepair parts NOTE: The Customer Self-Repair program is supported in all locations. Check your warranty to access and replace Customer SelfRepair parts successfully. This chapter provides removal and replacement procedures for Customer Self-Repair parts There are on page 13 for details. Make special note of your location. Installing a part not supported by the Customer Self-Repair program may void your computer, including model, serial number, product key, and...
HP Pavilion TouchSmart 11 Notebook PC - Maintenance and Service Guide
Page 41
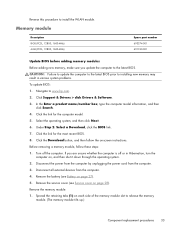
... removing a memory module, follow the on-screen instructions. Disconnect all external devices from the computer. 3. Spread the retaining tabs (1) on , and then shut it down through the operating system. 2. Under Step 2: Select a Download, click the BIOS link. 7. Navigate to release the memory module. (The memory module tilts up.) Component replacement procedures 33 Turn off or in various system problems. To update BIOS: 1. Remove the memory module: 1. In the Enter a product name/number box, type the...
... removing a memory module, follow the on-screen instructions. Disconnect all external devices from the computer. 3. Spread the retaining tabs (1) on , and then shut it down through the operating system. 2. Under Step 2: Select a Download, click the BIOS link. 7. Navigate to release the memory module. (The memory module tilts up.) Component replacement procedures 33 Turn off or in various system problems. To update BIOS: 1. Remove the memory module: 1. In the Enter a product name/number box, type the...

HP Pavilion TouchSmart 11 Notebook PC - Maintenance and Service Guide
Page 43
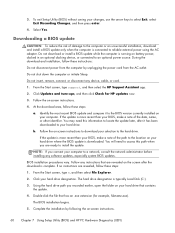
... on, and then shut it down through the operating system. 2. Release the RTC battery cable (2) from the system board. 2. 6 Removal and replacement procedures for Authorized Service Provider only parts. Accessing these steps: 1. Remove the RTC battery: 1. Remove the battery (see Service cover on page 28). Make special note of each screw size and location during removal and replacement. Disconnect the RTC battery cable (1) from the routing channel built into the bottom...
... on, and then shut it down through the operating system. 2. Release the RTC battery cable (2) from the system board. 2. 6 Removal and replacement procedures for Authorized Service Provider only parts. Accessing these steps: 1. Remove the RTC battery: 1. Remove the battery (see Service cover on page 28). Make special note of each screw size and location during removal and replacement. Disconnect the RTC battery cable (1) from the routing channel built into the bottom...
HP Pavilion TouchSmart 11 Notebook PC - Maintenance and Service Guide
Page 68
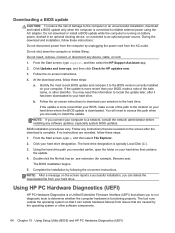
... insert, remove, connect, or disconnect any software updates, especially system BIOS updates. You will need this path when you recorded earlier, open the folder on -screen instructions to the hard drive. 3. To exit Setup Utility (BIOS) without saving your computer. Downloading a BIOS update CAUTION: To reduce the risk of the path to the location on your changes, use the arrow keys to a network, consult the network administrator before installing any device, cable, or cord. 1. From the Start screen, type support, and...
... insert, remove, connect, or disconnect any software updates, especially system BIOS updates. You will need this path when you recorded earlier, open the folder on -screen instructions to the hard drive. 3. To exit Setup Utility (BIOS) without saving your computer. Downloading a BIOS update CAUTION: To reduce the risk of the path to the location on your changes, use the arrow keys to a network, consult the network administrator before installing any device, cable, or cord. 1. From the Start screen, type support, and...
HP Pavilion TouchSmart 11 Notebook PC - Maintenance and Service Guide
Page 75
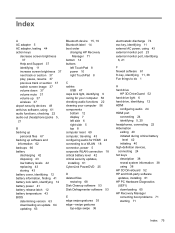
... the backups you want to recover the computer's original factory partitioning and content, you can use the Drivers and Applications Reinstall option of Windows Refresh or a reinstallation. Windows creates system restore points automatically during a Windows update and other system maintenance events. From the Start screen, type h, and then select Help and Support. ● If you wish to remove the recovery partition to reclaim hard drive space, HP Recovery Manager offers the Remove Recovery Partition option. For more information, see Remove everything...
... the backups you want to recover the computer's original factory partitioning and content, you can use the Drivers and Applications Reinstall option of Windows Refresh or a reinstallation. Windows creates system restore points automatically during a Windows update and other system maintenance events. From the Start screen, type h, and then select Help and Support. ● If you wish to remove the recovery partition to reclaim hard drive space, HP Recovery Manager offers the Remove Recovery Partition option. For more information, see Remove everything...

HP Pavilion TouchSmart 11 Notebook PC - Maintenance and Service Guide
Page 84
...L left-side components 10 light components 8 lights AC adapter 11 caps lock 8 hard drive 10 mute 8 power 8, 10 webcamera 4 wireless 8 M mass storage device illustrated 17 precautions 22 spare part numbers 17 media card reader board removal 48 spare part number 15, 20, 48 memory card reader 10 memory module product description 1 removal 33 spare part numbers 16, 19, 33 microphone location 5 product description 2 microphone jack 11 model name 1 monitor connector board removal 51 spare part number 15, 20, 51 monitor port 10 mute light 8 N network jack 11 O operating system, product description...
...L left-side components 10 light components 8 lights AC adapter 11 caps lock 8 hard drive 10 mute 8 power 8, 10 webcamera 4 wireless 8 M mass storage device illustrated 17 precautions 22 spare part numbers 17 media card reader board removal 48 spare part number 15, 20, 48 memory card reader 10 memory module product description 1 removal 33 spare part numbers 16, 19, 33 microphone location 5 product description 2 microphone jack 11 model name 1 monitor connector board removal 51 spare part number 15, 20, 51 monitor port 10 mute light 8 N network jack 11 O operating system, product description...
User Guide
Page 5
... Locating software ...4 Right side ...5 Left side ...6 Display ...7 Top ...8 TouchPad ...8 Lights ...9 Buttons and speakers ...10 Keys ...11 Bottom ...12 Labels ...13 3 Connecting to a network ...15 Connecting to a wireless network ...15 Using the wireless controls 15 Using the wireless button 15 Using operating system controls 15 Sharing data and drives and accessing software 16 Using a WLAN ...16 Using an Internet service provider 17 Setting up a WLAN 17 Configuring a wireless router 17 Protecting your WLAN 18 Connecting to a WLAN 18 Using Bluetooth wireless devices (select models...
... Locating software ...4 Right side ...5 Left side ...6 Display ...7 Top ...8 TouchPad ...8 Lights ...9 Buttons and speakers ...10 Keys ...11 Bottom ...12 Labels ...13 3 Connecting to a network ...15 Connecting to a wireless network ...15 Using the wireless controls 15 Using the wireless button 15 Using operating system controls 15 Sharing data and drives and accessing software 16 Using a WLAN ...16 Using an Internet service provider 17 Setting up a WLAN 17 Configuring a wireless router 17 Protecting your WLAN 18 Connecting to a WLAN 18 Using Bluetooth wireless devices (select models...

User Guide
Page 7
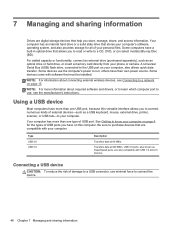
... Storing a user-replaceable battery 43 Disposing of a user-replaceable battery 43 Replacing a user-replaceable battery 43 Running on external AC power ...43 Troubleshooting power problems 44 HP CoolSense (select models only 44 Shutting down (turning off) the computer 45 7 Managing and sharing information ...46 Using a USB device ...46 Connecting a USB device 46 Removing a USB device ...47 Inserting and removing a memory card 47 8 Maintaining your computer ...49 Improving performance ...49 Handling drives ...49 Replacing a hard drive ...49 Using HP 3D DriveGuard (select models only 52...
... Storing a user-replaceable battery 43 Disposing of a user-replaceable battery 43 Replacing a user-replaceable battery 43 Running on external AC power ...43 Troubleshooting power problems 44 HP CoolSense (select models only 44 Shutting down (turning off) the computer 45 7 Managing and sharing information ...46 Using a USB device ...46 Connecting a USB device 46 Removing a USB device ...47 Inserting and removing a memory card 47 8 Maintaining your computer ...49 Improving performance ...49 Handling drives ...49 Replacing a hard drive ...49 Using HP 3D DriveGuard (select models only 52...
User Guide
Page 8
...up your software applications and information 62 Using an optional security cable lock 62 10 Using Setup Utility (BIOS) and HP PC Hardware Diagnostics (UEFI 63 Starting Setup Utility (BIOS) ...63 Updating the BIOS ...63 Determining the BIOS version 63 Downloading a BIOS update 64 Using HP PC Hardware Diagnostics (UEFI 64 Downloading HP PC Hardware Diagnostics (UEFI) to a USB device 65 11 Backing up, restoring, and recovering ...66 Creating recovery media and backups 66 Creating HP Recovery media 67 Restore and recovery ...68 Using Windows Refresh for quick and easy recovery 69 Remove...
...up your software applications and information 62 Using an optional security cable lock 62 10 Using Setup Utility (BIOS) and HP PC Hardware Diagnostics (UEFI 63 Starting Setup Utility (BIOS) ...63 Updating the BIOS ...63 Determining the BIOS version 63 Downloading a BIOS update 64 Using HP PC Hardware Diagnostics (UEFI 64 Downloading HP PC Hardware Diagnostics (UEFI) to a USB device 65 11 Backing up, restoring, and recovering ...66 Creating recovery media and backups 66 Creating HP Recovery media 67 Restore and recovery ...68 Using Windows Refresh for quick and easy recovery 69 Remove...
User Guide
Page 25
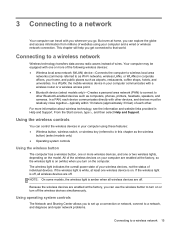
... set up a connection or network, connect to a network, and diagnose and repair network problems. Connecting to that world. 3 Connecting to a network Your computer can travel with a wireless router or a wireless access point. ● Bluetooth device (select models only)-Creates a personal area network (PAN) to connect to other . Connecting to a wireless network Wireless technology transfers data across radio waves instead of your computer are enabled at least one or two wireless lights, depending on or turn on the model. Using the wireless controls...
... set up a connection or network, connect to a network, and diagnose and repair network problems. Connecting to that world. 3 Connecting to a network Your computer can travel with a wireless router or a wireless access point. ● Bluetooth device (select models only)-Creates a personal area network (PAN) to connect to other . Connecting to a wireless network Wireless technology transfers data across radio waves instead of your computer are enabled at least one or two wireless lights, depending on or turn on the model. Using the wireless controls...
User Guide
Page 29
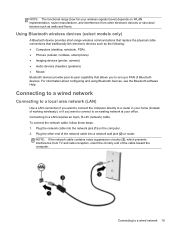
Using Bluetooth wireless devices (select models only) A Bluetooth device provides short-range wireless communications that replace the physical cable connections that traditionally link electronic devices such as walls and floors. For information about configuring and using Bluetooth devices, see the Bluetooth software Help. Connecting to a wired network Connecting to a local area network (LAN) Use a LAN connection if you want to connect to set up a PAN of Bluetooth devices. Plug the network cable into the network jack (1) on WLAN implementation, router manufacturer, and interference from...
Using Bluetooth wireless devices (select models only) A Bluetooth device provides short-range wireless communications that replace the physical cable connections that traditionally link electronic devices such as walls and floors. For information about configuring and using Bluetooth devices, see the Bluetooth software Help. Connecting to a wired network Connecting to a local area network (LAN) Use a LAN connection if you want to connect to set up a PAN of Bluetooth devices. Plug the network cable into the network jack (1) on WLAN implementation, router manufacturer, and interference from...
User Guide
Page 31
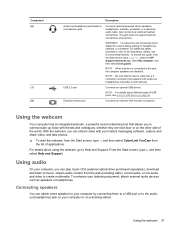
... Support. External monitor port Connects an external VGA monitor or projector. NOTE: Be sure that the device cable has a 4conductor connector that allows you can stream video with friends and colleagues, whether they are disabled. From the Start screen, type h, and then select Help and Support. Using the webcam 21 To reduce the risk of applications. This jack does not support optional microphone-only devices. To access this guide, from the list of personal injury, adjust...
... Support. External monitor port Connects an external VGA monitor or projector. NOTE: Be sure that the device cable has a 4conductor connector that allows you can stream video with friends and colleagues, whether they are disabled. From the Start screen, type h, and then select Help and Support. Using the webcam 21 To reduce the risk of applications. This jack does not support optional microphone-only devices. To access this guide, from the list of personal injury, adjust...
User Guide
Page 56
... power source. Type USB 2.0 USB 3.0 Description Transfers data at 640 MB/s. Some devices use minimal force to a network on select models) Blu-ray Disc (BD). USB 3.0 ports, also known as an optical drive or hard drive, or insert a memory card directly from your phone or camera. Connecting a USB device CAUTION: To reduce the risk of USB port. NOTE: For information about required software and drivers, or to learn which computer port to use, see Connecting to connect the device...
... power source. Type USB 2.0 USB 3.0 Description Transfers data at 640 MB/s. Some devices use minimal force to a network on select models) Blu-ray Disc (BD). USB 3.0 ports, also known as an optical drive or hard drive, or insert a memory card directly from your phone or camera. Connecting a USB device CAUTION: To reduce the risk of USB port. NOTE: For information about required software and drivers, or to learn which computer port to use, see Connecting to connect the device...

User Guide
Page 63
..., Disk Defragmenter may set Disk Defragmenter to free up disk space by deleting unnecessary files. 2. You may take more than an hour to AC power. 2. From the Start screen, type d, and then type disk in the search box. Select Settings, and then select Defragment and optimize your computer manually at least once a month. Follow the on -screen instructions. Adding or replacing memory modules Adding memory can defragment your drives. 3. The hard drive...
..., Disk Defragmenter may set Disk Defragmenter to free up disk space by deleting unnecessary files. 2. You may take more than an hour to AC power. 2. From the Start screen, type d, and then type disk in the search box. Select Settings, and then select Defragment and optimize your computer manually at least once a month. Follow the on -screen instructions. Adding or replacing memory modules Adding memory can defragment your drives. 3. The hard drive...
User Guide
Page 74
... download your hard drive. You may need to access this information to locate the update later, after the download is functioning properly. If no instructions are ready to install the update. Follow the on -screen instructions. 4. You will need this path when you connect your BIOS, make a note of the date, name, or other software components. 64 Chapter 10 Using Setup Utility (BIOS) and HP PC Hardware Diagnostics (UEFI) Click your hard drive. BIOS installation procedures vary. From the Start screen, type...
... download your hard drive. You may need to access this information to locate the update later, after the download is functioning properly. If no instructions are ready to install the update. Follow the on -screen instructions. 4. You will need this path when you connect your BIOS, make a note of the date, name, or other software components. 64 Chapter 10 Using Setup Utility (BIOS) and HP PC Hardware Diagnostics (UEFI) Click your hard drive. BIOS installation procedures vary. From the Start screen, type...

User Guide
Page 78
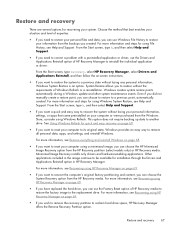
... to reset your computer or were purchased from the HP Recovery partition (select models only) or HP Recovery media. From the Start screen, type h, and then select Help and Support. ● If you want a quick and easy way to recover the system without the requirements of HP Recovery media to restore the factory image to reinstall the individual application or driver. Minimized Image Recovery installs only drivers and hardware-enabling applications. For more information, see Remove...
... to reset your computer or were purchased from the HP Recovery partition (select models only) or HP Recovery media. From the Start screen, type h, and then select Help and Support. ● If you want a quick and easy way to recover the system without the requirements of HP Recovery media to restore the factory image to reinstall the individual application or driver. Minimized Image Recovery installs only drivers and hardware-enabling applications. For more information, see Remove...
User Guide
Page 85
... key, identifying 11, 38 Fun things to do 1 H hard drive HP 3D DriveGuard 52 hard drive light 6 hard drive, identifying 12 HDMI configuring audio 24 HDMI port connecting 24 identifying 5, 20 headphones, connecting 22 Hibernation exiting 40 initiated during critical battery level 42 initiating 40 high-definition devices, connecting 24 hot keys description 38 reveal system information 38 using 38 HP 3D DriveGuard 52 HP and third-party software updates, installing 61 HP PC Hardware Diagnostics (UEFI) downloading 65 HP Recovery Manager correcting boot problems 71 starting...
... key, identifying 11, 38 Fun things to do 1 H hard drive HP 3D DriveGuard 52 hard drive light 6 hard drive, identifying 12 HDMI configuring audio 24 HDMI port connecting 24 identifying 5, 20 headphones, connecting 22 Hibernation exiting 40 initiated during critical battery level 42 initiating 40 high-definition devices, connecting 24 hot keys description 38 reveal system information 38 using 38 HP 3D DriveGuard 52 HP and third-party software updates, installing 61 HP PC Hardware Diagnostics (UEFI) downloading 65 HP Recovery Manager correcting boot problems 71 starting...

User Guide
Page 86
... 47 memory card reader, identifying 6 memory module identifying 12 inserting 55 removing 54 replacing 53 memory module service door, removing 54 microphone, connecting 22 minimized image creating 70 minimized image recovery 70 mouse, external setting preferences 26 mute light, identifying 9 N network jack, identifying 5 O operating environment 73 original system recovery 70 P passwords Setup Utility (BIOS) 60 Windows 60 pinching touch screen gesture 34 pinching TouchPad gesture 28 ports external monitor 6, 21, 23 HDMI 5, 20, 24 USB 2.0 6, 21 USB 3.0 5, 20 VGA 23 power battery 41 power button...
... 47 memory card reader, identifying 6 memory module identifying 12 inserting 55 removing 54 replacing 53 memory module service door, removing 54 microphone, connecting 22 minimized image creating 70 minimized image recovery 70 mouse, external setting preferences 26 mute light, identifying 9 N network jack, identifying 5 O operating environment 73 original system recovery 70 P passwords Setup Utility (BIOS) 60 Windows 60 pinching touch screen gesture 34 pinching TouchPad gesture 28 ports external monitor 6, 21, 23 HDMI 5, 20, 24 USB 2.0 6, 21 USB 3.0 5, 20 VGA 23 power battery 41 power button...
User Guide
Page 87
serial number 13 serial number, computer 13 service labels locating 13 setting password protection on wakeup 40 setup of WLAN 17 Setup Utility (BIOS) passwords 60 Setup Utility (BIOS), using 63 shipping the computer 58 shutdown 45 Sleep exiting 39 initiating 39 slots memory card 6 security cable 6 software CyberLink PowerDVD 25 Disk Cleanup 53 Disk Defragmenter 53 software updates, installing 61 speakers connecting 21 identifying 10 storing a battery 43 supported discs recovery 67 system information hot key 38 system recovery 70 system restore point creating 66 restoring 68 T temperature 43...
serial number 13 serial number, computer 13 service labels locating 13 setting password protection on wakeup 40 setup of WLAN 17 Setup Utility (BIOS) passwords 60 Setup Utility (BIOS), using 63 shipping the computer 58 shutdown 45 Sleep exiting 39 initiating 39 slots memory card 6 security cable 6 software CyberLink PowerDVD 25 Disk Cleanup 53 Disk Defragmenter 53 software updates, installing 61 speakers connecting 21 identifying 10 storing a battery 43 supported discs recovery 67 system information hot key 38 system recovery 70 system restore point creating 66 restoring 68 T temperature 43...


