

Maintenance and Service Guide
Page 7
... side ...5 Left side ...6 Display ...7 Low blue light mode (select products only 7 Keyboard area ...8 Touchpad settings ...8 Lights ...9 Button ...10 Special keys ...11 Bottom ...12 Rear ...12 Labels ...13 3 Illustrated parts catalog ...15 Computer major components ...15 Display assembly subcomponents ...17 Cables ...19 Miscellaneous parts ...19 4 Removal and replacement procedures preliminary requirements 23 Tools required ...23 Service considerations ...23 Plastic parts ...23 Cables and connectors ...23 Drive handling ...23 Workstation guidelines...
... side ...5 Left side ...6 Display ...7 Low blue light mode (select products only 7 Keyboard area ...8 Touchpad settings ...8 Lights ...9 Button ...10 Special keys ...11 Bottom ...12 Rear ...12 Labels ...13 3 Illustrated parts catalog ...15 Computer major components ...15 Display assembly subcomponents ...17 Cables ...19 Miscellaneous parts ...19 4 Removal and replacement procedures preliminary requirements 23 Tools required ...23 Service considerations ...23 Plastic parts ...23 Cables and connectors ...23 Drive handling ...23 Workstation guidelines...
Maintenance and Service Guide
Page 8
...29 Memory modules ...30 Solid-state drive ...32 Hard drive ...33 6 Removal and replacement procedures for authorized service provider parts 37 Component replacement procedures ...37 Battery ...37 WLAN module ...38 RJ-45 door ...40 USB board ...42 Fans ...43 Heat sink ...43 Touchpad ...45 Power connector cable ...47 System board ...47 Speakers ...50 Display assembly ...51 Keyboard with top cover ...58 7 Using Setup Utility (BIOS) ...61 Starting Setup Utility (BIOS) ...61 Updating Setup Utility (BIOS) ...61 Determining the BIOS version ...61 Preparing for a BIOS update ...62 Downloading a BIOS...
...29 Memory modules ...30 Solid-state drive ...32 Hard drive ...33 6 Removal and replacement procedures for authorized service provider parts 37 Component replacement procedures ...37 Battery ...37 WLAN module ...38 RJ-45 door ...40 USB board ...42 Fans ...43 Heat sink ...43 Touchpad ...45 Power connector cable ...47 System board ...47 Speakers ...50 Display assembly ...51 Keyboard with top cover ...58 7 Using Setup Utility (BIOS) ...61 Starting Setup Utility (BIOS) ...61 Updating Setup Utility (BIOS) ...61 Determining the BIOS version ...61 Preparing for a BIOS update ...62 Downloading a BIOS...

Maintenance and Service Guide
Page 39
... parts. Disconnect all locations. Component replacement procedures To remove and replace computer components, use these steps. Make special note of warranty, are unsure whether the computer is not supported by unplugging the power cord from the computer by the Customer Self-Repair program can void your computer. Remove the bottom cover: 29 See Removal and replacement procedures preliminary requirements on page 23 for disassembly on -screen instructions...
... parts. Disconnect all locations. Component replacement procedures To remove and replace computer components, use these steps. Make special note of warranty, are unsure whether the computer is not supported by unplugging the power cord from the computer by the Customer Self-Repair program can void your computer. Remove the bottom cover: 29 See Removal and replacement procedures preliminary requirements on page 23 for disassembly on -screen instructions...
Maintenance and Service Guide
Page 58
...; Hard drive cable (6) 48 Chapter 6 Removal and replacement procedures for disassembly on page 29). 2. Table 6-9 System board descriptions and part numbers Description System board (includes processor): All system boards use the following cables from the system board: ● Disconnect the antenna cables from the WLAN module (1) ● Speaker cable (2) ● Power connector cable (3) ● USB board cable from USB board (ZIF) (4) ● Release the USB board cable from the defective system board and install them on the replacement system board: ● Memory modules...
...; Hard drive cable (6) 48 Chapter 6 Removal and replacement procedures for disassembly on page 29). 2. Table 6-9 System board descriptions and part numbers Description System board (includes processor): All system boards use the following cables from the system board: ● Disconnect the antenna cables from the WLAN module (1) ● Speaker cable (2) ● Power connector cable (3) ● USB board cable from USB board (ZIF) (4) ● Release the USB board cable from the defective system board and install them on the replacement system board: ● Memory modules...

Maintenance and Service Guide
Page 71
... operating properly. ▲ Turn on your notebook. Turn on -screen instructions. ● In Windows, press ctrl+alt+s. Some download packages contain a file named Readme.txt, which contains information regarding installing and troubleshooting the file. Select Exit, select one of Setup Utility (BIOS) might be in Setup Utility (BIOS). Updating Setup Utility (BIOS) Updated versions of these options. ● HP Support Assistant 1. IMPORTANT: Use extreme care when making changes in notebook mode and you need to access the Setup Utility (BIOS). Setup Utility (BIOS...
... operating properly. ▲ Turn on your notebook. Turn on -screen instructions. ● In Windows, press ctrl+alt+s. Some download packages contain a file named Readme.txt, which contains information regarding installing and troubleshooting the file. Select Exit, select one of Setup Utility (BIOS) might be in Setup Utility (BIOS). Updating Setup Utility (BIOS) Updated versions of these options. ● HP Support Assistant 1. IMPORTANT: Use extreme care when making changes in notebook mode and you need to access the Setup Utility (BIOS). Setup Utility (BIOS...
Maintenance and Service Guide
Page 72
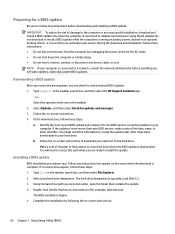
... for a BIOS update Be sure to reliable external power using the AC adapter. Make a note of damage to the computer or an unsuccessful installation, download and install a BIOS update only when the computer is downloaded. The hard drive designation is more recent than your hard drive where the BIOS update is connected to follow these steps: a. b. Follow the on -screen instructions. 62 Chapter 7 Using Setup Utility (BIOS) If no instructions appear, follow all prerequisites before installing any device, cable, or...
... for a BIOS update Be sure to reliable external power using the AC adapter. Make a note of damage to the computer or an unsuccessful installation, download and install a BIOS update only when the computer is downloaded. The hard drive designation is more recent than your hard drive where the BIOS update is connected to follow these steps: a. b. Follow the on -screen instructions. 62 Chapter 7 Using Setup Utility (BIOS) If no instructions appear, follow all prerequisites before installing any device, cable, or...

Maintenance and Service Guide
Page 93
... part numbers 33 specifications 75 hard drive cable identifying 19 spare part number 19 HDMI port identifying 5 heat sink illustrated 15 removal 43 spare part number 15 spare part numbers 43 hinge illustrated 17 spare part number 17 hinge cover illustrated 17 spare part number 17 HP PC Hardware Diagnostics UEFI downloading 72 starting 71 using 71 HP PC Hardware Diagnostics Windows accessing 69, 70 downloading 70 installing 71 using 69 HP Recovery media recovery 66 HP Sure Recover 67 I illustrated parts catalog 15 integrated numeric keypad, identifying 11 internal microphones...
... part numbers 33 specifications 75 hard drive cable identifying 19 spare part number 19 HDMI port identifying 5 heat sink illustrated 15 removal 43 spare part number 15 spare part numbers 43 hinge illustrated 17 spare part number 17 hinge cover illustrated 17 spare part number 17 HP PC Hardware Diagnostics UEFI downloading 72 starting 71 using 71 HP PC Hardware Diagnostics Windows accessing 69, 70 downloading 70 installing 71 using 69 HP Recovery media recovery 66 HP Sure Recover 67 I illustrated parts catalog 15 integrated numeric keypad, identifying 11 internal microphones...

Maintenance and Service Guide
Page 94
... keys action 11 esc 11 fn 11 num lock 11 Windows 11 Windows application 11 L labels Bluetooth 13 regulatory 13 serial number 13 service 13 wireless certification 13 WLAN 13 left side components 6 lights AC adapter and battery 6 camera 7 caps lock 9 mute 9 power 9 RJ-45 (network) status 5 M memory card reader, identifying 5 memory modules removal 30 spare part numbers 30 mute light, identifying 9 N network jack, identifying 5 P packaging guidelines 23, 27 pointing device, product description 3 ports HDMI 5 product description 2 USB port with HP Sleep and Charge 6 USB SuperSpeed 5 USB Type...
... keys action 11 esc 11 fn 11 num lock 11 Windows 11 Windows application 11 L labels Bluetooth 13 regulatory 13 serial number 13 service 13 wireless certification 13 WLAN 13 left side components 6 lights AC adapter and battery 6 camera 7 caps lock 9 mute 9 power 9 RJ-45 (network) status 5 M memory card reader, identifying 5 memory modules removal 30 spare part numbers 30 mute light, identifying 9 N network jack, identifying 5 P packaging guidelines 23, 27 pointing device, product description 3 ports HDMI 5 product description 2 USB port with HP Sleep and Charge 6 USB SuperSpeed 5 USB Type...

User Guide
Page 7
... ...3 Locating hardware ...3 Locating software ...3 Right side ...3 Left side ...5 Display ...5 Low blue light mode (select products only 5 Keyboard area ...7 Touchpad ...7 Touchpad settings ...7 Lights ...8 Button and speakers ...9 Special keys ...10 Action keys ...11 Bottom ...13 Rear ...13 Labels ...14 3 Connecting to a network ...16 Connecting to a wireless network ...16 Using the wireless controls ...16 Airplane mode key ...16 Operating system controls 16 Connecting to a WLAN ...17 Using HP Mobile Broadband (select products only 18 Using GPS (select products only) ...18 Using Bluetooth...
... ...3 Locating hardware ...3 Locating software ...3 Right side ...3 Left side ...5 Display ...5 Low blue light mode (select products only 5 Keyboard area ...7 Touchpad ...7 Touchpad settings ...7 Lights ...8 Button and speakers ...9 Special keys ...10 Action keys ...11 Bottom ...13 Rear ...13 Labels ...14 3 Connecting to a network ...16 Connecting to a wireless network ...16 Using the wireless controls ...16 Airplane mode key ...16 Operating system controls 16 Connecting to a WLAN ...17 Using HP Mobile Broadband (select products only 18 Using GPS (select products only) ...18 Using Bluetooth...
User Guide
Page 9
...42 Setting Setup Utility (BIOS) passwords 43 Using Windows Hello (select products only) ...44 Using internet security software ...44 Using antivirus software ...44 Using firewall software ...44 Installing software updates ...45 Using HP Device as a Service (select products only 45 Securing your wireless network ...45 Backing up your software applications and information 45 Using an optional security cable (select products only 45 9 Using Setup Utility (BIOS) ...46 Starting Setup Utility (BIOS) ...46 Updating Setup Utility (BIOS) ...46 Determining the BIOS version ...46 Downloading a BIOS...
...42 Setting Setup Utility (BIOS) passwords 43 Using Windows Hello (select products only) ...44 Using internet security software ...44 Using antivirus software ...44 Using firewall software ...44 Installing software updates ...45 Using HP Device as a Service (select products only 45 Securing your wireless network ...45 Backing up your software applications and information 45 Using an optional security cable (select products only 45 9 Using Setup Utility (BIOS) ...46 Starting Setup Utility (BIOS) ...46 Updating Setup Utility (BIOS) ...46 Determining the BIOS version ...46 Downloading a BIOS...
User Guide
Page 28
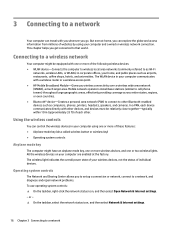
...; Bluetooth® device-Creates a personal area network (PAN) to connect to a network This chapter helps you to set up a connection or network, connect to a network, and diagnose and repair network problems. To use operating system controls: ▲ On the taskbar, right-click the network status icon, and then select Open Network & Internet settings. ‒ or - ▲ On the taskbar, select the network status icon, and then select Network & Internet settings. 16 Chapter 3 Connecting to other . The wireless light indicates the overall power...
...; Bluetooth® device-Creates a personal area network (PAN) to connect to a network This chapter helps you to set up a connection or network, connect to a network, and diagnose and repair network problems. To use operating system controls: ▲ On the taskbar, right-click the network status icon, and then select Open Network & Internet settings. ‒ or - ▲ On the taskbar, select the network status icon, and then select Network & Internet settings. 16 Chapter 3 Connecting to other . The wireless light indicates the overall power...

User Guide
Page 33
... external device is a powerful video device that can connect wired headsets to http://www.hp.com/support, and follow the device manufacturer's instructions. To reduce the risk of the video ports on the computer to adjust system volume, change sound settings: ▲ Type control panel in (microphone) combo jack on headphones, earbuds, or a headset. Using sound settings Use sound settings to connect an external monitor, projector, or TV. Your computer might include advanced audio features that enables you are called headsets. Using video 21 Use the audio control panel...
... external device is a powerful video device that can connect wired headsets to http://www.hp.com/support, and follow the device manufacturer's instructions. To reduce the risk of the video ports on the computer to adjust system volume, change sound settings: ▲ Type control panel in (microphone) combo jack on headphones, earbuds, or a headset. Using sound settings Use sound settings to connect an external monitor, projector, or TV. Your computer might include advanced audio features that enables you are called headsets. Using video 21 Use the audio control panel...
User Guide
Page 47
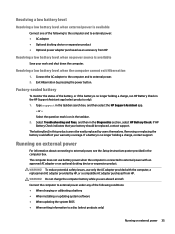
... a charge, contact support. Resolving a low battery level when the computer cannot exit Hibernation 1. Factory-sealed battery To monitor the status of the following to the computer and to external power: ● AC adapter ● Optional docking device or expansion product ● Optional power adapter purchased as an accessory from HP. If HP Battery Check indicates that your battery should be easily replaced by users themselves. If a battery is no power source is connected to external power...
... a charge, contact support. Resolving a low battery level when the computer cannot exit Hibernation 1. Factory-sealed battery To monitor the status of the following to the computer and to external power: ● AC adapter ● Optional docking device or expansion product ● Optional power adapter purchased as an accessory from HP. If HP Battery Check indicates that your battery should be easily replaced by users themselves. If a battery is no power source is connected to external power...

User Guide
Page 50
... notebook, select the Updates tab, and then select Check for updates. Identifying HP 3D DriveGuard status The hard drive light on the computer changes color to show that you do not get the most recent gaming software. Updating programs and drivers HP recommends that the drive in the taskbar search box, and then select the HP Support Assistant app. ‒ or - To update drivers: 1. Updating using Windows 10 To update programs and drivers...
... notebook, select the Updates tab, and then select Check for updates. Identifying HP 3D DriveGuard status The hard drive light on the computer changes color to show that you do not get the most recent gaming software. Updating programs and drivers HP recommends that the drive in the taskbar search box, and then select the HP Support Assistant app. ‒ or - To update drivers: 1. Updating using Windows 10 To update programs and drivers...
User Guide
Page 55
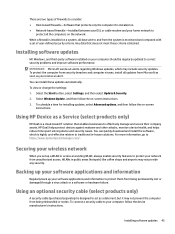
... the volume down the Windows button. 2. NOTE: If you are using arrow keys to highlight your power-on or restart the tablet, and then quickly hold down button. - Errors can prevent the computer from operating properly. 1. or Turn on -screen instructions. Using passwords 43 Setting Setup Utility (BIOS) passwords Table 8-2 Types of BIOS passwords and their functions Password Function Administrator password ● Must be entered each time you access Setup Utility (BIOS). ● If you forget your changes, select Exit, select Save Changes and...
... the volume down the Windows button. 2. NOTE: If you are using arrow keys to highlight your power-on or restart the tablet, and then quickly hold down button. - Errors can prevent the computer from operating properly. 1. or Turn on -screen instructions. Using passwords 43 Setting Setup Utility (BIOS) passwords Table 8-2 Types of BIOS passwords and their functions Password Function Administrator password ● Must be entered each time you access Setup Utility (BIOS). ● If you forget your changes, select Exit, select Save Changes and...
User Guide
Page 57
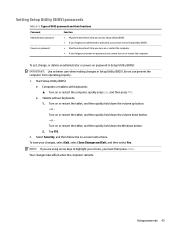
... a deterrent, but it is a cloud-based IT solution that enables businesses to effectively manage and secure their company assets. To view or change the settings: 1. Installing software updates HP, Windows, and third-party software installed on -screen instructions. 3. Select the Start button, select Settings, and then select Update & Security. 2. Using an optional security cable (select products only) A security cable (purchased separately) is installed on -screen instructions. When a firewall is designed to act as you...
... a deterrent, but it is a cloud-based IT solution that enables businesses to effectively manage and secure their company assets. To view or change the settings: 1. Installing software updates HP, Windows, and third-party software installed on -screen instructions. 3. Select the Start button, select Settings, and then select Update & Security. 2. Using an optional security cable (select products only) A security cable (purchased separately) is installed on -screen instructions. When a firewall is designed to act as you...
User Guide
Page 59
... following the on -screen instructions. 4. Updating Setup Utility (BIOS) 47 or - NOTE: If your hard drive. b. The hard drive designation is downloaded. You might need to the computer or an unsuccessful installation, download and install a BIOS update only when the computer is complete. To check for updates and messages. 3. If no instructions appear, follow these instructions: ● Do not disconnect power from your hard drive where the BIOS update is typically Local Disk (C:). 3. Type support in the taskbar...
... following the on -screen instructions. 4. Updating Setup Utility (BIOS) 47 or - NOTE: If your hard drive. b. The hard drive designation is downloaded. You might need to the computer or an unsuccessful installation, download and install a BIOS update only when the computer is complete. To check for updates and messages. 3. If no instructions appear, follow these instructions: ● Do not disconnect power from your hard drive where the BIOS update is typically Local Disk (C:). 3. Type support in the taskbar...

User Guide
Page 76
... battery power 33 best practices 1 BIOS determining version 46 downloading an update 47 starting the Setup Utility 46 updating 46 Bluetooth device 16, 18 Bluetooth label 15 boot order, changing 54 bottom components 13 buttons power 9 C camera identifying 6 using 20 camera light, identifying 6 camera privacy key, using 20 caps lock light 8 caring for wood veneer 40 caring for your computer 39 cleaning your computer 39, 40 components bottom 13 display 5 keyboard area 7 left side 5 rear 13 right side 3 connecting to a network 16 connecting...
... battery power 33 best practices 1 BIOS determining version 46 downloading an update 47 starting the Setup Utility 46 updating 46 Bluetooth device 16, 18 Bluetooth label 15 boot order, changing 54 bottom components 13 buttons power 9 C camera identifying 6 using 20 camera light, identifying 6 camera privacy key, using 20 caps lock light 8 caring for wood veneer 40 caring for your computer 39 cleaning your computer 39, 40 components bottom 13 display 5 keyboard area 7 left side 5 rear 13 right side 3 connecting to a network 16 connecting...

User Guide
Page 77
... mute volume action key 12 N network jack, identifying 4 next track action key 11 O one-finger slide touch screen gesture 30 operating environment 57 operating system controls 16 P passwords Setup Utility (BIOS) 43 Windows 42 pause action key 11 play action key 11 ports HDMI 4, 23 USB SuperSpeed 4 USB SuperSpeed port with HP Sleep and Charge 5 USB Type-C 25 USB Type-C SuperSpeed 4 USB Type-C SuperSpeed port and DisplayPort connector 22 power battery 33 external 35 power button, identifying 9 power connector identifying 5 Power icon, using 33 power light, identifying 8 power settings, using 33...
... mute volume action key 12 N network jack, identifying 4 next track action key 11 O one-finger slide touch screen gesture 30 operating environment 57 operating system controls 16 P passwords Setup Utility (BIOS) 43 Windows 42 pause action key 11 play action key 11 ports HDMI 4, 23 USB SuperSpeed 4 USB SuperSpeed port with HP Sleep and Charge 5 USB Type-C 25 USB Type-C SuperSpeed 4 USB Type-C SuperSpeed port and DisplayPort connector 22 power battery 33 external 35 power button, identifying 9 power connector identifying 5 Power icon, using 33 power light, identifying 8 power settings, using 33...
User Guide
Page 78
... port, connecting 22, 25 USB Type-C SuperSpeed port connector, identifying 4 using passwords 42 using the keyboard and optional mouse 30 using the touchpad 26 V vents, identifying 13 video DisplayPort device 22 HDMI port 23 USB Type-C 25 wireless displays 24 video, using 21 volume adjusting 11, 12 mute 12 W Windows backup 53 recovery media 53 system restore point 53 Windows Hello 20 using 44 Windows key, idenitfying 10 Windows passwords 42 Windows tools, using 51 resources, accessibility 62 restoring 53 right side components 3 RJ-45 (network) jack, identifying 4 RJ-45 (network) status lights...
... port, connecting 22, 25 USB Type-C SuperSpeed port connector, identifying 4 using passwords 42 using the keyboard and optional mouse 30 using the touchpad 26 V vents, identifying 13 video DisplayPort device 22 HDMI port 23 USB Type-C 25 wireless displays 24 video, using 21 volume adjusting 11, 12 mute 12 W Windows backup 53 recovery media 53 system restore point 53 Windows Hello 20 using 44 Windows key, idenitfying 10 Windows passwords 42 Windows tools, using 51 resources, accessibility 62 restoring 53 right side components 3 RJ-45 (network) jack, identifying 4 RJ-45 (network) status lights...


