Start Here
Page 9
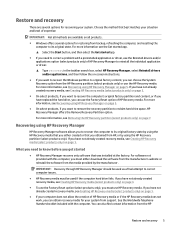
... Recovering using HP Recovery Manager on page 5. What you obtained from support. If you have replaced the hard drive, you can use the Reinstall drivers and/or applications option (select products only) of HP Recovery media. For software not provided with the computer. For more information, see Creating HP Recovery media (select products only) on -screen instructions. ● If you want to recover the Windows partition to original factory content, you get started app. ● If you need...
... Recovering using HP Recovery Manager on page 5. What you obtained from support. If you have replaced the hard drive, you can use the Reinstall drivers and/or applications option (select products only) of HP Recovery media. For software not provided with the computer. For more information, see Creating HP Recovery media (select products only) on -screen instructions. ● If you want to recover the Windows partition to original factory content, you get started app. ● If you need...
Start Here
Page 11
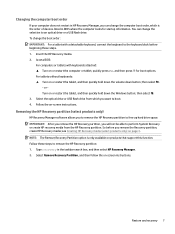
... in HP Recovery Manager, you can change the boot order: IMPORTANT: For a tablet with keyboards attached: ▲ Turn on or restart the computer or tablet, quickly press esc, and then press f9 for startup information. Access BIOS: For computers or tablets with a detachable keyboard, connect the keyboard to the keyboard dock before you to remove the HP Recovery partition to an optical drive or a USB flash drive. or Turn on -screen instructions. To change the selection to free up hard drive...
... in HP Recovery Manager, you can change the boot order: IMPORTANT: For a tablet with keyboards attached: ▲ Turn on or restart the computer or tablet, quickly press esc, and then press f9 for startup information. Access BIOS: For computers or tablets with a detachable keyboard, connect the keyboard to the keyboard dock before you to remove the HP Recovery partition to an optical drive or a USB flash drive. or Turn on -screen instructions. To change the selection to free up hard drive...

Maintenance and Service Guide
Page 6
... battery ...39 Card reader board ...40 Solid-state drive ...42 Fan ...43 System board ...44 Heat sink ...47 TouchPad cable ...50 Speakers ...51 Power connector cable ...52 Display assembly ...53 6 Using Setup Utility (BIOS) ...62 Starting Setup Utility (BIOS) ...62 Updating Setup Utility (BIOS) ...62 Determining the BIOS version ...62 Downloading a BIOS update ...63 7 Using HP PC Hardware Diagnostics (UEFI) ...64 Downloading HP PC Hardware Diagnostics (UEFI) to a USB device 64 8 Specifications ...66 Computer specifications ...66 9 Backing up, restoring, and recovering ...68 Creating recovery...
... battery ...39 Card reader board ...40 Solid-state drive ...42 Fan ...43 System board ...44 Heat sink ...47 TouchPad cable ...50 Speakers ...51 Power connector cable ...52 Display assembly ...53 6 Using Setup Utility (BIOS) ...62 Starting Setup Utility (BIOS) ...62 Updating Setup Utility (BIOS) ...62 Determining the BIOS version ...62 Downloading a BIOS update ...63 7 Using HP PC Hardware Diagnostics (UEFI) ...64 Downloading HP PC Hardware Diagnostics (UEFI) to a USB device 64 8 Specifications ...66 Computer specifications ...66 9 Backing up, restoring, and recovering ...68 Creating recovery...
Maintenance and Service Guide
Page 45
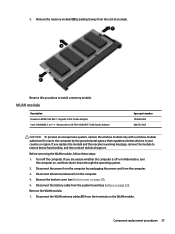
Before removing the WLAN module, follow these steps: 1. Disconnect the battery cable from the computer. 4. Remove the memory module (2) by pulling it down through the operating system. 2. Component replacement procedures 37 Reverse this procedure to restore device functionality, and then contact technical support. Turn off or in your country or region. Disconnect all external devices from the system board (see Bottom cover on page 33). Remove the bottom cover (see Battery on...
Before removing the WLAN module, follow these steps: 1. Disconnect the battery cable from the computer. 4. Remove the memory module (2) by pulling it down through the operating system. 2. Component replacement procedures 37 Reverse this procedure to restore device functionality, and then contact technical support. Turn off or in your country or region. Disconnect all external devices from the system board (see Bottom cover on page 33). Remove the bottom cover (see Battery on...
Maintenance and Service Guide
Page 71
... is connected to the location on -screen instructions. During the download and installation, follow these steps: a. You will need this path when you are ready to your selection to reliable external power using the AC adapter. Double-click the file that appear on -screen instructions to download your hard drive. Updating Setup Utility (BIOS) 63 Downloading a BIOS update CAUTION: To reduce the risk of damage to the computer or an unsuccessful installation, download and install a BIOS update only...
... is connected to the location on -screen instructions. During the download and installation, follow these steps: a. You will need this path when you are ready to your selection to reliable external power using the AC adapter. Double-click the file that appear on -screen instructions to download your hard drive. Updating Setup Utility (BIOS) 63 Downloading a BIOS update CAUTION: To reduce the risk of damage to the computer or an unsuccessful installation, download and install a BIOS update only...

Maintenance and Service Guide
Page 78
... Start button, and then select the Get started ● HP Recovery Manager recovers only software that best matches your situation and level of HP Recovery media or if the HP Recovery media does not work, you can obtain recovery media for recovering your system from support. For more information, see Creating HP Recovery media (select products only) on page 73. IMPORTANT: Recovery through HP Recovery Manager should be used if the computer hard drive fails. Choose the method that was installed...
... Start button, and then select the Get started ● HP Recovery Manager recovers only software that best matches your situation and level of HP Recovery media or if the HP Recovery media does not work, you can obtain recovery media for recovering your system from support. For more information, see Creating HP Recovery media (select products only) on page 73. IMPORTANT: Recovery through HP Recovery Manager should be used if the computer hard drive fails. Choose the method that was installed...

Maintenance and Service Guide
Page 85
... spare part number 20, 34 hard drive cable removal 35 spare part numbers 20, 34 hard drive connector board, spare part number 20 HDMI port 11 HDMI-to-VGA adapter, spare part number 25 headphone jack 10 heat sink removal 47 spare part numbers 20, 47 hinge removal 59 spare part number 24, 60 hinge cap, spare part number 24 HP PC Hardware Diagnostics (UEFI) using 64 HP Recovery Manager correcting boot problems 72 starting 71 HP Recovery media creating 68 recovery 71 HP Recovery partition recovery 71 removing 73 J jacks audio-in 10 audio-out 10 headphone 10 microphone 10 network...
... spare part number 20, 34 hard drive cable removal 35 spare part numbers 20, 34 hard drive connector board, spare part number 20 HDMI port 11 HDMI-to-VGA adapter, spare part number 25 headphone jack 10 heat sink removal 47 spare part numbers 20, 47 hinge removal 59 spare part number 24, 60 hinge cap, spare part number 24 HP PC Hardware Diagnostics (UEFI) using 64 HP Recovery Manager correcting boot problems 72 starting 71 HP Recovery media creating 68 recovery 71 HP Recovery partition recovery 71 removing 73 J jacks audio-in 10 audio-out 10 headphone 10 microphone 10 network...

Maintenance and Service Guide
Page 86
...description audio 2 chipset 1 display panel 1 Ethernet 2 external media cards 2 graphics 1 hard drive 2 keyboard 2, 3 memory 1, 2 microphone 2 operating system 3 pointing device 2, 3 ports 2 power requirements 3 processors 1 product name 1 security 3 serviceability 3 solid-state drive 2 video 2 wireless 2 product name 1 R recover options 70 recovery discs 69, 71 HP Recovery Manager 70 media 71 starting 71 supported discs 69 system 70 USB flash drive 71 using HP Recovery media 69 recovery media creating 68 creating using HP Recovery Manager 69 recovery partition removing 73 removal/replacement...
...description audio 2 chipset 1 display panel 1 Ethernet 2 external media cards 2 graphics 1 hard drive 2 keyboard 2, 3 memory 1, 2 microphone 2 operating system 3 pointing device 2, 3 ports 2 power requirements 3 processors 1 product name 1 security 3 serviceability 3 solid-state drive 2 video 2 wireless 2 product name 1 R recover options 70 recovery discs 69, 71 HP Recovery Manager 70 media 71 starting 71 supported discs 69 system 70 USB flash drive 71 using HP Recovery media 69 recovery media creating 68 creating using HP Recovery Manager 69 recovery partition removing 73 removal/replacement...

User Guide
Page 7
... Locating hardware ...3 Locating software ...3 Right side ...4 Left side ...6 Display ...7 Keyboard area ...8 TouchPad ...8 Lights ...9 Button and speaker ...10 Special keys ...11 Action keys ...12 Bottom ...14 Rear ...15 Labels ...16 3 Connecting to a network ...18 Connecting to a wireless network ...18 Using the wireless controls ...18 Airplane mode key ...18 Operating system controls 18 Connecting to a WLAN ...19 Using HP Mobile Broadband (select products only 20 Using GPS (select products only) ...20 Using Bluetooth wireless devices (select products only 20 Connecting Bluetooth devices...
... Locating hardware ...3 Locating software ...3 Right side ...4 Left side ...6 Display ...7 Keyboard area ...8 TouchPad ...8 Lights ...9 Button and speaker ...10 Special keys ...11 Action keys ...12 Bottom ...14 Rear ...15 Labels ...16 3 Connecting to a network ...18 Connecting to a wireless network ...18 Using the wireless controls ...18 Airplane mode key ...18 Operating system controls 18 Connecting to a WLAN ...19 Using HP Mobile Broadband (select products only 20 Using GPS (select products only) ...20 Using Bluetooth wireless devices (select products only 20 Connecting Bluetooth devices...

User Guide
Page 9
... Setting Setup Utility (BIOS) passwords 41 Using Windows Hello (select products only) ...42 Using Internet security software ...42 Using antivirus software ...42 Using firewall software ...42 Installing software updates ...43 Using HP Device as a Service (HP DaaS) (select products only 43 Securing your wireless network ...43 Backing up your software applications and information 43 Using an optional security cable (select products only 43 9 Using Setup Utility (BIOS) ...44 Starting Setup Utility (BIOS) ...44 Updating Setup Utility (BIOS) ...44 Determining the BIOS version ...44 Downloading...
... Setting Setup Utility (BIOS) passwords 41 Using Windows Hello (select products only) ...42 Using Internet security software ...42 Using antivirus software ...42 Using firewall software ...42 Installing software updates ...43 Using HP Device as a Service (HP DaaS) (select products only 43 Securing your wireless network ...43 Backing up your software applications and information 43 Using an optional security cable (select products only 43 9 Using Setup Utility (BIOS) ...44 Starting Setup Utility (BIOS) ...44 Updating Setup Utility (BIOS) ...44 Determining the BIOS version ...44 Downloading...

User Guide
Page 30
... and repair network problems. To use operating system controls: ▲ On the taskbar, right-click the network status icon, and then select Open Network & Internet settings. ‒ or - ▲ On the taskbar, select the network status icon, and then select Network & Internet settings. 18 Chapter 3 Connecting to a network Your computer can control the wireless devices in this chapter as Wi-Fi networks, wireless LANs, or WLANs) in your computer and a wired or wireless network connection. The wireless light indicates...
... and repair network problems. To use operating system controls: ▲ On the taskbar, right-click the network status icon, and then select Open Network & Internet settings. ‒ or - ▲ On the taskbar, select the network status icon, and then select Network & Internet settings. 18 Chapter 3 Connecting to a network Your computer can control the wireless devices in this chapter as Wi-Fi networks, wireless LANs, or WLANs) in your computer and a wired or wireless network connection. The wireless light indicates...

User Guide
Page 35
... adjust system volume, change sound settings: ▲ Type control panel in the taskbar search box, select Control Panel, select Hardware and Sound, and then select Sound. For additional safety information, see the computer screen image on the computer, using an HDMI cable (select products only) NOTE: To connect an HDMI device to your favorite websites and download video and movies to the following instructions: 1. Using video 23 Connecting video devices using the correct cable. Using video Your computer is a powerful video device that the external device is connected...
... adjust system volume, change sound settings: ▲ Type control panel in the taskbar search box, select Control Panel, select Hardware and Sound, and then select Sound. For additional safety information, see the computer screen image on the computer, using an HDMI cable (select products only) NOTE: To connect an HDMI device to your favorite websites and download video and movies to the following instructions: 1. Using video 23 Connecting video devices using the correct cable. Using video Your computer is a powerful video device that the external device is connected...

User Guide
Page 45
.... Displaying battery charge To view the percentage of the display. ● Turn off wireless devices when you are not using . ● Before you are not using them. ● Disconnect unused external devices that are not plugged into an external power source, such as an external hard drive connected to a USB port. ● Stop, disable, or remove any unsaved information. ● If Hibernation is enabled and the computer is on or in the Sleep...
.... Displaying battery charge To view the percentage of the display. ● Turn off wireless devices when you are not using . ● Before you are not using them. ● Disconnect unused external devices that are not plugged into an external power source, such as an external hard drive connected to a USB port. ● Stop, disable, or remove any unsaved information. ● If Hibernation is enabled and the computer is on or in the Sleep...

User Guide
Page 46
... installing or updating system software ● When updating the system BIOS ● When writing information to a disc (select products only) 34 Chapter 6 Managing power Select Troubleshooting and fixes, and then in the taskbar. 2. To reduce potential safety issues, use battery power when the computer is available Save your work and shut down the computer. WARNING! Connect the AC adapter to the computer and to the Setup Instructions poster...
... installing or updating system software ● When updating the system BIOS ● When writing information to a disc (select products only) 34 Chapter 6 Managing power Select Troubleshooting and fixes, and then in the taskbar. 2. To reduce potential safety issues, use battery power when the computer is available Save your work and shut down the computer. WARNING! Connect the AC adapter to the computer and to the Setup Instructions poster...

User Guide
Page 53
Start Setup Utility (BIOS): ● Computers or tablets with keyboards: ▲ Turn on -screen instructions. Select Security, and then follow the on or restart the computer, quickly press esc, and then press f10. ● Tablets without keyboards: 1. Errors can prevent the computer from operating properly. 1. Using passwords 41 or Turn on or restart the tablet, and then quickly hold down the volume down button. - NOTE: If you are using arrow...
Start Setup Utility (BIOS): ● Computers or tablets with keyboards: ▲ Turn on -screen instructions. Select Security, and then follow the on or restart the computer, quickly press esc, and then press f10. ● Tablets without keyboards: 1. Errors can prevent the computer from operating properly. 1. Using passwords 41 or Turn on or restart the tablet, and then quickly hold down the volume down button. - NOTE: If you are using arrow...
User Guide
Page 55
...-screen instructions. 3. Securing your wireless network When you receive an alert. To connect a security cable to protect them from Microsoft as soon as a Service (HP DaaS) (select products only) HP DaaS is designed to effectively manage and secure their company assets. Select the Start button, select Settings, and then select Update & Security. 2. To view or change the settings: 1. HP DaaS helps protect devices against malware and other attacks, monitors device...
...-screen instructions. 3. Securing your wireless network When you receive an alert. To connect a security cable to protect them from Microsoft as soon as a Service (HP DaaS) (select products only) HP DaaS is designed to effectively manage and secure their company assets. Select the Start button, select Settings, and then select Update & Security. 2. To view or change the settings: 1. HP DaaS helps protect devices against malware and other attacks, monitors device...
User Guide
Page 57
... Sleep. ● Do not insert, remove, connect, or disconnect any device, cable, or cord. NOTE: After a message on -screen instructions. BIOS installation procedures vary. Follow any software updates, especially system BIOS updates. 1. Using the hard drive path you recorded earlier, open the folder that appear on -screen instructions. 4. or - Identify the most recent BIOS update and compare it has been downloaded to install the update. The BIOS installation begins. 5. Select your hard drive where the BIOS update is downloaded. During the download...
... Sleep. ● Do not insert, remove, connect, or disconnect any device, cable, or cord. NOTE: After a message on -screen instructions. BIOS installation procedures vary. Follow any software updates, especially system BIOS updates. 1. Using the hard drive path you recorded earlier, open the folder that appear on -screen instructions. 4. or - Identify the most recent BIOS update and compare it has been downloaded to install the update. The BIOS installation begins. 5. Select your hard drive where the BIOS update is downloaded. During the download...
User Guide
Page 78
... downloading an update 45 starting the Setup Utility 44 updating 44 Bluetooth device 18, 20 Bluetooth label 17 boot order, changing 55 bottom components 14 buttons power 10 C camera identifying 7 using 22 camera light, identifying 7 caps lock light, identifying 9 caring for your computer 37 cleaning your computer 37 components bottom 14, 15 display 7 keyboard area 8 left side 6 right side 4 connecting to a network 18 connecting to a wireless network 18 connecting to a WLAN 19 connecting to LAN 21 connector, power 4 control zone 8 corporate WLAN connection 19 critical battery...
... downloading an update 45 starting the Setup Utility 44 updating 44 Bluetooth device 18, 20 Bluetooth label 17 boot order, changing 55 bottom components 14 buttons power 10 C camera identifying 7 using 22 camera light, identifying 7 caps lock light, identifying 9 caring for your computer 37 cleaning your computer 37 components bottom 14, 15 display 7 keyboard area 8 left side 6 right side 4 connecting to a network 18 connecting to a wireless network 18 connecting to a WLAN 19 connecting to LAN 21 connector, power 4 control zone 8 corporate WLAN connection 19 critical battery...

User Guide
Page 79
... 4 memory card, identifying 4 minimized image recovery 54 minimized image, creating 54 Miracast 25 mobile broadband activating 20 IMEI number 20 MEID number 20 mute light, identifying 9 mute volume action key 13 N network jack, identifying 4 next track action key 12 O one-finger slide touch screen gesture 29 operating environment 57 operating system controls 18 original system recovery 54 P passwords Setup Utility (BIOS) 41 Windows 40 pause action key 12 play action key 12 ports HDMI 4, 23 USB 6 USB SuperSpeed 4, 6 power battery 32 external 34 power button...
... 4 memory card, identifying 4 minimized image recovery 54 minimized image, creating 54 Miracast 25 mobile broadband activating 20 IMEI number 20 MEID number 20 mute light, identifying 9 mute volume action key 13 N network jack, identifying 4 next track action key 12 O one-finger slide touch screen gesture 29 operating environment 57 operating system controls 18 original system recovery 54 P passwords Setup Utility (BIOS) 41 Windows 40 pause action key 12 play action key 12 ports HDMI 4, 23 USB 6 USB SuperSpeed 4, 6 power battery 32 external 34 power button...

User Guide
Page 80
... 40 using the keyboard and optional mouse 29 using the TouchPad 26 V vents, identifying 14, 15 video HDMI port 23 wireless displays 25 video, using 49 resources, accessibility 64 right control zone, identifying 8 right side components 4 RJ-45 (network) jack, identifying 4 RJ-45 (network) status lights, identifying 4 S screen brightness action keys 12 Section 508 accessibility standards 61, 62 security cable slot, identifying 6 security cable, installing 43 serial number, computer 16 service labels, locating 16 Setup Utility (BIOS) passwords 41 shipping the computer 38 shutdown 31 Sleep...
... 40 using the keyboard and optional mouse 29 using the TouchPad 26 V vents, identifying 14, 15 video HDMI port 23 wireless displays 25 video, using 49 resources, accessibility 64 right control zone, identifying 8 right side components 4 RJ-45 (network) jack, identifying 4 RJ-45 (network) status lights, identifying 4 S screen brightness action keys 12 Section 508 accessibility standards 61, 62 security cable slot, identifying 6 security cable, installing 43 serial number, computer 16 service labels, locating 16 Setup Utility (BIOS) passwords 41 shipping the computer 38 shutdown 31 Sleep...


