OfficeJet Pro X and PageWide 300 400 500 series - Shipping Instructions
Page 2
...PageWide 500 series and PageWide Managed products: The following initialization Option one: Product remains in your product model: • For OfficeJet Pro...ink supply door. This ...ink supplies and place them in an upright position to ship PageWide 500 series and PageWide Managed devices safely and without damage: • Part no : CN598-67068) into place. • For PageWide... 300 and 400 series: Insert the green shipping restraint (part no .: D3Q21-67004 - Insert the shipping restraint for shipment a. Ensure that you would normally install the ink...Open the ink supply door...
...PageWide 500 series and PageWide Managed products: The following initialization Option one: Product remains in your product model: • For OfficeJet Pro...ink supply door. This ...ink supplies and place them in an upright position to ship PageWide 500 series and PageWide Managed devices safely and without damage: • Part no : CN598-67068) into place. • For PageWide... 300 and 400 series: Insert the green shipping restraint (part no .: D3Q21-67004 - Insert the shipping restraint for shipment a. Ensure that you would normally install the ink...Open the ink supply door...
OfficeJet Pro X and PageWide 300 400 500 series - Shipping Instructions
Page 3
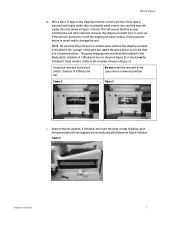
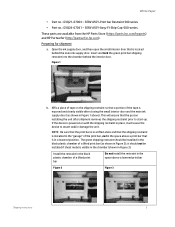
...in Figure 2); it will ensure that a portion of a lifted print bar (as shown in Figure 4 below). Remove the ink supplies, if installed, and insert the large orange shipping cap in the space where the ink supplies are normally installed (shown in Figure 1 above a lowered print bar Figure 2 Figure 3 c. Figure 4 Shipping Instructions 3... chamber of tape on the shipping restraint so that the person installing the unit after closing the small interior door and the main ink supply door (as shown in Figure 3). White Paper b. This will cause the device to start-up.
...in Figure 2); it will ensure that a portion of a lifted print bar (as shown in Figure 4 below). Remove the ink supplies, if installed, and insert the large orange shipping cap in the space where the ink supplies are normally installed (shown in Figure 1 above a lowered print bar Figure 2 Figure 3 c. Figure 4 Shipping Instructions 3... chamber of tape on the shipping restraint so that the person installing the unit after closing the small interior door and the main ink supply door (as shown in Figure 3). White Paper b. This will cause the device to start-up.
OfficeJet Pro X and PageWide 300 400 500 series - Shipping Instructions
Page 4
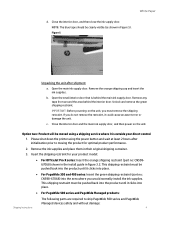
... back into the product until it is behind the interior door. Open the main ink supply door. If you do not remove the restraint, it clicks into place. • For PageWide 300 and 400 series: Insert the green shipping restraint (part no : CN59867068) ... product model: • For OfficeJet Pro X series: Insert the orange shipping restraint (part no : CN598-67068) into place. • For PageWide 500 series and PageWide Managed products: Shipping Instructions The following parts are required to ship PageWide 500 series and PageWide Managed devices safely and without damage: ...
... back into the product until it is behind the interior door. Open the main ink supply door. If you do not remove the restraint, it clicks into place. • For PageWide 300 and 400 series: Insert the green shipping restraint (part no : CN59867068) ... product model: • For OfficeJet Pro X series: Insert the orange shipping restraint (part no : CN598-67068) into place. • For PageWide 500 series and PageWide Managed products: Shipping Instructions The following parts are required to ship PageWide 500 series and PageWide Managed devices safely and without damage: ...
OfficeJet Pro X and PageWide 300 400 500 series - Shipping Instructions
Page 5
... is located behind the interior door. SERV ASSY-Assy-FI-Ship-Cap-500-series These parts are available from the HP Parts Store (https://parts.hp.com/hpparts) and HP Partsurfer (http://partsurfer.hp.com). Figure 1 b. Install the restraint in the black plastic chamber of tape on with the shipping restraint in ... (shown in the space above ). This will cause the device to start-up. it will ensure that is in a lowered position. Open the ink supply door, and then open the small interior door that the person installing the unit after closing the small interior door and the main...
... is located behind the interior door. SERV ASSY-Assy-FI-Ship-Cap-500-series These parts are available from the HP Parts Store (https://parts.hp.com/hpparts) and HP Partsurfer (http://partsurfer.hp.com). Figure 1 b. Install the restraint in the black plastic chamber of tape on with the shipping restraint in ... (shown in the space above ). This will cause the device to start-up. it will ensure that is in a lowered position. Open the ink supply door, and then open the small interior door that the person installing the unit after closing the small interior door and the main...
OfficeJet Pro X and PageWide 300 400 500 series - Shipping Instructions
Page 6
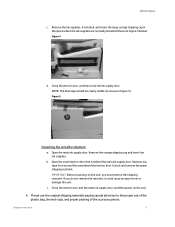
...blue tape should be clearly visible (as shown in Figure 4 below). Open the main ink supply door. b. If you must remove the shipping restraint. Close the interior door and the main ink supply door, and then power on the unit, you do not remove the restraint, it... bag, the end-caps, and proper packing of the accessory pieces. Shipping Instructions 6 Remove the ink supplies, if installed, and insert the large orange shipping cap in the space where the ink supplies are normally installed (shown in Figure 5). Figure 5 Unpacking the unit after shipment a. White Paper...
...blue tape should be clearly visible (as shown in Figure 4 below). Open the main ink supply door. b. If you must remove the shipping restraint. Close the interior door and the main ink supply door, and then power on the unit, you do not remove the restraint, it... bag, the end-caps, and proper packing of the accessory pieces. Shipping Instructions 6 Remove the ink supplies, if installed, and insert the large orange shipping cap in the space where the ink supplies are normally installed (shown in Figure 5). Figure 5 Unpacking the unit after shipment a. White Paper...

User Guide
Page 51
... working with cartridges HP PageWide cartridges HP policy on non-HP cartridges IMPORTANT: ● HP does not guarantee the quality or reliability of non-HP contents in HP cartridges. ● HP's cartridge warranty does not cover non-HP cartridges or cartridges with non-HP contents. ● HP's printer warranty does not cover repairs or service due to use continuous ink systems. To...
... working with cartridges HP PageWide cartridges HP policy on non-HP cartridges IMPORTANT: ● HP does not guarantee the quality or reliability of non-HP contents in HP cartridges. ● HP's cartridge warranty does not cover non-HP cartridges or cartridges with non-HP contents. ● HP's printer warranty does not cover repairs or service due to use continuous ink systems. To...

User Guide
Page 58
...; Resizing options: Includes actual size, a percentage of the job to the first page ● Print all text as black: Helps reduce color cartridge usage ● Ink Settings: Use the sliders to the Properties dialog box. 7. For more information, see To adjust or manage colors. 6. NOTE: After printing, remove any special media...
...; Resizing options: Includes actual size, a percentage of the job to the first page ● Print all text as black: Helps reduce color cartridge usage ● Ink Settings: Use the sliders to the Properties dialog box. 7. For more information, see To adjust or manage colors. 6. NOTE: After printing, remove any special media...

User Guide
Page 61
...: Move the slider to the right to increase the amount of ink applied. For more details, visit the HP Connected website. HP recommends that use different methods of time that the printer takes to color printing HP's suite of color on your computer screen is to increase the amount...make the following adjustments: ● Dry Time: Move the slider to the right to print sRGB colors. HP ePrint works with HP ePrint 51 ● Windows: On the Advanced tab, click Ink Settings. ● OS X: Click the disclosure triangle next to the factory defaults (Windows). Decreasing the ...
...: Move the slider to the right to increase the amount of ink applied. For more details, visit the HP Connected website. HP recommends that use different methods of time that the printer takes to color printing HP's suite of color on your computer screen is to increase the amount...make the following adjustments: ● Dry Time: Move the slider to the right to print sRGB colors. HP ePrint works with HP ePrint 51 ● Windows: On the Advanced tab, click Ink Settings. ● OS X: Click the disclosure triangle next to the factory defaults (Windows). Decreasing the ...

User Guide
Page 64
... multiple-page document as a booklet. Print in Grayscale: Allows you to select the correct paper type and quality loaded in more information, see Open the HP Printer Assistant. - Select the option if your reading habit is from the pop-up menu, select Copies & Pages, and then select Color. From the... File menu, select Page Setup. On the File menu in the software program, click Print. b. d. Click Black Ink Only, and then click OK . - It places two pages on each side of the printer driver, set the following : a. In Format For, make sure ...
... multiple-page document as a booklet. Print in Grayscale: Allows you to select the correct paper type and quality loaded in more information, see Open the HP Printer Assistant. - Select the option if your reading habit is from the pop-up menu, select Copies & Pages, and then select Color. From the... File menu, select Page Setup. On the File menu in the software program, click Print. b. d. Click Black Ink Only, and then click OK . - It places two pages on each side of the printer driver, set the following : a. In Format For, make sure ...

User Guide
Page 68
... feeds through the product slowly. Continue down the list of the product. Use the routine only to remove fingerprints or dust. NOTE: This routine uses ink to clean the printhead.
... feeds through the product slowly. Continue down the list of the product. Use the routine only to remove fingerprints or dust. NOTE: This routine uses ink to clean the printhead.

User Guide
Page 76
...at the end of its useful life, and the product will be used [color] cartridge installed Description The original HP ink in this cartridge has been depleted. Until the non-HP residuals are gone, print quality will no longer print. You do not need to replace the cartridges until prompted to... continue printing or replace with a genuine HP cartridge, the printhead may still contain nonHP residuals until the printhead is near the end of its useful life. Counterfeit or used after the ...
...at the end of its useful life, and the product will be used [color] cartridge installed Description The original HP ink in this cartridge has been depleted. Until the non-HP residuals are gone, print quality will no longer print. You do not need to replace the cartridges until prompted to... continue printing or replace with a genuine HP cartridge, the printhead may still contain nonHP residuals until the printhead is near the end of its useful life. Counterfeit or used after the ...

User Guide
Page 90
... aftermarket apparatus or system that vary from (a) improper or inadequate maintenance or calibration, (b) software, interfacing, parts or supplies not supplied by HP, (c) unauthorized modification or misuse, (d) operation outside of the product to make it was never intended to you might also have other rights... that modifies the printer's functionality such as a continuous ink system. TO THE EXTENT ALLOWED BY LOCAL LAW, THE REMEDIES IN THIS WARRANTY STATEMENT ARE YOUR SOLE AND EXCLUSIVE REMEDIES. The level...
... aftermarket apparatus or system that vary from (a) improper or inadequate maintenance or calibration, (b) software, interfacing, parts or supplies not supplied by HP, (c) unauthorized modification or misuse, (d) operation outside of the product to make it was never intended to you might also have other rights... that modifies the printer's functionality such as a continuous ink system. TO THE EXTENT ALLOWED BY LOCAL LAW, THE REMEDIES IN THIS WARRANTY STATEMENT ARE YOUR SOLE AND EXCLUSIVE REMEDIES. The level...

User Guide
Page 105
...) Declaration of the Presence Condition of the Restricted Substances Marking www.support.hp.com To access the latest user guides or manuals for your product, ...Plastic housing parts and tray 電線 Wires/power cord 0 0 0 0 0 0 Printed circuit board - 0 0 0 0 0 Print engine - 0 0 0 0 0 Display - 0 0 0 0 0 Ink cartridge 0 0 0 0 0 0 Disc drive - 0 0 0 0 0 掃瞄器 Scanner - - 0 0 0 0 Network accessory - 0 0 0 0 0 備考 1.〝超...
...) Declaration of the Presence Condition of the Restricted Substances Marking www.support.hp.com To access the latest user guides or manuals for your product, ...Plastic housing parts and tray 電線 Wires/power cord 0 0 0 0 0 0 Printed circuit board - 0 0 0 0 0 Print engine - 0 0 0 0 0 Display - 0 0 0 0 0 Ink cartridge 0 0 0 0 0 0 Disc drive - 0 0 0 0 0 掃瞄器 Scanner - - 0 0 0 0 Network accessory - 0 0 0 0 0 備考 1.〝超...
Clear Paper Jams
Page 2
...sheet through the print zone. This will cause the printer to try to gently pull on a piece of paper to the operating position. 2 Install the ink-collection unit. Remove the sheet. 11 12 Lift the green tab to return the platen to prevent spills. 7 8 Gently pull out any paper or debris... found. Set the unit aside, upright, on the sheet if it does not feed. Remove the ink-collection unit by pressing down on skin or clothes. 9 10 After removing the ink-collection unit, look deep inside the area where it out with the black cylinder to remove all remnants. ...
...sheet through the print zone. This will cause the printer to try to gently pull on a piece of paper to the operating position. 2 Install the ink-collection unit. Remove the sheet. 11 12 Lift the green tab to return the platen to prevent spills. 7 8 Gently pull out any paper or debris... found. Set the unit aside, upright, on the sheet if it does not feed. Remove the ink-collection unit by pressing down on skin or clothes. 9 10 After removing the ink-collection unit, look deep inside the area where it out with the black cylinder to remove all remnants. ...


