HP Limited Warranty and Support Guide - Refurbished Desktops
Page 4
.... If so, your limited warranty entitlements. In addition, you may vary from Hewlett-Packard, the manufacturer. Under the HP Global Limited Warranty program, products purchased in this Limited Warranty. THE LIMITED WARRANTY TERMS CONTAINED IN THIS STATEMENT, EXCEPT TO...PARTICULAR PURPOSE IS LIMITED TO THE DURATION OF THE EXPRESS WARRANTY SET FORTH ABOVE. Refurbished HP Pavilion Desktop Computers, HP Pavilion Media Center Computers, HP Digital Entertainment Center, HP Displays, and HP Notebook Consumer Products. SOME STATES OR COUNTRIES/REGIONS DO NOT ALLOW A LIMITATION ON HOW...
.... If so, your limited warranty entitlements. In addition, you may vary from Hewlett-Packard, the manufacturer. Under the HP Global Limited Warranty program, products purchased in this Limited Warranty. THE LIMITED WARRANTY TERMS CONTAINED IN THIS STATEMENT, EXCEPT TO...PARTICULAR PURPOSE IS LIMITED TO THE DURATION OF THE EXPRESS WARRANTY SET FORTH ABOVE. Refurbished HP Pavilion Desktop Computers, HP Pavilion Media Center Computers, HP Digital Entertainment Center, HP Displays, and HP Notebook Consumer Products. SOME STATES OR COUNTRIES/REGIONS DO NOT ALLOW A LIMITATION ON HOW...

HP Limited Warranty and Support Guide - Refurbished Desktops
Page 8
..., normally fifteen (15) days. Pick Up & Return Warranty Service (Desktops and Digital Entertainment Centers ONLY) Your HP Limited Warranty may include a mail-in HP billing you will assist you over the phone. If applicable, HP will ship approved replacement parts directly to you must be fixed using one... the product to an authorized service location and assume risk of mail-in this warranty service on the HP Web site at: http://www.hp.com/support Carry-in Warranty Service (Desktops ONLY) Under the terms of these parts, a replaceable part can also obtain information on this process....
..., normally fifteen (15) days. Pick Up & Return Warranty Service (Desktops and Digital Entertainment Centers ONLY) Your HP Limited Warranty may include a mail-in HP billing you will assist you over the phone. If applicable, HP will ship approved replacement parts directly to you must be fixed using one... the product to an authorized service location and assume risk of mail-in this warranty service on the HP Web site at: http://www.hp.com/support Carry-in Warranty Service (Desktops ONLY) Under the terms of these parts, a replaceable part can also obtain information on this process....

Troubleshooting & Maintenance Guide
Page 15
... steps to back up your files, and you see the initial company logo screen appear, repeatedly press F11 on your keyboard until you see the desktop. 10. If you to restart the computer. Under I need help immediately, click System Recovery. 6. Under I need help immediately, select System Recovery. NOTE: If your system...
... steps to back up your files, and you see the initial company logo screen appear, repeatedly press F11 on your keyboard until you see the desktop. 10. If you to restart the computer. Under I need help immediately, click System Recovery. 6. Under I need help immediately, select System Recovery. NOTE: If your system...

Troubleshooting & Maintenance Guide
Page 16
... your hard disk drive. This image contains the operating system and software program files that were originally installed on . To create recovery media, see the desktop. 9. Press the Power button to turn the computer back on your computer, and the media can be used only with this computer. If you are...
... your hard disk drive. This image contains the operating system and software program files that were originally installed on . To create recovery media, see the desktop. 9. Press the Power button to turn the computer back on your computer, and the media can be used only with this computer. If you are...

Getting Started (For Select TouchSmart Models Only)
Page 8
...with stationary and moving objects. ◦ Place playlists, slide shows, music, graffiti, videos, and photos on the desktop, or tap the Start button and then tap HP TouchSmart. ● The Magic Canvas The Magic Canvas is a touch-enabled high-performance computer built into view by ...content that expands to spread out your applications and documents. Magic Canvas provides an interactive desktop that you scroll to the left and right, allowing you to the left and right. HP TouchSmart 5.0 provides a unique, touch-based computer experience. You are highlighted in the ...
...with stationary and moving objects. ◦ Place playlists, slide shows, music, graffiti, videos, and photos on the desktop, or tap the Start button and then tap HP TouchSmart. ● The Magic Canvas The Magic Canvas is a touch-enabled high-performance computer built into view by ...content that expands to spread out your applications and documents. Magic Canvas provides an interactive desktop that you scroll to the left and right, allowing you to the left and right. HP TouchSmart 5.0 provides a unique, touch-based computer experience. You are highlighted in the ...

Getting Started (For Select TouchSmart Models Only)
Page 16
Affects the volume of the following buttons will still affect PC mode: ● A/V - Automatically switches back to desktop ● Press the Ctrl+Alt+Del buttons simultaneously on the keyboard ● Press the Power/Sleep button on the keyboard or remote ● Press the ... Mutes sound in games and on your are in gaming mode, the following options: ● Tap the full screen to return to desktop ● Press ESC key to return to desktop ● Left click mouse to return to computer and opens Media Center ● Power - Return to PC mode from gaming mode...
Affects the volume of the following buttons will still affect PC mode: ● A/V - Automatically switches back to desktop ● Press the Ctrl+Alt+Del buttons simultaneously on the keyboard ● Press the Power/Sleep button on the keyboard or remote ● Press the ... Mutes sound in games and on your are in gaming mode, the following options: ● Tap the full screen to return to desktop ● Press ESC key to return to desktop ● Left click mouse to return to computer and opens Media Center ● Power - Return to PC mode from gaming mode...
Getting Started (For Select TouchSmart Models Only)
Page 17
... is in the upper right hand corner of the computer . Using Beats Audio™ Select HP TouchSmart PC models only ENWW HP My Display TouchSmart Edition 13 Press the display menu button on the desktop, or from the task tray, or by tapping the ? button in display mode; Adjusting ...settings with onscreen display (game console models only) HP TouchSmart PCs with the touch of a button. ● An options screen lets you...
... is in the upper right hand corner of the computer . Using Beats Audio™ Select HP TouchSmart PC models only ENWW HP My Display TouchSmart Edition 13 Press the display menu button on the desktop, or from the task tray, or by tapping the ? button in display mode; Adjusting ...settings with onscreen display (game console models only) HP TouchSmart PCs with the touch of a button. ● An options screen lets you...
Getting Started (For Select TouchSmart Models Only)
Page 34
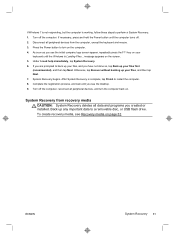
... discs, insert the next system-recovery disc when prompted. 7. If you created or installed. Complete the registration process, and wait until you will see the desktop. 10. System Recovery at system startup CAUTION: System Recovery deletes all peripheral devices from the recovery disc, or the recovery USB flash drive. Turn off...
... discs, insert the next system-recovery disc when prompted. 7. If you created or installed. Complete the registration process, and wait until you will see the desktop. 10. System Recovery at system startup CAUTION: System Recovery deletes all peripheral devices from the recovery disc, or the recovery USB flash drive. Turn off...
Getting Started (For Select TouchSmart Models Only)
Page 35
... steps to perform a System Recovery. 1. ENWW System Recovery 31 Press the Power button to turn the computer back on. To create recovery media, see the desktop. 9. If you are prompted to back up your files first (recommended), and then tap Next. Turn off . 2. message appears on page 32. If Windows 7 is...
... steps to perform a System Recovery. 1. ENWW System Recovery 31 Press the Power button to turn the computer back on. To create recovery media, see the desktop. 9. If you are prompted to back up your files first (recommended), and then tap Next. Turn off . 2. message appears on page 32. If Windows 7 is...

Wall Mounting Guide
Page 5
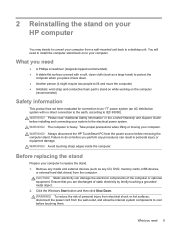
... removing the computer stand. WARNING! Take proper precautions when lifting or moving your system to reinstall the computer stand. 1 Preparing your HP computer for wallmounting This document provides instructions for reinstalling the stand on the computer (recommended) ● Wall-mounting device (sold separately)....and connecting your computer. WARNING! WARNING! Avoid touching sharp edges inside the computer. The computer is at the back of the HP computer and attaches to do so before wall-mounting the computer. Failure to a wall-mounting device (sold separately) with no ...
... removing the computer stand. WARNING! Take proper precautions when lifting or moving your system to reinstall the computer stand. 1 Preparing your HP computer for wallmounting This document provides instructions for reinstalling the stand on the computer (recommended) ● Wall-mounting device (sold separately)....and connecting your computer. WARNING! WARNING! Avoid touching sharp edges inside the computer. The computer is at the back of the HP computer and attaches to do so before wall-mounting the computer. Failure to a wall-mounting device (sold separately) with no ...
Wall Mounting Guide
Page 12
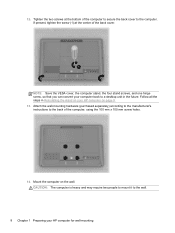
..., the computer stand, the four stand screws, and one hinge screw, so that you can convert your computer back to the wall. 8 Chapter 1 Preparing your HP computer on page 9. 13. Follow all the steps in the future. If present, tighten the screw (1) at the bottom of the computer to secure the... back of the back cover. Attach the wall-mounting hardware (purchased separately) according to the manufacturer's instructions to the computer. Mount the computer on your HP computer for wall-mounting CAUTION: The computer is heavy and may require two people to mount it to...
..., the computer stand, the four stand screws, and one hinge screw, so that you can convert your computer back to the wall. 8 Chapter 1 Preparing your HP computer on page 9. 13. Follow all the steps in the future. If present, tighten the screw (1) at the bottom of the computer to secure the... back of the back cover. Attach the wall-mounting hardware (purchased separately) according to the manufacturer's instructions to the computer. Mount the computer on your HP computer for wall-mounting CAUTION: The computer is heavy and may require two people to mount it to...
Wall Mounting Guide
Page 13
...What you perform any procedures can damage the electronic components of the computer or optional equipment. The computer is heavy. Always disconnect the HP TouchSmart PC from the computer. Remove any CD, DVD, memory cards, USB devices, or external hard disk drives) from the power ...you are discharged of personal injury from electrical shock or hot surfaces, disconnect the power cord from a wall-mounted unit back to a desktop unit. WARNING! Please read "Additional Safety Information" in personal injury or equipment damage. Failure to IEC 60950). Avoid touching sharp edges ...
...What you perform any procedures can damage the electronic components of the computer or optional equipment. The computer is heavy. Always disconnect the HP TouchSmart PC from the computer. Remove any CD, DVD, memory cards, USB devices, or external hard disk drives) from the power ...you are discharged of personal injury from electrical shock or hot surfaces, disconnect the power cord from a wall-mounted unit back to a desktop unit. WARNING! Please read "Additional Safety Information" in personal injury or equipment damage. Failure to IEC 60950). Avoid touching sharp edges ...

