Limited Warranty and Support Guide - Refurbished
Page 4
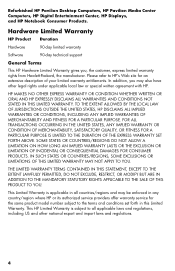
... and regulations, including US and other legal rights under applicable local law or special written agreement with HP. Refurbished HP Pavilion Desktop Computers, HP Pavilion Media Center Computers, HP Digital Entertainment Center, HP Displays, and HP Notebook Consumer Products. Hardware Limited Warranty HP Product Duration Hardware 90-day limited warranty Software 90-day technical support General Terms This...
... and regulations, including US and other legal rights under applicable local law or special written agreement with HP. Refurbished HP Pavilion Desktop Computers, HP Pavilion Media Center Computers, HP Digital Entertainment Center, HP Displays, and HP Notebook Consumer Products. Hardware Limited Warranty HP Product Duration Hardware 90-day limited warranty Software 90-day technical support General Terms This...
Limited Warranty and Support Guide - Refurbished
Page 8
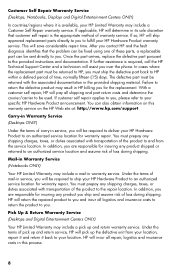
.... 8 In addition, you are responsible for the replacement. Customer Self Repair Warranty Service (Desktops, Notebooks, Displays and Digital Entertainment Centers ONLY) In countries/regions where it back to your HP Limited Warranty may include a pick up the defective unit from the service location. If applicable... problem can be fixed using one of these parts, a replaceable part can also obtain information on the HP Web site at: http://www.hp.com/support Carry-in Warranty Service (Desktops ONLY) Under the terms of carry-in service, you . Under the terms of time, normally fifteen...
.... 8 In addition, you are responsible for the replacement. Customer Self Repair Warranty Service (Desktops, Notebooks, Displays and Digital Entertainment Centers ONLY) In countries/regions where it back to your HP Limited Warranty may include a pick up the defective unit from the service location. If applicable... problem can be fixed using one of these parts, a replaceable part can also obtain information on the HP Web site at: http://www.hp.com/support Carry-in Warranty Service (Desktops ONLY) Under the terms of carry-in service, you . Under the terms of time, normally fifteen...

Getting Started
Page 17
... setup procedure or decline some options, you are ready to Use Your Computer 13 For help with getting started using your computer, see the Windows 7 desktop, the initial setup is complete. Preparing to turn on the computer: 1 Turn on the monitor. 2 Turn on the computer. 3 Turn on the computer...
... setup procedure or decline some options, you are ready to Use Your Computer 13 For help with getting started using your computer, see the Windows 7 desktop, the initial setup is complete. Preparing to turn on the computer: 1 Turn on the monitor. 2 Turn on the computer. 3 Turn on the computer...
Getting Started
Page 19
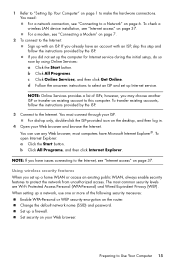
...: Online Services provides a list of the following security measures: Enable WPA-Personal or WEP security encryption on page 6. For a modem, see "Internet access" on the desktop, and then log in. 4 Open your Web browser and browse the Internet. If you may choose another ISP or transfer an existing account to this...
...: Online Services provides a list of the following security measures: Enable WPA-Personal or WEP security encryption on page 6. For a modem, see "Internet access" on the desktop, and then log in. 4 Open your Web browser and browse the Internet. If you may choose another ISP or transfer an existing account to this...
Getting Started
Page 30
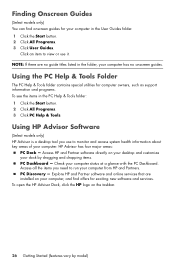
... customize your computer status at a glance with the PC Dashboard. HP Advisor has four major areas: PC Dock - PC Discovery - To open the HP Advisor Dock, click the HP logo on your computer. Using HP Advisor Software (Select models only) HP Advisor is a desktop tool you need to monitor and access system health information about key...
... customize your computer status at a glance with the PC Dashboard. HP Advisor has four major areas: PC Dock - PC Discovery - To open the HP Advisor Dock, click the HP logo on your computer. Using HP Advisor Software (Select models only) HP Advisor is a desktop tool you need to monitor and access system health information about key...
Getting Started
Page 56
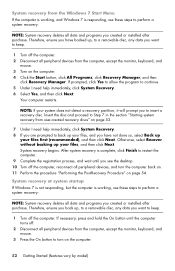
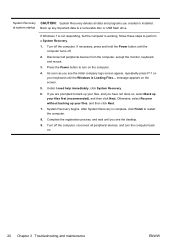
.... 7 Under I need help immediately, click System Recovery. 6 Select Yes, and then click Next. If necessary, press and hold the On button until you see the desktop. 10 Turn off the computer, reconnect all data and programs you created or installed after purchase. Insert the disc and proceed to Step 7 in the...
.... 7 Under I need help immediately, click System Recovery. 6 Select Yes, and then click Next. If necessary, press and hold the On button until you see the desktop. 10 Turn off the computer, reconnect all data and programs you created or installed after purchase. Insert the disc and proceed to Step 7 in the...
Getting Started
Page 57
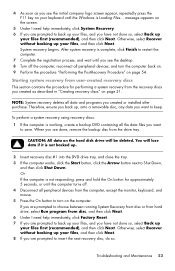
..., select Back up your files first (recommended), and then click Next. System recovery begins. NOTE: System recovery deletes all the data files you see the desktop. 8 Turn off . 4 Disconnect all peripheral devices, and turn on the computer. Therefore, ensure you back up your files, and then click Next. Starting system recovery...
..., select Back up your files first (recommended), and then click Next. System recovery begins. NOTE: System recovery deletes all the data files you see the desktop. 8 Turn off . 4 Disconnect all peripheral devices, and turn on the computer. Therefore, ensure you back up your files, and then click Next. Starting system recovery...
Getting Started Guide
Page 25
..., you see the Recovery Manager welcome screen again. Under I need help immediately, click System Recovery. 6. Complete the registration process, and wait until you see the desktop. 10. ENWW System recovery 19 If prompted, click Yes to allow the program to perform a System Recovery. 1. Your computer restarts. NOTE: If your system does...
..., you see the Recovery Manager welcome screen again. Under I need help immediately, click System Recovery. 6. Complete the registration process, and wait until you see the desktop. 10. ENWW System recovery 19 If prompted, click Yes to allow the program to perform a System Recovery. 1. Your computer restarts. NOTE: If your system does...
Getting Started Guide
Page 26
... (recommended), and then click Next. Turn off . 2. message appears on the screen. 5. System Recovery begins. Complete the registration process, and wait until you see the desktop. 9. at system startup Back up your files, and then click Next. 7. If Windows 7 is not responding, but the computer is working, follow these steps to...
... (recommended), and then click Next. Turn off . 2. message appears on the screen. 5. System Recovery begins. Complete the registration process, and wait until you see the desktop. 9. at system startup Back up your files, and then click Next. 7. If Windows 7 is not responding, but the computer is working, follow these steps to...
Getting Started Guide
Page 30
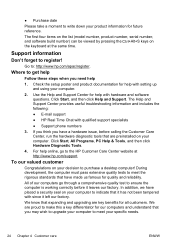
...; Support phone numbers 3. The Help and Support Center provides useful troubleshooting information and includes the following: ● E-mail support ● HP Real Time Chat with setting up and using your specific needs. 24 Chapter 4 Customer care ENWW For help 1. To our valued customer ...Congratulations on your computer. During development, the computer must pass extensive quality tests to purchase a desktop computer! The first four items on the list (model number, product number, serial number, and software build number) can be viewed by...
...; Support phone numbers 3. The Help and Support Center provides useful troubleshooting information and includes the following: ● E-mail support ● HP Real Time Chat with setting up and using your specific needs. 24 Chapter 4 Customer care ENWW For help 1. To our valued customer ...Congratulations on your computer. During development, the computer must pass extensive quality tests to purchase a desktop computer! The first four items on the list (model number, product number, serial number, and software build number) can be viewed by...
Getting Started Guide
Page 31
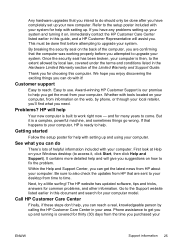
...from your computer. Go to the Support website listed earlier in the Hardware Limited Warranty section of the computer, you are sent to your desktop from HP about your computer. By breaking the security seal on the web, by local law, covered under the terms and conditions listed in this... upgrade your computer model. Problems? It contains more detailed help and will help with setting up your system and turning it on your Windows desktop (to the setup poster included with your computer. Refer to access it, click Start, then click Help and Support). Customer support Easy to...
...from your computer. Go to the Support website listed earlier in the Hardware Limited Warranty section of the computer, you are sent to your desktop from HP about your computer. By breaking the security seal on the web, by local law, covered under the terms and conditions listed in this... upgrade your computer model. Problems? It contains more detailed help and will help with setting up your system and turning it on your Windows desktop (to the setup poster included with your computer. Refer to access it, click Start, then click Help and Support). Customer support Easy to...

Troubleshooting & Maintenance Guide
Page 15
.... Turn off the computer, reconnect all peripheral devices from the computer, except the monitor, keyboard, and mouse. 3. Disconnect all data and programs you see the desktop. 10. message appears on the computer. 4.
.... Turn off the computer, reconnect all peripheral devices from the computer, except the monitor, keyboard, and mouse. 3. Disconnect all data and programs you see the desktop. 10. message appears on the computer. 4.

Troubleshooting & Maintenance Guide
Page 16
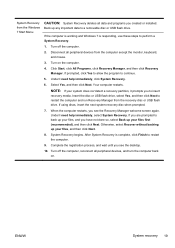
... used only with this computer. Use the arrow keys to select the USB device and press Enter to step 7. 6. To create recovery media, see the desktop. 9. When the Recovery Manager is powering on . Complete the registration process, and wait until the computer turns off the computer, reconnect all the data files...
... used only with this computer. Use the arrow keys to select the USB device and press Enter to step 7. 6. To create recovery media, see the desktop. 9. When the Recovery Manager is powering on . Complete the registration process, and wait until the computer turns off the computer, reconnect all the data files...

