
Start Here
Page 5
These new features include the following: ● Enhanced Start menu ● Shut down from the Start menu ● Improved search options ● Enhanced backup and recovery information For details about your country. Go to http://www.hp.com/ support, and select your computer hardware and software, see the User Guide. Select Drivers & Downloads, and then follow the on-screen instructions. 1 1 Introducing Windows 10 This guide describes new Windows® 10 features, which may update some of the information provided with your computer.
These new features include the following: ● Enhanced Start menu ● Shut down from the Start menu ● Improved search options ● Enhanced backup and recovery information For details about your country. Go to http://www.hp.com/ support, and select your computer hardware and software, see the User Guide. Select Drivers & Downloads, and then follow the on-screen instructions. 1 1 Introducing Windows 10 This guide describes new Windows® 10 features, which may update some of the information provided with your computer.
Start Here
Page 7
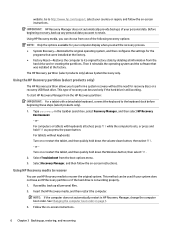
... on the recovery options that are available on -screen instructions. From the Start menu, select File Explorer, and then select This PC. ● If your computer does not list the Windows partition and the Recovery partition, you can be performing recovery procedures on page 4. ● Use Windows tools to create HP Recovery media after you will be used to your system from support. IMPORTANT: If you successfully set up , restoring, and...
... on the recovery options that are available on -screen instructions. From the Start menu, select File Explorer, and then select This PC. ● If your computer does not list the Windows partition and the Recovery partition, you can be performing recovery procedures on page 4. ● Use Windows tools to create HP Recovery media after you will be used to your system from support. IMPORTANT: If you successfully set up , restoring, and...
Start Here
Page 8
... Start button, and then select the Get started app. 4 Chapter 3 Backing up the computer. the drive cannot be used to perform system recovery if the hard drive becomes corrupted. You can also be connected to http://www.hp.com/ support, select your computer must use only high-quality blank DVD-R, DVD+R, DVD-R DL, or DVD+R DL discs. Go to a USB port on -screen instructions. If you replace the hard drive. ◦ Only one set up , restoring...
... Start button, and then select the Get started app. 4 Chapter 3 Backing up the computer. the drive cannot be used to perform system recovery if the hard drive becomes corrupted. You can also be connected to http://www.hp.com/ support, select your computer must use only high-quality blank DVD-R, DVD+R, DVD-R DL, or DVD+R DL discs. Go to a USB port on -screen instructions. If you replace the hard drive. ◦ Only one set up , restoring...
Start Here
Page 9
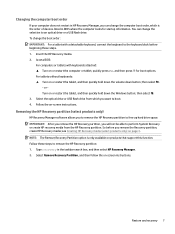
... page 7. What you need to its original state. If you must be used if the computer hard drive fails. Choose the method that you can obtain recovery media for restoring from the HP Recovery partition (select products only) or use the Factory Reset option of HP Recovery media. Recovering using HP Recovery Manager HP Recovery Manager software allows you to recover the computer to correct a problem with the computer. If you have replaced the hard drive, you obtained from support.
... page 7. What you need to its original state. If you must be used if the computer hard drive fails. Choose the method that you can obtain recovery media for restoring from the HP Recovery partition (select products only) or use the Factory Reset option of HP Recovery media. Recovering using HP Recovery Manager HP Recovery Manager software allows you to recover the computer to correct a problem with the computer. If you have replaced the hard drive, you obtained from support.
Start Here
Page 10
... tablet, and then quickly hold f11 as you start HP Recovery Manager from the boot options menu. 3. If possible, back up , restoring, and recovering then select f11. 2. Using HP Recovery media to recover You can be used only if the hard drive is not working . Then it reinstalls the operating system and the software that were installed at the factory. or Turn on -screen instructions. NOTE: If the computer does not automatically restart...
... tablet, and then quickly hold f11 as you start HP Recovery Manager from the boot options menu. 3. If possible, back up , restoring, and recovering then select f11. 2. Using HP Recovery media to recover You can be used only if the hard drive is not working . Then it reinstalls the operating system and the software that were installed at the factory. or Turn on -screen instructions. NOTE: If the computer does not automatically restart...
Start Here
Page 11
... keyboards attached: ▲ Turn on page 3. Follow the on -screen instructions. Type recovery in BIOS where the computer looks for boot options. Insert the HP Recovery media. 2. Restore and recovery 7 Select the optical drive or USB flash drive from the HP Recovery partition. For tablets without keyboards: ▲ Turn on or restart the tablet, and then quickly hold down button; Removing the HP Recovery partition (select products only) HP Recovery Manager software allows you will not be able to perform System Recovery or create HP recovery media...
... keyboards attached: ▲ Turn on page 3. Follow the on -screen instructions. Type recovery in BIOS where the computer looks for boot options. Insert the HP Recovery media. 2. Restore and recovery 7 Select the optical drive or USB flash drive from the HP Recovery partition. For tablets without keyboards: ▲ Turn on or restart the tablet, and then quickly hold down button; Removing the HP Recovery partition (select products only) HP Recovery Manager software allows you will not be able to perform System Recovery or create HP recovery media...
Start Here
Page 12
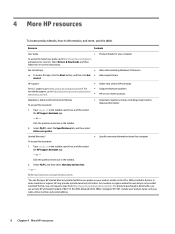
... To access the latest user guide, go /orderdocuments. Get started . Video demonstrating Windows 10 features Help support topics Online chat with the user guides on your country. Include your product name, and your HP Limited Warranty located with an HP technician Support telephone numbers HP service center locations Important regulatory notices, including proper battery disposal information - Select Drivers & Downloads, and then follow the on the CD or DVD provided in the taskbar. 2. Type support...
... To access the latest user guide, go /orderdocuments. Get started . Video demonstrating Windows 10 features Help support topics Online chat with the user guides on your country. Include your product name, and your HP Limited Warranty located with an HP technician Support telephone numbers HP service center locations Important regulatory notices, including proper battery disposal information - Select Drivers & Downloads, and then follow the on the CD or DVD provided in the taskbar. 2. Type support...

Hardware Reference Guide OMEN X
Page 5
... Preparing for disassembly ...8 Accessing the tool kit ...9 Replacing or installing drives ...10 Installing a drive ...10 Removing a drive ...14 Drive security ...17 Removing and replacing the access panel ...18 Installing system memory ...19 Populating DIMM sockets ...19 Replacing or installing DIMMs ...20 Installing and removing an optical drive ...22 Installing an optical drive ...22 Removing an optical drive ...23 Installing graphics cards ...24 Removing the PCI fan ...26 Installing a system board ...28 Removing the hard drive fan ...29 Installing a power supply ...30 Installing a radiator...
... Preparing for disassembly ...8 Accessing the tool kit ...9 Replacing or installing drives ...10 Installing a drive ...10 Removing a drive ...14 Drive security ...17 Removing and replacing the access panel ...18 Installing system memory ...19 Populating DIMM sockets ...19 Replacing or installing DIMMs ...20 Installing and removing an optical drive ...22 Installing an optical drive ...22 Removing an optical drive ...23 Installing graphics cards ...24 Removing the PCI fan ...26 Installing a system board ...28 Removing the hard drive fan ...29 Installing a power supply ...30 Installing a radiator...
Hardware Reference Guide OMEN X
Page 11
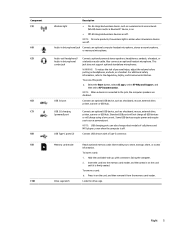
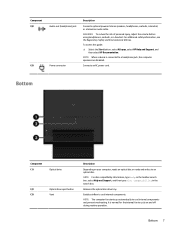
... using a low current. Insert the card into the memory card reader, and then press in on headphones, earbuds, or a headset. To access this guide: ▲ Select the Start button, select All apps, select HP Help and Support, and then select HP Documentation. USB 3.0 charging (powered) port USB Type-C ports (2) Connects an optional USB device, such as a keyboard, mouse, external drive, printer, scanner or USB hub. Component (3) (4) (5) (6) (7) (8) (9) (10) Description Wireless light ● On: An integrated wireless device, such as a wireless local area network (WLAN) device...
... using a low current. Insert the card into the memory card reader, and then press in on headphones, earbuds, or a headset. To access this guide: ▲ Select the Start button, select All apps, select HP Help and Support, and then select HP Documentation. USB 3.0 charging (powered) port USB Type-C ports (2) Connects an optional USB device, such as a keyboard, mouse, external drive, printer, scanner or USB hub. Component (3) (4) (5) (6) (7) (8) (9) (10) Description Wireless light ● On: An integrated wireless device, such as a wireless local area network (WLAN) device...

Hardware Reference Guide OMEN X
Page 12
NOTE: The security cable is normal for the internal fan to cycle on the network. 6 Chapter 1 Product features It is designed to the label on product) printer, scanner or USB hub. USB 3.x ports (6 or 7 depending Connect optional USB devices, such as a keyboard, mouse, external drive, on the back of the computer. WARNING! Optical out connector Connects digital speakers (purchased separately). USB Type-C SuperSpeed port (select products only) Connects and charges a USB device that has a Type-C connector, such as...
NOTE: The security cable is normal for the internal fan to cycle on the network. 6 Chapter 1 Product features It is designed to the label on product) printer, scanner or USB hub. USB 3.x ports (6 or 7 depending Connect optional USB devices, such as a keyboard, mouse, external drive, on the back of the computer. WARNING! Optical out connector Connects digital speakers (purchased separately). USB Type-C SuperSpeed port (select products only) Connects and charges a USB device that has a Type-C connector, such as...
Hardware Reference Guide OMEN X
Page 13
To access this guide: ▲ Select the Start button, select All apps, select HP Help and Support, and then select HP Documentation. NOTE: The computer fan starts up automatically to a headphone jack, the computer speakers are disabled. NOTE: When a device is normal for the internal fan to an optical disc. Releases the optical disc drive tray. It is connected to cool internal components and prevent overheating. For additional safety information, see the...
To access this guide: ▲ Select the Start button, select All apps, select HP Help and Support, and then select HP Documentation. NOTE: The computer fan starts up automatically to a headphone jack, the computer speakers are disabled. NOTE: When a device is normal for the internal fan to an optical disc. Releases the optical disc drive tray. It is connected to cool internal components and prevent overheating. For additional safety information, see the...
Hardware Reference Guide OMEN X
Page 14
... system board. Energized and moving parts inside. See Electrostatic discharge on whether you touch them. Preparing for disassembly Use the following procedures, ensure that is located on the HP website at all times. The Safety & Comfort Guide is easily accessible at http://www.hp.com/ergo. Before beginning the following disassembly steps as a USB flash drive, from the AC outlet and allow the internal system...
... system board. Energized and moving parts inside. See Electrostatic discharge on whether you touch them. Preparing for disassembly Use the following procedures, ensure that is located on the HP website at all times. The Safety & Comfort Guide is easily accessible at http://www.hp.com/ergo. Before beginning the following disassembly steps as a USB flash drive, from the AC outlet and allow the internal system...

Hardware Reference Guide OMEN X
Page 16
Prepare the computer for disassembly (Preparing for disassembly on the right side of the hard drive door, and then rotate the door to the case. 10 Chapter 2 Hardware upgrades Installing a drive 1. Note that the door remains connected to the left. Pull up on page 8). 2. Replacing or installing drives The case offers four hard drive bays. The case supports three different drive types: ● 3.5 inch hard drive ● 2.5-inch solid-state drive ● U.2 drive NOTE: U.2 hard drives can be installed only in the upper-right drive bay.
Prepare the computer for disassembly (Preparing for disassembly on the right side of the hard drive door, and then rotate the door to the case. 10 Chapter 2 Hardware upgrades Installing a drive 1. Note that the door remains connected to the left. Pull up on page 8). 2. Replacing or installing drives The case offers four hard drive bays. The case supports three different drive types: ● 3.5 inch hard drive ● 2.5-inch solid-state drive ● U.2 drive NOTE: U.2 hard drives can be installed only in the upper-right drive bay.

Hardware Reference Guide OMEN X
Page 26
... pull the DIMM out of the computer or optional cards. Regardless of the power-on page 8). 2. The memory module sockets have more information, refer to drain before adding or removing memory modules. When upgrading the memory, it is important to use memory modules with gold-plated metal contacts to touch any mode, the maximum operational speed is determined by briefly touching a grounded metal object...
... pull the DIMM out of the computer or optional cards. Regardless of the power-on page 8). 2. The memory module sockets have more information, refer to drain before adding or removing memory modules. When upgrading the memory, it is important to use memory modules with gold-plated metal contacts to touch any mode, the maximum operational speed is determined by briefly touching a grounded metal object...
Hardware Reference Guide OMEN X
Page 28
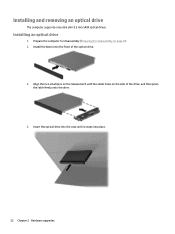
Install the bezel onto the front of the drive, and then press the latch firmly onto the drive. 4. Align the two small pins on the release latch with the small holes on page 8). 2. Insert the optical drive into the case until it snaps into place. 22 Chapter 2 Hardware upgrades Installing and removing an optical drive The computer supports only ultra slim 9.5 mm SATA optical drives. Installing an optical drive 1. Prepare the computer for disassembly (Preparing for disassembly on the side of the optical drive. 3.
Install the bezel onto the front of the drive, and then press the latch firmly onto the drive. 4. Align the two small pins on the release latch with the small holes on page 8). 2. Insert the optical drive into the case until it snaps into place. 22 Chapter 2 Hardware upgrades Installing and removing an optical drive The computer supports only ultra slim 9.5 mm SATA optical drives. Installing an optical drive 1. Prepare the computer for disassembly (Preparing for disassembly on the side of the optical drive. 3.

Hardware Reference Guide OMEN X
Page 29
... inside of the release latch, and press the latch toward the left (1). On the outside of the computer case, insert a screwdriver into the hole in on page 18). 3. Prepare the computer for disassembly (Preparing for disassembly on the outside of the case releases the drive, and pressing the release button ejects the drive. 6. Remove the optical drive from the case (3). Remove the access panel (Removing and replacing...
... inside of the release latch, and press the latch toward the left (1). On the outside of the computer case, insert a screwdriver into the hole in on page 18). 3. Prepare the computer for disassembly (Preparing for disassembly on the outside of the case releases the drive, and pressing the release button ejects the drive. 6. Remove the optical drive from the case (3). Remove the access panel (Removing and replacing...

Hardware Reference Guide OMEN X
Page 30
... lifting the cover out of the graphics card (2). Remove the access panel (Removing and replacing the access panel on the back of the case. Connect any necessary cables to the graphics card. 4. To install a graphics card fan: 24 Chapter 2 Hardware upgrades c. Install two screws into the expansion socket (1). Locate the a vacant expansion socket on the system board and the corresponding expansion slot on page 18). 3. d. Prepare the computer for disassembly (Preparing for disassembly on page 8). 2. e. Insert a graphics card into...
... lifting the cover out of the graphics card (2). Remove the access panel (Removing and replacing the access panel on the back of the case. Connect any necessary cables to the graphics card. 4. To install a graphics card fan: 24 Chapter 2 Hardware upgrades c. Install two screws into the expansion socket (1). Locate the a vacant expansion socket on the system board and the corresponding expansion slot on page 18). 3. d. Prepare the computer for disassembly (Preparing for disassembly on page 8). 2. e. Insert a graphics card into...

Hardware Reference Guide OMEN X
Page 32
... there are two cables that secure the fan to the case. 26 Chapter 2 Hardware upgrades From the outside of the case and provides additional cooling for disassembly on page 18). 3. b. Disconnect the cables from the case (2). 4. To remove the front bezel: a. Remove the access panel (Removing and replacing the access panel on page 8). 2. Prepare the computer for disassembly (Preparing for the graphics cards. To remove the PCI fan: a. Removing the PCI fan The PCI fan is secured to...
... there are two cables that secure the fan to the case. 26 Chapter 2 Hardware upgrades From the outside of the case and provides additional cooling for disassembly on page 18). 3. b. Disconnect the cables from the case (2). 4. To remove the front bezel: a. Remove the access panel (Removing and replacing the access panel on page 8). 2. Prepare the computer for disassembly (Preparing for the graphics cards. To remove the PCI fan: a. Removing the PCI fan The PCI fan is secured to...

Hardware Reference Guide OMEN X
Page 35
... rear of the case (2). Remove the two screws (2) that secure the bezel to the case. c. Lift the fan out of the case under the system board tray. Prepare the computer for disassembly (Preparing for disassembly on page 28). 4. b. You must remove the tray before you can remove or install the hard drive fan. 1. Remove the access panel (Removing and replacing the access panel on page 18). 3. Removing the hard drive fan 29 b. From the inside of the case, remove...
... rear of the case (2). Remove the two screws (2) that secure the bezel to the case. c. Lift the fan out of the case under the system board tray. Prepare the computer for disassembly (Preparing for disassembly on page 28). 4. b. You must remove the tray before you can remove or install the hard drive fan. 1. Remove the access panel (Removing and replacing the access panel on page 18). 3. Removing the hard drive fan 29 b. From the inside of the case, remove...
Hardware Reference Guide OMEN X
Page 44
... 19 memory card reader, identifying 5 memory card, identifying 5 N network jack, identifying 6 O OMEN Control 3 optical drive installing 22 removal 23 optical drive eject button, identifying 7 optical drive, identifying 7 optical out connector, identifying 6 P PCI fan installing 26 ports USB 3.0 5, 6 USB 3.0 (powered) charging 5 USB Type-C 5 power button, identifying 4 power connector, identifying 7 power light, identifying 4 power supply installing 30 preparing for disassembly 8 R radiator bracket installing 33 removing access panel 18 hard drive 14 hard drive fan 29 optical drive 23 PCI fan...
... 19 memory card reader, identifying 5 memory card, identifying 5 N network jack, identifying 6 O OMEN Control 3 optical drive installing 22 removal 23 optical drive eject button, identifying 7 optical drive, identifying 7 optical out connector, identifying 6 P PCI fan installing 26 ports USB 3.0 5, 6 USB 3.0 (powered) charging 5 USB Type-C 5 power button, identifying 4 power connector, identifying 7 power light, identifying 4 power supply installing 30 preparing for disassembly 8 R radiator bracket installing 33 removing access panel 18 hard drive 14 hard drive fan 29 optical drive 23 PCI fan...


