
Maintenance and Service Guide
Page 8
... drive and Optane Memory Module 29 Memory module ...30 6 Removal and replacement procedures for authorized service provider parts 31 Component replacement procedures ...31 Thermal material ...31 Battery and speakers ...32 Heat sink/fan assembly ...35 Second display transfer board ...38 Power connector cable ...39 Power button board ...40 System board ...41 Network connector door ...44 Thermal shield (CU plate) ...45 IR sensor board ...46 Touchpad cable ...47 Second display panel ...48 Display assembly ...51 Keyboard/top cover ...59 7 Using Setup Utility (BIOS) ...60 Starting Setup Utility...
... drive and Optane Memory Module 29 Memory module ...30 6 Removal and replacement procedures for authorized service provider parts 31 Component replacement procedures ...31 Thermal material ...31 Battery and speakers ...32 Heat sink/fan assembly ...35 Second display transfer board ...38 Power connector cable ...39 Power button board ...40 System board ...41 Network connector door ...44 Thermal shield (CU plate) ...45 IR sensor board ...46 Touchpad cable ...47 Second display panel ...48 Display assembly ...51 Keyboard/top cover ...59 7 Using Setup Utility (BIOS) ...60 Starting Setup Utility...
Maintenance and Service Guide
Page 71
... initiate Sleep. ● Do not insert, remove, connect, or disconnect any instructions that appear on -screen instructions to download your hard drive. Type support in the taskbar search box, and then select File Explorer. 2. If the update is connected to reliable external power using the AC adapter. The hard drive designation is complete. Follow any device, cable, or cord. or - Make a note of damage to the computer or an unsuccessful installation, download and install a BIOS update only...
... initiate Sleep. ● Do not insert, remove, connect, or disconnect any instructions that appear on -screen instructions to download your hard drive. Type support in the taskbar search box, and then select File Explorer. 2. If the update is connected to reliable external power using the AC adapter. The hard drive designation is complete. Follow any device, cable, or cord. or - Make a note of damage to the computer or an unsuccessful installation, download and install a BIOS update only...
Maintenance and Service Guide
Page 73
... or number, follow these steps: 1. For assistance in solving the problem: ▲ Select Get Support, and then use a Windows computer and a USB flash drive to determine whether the computer hardware is displayed. 2. Using HP PC Hardware Diagnostics UEFI 63 The tool is downloaded to a USB flash drive on -screen instructions. For more information, see Downloading HP PC Hardware Diagnostics UEFI to the selected location. The tool is downloaded to scan the QR code that requires hardware replacement...
... or number, follow these steps: 1. For assistance in solving the problem: ▲ Select Get Support, and then use a Windows computer and a USB flash drive to determine whether the computer hardware is displayed. 2. Using HP PC Hardware Diagnostics UEFI 63 The tool is downloaded to a USB flash drive on -screen instructions. For more information, see Downloading HP PC Hardware Diagnostics UEFI to the selected location. The tool is downloaded to scan the QR code that requires hardware replacement...
Maintenance and Service Guide
Page 84
...B back cover spare part number 20 backup, creating 67 backups 67 battery removal 32 spare part number 17, 32 bezel spare part number 19, 52 BIOS determining version 60 downloading an update 61 starting the Setup Utility 60 updating 60 Bluetooth label 14 boot order, changing 68 bottom components 12 bottom cover removal 27 spare part number 27 bottom cover, spare part numbers 18 buttons left touchpad 8 power 10 right touchpad 8 C camera identifying 7 camera light, identifying 7 caps lock light, identifying 9 cautions electrostatic discharge 22 components bottom 12 display 7 keyboard area 8 left...
...B back cover spare part number 20 backup, creating 67 backups 67 battery removal 32 spare part number 17, 32 bezel spare part number 19, 52 BIOS determining version 60 downloading an update 61 starting the Setup Utility 60 updating 60 Bluetooth label 14 boot order, changing 68 bottom components 12 bottom cover removal 27 spare part number 27 bottom cover, spare part numbers 18 buttons left touchpad 8 power 10 right touchpad 8 C camera identifying 7 camera light, identifying 7 caps lock light, identifying 9 cautions electrostatic discharge 22 components bottom 12 display 7 keyboard area 8 left...
Maintenance and Service Guide
Page 85
...audio 2 display panel 1 graphics 1 internal card expansion 3 keyboard/pointing devices 3 memory 1 microphone 2 operating system 3 ports 2 power requirements 3 processors 1 product name 1 RJ-45 (network) jack 2 security 3 serviceability 4 storage 2 video 2 wireless networking 2 product name 1 product name and number, computer 13 R recovery 67 discs 68 HP Recovery partition 68 media 68 USB flash drive 68 recovery media creating using HP Cloud Recovery Download Tool 67 creating using Windows tools 67 regulatory information regulatory label 14 wireless certification labels 14 Remote HP PC Hardware...
...audio 2 display panel 1 graphics 1 internal card expansion 3 keyboard/pointing devices 3 memory 1 microphone 2 operating system 3 ports 2 power requirements 3 processors 1 product name 1 RJ-45 (network) jack 2 security 3 serviceability 4 storage 2 video 2 wireless networking 2 product name 1 product name and number, computer 13 R recovery 67 discs 68 HP Recovery partition 68 media 68 USB flash drive 68 recovery media creating using HP Cloud Recovery Download Tool 67 creating using Windows tools 67 regulatory information regulatory label 14 wireless certification labels 14 Remote HP PC Hardware...

User Guide
Page 7
... 1 Getting started ...1 Best practices ...1 More HP resources ...2 2 Getting to know your computer ...3 Locating hardware ...3 Locating software ...3 Right side ...4 Left side ...5 Display ...6 Keyboard area ...7 TouchPad ...7 Lights ...8 Power button and second screen ...9 Special keys ...10 Action keys ...11 Bottom ...12 Labels ...13 HP OMEN Command Center ...14 Using the second screen ...15 3 Connecting to a network ...16 Connecting to a wireless network ...16 Using the wireless controls ...16 Airplane mode key ...16 Operating system controls 16 Connecting to a WLAN ...17 Using HP Mobile...
... 1 Getting started ...1 Best practices ...1 More HP resources ...2 2 Getting to know your computer ...3 Locating hardware ...3 Locating software ...3 Right side ...4 Left side ...5 Display ...6 Keyboard area ...7 TouchPad ...7 Lights ...8 Power button and second screen ...9 Special keys ...10 Action keys ...11 Bottom ...12 Labels ...13 HP OMEN Command Center ...14 Using the second screen ...15 3 Connecting to a network ...16 Connecting to a wireless network ...16 Using the wireless controls ...16 Airplane mode key ...16 Operating system controls 16 Connecting to a WLAN ...17 Using HP Mobile...
User Guide
Page 9
... the display ...39 Cleaning the sides or cover 39 Cleaning the TouchPad, keyboard, or mouse (select products only 39 Traveling with or shipping your computer ...39 8 Securing your computer and information ...41 Using passwords ...41 Setting Windows passwords ...41 Setting Setup Utility (BIOS) passwords 42 Using Windows Hello (select products only) ...43 Using Internet security software ...43 Using antivirus software ...43 Using firewall software ...43 Installing software updates ...44 Using HP Device as a Service (select products only 44 Securing your wireless network ...44...
... the display ...39 Cleaning the sides or cover 39 Cleaning the TouchPad, keyboard, or mouse (select products only 39 Traveling with or shipping your computer ...39 8 Securing your computer and information ...41 Using passwords ...41 Setting Windows passwords ...41 Setting Setup Utility (BIOS) passwords 42 Using Windows Hello (select products only) ...43 Using Internet security software ...43 Using antivirus software ...43 Using firewall software ...43 Installing software updates ...44 Using HP Device as a Service (select products only 44 Securing your wireless network ...44...

User Guide
Page 23
... display devices connected to off after 30 seconds of a DVD or a Blu-ray Disc (BD). On select products, you adjust the keyboard backlight setting, the backlight will turn on both the computer and the monitor. Press the key repeatedly to adjust the brightness from onlookers. Plays the next track of an audio CD or the next section of the keys listed in Windows 10" webpage. Increases speaker volume...
... display devices connected to off after 30 seconds of a DVD or a Blu-ray Disc (BD). On select products, you adjust the keyboard backlight setting, the backlight will turn on both the computer and the monitor. Press the key repeatedly to adjust the brightness from onlookers. Plays the next track of an audio CD or the next section of the keys listed in Windows 10" webpage. Increases speaker volume...
User Guide
Page 28
... a connection or network, connect to a network, and diagnose and repair network problems. To use operating system controls: ▲ On the taskbar, right-click the network status icon, and then select Open Network & Internet settings. ‒ or - ▲ On the taskbar, select the network status icon, and then select Network & Internet settings. 16 Chapter 3 Connecting to that world. But even at the factory. The wireless light indicates the overall power state of the following wireless devices: ● WLAN device-Connects...
... a connection or network, connect to a network, and diagnose and repair network problems. To use operating system controls: ▲ On the taskbar, right-click the network status icon, and then select Open Network & Internet settings. ‒ or - ▲ On the taskbar, select the network status icon, and then select Network & Internet settings. 16 Chapter 3 Connecting to that world. But even at the factory. The wireless light indicates the overall power state of the following wireless devices: ● WLAN device-Connects...

User Guide
Page 33
... view or change system sounds, or manage audio devices. IMPORTANT: Be sure that the external device is a powerful video device that can connect wired headsets to a network. Headphones combined with a microphone are not connected to the audioout (headphone)/audio-in (microphone) combo jack on headphones, earbuds, or a headset. Using sound settings Use sound settings to your sound system. For information about using the correct cable. To access this document: ▲ Select the Start button, select HP Help and Support, and then...
... view or change system sounds, or manage audio devices. IMPORTANT: Be sure that the external device is a powerful video device that can connect wired headsets to a network. Headphones combined with a microphone are not connected to the audioout (headphone)/audio-in (microphone) combo jack on headphones, earbuds, or a headset. Using sound settings Use sound settings to your sound system. For information about using the correct cable. To access this document: ▲ Select the Start button, select HP Help and Support, and then...

User Guide
Page 46
... or critical battery level. - Type support in HP Support Assistant (select products only) To access battery information: 1. If HP Battery Check indicates that your work, initiate Sleep or shut down and loses any external media cards that you are not using. ● Before you are not using them. ● Disconnect unused external devices that are not plugged into an external power source, such as an external hard drive connected to a USB port. ● Stop, disable, or remove any unsaved...
... or critical battery level. - Type support in HP Support Assistant (select products only) To access battery information: 1. If HP Battery Check indicates that your work, initiate Sleep or shut down and loses any external media cards that you are not using. ● Before you are not using them. ● Disconnect unused external devices that are not plugged into an external power source, such as an external hard drive connected to a USB port. ● Stop, disable, or remove any unsaved...
User Guide
Page 47
... adapter ● Optional docking device or expansion product ● Optional power adapter purchased as an accessory from HP. If HP Battery Check indicates that your warranty coverage. Removing or replacing the battery could affect your battery should be easily replaced by users themselves. WARNING! Resolving a low battery level Resolving a low battery level when external power is available Connect one of the following conditions: ● When charging or calibrating a battery ● When installing or updating system software...
... adapter ● Optional docking device or expansion product ● Optional power adapter purchased as an accessory from HP. If HP Battery Check indicates that your warranty coverage. Removing or replacing the battery could affect your battery should be easily replaced by users themselves. WARNING! Resolving a low battery level Resolving a low battery level when external power is available Connect one of the following conditions: ● When charging or calibrating a battery ● When installing or updating system software...

User Guide
Page 49
... information, access the Disk Defragmenter software Help. NOTE: Because solid-state drives (SSDs) lack moving parts, HP 3D DriveGuard is important to perform regular maintenance to keep your computer in an optional docking device or connected to a USB port is running on solid-state drives. Improving performance You can safely delete to free up disk space and help the computer run Disk Cleanup: 1. NOTE: Only internal hard drives are protected...
... information, access the Disk Defragmenter software Help. NOTE: Because solid-state drives (SSDs) lack moving parts, HP 3D DriveGuard is important to perform regular maintenance to keep your computer in an optional docking device or connected to a USB port is running on solid-state drives. Improving performance You can safely delete to free up disk space and help the computer run Disk Cleanup: 1. NOTE: Only internal hard drives are protected...
User Guide
Page 54
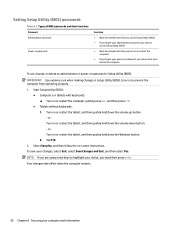
... the Windows button. 2. Select Security, and then follow the on password in Setup Utility (BIOS): IMPORTANT: Use extreme care when making changes in Setup Utility (BIOS). To set, change, or delete an administrator or power-on -screen instructions. or Turn on or restart the tablet, and then quickly hold down the volume down button. - or Turn on or restart the tablet, and then quickly hold down the volume up button. - NOTE: If you are using arrow keys...
... the Windows button. 2. Select Security, and then follow the on password in Setup Utility (BIOS): IMPORTANT: Use extreme care when making changes in Setup Utility (BIOS). To set, change, or delete an administrator or power-on -screen instructions. or Turn on or restart the tablet, and then quickly hold down the volume down button. - or Turn on or restart the tablet, and then quickly hold down the volume up button. - NOTE: If you are using arrow keys...
User Guide
Page 56
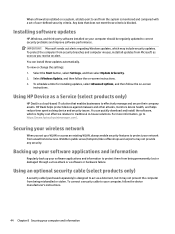
... or a software or hardware failure. Select Windows Update, and then follow the on -screen instructions. To connect a security cable to your computer, follow the on -screen instructions. 3. Select the Start button, select Settings, and then select Update & Security. 2. To schedule a time for installing updates, select Advanced options, and then follow the device manufacturer's instructions. 44 Chapter 8 Securing your computer should be regularly updated to correct security problems and improve software performance. For...
... or a software or hardware failure. Select Windows Update, and then follow the on -screen instructions. To connect a security cable to your computer, follow the on -screen instructions. 3. Select the Start button, select Settings, and then select Update & Security. 2. To schedule a time for installing updates, select Advanced options, and then follow the device manufacturer's instructions. 44 Chapter 8 Securing your computer should be regularly updated to correct security problems and improve software performance. For...
User Guide
Page 58
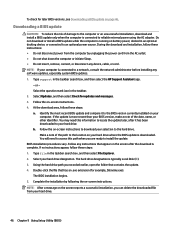
... BIOS update and compare it has been downloaded to your BIOS version, make a note of damage to download your hard drive. 46 Chapter 9 Using Setup Utility (BIOS) If the update is downloaded. You may need to access this information to locate the update later, after the download is connected to the location on -screen instructions. Type file in an optional docking device, or connected to install the update. Using the hard drive path you are ready to an optional power source. During the download and installation...
... BIOS update and compare it has been downloaded to your BIOS version, make a note of damage to download your hard drive. 46 Chapter 9 Using Setup Utility (BIOS) If the update is downloaded. You may need to access this information to locate the update later, after the download is connected to the location on -screen instructions. Type file in an optional docking device, or connected to install the update. Using the hard drive path you are ready to an optional power source. During the download and installation...
User Guide
Page 60
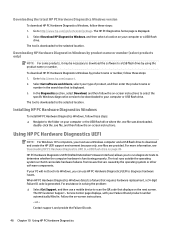
... -screen instructions to select the specific Windows diagnostics version to be necessary to download the software to a USB flash drive by product name or number (select products only) NOTE: For some products, it can use a mobile device to your PC will not boot into Windows, you must use a Windows computer and a USB flash drive to diagnose hardware issues. The tool is downloaded to the selected location. Installing HP PC Hardware Diagnostics Windows To install HP PC Hardware Diagnostics Windows, follow...
... -screen instructions to select the specific Windows diagnostics version to be necessary to download the software to a USB flash drive by product name or number (select products only) NOTE: For some products, it can use a mobile device to your PC will not boot into Windows, you must use a Windows computer and a USB flash drive to diagnose hardware issues. The tool is downloaded to the selected location. Installing HP PC Hardware Diagnostics Windows To install HP PC Hardware Diagnostics Windows, follow...

User Guide
Page 76
... battery charge 34 battery information, finding 34 battery power 33 best practices 1 BIOS determining version 45 downloading an update 46 starting the Setup Utility 45 updating 45 Bluetooth device 16, 18 Bluetooth label 14 boot order, changing 53 bottom components 12 buttons left TouchPad 7 power 9 right TouchPad 7 C camera identifying 6 using 20 camera light, identifying 6 caps lock light, identifying 8 caring for your computer 38 cleaning your computer 38 components bottom 12 display 6 keyboard area 7 left side 5 right side 4 connecting to a network 16 connecting to a wireless network...
... battery charge 34 battery information, finding 34 battery power 33 best practices 1 BIOS determining version 45 downloading an update 46 starting the Setup Utility 45 updating 45 Bluetooth device 16, 18 Bluetooth label 14 boot order, changing 53 bottom components 12 buttons left TouchPad 7 power 9 right TouchPad 7 C camera identifying 6 using 20 camera light, identifying 6 caps lock light, identifying 8 caring for your computer 38 cleaning your computer 38 components bottom 12 display 6 keyboard area 7 left side 5 right side 4 connecting to a network 16 connecting to a wireless network...

User Guide
Page 77
... updating programs and drivers 38 managing power 31 MEID number 17 Miracast 24 mobile broadband activating 17 IMEI number 17 MEID number 17 mute light, identifying 8 mute volume action key 12 N network jack, identifying 5 next track action key 11 O OMEN key 14 OMEN key, identifying 10 one-finger slide touch screen gesture 30 operating environment 55 operating system controls 16 P passwords Setup Utility (BIOS) 42 Windows 41 pause action key 11 play action key 11 ports HDMI 5, 23 USB SuperSpeed port with HP Sleep and Charge 4, 5 USB Type-C 25 USB Type-C power...
... updating programs and drivers 38 managing power 31 MEID number 17 Miracast 24 mobile broadband activating 17 IMEI number 17 MEID number 17 mute light, identifying 8 mute volume action key 12 N network jack, identifying 5 next track action key 11 O OMEN key 14 OMEN key, identifying 10 one-finger slide touch screen gesture 30 operating environment 55 operating system controls 16 P passwords Setup Utility (BIOS) 42 Windows 41 pause action key 11 play action key 11 ports HDMI 5, 23 USB SuperSpeed port with HP Sleep and Charge 4, 5 USB Type-C 25 USB Type-C power...
User Guide
Page 78
... switch screen image action key 11 system restore point, creating 52 T tap TouchPad and touch screen gesture 26 three-finger swipe TouchPad gesture 29 three-finger tap TouchPad gesture 28 Thunderbolt port with HP Sleep and Charge, identifying 4 using passwords 41 using the keyboard and optional mouse 30 using the TouchPad 26 V vent, identifying 4 vents, identifying 12 video HDMI port 23 Thunderbolt port device 22 USB Type-C 25 wireless displays 24 video, using 21 virtual numeric keypad key, identifying 10 volume adjusting 11 mute 12 W Windows backup 52 recovery media...
... switch screen image action key 11 system restore point, creating 52 T tap TouchPad and touch screen gesture 26 three-finger swipe TouchPad gesture 29 three-finger tap TouchPad gesture 28 Thunderbolt port with HP Sleep and Charge, identifying 4 using passwords 41 using the keyboard and optional mouse 30 using the TouchPad 26 V vent, identifying 4 vents, identifying 12 video HDMI port 23 Thunderbolt port device 22 USB Type-C 25 wireless displays 24 video, using 21 virtual numeric keypad key, identifying 10 volume adjusting 11 mute 12 W Windows backup 52 recovery media...


