
User Guide
Page 6
Using an Internet service provider 22 Setting up a WLAN 22 Configuring a wireless router 22 Protecting your WLAN 22 Connecting to a WLAN 23 Using Bluetooth wireless devices (select models only 24 5 Enjoying entertainment features ...25 Multimedia features ...25 Using the webcam ...26 Using audio ...27 Connecting speakers ...27 Connecting headphones and microphones 27 Testing your audio features 27 Using video ...28 Connecting video devices by using an HDMI cable 28 Setting up HDMI audio 29 Connecting digital display devices by using a DisplayPort cable 29 Discovering and connecting ...
Using an Internet service provider 22 Setting up a WLAN 22 Configuring a wireless router 22 Protecting your WLAN 22 Connecting to a WLAN 23 Using Bluetooth wireless devices (select models only 24 5 Enjoying entertainment features ...25 Multimedia features ...25 Using the webcam ...26 Using audio ...27 Connecting speakers ...27 Connecting headphones and microphones 27 Testing your audio features 27 Using video ...28 Connecting video devices by using an HDMI cable 28 Setting up HDMI audio 29 Connecting digital display devices by using a DisplayPort cable 29 Discovering and connecting ...

User Guide
Page 7
... ...49 Improving performance ...49 Handling drives ...49 Using Disk Cleanup ...49 Updating programs and drivers ...50 Cleaning your computer ...50 Cleaning procedures ...50 Cleaning the display 51 Cleaning the sides or cover 51 Cleaning the touchpad, keyboard, or mouse 51 Traveling with or shipping your computer 51 10 Securing your computer and information ...53 Using passwords ...53 Setting Windows passwords 54 Setting Setup Utility (BIOS) passwords 54 Using Internet security software ...54 vii
... ...49 Improving performance ...49 Handling drives ...49 Using Disk Cleanup ...49 Updating programs and drivers ...50 Cleaning your computer ...50 Cleaning procedures ...50 Cleaning the display 51 Cleaning the sides or cover 51 Cleaning the touchpad, keyboard, or mouse 51 Traveling with or shipping your computer 51 10 Securing your computer and information ...53 Using passwords ...53 Setting Windows passwords 54 Setting Setup Utility (BIOS) passwords 54 Using Internet security software ...54 vii
User Guide
Page 8
... 57 Downloading a BIOS update 58 Using HP PC Hardware Diagnostics (UEFI 58 Downloading HP PC Hardware Diagnostics (UEFI) to a USB device 59 12 Backing up, restoring, and recovering ...60 Creating recovery media and backups 60 Creating HP Recovery media 60 Restore and recovery ...61 Recovering using HP Recovery Manager 62 What you need to know 62 Using the HP Recovery partition (select models only 62 Using HP Recovery media to recover 63 Changing the computer boot order 63 Removing the HP Recovery partition (select models only 63 13 Specifications ...64 Input power ...64 Operating...
... 57 Downloading a BIOS update 58 Using HP PC Hardware Diagnostics (UEFI 58 Downloading HP PC Hardware Diagnostics (UEFI) to a USB device 59 12 Backing up, restoring, and recovering ...60 Creating recovery media and backups 60 Creating HP Recovery media 60 Restore and recovery ...61 Recovering using HP Recovery Manager 62 What you need to know 62 Using the HP Recovery partition (select models only 62 Using HP Recovery media to recover 63 Changing the computer boot order 63 Removing the HP Recovery partition (select models only 63 13 Specifications ...64 Input power ...64 Operating...
User Guide
Page 22
... 3 to the default settings. 14 Chapter 3 Gaming keyboard Under Profiles, select Current Settings, and then make changes to existing profiles and save current settings for future use: 1. You can view and change settings and they are customized and saved for that you can make any one of all the keyboard, lighting, and advanced settings. Current settings Current Settings in HP OMEN Control shows you the current, active state of the number keys.
... 3 to the default settings. 14 Chapter 3 Gaming keyboard Under Profiles, select Current Settings, and then make changes to existing profiles and save current settings for future use: 1. You can view and change settings and they are customized and saved for that you can make any one of all the keyboard, lighting, and advanced settings. Current settings Current Settings in HP OMEN Control shows you the current, active state of the number keys.
User Guide
Page 25
... can disable keys on the keyboard as well as the touchpad and touch screen. Advanced keyboard settings 17 Advanced keyboard settings With advanced settings in HP OMEN Control, you want to change , and then assign it to all the lighting zones at once. In the drop-down box, select the lighting zone that you want to change for each lighting zone you can have more control over your keyboard functions. From the Windows...
... can disable keys on the keyboard as well as the touchpad and touch screen. Advanced keyboard settings 17 Advanced keyboard settings With advanced settings in HP OMEN Control, you want to change , and then assign it to all the lighting zones at once. In the drop-down box, select the lighting zone that you want to change for each lighting zone you can have more control over your keyboard functions. From the Windows...
User Guide
Page 29
... on -screen instructions. From the Windows desktop, right-click the network status icon in your computer. Select Open Network and Sharing Center. 3. Select Share from the Start screen, type help, and then select Help and Support. Click Share and then follow the on the same network: 1. Select Change advanced sharing settings to set up a connection or network, connect to a network, and diagnose and repair network problems. To use the WLAN device in the...
... on -screen instructions. From the Windows desktop, right-click the network status icon in your computer. Select Open Network and Sharing Center. 3. Select Share from the Start screen, type help, and then select Help and Support. Click Share and then follow the on the same network: 1. Select Change advanced sharing settings to set up a connection or network, connect to a network, and diagnose and repair network problems. To use the WLAN device in the...
User Guide
Page 48
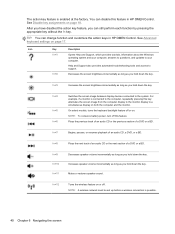
... can change function and customize the action keys in HP OMEN Control. After you have disabled the action key feature, you hold down the key. fn+f3 Increases the screen brightness incrementally as long as you can still perform each function by pressing the appropriate key without the fn key. NOTE: To conserve battery power, turn off . NOTE: A wireless network must be set up before a wireless connection is enabled at the factory. See Advanced keyboard settings...
... can change function and customize the action keys in HP OMEN Control. After you have disabled the action key feature, you hold down the key. fn+f3 Increases the screen brightness incrementally as long as you can still perform each function by pressing the appropriate key without the fn key. NOTE: To conserve battery power, turn off . NOTE: A wireless network must be set up before a wireless connection is enabled at the factory. See Advanced keyboard settings...
User Guide
Page 52
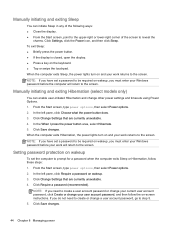
... the Start screen, type power options, then select Power options. 2. Click Require a password (recommended). To exit Sleep: ● Briefly press the power button. ● If the display is closed, open the display. ● Press a key on wakeup, you must enter your Windows password before your work will return to the screen. Click Change Settings that are currently unavailable. 4. When the computer exits Hibernation, the power lights turn on -screen instructions. Click Change Settings that are currently unavailable. 4. If you need...
... the Start screen, type power options, then select Power options. 2. Click Require a password (recommended). To exit Sleep: ● Briefly press the power button. ● If the display is closed, open the display. ● Press a key on wakeup, you must enter your Windows password before your work will return to the screen. Click Change Settings that are currently unavailable. 4. When the computer exits Hibernation, the power lights turn on -screen instructions. Click Change Settings that are currently unavailable. 4. If you need...
User Guide
Page 53
... the Windows desktop, point over the power meter icon. ● To use Power Options, click the power meter icon and select an item from external power. Factory-sealed battery To monitor the status of your battery should be easily replaced by users themselves. When a battery has reached the end of its useful life, do not dispose of remaining battery charge and the current power plan, on the computer, screen brightness, external devices connected to quickly access power settings...
... the Windows desktop, point over the power meter icon. ● To use Power Options, click the power meter icon and select an item from external power. Factory-sealed battery To monitor the status of your battery should be easily replaced by users themselves. When a battery has reached the end of its useful life, do not dispose of remaining battery charge and the current power plan, on the computer, screen brightness, external devices connected to quickly access power settings...
User Guide
Page 63
... -screen instructions. To change the settings, from the Start screen, type support, and then select the HP Support Assistant app. the security software trial offer or purchase the software of your choice in order to correct security problems and improve software performance. Using antivirus software Computer viruses can be software you receive an alert. When a firewall is monitored and compared with a set of both hardware and software. Select System and Security, select Windows Update...
... -screen instructions. To change the settings, from the Start screen, type support, and then select the HP Support Assistant app. the security software trial offer or purchase the software of your choice in order to correct security problems and improve software performance. Using antivirus software Computer viruses can be software you receive an alert. When a firewall is monitored and compared with a set of both hardware and software. Select System and Security, select Windows Update...
User Guide
Page 66
... connected to reliable external power using the AC adapter. b. NOTE: If you connect your BIOS, make a note of the path to an optional power source. From the Start screen, type file, and then select File Explorer. 2. Using HP PC Hardware Diagnostics (UEFI) HP PC Hardware Diagnostics is downloaded. Follow the on -screen instructions. You will need this path when you to run diagnostic tests to a network, consult the network administrator before installing any software updates, especially system BIOS updates...
... connected to reliable external power using the AC adapter. b. NOTE: If you connect your BIOS, make a note of the path to an optional power source. From the Start screen, type file, and then select File Explorer. 2. Using HP PC Hardware Diagnostics (UEFI) HP PC Hardware Diagnostics is downloaded. Follow the on -screen instructions. You will need this path when you to run diagnostic tests to a network, consult the network administrator before installing any software updates, especially system BIOS updates...

User Guide
Page 69
... HP Recovery partition (select models only) or HP Recovery media. From the Start screen, type recovery, select HP Recovery Manager, select Drivers and Applications Reinstall, and then follow the on-screen instructions. ● If you want to recover the computer's original factory partitioning and content, you need to an hour or more information and steps, see Recovering using HP Recovery Manager on page 62. Other applications included in the image continue to create recovery discs, or you have replaced the hard drive...
... HP Recovery partition (select models only) or HP Recovery media. From the Start screen, type recovery, select HP Recovery Manager, select Drivers and Applications Reinstall, and then follow the on-screen instructions. ● If you want to recover the computer's original factory partitioning and content, you need to an hour or more information and steps, see Recovering using HP Recovery Manager on page 62. Other applications included in the image continue to create recovery discs, or you have replaced the hard drive...
User Guide
Page 71
...screen instructions. Restore and recovery 63 Select Troubleshoot from the HP Recovery partition. Using HP Recovery media to remove everything and reinstall Windows. Removing the HP Recovery partition (select models only) HP Recovery Manager software allows you can no longer use HP Recovery media to remove the HP Recovery partition: 1. Insert the HP Recovery media you can change the selection for boot options. 3. IMPORTANT: After you remove the HP Recovery partition, you created. 2. If possible, back up hard drive space. Press and hold f11 as you press the power button...
...screen instructions. Restore and recovery 63 Select Troubleshoot from the HP Recovery partition. Using HP Recovery media to remove everything and reinstall Windows. Removing the HP Recovery partition (select models only) HP Recovery Manager software allows you can no longer use HP Recovery media to remove the HP Recovery partition: 1. Insert the HP Recovery media you can change the selection for boot options. 3. IMPORTANT: After you remove the HP Recovery partition, you created. 2. If possible, back up hard drive space. Press and hold f11 as you press the power button...
User Guide
Page 74
... 15 gaming profiles, creating 14 gaming shortcut keys 18 H HDMI configuring audio 29 HDMI port connecting 28 identifying 6, 26 headphones and microphones, connecting 27 Hibernation exiting 44 initiated during critical battery level 46 initiating 44 high-definition devices, connecting 28, 29, 30 HP and third-party software updates, installing 55 HP OMEN Control 13 HP PC Hardware Diagnostics (UEFI) downloading 59 using 58 HP Performance Advisor 42 device information 4 HP Recovery Manager correcting boot problems 63 starting 62 HP Recovery media creating 60 recovery 63 HP Recovery partition...
... 15 gaming profiles, creating 14 gaming shortcut keys 18 H HDMI configuring audio 29 HDMI port connecting 28 identifying 6, 26 headphones and microphones, connecting 27 Hibernation exiting 44 initiated during critical battery level 46 initiating 44 high-definition devices, connecting 28, 29, 30 HP and third-party software updates, installing 55 HP OMEN Control 13 HP PC Hardware Diagnostics (UEFI) downloading 59 using 58 HP Performance Advisor 42 device information 4 HP Recovery Manager correcting boot problems 63 starting 62 HP Recovery media creating 60 recovery 63 HP Recovery partition...

User Guide
Page 75
... 38 S scrolling touchpad gesture 32 security, wireless 22 serial number, computer 12 service labels, locating 12 setting password protection on wakeup 44 setup of WLAN 22 Setup Utility (BIOS) passwords 54 shipping the computer 51 shutdown 48 Sleep exiting 44 initiating 44 slots, memory card reader 5, 26 software updates, installing 55 software, Disk Cleanup 49 speakers connecting 27 identifying 10, 26 supported discs recovery 60 system recovery 62 system restore point creating 60 T testing an AC adapter 47 testing audio features 27 touch screen turn off...
... 38 S scrolling touchpad gesture 32 security, wireless 22 serial number, computer 12 service labels, locating 12 setting password protection on wakeup 44 setup of WLAN 22 Setup Utility (BIOS) passwords 54 shipping the computer 51 shutdown 48 Sleep exiting 44 initiating 44 slots, memory card reader 5, 26 software updates, installing 55 software, Disk Cleanup 49 speakers connecting 27 identifying 10, 26 supported discs recovery 60 system recovery 62 system restore point creating 60 T testing an AC adapter 47 testing audio features 27 touch screen turn off...
Maintenance and Service Guide
Page 42
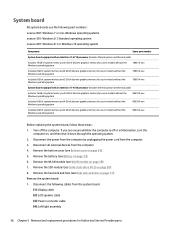
... external devices from the computer. 3. System board All system boards use the following cables from the system board. (1): Display cable (2): Left speaker cable (3): Power connector cable (4): Left light assembly 36 Chapter 5 Removal and replacement procedures for use in models without the Windows operating system 806344-xxx Includes 8 GB of system memory and 2 GB of discrete graphics memory for Authorized Service Provider parts Turn off or in models without the Windows operating system 806343-xxx Before replacing the system board...
... external devices from the computer. 3. System board All system boards use the following cables from the system board. (1): Display cable (2): Left speaker cable (3): Power connector cable (4): Left light assembly 36 Chapter 5 Removal and replacement procedures for use in models without the Windows operating system 806344-xxx Includes 8 GB of system memory and 2 GB of discrete graphics memory for Authorized Service Provider parts Turn off or in models without the Windows operating system 806343-xxx Before replacing the system board...

Maintenance and Service Guide
Page 58
... BIOS, make a note of damage to install the update. NOTE: If you recorded earlier, open the folder on battery power, docked in Windows 8.1 BIOS installation procedures vary. The hard drive designation is complete. NOTE: After a message on your hard drive. 52 Chapter 7 Windows Using Setup Utility (BIOS) in an optional docking device, or connected to a network, consult the network administrator before installing any software updates, especially system BIOS updates. From the Start screen, type file, and then select File Explorer. 2. Do not download...
... BIOS, make a note of damage to install the update. NOTE: If you recorded earlier, open the folder on battery power, docked in Windows 8.1 BIOS installation procedures vary. The hard drive designation is complete. NOTE: After a message on your hard drive. 52 Chapter 7 Windows Using Setup Utility (BIOS) in an optional docking device, or connected to a network, consult the network administrator before installing any software updates, especially system BIOS updates. From the Start screen, type file, and then select File Explorer. 2. Do not download...

Maintenance and Service Guide
Page 60
... Sleep. ● Do not insert, remove, connect, or disconnect any device, cable, or cord. If the update is connected to a network, consult the network administrator before installing any instructions that contains the update. 54 Chapter 8 Using Setup Utility (BIOS) in an optional docking device, or connected to an optional power source. You may need to the hard drive. Start Setup Utility (BIOS) (see Downloading a BIOS update on page 54. Select Exit, select No, and then follow these steps: a. Follow the on -screen instructions. BIOS installation...
... Sleep. ● Do not insert, remove, connect, or disconnect any device, cable, or cord. If the update is connected to a network, consult the network administrator before installing any instructions that contains the update. 54 Chapter 8 Using Setup Utility (BIOS) in an optional docking device, or connected to an optional power source. You may need to the hard drive. Start Setup Utility (BIOS) (see Downloading a BIOS update on page 54. Select Exit, select No, and then follow these steps: a. Follow the on -screen instructions. BIOS installation...

Maintenance and Service Guide
Page 76
... battery disconnecting 27 removal 33 spare part number 15, 18, 33 bezel spare part number 16 BIOS determining version 51, 53 downloading an update 52, 54 starting the Setup Utility 53 updating 51, 53 Bluetooth label 12 boot order changing 66 changing HP Recovery Manager 61 bottom 12 bottom cover removal 25 spare part number 25 buttons left touchpad 6 power 8 right touchpad 6 C caps lock light, identifying 7 chipset, product description 1 components display 3 right side 4 top 6 computer major components 13 specifications 49 connector, power 5 D deleted files restoring 59 display specifications...
... battery disconnecting 27 removal 33 spare part number 15, 18, 33 bezel spare part number 16 BIOS determining version 51, 53 downloading an update 52, 54 starting the Setup Utility 53 updating 51, 53 Bluetooth label 12 boot order changing 66 changing HP Recovery Manager 61 bottom 12 bottom cover removal 25 spare part number 25 buttons left touchpad 6 power 8 right touchpad 6 C caps lock light, identifying 7 chipset, product description 1 components display 3 right side 4 top 6 computer major components 13 specifications 49 connector, power 5 D deleted files restoring 59 display specifications...

Maintenance and Service Guide
Page 77
...chipset 1 display panel 1 external media cards 2 graphics 1 memory 1 microphone 1 operating system 2 ports 2 power requirements 2 processors 1 product name 1 serviceability 2 storage 1 video 1 wireless 2 product name 1 product name and number, computer 11 programmable gaming keys, identifying 9 R recover options 64 recovery 60 discs 59, 61, 63, 65 HP Recovery Manager 60, 64 media 61, 65 starting 65 supported discs 59, 63 system 64 USB flash drive 61, 65 using HP Recovery media 59, 63 recovery media creating 58, 62 creating using HP Recovery Manager 59, 63 recovery partition 60 removing 61, 66...
...chipset 1 display panel 1 external media cards 2 graphics 1 memory 1 microphone 1 operating system 2 ports 2 power requirements 2 processors 1 product name 1 serviceability 2 storage 1 video 1 wireless 2 product name 1 product name and number, computer 11 programmable gaming keys, identifying 9 R recover options 64 recovery 60 discs 59, 61, 63, 65 HP Recovery Manager 60, 64 media 61, 65 starting 65 supported discs 59, 63 system 64 USB flash drive 61, 65 using HP Recovery media 59, 63 recovery media creating 58, 62 creating using HP Recovery Manager 59, 63 recovery partition 60 removing 61, 66...


