
Bluetooth Wireless Technology Basics
Page 7
... by hp to enable the software for the first time, the Found New Hardware wizard opens. Select the check box next to white. Select Finish to complete the installation and to Bluetooth operations. Enable BWT functionality If the wireless light (ICON) is enabled, a Bluetooth icon will change from red to Bluetooth by pressing the wireless button on HP notebook PCs; When you need help locating the wireless button and light. Set up the BWT software. Table 1. Bluetooth status Disabled Enabled Connected Blue...
... by hp to enable the software for the first time, the Found New Hardware wizard opens. Select the check box next to white. Select Finish to complete the installation and to Bluetooth operations. Enable BWT functionality If the wireless light (ICON) is enabled, a Bluetooth icon will change from red to Bluetooth by pressing the wireless button on HP notebook PCs; When you need help locating the wireless button and light. Set up the BWT software. Table 1. Bluetooth status Disabled Enabled Connected Blue...

Bluetooth Wireless Technology Basics
Page 8
... activate BWT functionality, to create BWT connections, or to send images, text, business cards, and calendar notes. If you can also perform these wireless technologies by selecting the Start menu, and then the IPAQ Wireless option. Printers The HP 995c Deskjet printer and some of the BWT profiles built into HP notebook PCs, iPAQ Pocket PCs, and printers. After you can be used to manage and change...
... activate BWT functionality, to create BWT connections, or to send images, text, business cards, and calendar notes. If you can also perform these wireless technologies by selecting the Start menu, and then the IPAQ Wireless option. Printers The HP 995c Deskjet printer and some of the BWT profiles built into HP notebook PCs, iPAQ Pocket PCs, and printers. After you can be used to manage and change...
Limited Warranty and Technical Support
Page 5
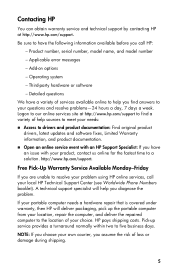
... you call your needs: „ Access to five business days. Product number, serial number, model name, and model number - Applicable error messages - Detailed questions We have the following information available before you find a variety of services available online to resolve your problem using HP online services, call HP: - Logon to our online services site at http://www.hp.com/support. If your portable computer needs a hardware repair that is covered under warranty, then...
... you call your needs: „ Access to five business days. Product number, serial number, model name, and model number - Applicable error messages - Detailed questions We have the following information available before you find a variety of services available online to resolve your problem using HP online services, call HP: - Logon to our online services site at http://www.hp.com/support. If your portable computer needs a hardware repair that is covered under warranty, then...
Hardware and Software Guide
Page 4
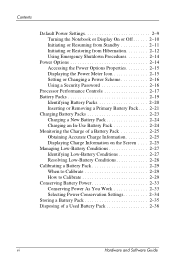
Contents Default Power Settings 2-9 Turning the Notebook or Display On or Off 2-10 Initiating or Resuming from Standby 2-11 Initiating or Restoring from Hibernation 2-12 Using Emergency Shutdown Procedures 2-14 Power Options 2-14 Accessing the Power Options Properties 2-15 Displaying the Power Meter Icon 2-15 Setting or Changing a Power Scheme 2-16 Using a Security Password 2-16 Processor Performance Controls 2-17 Battery Packs 2-19 Identifying Battery Packs 2-20 Inserting or Removing a Primary Battery Pack. . . . 2-21 Charging Battery Packs 2-23 Charging a New Battery Pack...
Contents Default Power Settings 2-9 Turning the Notebook or Display On or Off 2-10 Initiating or Resuming from Standby 2-11 Initiating or Restoring from Hibernation 2-12 Using Emergency Shutdown Procedures 2-14 Power Options 2-14 Accessing the Power Options Properties 2-15 Displaying the Power Meter Icon 2-15 Setting or Changing a Power Scheme 2-16 Using a Security Password 2-16 Processor Performance Controls 2-17 Battery Packs 2-19 Identifying Battery Packs 2-20 Inserting or Removing a Primary Battery Pack. . . . 2-21 Charging Battery Packs 2-23 Charging a New Battery Pack...

Hardware and Software Guide
Page 80
Pointing Devices and Keyboard Hotkey and Shortcut Key Quick Reference Function Key Combination Key Combination to Activate to Deactivate Function Function Initiate standby fn+f3 Power/standby button Switch between notebook display fn+f4 and external display fn+f4 View battery information fn+f8 fn+f8 Decrease screen brightness fn+f9 Not applicable Increase screen brightness fn+f10 Not applicable Display system information fn+esc fn+esc Hardware and Software Guide 3-7
Pointing Devices and Keyboard Hotkey and Shortcut Key Quick Reference Function Key Combination Key Combination to Activate to Deactivate Function Function Initiate standby fn+f3 Power/standby button Switch between notebook display fn+f4 and external display fn+f4 View battery information fn+f8 fn+f8 Decrease screen brightness fn+f9 Not applicable Increase screen brightness fn+f10 Not applicable Display system information fn+esc fn+esc Hardware and Software Guide 3-7

Hardware and Software Guide
Page 83
... a second time to decrease screen brightness. Using Hotkeys with External Keyboards The following table describes how certain hotkeys are used on external keyboards: Notebook Keys External Keyboard Keys fn+esc scroll lock+scroll lock+esc* fn+f4 scroll lock+scroll lock+f4* fn+f8 scroll lock+scroll lock+f8* *Pressing the scroll lock 2 times on an external keyboard is the version number of the system ROM. The BIOS date may display in a decimal format, such as 10/19/2004 F.07. Pointing Devices and Keyboard Decreasing Screen Brightness (fn+f9) Press...
... a second time to decrease screen brightness. Using Hotkeys with External Keyboards The following table describes how certain hotkeys are used on external keyboards: Notebook Keys External Keyboard Keys fn+esc scroll lock+scroll lock+esc* fn+f4 scroll lock+scroll lock+f4* fn+f8 scroll lock+scroll lock+f8* *Pressing the scroll lock 2 times on an external keyboard is the version number of the system ROM. The BIOS date may display in a decimal format, such as 10/19/2004 F.07. Pointing Devices and Keyboard Decreasing Screen Brightness (fn+f9) Press...

Hardware and Software Guide
Page 157
Wireless networks include wireless local area networks (WLANs) or "hotspots." Hotspots are wireless access points available in most closely matches your notebook. Your notebook has a button that most notebook models. The illustrations in this chapter identify the standard external features included in public places such as 802.11 or Bluetooth wireless devices, you have a wireless notebook. ■ An 802.11 wireless notebook can be used to enable and disable 802.11 and Bluetooth wireless devices and...
Wireless networks include wireless local area networks (WLANs) or "hotspots." Hotspots are wireless access points available in most closely matches your notebook. Your notebook has a button that most notebook models. The illustrations in this chapter identify the standard external features included in public places such as 802.11 or Bluetooth wireless devices, you have a wireless notebook. ■ An 802.11 wireless notebook can be used to enable and disable 802.11 and Bluetooth wireless devices and...

Hardware and Software Guide
Page 178
... Setup, and then enable a PIN in this functionality. Hardware and Software Guide 7-5 HP Passwords Function HP administrator password Protects access to notebook contents. User password* Protects access to remove DriveLock protection from standby. *For information about Windows passwords, such as screen-saver passwords, refer to access the notebook during startup and when you restart the notebook. DriveLock master password Used by the HP administrator to access drives protected by DriveLock at startup. Power-on smart cards if an optional smart card reader supports...
... Setup, and then enable a PIN in this functionality. Hardware and Software Guide 7-5 HP Passwords Function HP administrator password Protects access to notebook contents. User password* Protects access to remove DriveLock protection from standby. *For information about Windows passwords, such as screen-saver passwords, refer to access the notebook during startup and when you restart the notebook. DriveLock master password Used by the HP administrator to access drives protected by DriveLock at startup. Power-on smart cards if an optional smart card reader supports...
Hardware and Software Guide
Page 180
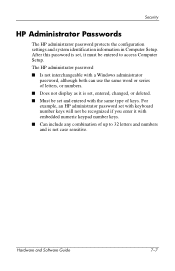
... Computer Setup. The HP administrator password ■ Is not interchangeable with a Windows administrator password, although both can use the same word or series of letters, or numbers. ■ Does not display as it is set , it with the same type of up to 32 letters and numbers and is set , entered, changed, or deleted. ■ Must be entered to access Computer Setup. Hardware and Software Guide 7-7 For example, an HP administrator password set with keyboard number keys...
... Computer Setup. The HP administrator password ■ Is not interchangeable with a Windows administrator password, although both can use the same word or series of letters, or numbers. ■ Does not display as it is set , it with the same type of up to 32 letters and numbers and is set , entered, changed, or deleted. ■ Must be entered to access Computer Setup. Hardware and Software Guide 7-7 For example, an HP administrator password set with keyboard number keys...

Hardware and Software Guide
Page 182
... type of the notebook. Setting Power-On Passwords A power-on or restarted. Hardware and Software Guide 7-9 After this password is not case sensitive. For example, a power-on password, type the password in the lower-left corner of the screen. ❏ To change the language, press f2. ❏ For navigation instructions, press f1. 2. To manage the password: 1. Use the arrow keys to select Security > Power-On password, and then press enter. ❏ To set a power-on password set with keyboard number keys...
... type of the notebook. Setting Power-On Passwords A power-on or restarted. Hardware and Software Guide 7-9 After this password is not case sensitive. For example, a power-on password, type the password in the lower-left corner of the screen. ❏ To change the language, press f2. ❏ For navigation instructions, press f1. 2. To manage the password: 1. Use the arrow keys to select Security > Power-On password, and then press enter. ❏ To set a power-on password set with keyboard number keys...
Hardware and Software Guide
Page 186
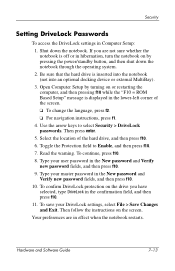
Security Setting DriveLock Passwords To access the DriveLock settings in the lower-left corner of the hard drive, and then press f10. 6. Open Computer Setup by turning on by pressing the power/standby button, and then shut down the notebook. Then press enter. 5. Read the warning. Type your master password in the New password and Verify new password fields, and then press f10. 10. Type your user password in effect when the notebook restarts...
Security Setting DriveLock Passwords To access the DriveLock settings in the lower-left corner of the hard drive, and then press f10. 6. Open Computer Setup by turning on by pressing the power/standby button, and then shut down the notebook. Then press enter. 5. Read the warning. Type your master password in the New password and Verify new password fields, and then press f10. 10. Type your user password in effect when the notebook restarts...
Hardware and Software Guide
Page 204
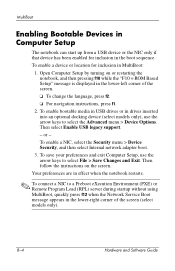
To enable bootable media in USB drives or in drives inserted into an optional docking device (select models only), use the arrow keys to select File > Save Changes and Exit. Your preferences are in effect when the notebook restarts. ✎ To connect a NIC to select the Advanced menu > Device Options. Open Computer Setup by turning on the screen. or - To enable a NIC, select the Security menu > Device Security, and then select Internal network adapter boot. 3. To save your...
To enable bootable media in USB drives or in drives inserted into an optional docking device (select models only), use the arrow keys to select File > Save Changes and Exit. Your preferences are in effect when the notebook restarts. ✎ To connect a NIC to select the Advanced menu > Device Options. Open Computer Setup by turning on the screen. or - To enable a NIC, select the Security menu > Device Security, and then select Internal network adapter boot. 3. To save your...

Hardware and Software Guide
Page 205
... optional docking device (select models only) that boots as USB hard disk. For example, if you start up from a CD-ROM drive with the NIC. ■ Drives in an optional docking device (select models only) are treated like external USB devices in the boot sequence and must be shown in the boot order in Computer Setup. Instead, it does not contain media or the media is associated with a disc that contains a hard drive. For example, the notebook...
... optional docking device (select models only) that boots as USB hard disk. For example, if you start up from a CD-ROM drive with the NIC. ■ Drives in an optional docking device (select models only) are treated like external USB devices in the boot sequence and must be shown in the boot order in Computer Setup. Instead, it does not contain media or the media is associated with a disc that contains a hard drive. For example, the notebook...

Hardware and Software Guide
Page 215
... devices at startup. (To set the notebook to support only a single, usually nonstandard, pointing device at startup, select Disable.) ■ Enable/disable USB legacy support for a USB keyboard, mouse, and hubs. ❐ A USB keyboard, mouse, and hubs work even when a Windows operating system is not loaded. ❐ The notebook starts from a bootable hard drive, diskette drive diskette, or CD-ROM, CD-RW, or DVD inserted into a drive connected by a USB port to the notebook or to an optional docking device (select models only). ■ Select a parallel port mode...
... devices at startup. (To set the notebook to support only a single, usually nonstandard, pointing device at startup, select Disable.) ■ Enable/disable USB legacy support for a USB keyboard, mouse, and hubs. ❐ A USB keyboard, mouse, and hubs work even when a Windows operating system is not loaded. ❐ The notebook starts from a bootable hard drive, diskette drive diskette, or CD-ROM, CD-RW, or DVD inserted into a drive connected by a USB port to the notebook or to an optional docking device (select models only). ■ Select a parallel port mode...

Hardware and Software Guide
Page 222
... Start > Help and Support, and then click a software update link. - Follow the instructions on the screen to download your selection to the hard drive. ✎ Make a note of the date, name, or other identifier. You will be downloaded. Do not download or install a BIOS update while the computer is connected to reliable external power using the AC adapter. Make a note of the path to the location on your computer. Access the page on battery power...
... Start > Help and Support, and then click a software update link. - Follow the instructions on the screen to download your selection to the hard drive. ✎ Make a note of the date, name, or other identifier. You will be downloaded. Do not download or install a BIOS update while the computer is connected to reliable external power using the AC adapter. Make a note of the path to the location on your computer. Access the page on battery power...

Hardware and Software Guide
Page 244
... (network) jack 1-20, 1-22, 5-38 ROM determining current version of 3-10 ROMPaq 11-3 S screen saver 2-34 scroll lock key 3-10 scrolling regions, TouchPad 1-6, 3-2 Secure Digital (SD) MemoryCard 1-13, 5-17 security cable lock, connecting 7-27 security cable slot 1-16, 1-17 security features 7-1 security features on notebook Computer Setup 7-3 security passwords 2-16 serial number, computer 11-2 serial number, notebook 1-27, 9-4 serial port 1-18 Service Tag 1-27 Setup utility accessing 9-2 Advanced menu 9-6 enabling bootable devices 8-4 File menu 9-4 restoring default settings 9-3 Security menu...
... (network) jack 1-20, 1-22, 5-38 ROM determining current version of 3-10 ROMPaq 11-3 S screen saver 2-34 scroll lock key 3-10 scrolling regions, TouchPad 1-6, 3-2 Secure Digital (SD) MemoryCard 1-13, 5-17 security cable lock, connecting 7-27 security cable slot 1-16, 1-17 security features 7-1 security features on notebook Computer Setup 7-3 security passwords 2-16 serial number, computer 11-2 serial number, notebook 1-27, 9-4 serial port 1-18 Service Tag 1-27 Setup utility accessing 9-2 Advanced menu 9-6 enabling bootable devices 8-4 File menu 9-4 restoring default settings 9-3 Security menu...

HP Compaq nx6110, nc6110, nx6120 and nc6120 Notebook PCs - Maintenance and Service Guide
Page 55
The BIOS initializes the operating system, determines how the computer will interact with the hardware devices, and provides for a system ROM update by identifying the ROM version currently installed on your computer model, product category, and series or family. To update HP software: 1. Install the updates. Maintenance and Service Guide 3-1 Access the updates through the HP Web site (http://www.hp.com) or the Support Software CD (purchased separately). For more information, refer to "Accessing Computer...
The BIOS initializes the operating system, determines how the computer will interact with the hardware devices, and provides for a system ROM update by identifying the ROM version currently installed on your computer model, product category, and series or family. To update HP software: 1. Install the updates. Maintenance and Service Guide 3-1 Access the updates through the HP Web site (http://www.hp.com) or the Support Software CD (purchased separately). For more information, refer to "Accessing Computer...
HP Compaq nx6110, nc6110, nx6120 and nc6120 Notebook PCs - Maintenance and Service Guide
Page 59
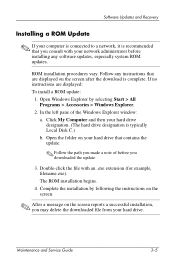
... installation, you downloaded the update. 3. Complete the installation by selecting Start > All Programs > Accessories > Windows Explorer. 2. Maintenance and Service Guide 3-5 Double-click the file with your network administrator before you may delete the downloaded file from your hard drive. ROM installation procedures vary. Open Windows Explorer by following the instructions on the screen. ✎ After a message on your hard drive that are displayed: To install a ROM update: 1. Click My Computer and then your hard drive designation. (The hard drive...
... installation, you downloaded the update. 3. Complete the installation by selecting Start > All Programs > Accessories > Windows Explorer. 2. Maintenance and Service Guide 3-5 Double-click the file with your network administrator before you may delete the downloaded file from your hard drive. ROM installation procedures vary. Open Windows Explorer by following the instructions on the screen. ✎ After a message on your hard drive that are displayed: To install a ROM update: 1. Click My Computer and then your hard drive designation. (The hard drive...
HP Compaq notebook single image white paper
Page 3
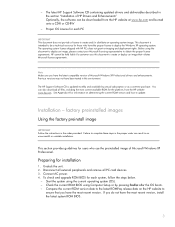
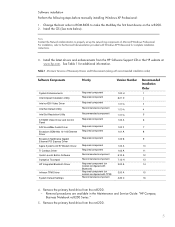
... uses this environment. Connect AC power. 4. Installation - Note Make sure you do not have the most current available ROM for each system, follow the steps below. - If you have been tested in the order provided. Previous versions may not have the latest compatible version of HP Drivers and Enhancements" Optionally, the software can also download all PC card devices. 3. Check the current ROM BIOS using the current operating...
... uses this environment. Connect AC power. 4. Installation - Note Make sure you do not have the most current available ROM for each system, follow the steps below. - If you have been tested in the order provided. Previous versions may not have the latest compatible version of HP Drivers and Enhancements" Optionally, the software can also download all PC card devices. 3. Check the current ROM BIOS using the current operating...
HP Compaq notebook single image white paper
Page 5
... hard drive from the nc6200. 5 Note Contact the Network Administrators to make the Multibay the first boot device on models configured with Windows XP Professional for additional information. Removal procedures are available in ROM BIOS to properly set up the networking components of Necessary Drivers and Enhancements (along with recommended installation order) Software Components System Enhancements Intel Chipset Installation Utility Intel nc4200 Video Driver Intel Set Default Utility Intel Set Resolution Utility ATI 8200 Video Driver and Control Panel ADI SoundMax Audio Driver...
... hard drive from the nc6200. 5 Note Contact the Network Administrators to make the Multibay the first boot device on models configured with Windows XP Professional for additional information. Removal procedures are available in ROM BIOS to properly set up the networking components of Necessary Drivers and Enhancements (along with recommended installation order) Software Components System Enhancements Intel Chipset Installation Utility Intel nc4200 Video Driver Intel Set Default Utility Intel Set Resolution Utility ATI 8200 Video Driver and Control Panel ADI SoundMax Audio Driver...


