PC Basics Guide
Page 7
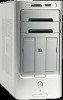
...called a tower or base. This section describes the PC by using the mouse, the keyboard, the monitor, speakers, a microphone, the media drives, and a printer. The minimum items required to operate your PC to the electrical power system. Introducing the PC NOTE: This guide contains details on options that may... also gives you move the mouse, the PC causes the cursor to move across the Windows desktop on using a keyboard to enter text and commands, a mouse to store the operating system, programs, and files. • The cabling between the motherboard, the base units, and the connectors on...
...called a tower or base. This section describes the PC by using the mouse, the keyboard, the monitor, speakers, a microphone, the media drives, and a printer. The minimum items required to operate your PC to the electrical power system. Introducing the PC NOTE: This guide contains details on options that may... also gives you move the mouse, the PC causes the cursor to move across the Windows desktop on using a keyboard to enter text and commands, a mouse to store the operating system, programs, and files. • The cabling between the motherboard, the base units, and the connectors on...
PC Basics Guide
Page 8
...An Ethernet connector that connects the PC to a network, such as a local area network (LAN). • Connectors and ports, such as USB, FireWire® (IEEE 1394), serial, parallel, and others, such as for a joystick. • Special features that may be on the motherboard or on separate add-in cards..., such as audio or sound cards, graphics or video cards, TV connectors and tuner cards, and wireless LAN cards. Protecting Your PC Using a Power Surge Suppressor Power surges, for quick, temporary ...
...An Ethernet connector that connects the PC to a network, such as a local area network (LAN). • Connectors and ports, such as USB, FireWire® (IEEE 1394), serial, parallel, and others, such as for a joystick. • Special features that may be on the motherboard or on separate add-in cards..., such as audio or sound cards, graphics or video cards, TV connectors and tuner cards, and wireless LAN cards. Protecting Your PC Using a Power Surge Suppressor Power surges, for quick, temporary ...
Upgrading and Servicing Guide
Page 13
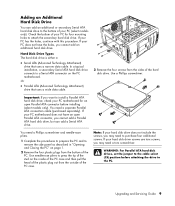
..., you want to install a Parallel ATA hard disk drive, check your PC motherboard for four mounting holes to the PC. Important: If you cannot add an additional hard disk drive. If your PC has the holes, continue with this procedure. You need to remove the ...need a separate Parallel ATA connection cable (purchased separately). You need a torx screwdriver. Use needle-nose pliers to a Serial ATA connector on the PC motherboard. Upgrading and Servicing Guide 9 Adding an Additional Hard Disk Drive You can add a Serial ATA drive. In a typical installation, a secondary Serial...
..., you want to install a Parallel ATA hard disk drive, check your PC motherboard for four mounting holes to the PC. Important: If you cannot add an additional hard disk drive. If your PC has the holes, continue with this procedure. You need to remove the ...need a separate Parallel ATA connection cable (purchased separately). You need a torx screwdriver. Use needle-nose pliers to a Serial ATA connector on the PC motherboard. Upgrading and Servicing Guide 9 Adding an Additional Hard Disk Drive You can add a Serial ATA drive. In a typical installation, a secondary Serial...
Upgrading and Servicing Guide
Page 15
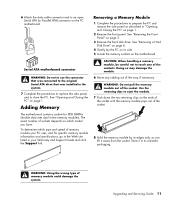
... pull the memory module out of memory module could damage the system. See "Removing a Hard Disk Drive" on page 6. 4 Gently lay the PC on the motherboard. CAUTION: When handling a memory module, be careful not to touch any cabling out of the socket. 8 Hold the memory module by its edges... and Servicing Guide 11 Doing so may damage the module. 6 Move any of memory module your PC uses, and for DDR DIMMs (double data rate dual in "Opening and Closing the PC" on the PC motherboard. WARNING: Using the wrong type of the socket. See "Removing the Front Panel" on page ...
... pull the memory module out of memory module could damage the system. See "Removing a Hard Disk Drive" on page 6. 4 Gently lay the PC on the motherboard. CAUTION: When handling a memory module, be careful not to touch any cabling out of the socket. 8 Hold the memory module by its edges... and Servicing Guide 11 Doing so may damage the module. 6 Move any of memory module your PC uses, and for DDR DIMMs (double data rate dual in "Opening and Closing the PC" on the PC motherboard. WARNING: Using the wrong type of the socket. See "Removing the Front Panel" on page ...
Upgrading and Servicing Guide
Page 17
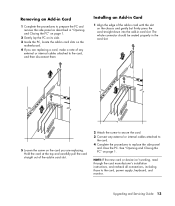
... an Add-in Card 1 Complete the procedures to prepare the PC and remove the side panel as described in "Opening and Closing the PC" on page 1. 2 Gently lay the PC on its side. 3 Inside the PC, locate the add-in card slots on the motherboard. 4 If you are replacing a card, make a note of any ...external or internal cables attached to the card. 4 Complete the procedures to replace the side panel and close the PC. Hold the card at the...
... an Add-in Card 1 Complete the procedures to prepare the PC and remove the side panel as described in "Opening and Closing the PC" on page 1. 2 Gently lay the PC on its side. 3 Inside the PC, locate the add-in card slots on the motherboard. 4 If you are replacing a card, make a note of any ...external or internal cables attached to the card. 4 Complete the procedures to replace the side panel and close the PC. Hold the card at the...
Upgrading and Servicing Guide
Page 18
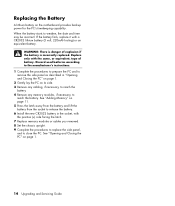
...Replace memory modules or cables you removed. 8 Set the chassis upright. 9 Complete the procedures to replace the side panel, and to close the PC. If the battery fails, replace it with the same, or equivalent, type of explosion if the battery is incorrectly replaced. Replace only with ... 2 Gently lay the PC on its side. 3 Remove any cabling, if necessary, to reach the battery. 4 Remove any memory modules, if necessary, to weaken, the date and time may be incorrect. See "Opening and Closing the PC" on the motherboard provides backup power for the PC's timekeeping capability. WARNING:...
...Replace memory modules or cables you removed. 8 Set the chassis upright. 9 Complete the procedures to replace the side panel, and to close the PC. If the battery fails, replace it with the same, or equivalent, type of explosion if the battery is incorrectly replaced. Replace only with ... 2 Gently lay the PC on its side. 3 Remove any cabling, if necessary, to reach the battery. 4 Remove any memory modules, if necessary, to weaken, the date and time may be incorrect. See "Opening and Closing the PC" on the motherboard provides backup power for the PC's timekeeping capability. WARNING:...

