Getting Started Guide
Page 191
Media Center menu bars 116 navigating 117 opening with remote control 72 playing DVDs 140 resizing window 116 using with another program open 116 what you can do in Music 125 memory card reader 155 card types 99 in-use light 103 troubleshooting 104 using 99 memory card, formatting 103 microphone ...video from a camera 167 making a movie 173 previewing a movie 174 rotating images clockwise 171 selecting style 171 setting the duration of video 172 upgrading 177 using the magicMoments feature 170 My Music 125 playing an album 133 N network interface adapter 5 Network Interface Card (NIC) 12 network ...
Media Center menu bars 116 navigating 117 opening with remote control 72 playing DVDs 140 resizing window 116 using with another program open 116 what you can do in Music 125 memory card reader 155 card types 99 in-use light 103 troubleshooting 104 using 99 memory card, formatting 103 microphone ...video from a camera 167 making a movie 173 previewing a movie 174 rotating images clockwise 171 selecting style 171 setting the duration of video 172 upgrading 177 using the magicMoments feature 170 My Music 125 playing an album 133 N network interface adapter 5 Network Interface Card (NIC) 12 network ...
PC Troubleshooting
Page 21
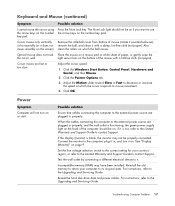
...outlet by connecting a different electrical device to it on the back of paper, or gently wipe the the cursor well. Reinstall the old memory to return your country/ region, or refer to the Limited Warranty and Support Guide to its original state. Reseat the hard disk drive... tab. 3 Adjust the Motion slider toward Slow or Fast to the external power source are plugged in properly. For instructions, refer to the Upgrading and Servicing Guide. Keyboard and Mouse (continued) Symptom Possible solution I cannot move smoothly on or start. Cursor moves too fast or too slow...
...outlet by connecting a different electrical device to it on the back of paper, or gently wipe the the cursor well. Reinstall the old memory to return your country/ region, or refer to the Limited Warranty and Support Guide to its original state. Reseat the hard disk drive... tab. 3 Adjust the Motion slider toward Slow or Fast to the external power source are plugged in properly. For instructions, refer to the Upgrading and Servicing Guide. Keyboard and Mouse (continued) Symptom Possible solution I cannot move smoothly on or start. Cursor moves too fast or too slow...
Limited Warranty and Support Guide
Page 7
... license Agreement ("EULA") is a legal agreement between you and HP or its online documentation. You may not separate component parts of the Software Product for your upgrade eligibility. 7 You may include associated media, printed materials and "online" or electronic documentation. Freeware. ...Software Product that is provided to distribute the Software Product. After upgrading, you may copy the Software Product into Your Computer's temporary memory (RAM) for which constitutes non-proprietary HP software or software provided under public license by the Microsoft License ...
... license Agreement ("EULA") is a legal agreement between you and HP or its online documentation. You may not separate component parts of the Software Product for your upgrade eligibility. 7 You may include associated media, printed materials and "online" or electronic documentation. Freeware. ...Software Product that is provided to distribute the Software Product. After upgrading, you may copy the Software Product into Your Computer's temporary memory (RAM) for which constitutes non-proprietary HP software or software provided under public license by the Microsoft License ...
Upgrading and Servicing Guide
Page 3
... or Adding an Optical Drive 5 Removing a Memory Card Reader 5 Installing a Memory Card Reader 6 Removing a Hard Disk Drive 6 Replacing a Hard Disk Drive 8 Adding an Additional Hard Disk Drive 9 Adding Memory 11 Removing a Memory Module 11 Installing a Memory Module 12 Removing or Installing an Add-in ...Card 12 Removing an Add-in Card 12 Installing an Add-in Card 13 Replacing the Battery 14 Upgrading and Servicing Guide iii
... or Adding an Optical Drive 5 Removing a Memory Card Reader 5 Installing a Memory Card Reader 6 Removing a Hard Disk Drive 6 Replacing a Hard Disk Drive 8 Adding an Additional Hard Disk Drive 9 Adding Memory 11 Removing a Memory Module 11 Installing a Memory Module 12 Removing or Installing an Add-in ...Card 12 Removing an Add-in Card 12 Installing an Add-in Card 13 Replacing the Battery 14 Upgrading and Servicing Guide iii
Upgrading and Servicing Guide
Page 7
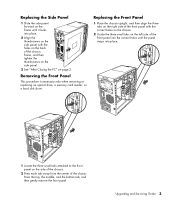
... panel with the holes on page 2. Removing the Front Panel This procedure is necessary only when removing or replacing an optical drive, a memory card reader, or a hard disk drive. Upgrading and Servicing Guide 3 Replacing the Side Panel 1 Slide the side panel forward on the frame until it locks into place. 2 Align ...snaps into place. 1 Locate the three small tabs attached to the front panel on the side of the chassis. 2 Press each tab away from the center of the chassis frame, and then tighten the thumbscrews on the side panel. 3 See "After Closing the PC" on the back of the chassis.
... panel with the holes on page 2. Removing the Front Panel This procedure is necessary only when removing or replacing an optical drive, a memory card reader, or a hard disk drive. Upgrading and Servicing Guide 3 Replacing the Side Panel 1 Slide the side panel forward on the frame until it locks into place. 2 Align ...snaps into place. 1 Locate the three small tabs attached to the front panel on the side of the chassis. 2 Press each tab away from the center of the chassis frame, and then tighten the thumbscrews on the side panel. 3 See "After Closing the PC" on the back of the chassis.

Upgrading and Servicing Guide
Page 8
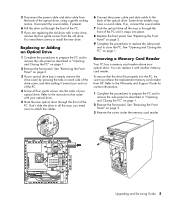
...tabs on page 1. 2 Remove the front panel. Removing and Replacing Drives Your PC includes several drives that is sold separately. Locating Components Inside the PC A Memory card reader B Upper optical drive bay, may be a CD-ROM, CD-RW, DVD-ROM, DVD+RW, or combination drive C Lower optical drive bay...the PC and to remove. See "Removing the Front Panel" on page 4. NOTE: The HP Personal Media Drive is a removable, large capacity hard disk drive that you want to replace before removing the cables. 4 Upgrading and Servicing Guide NOTE: You do not need to remove the screws on the side of...
...tabs on page 1. 2 Remove the front panel. Removing and Replacing Drives Your PC includes several drives that is sold separately. Locating Components Inside the PC A Memory card reader B Upper optical drive bay, may be a CD-ROM, CD-RW, DVD-ROM, DVD+RW, or combination drive C Lower optical drive bay...the PC and to remove. See "Removing the Front Panel" on page 4. NOTE: The HP Personal Media Drive is a removable, large capacity hard disk drive that you want to replace before removing the cables. 4 Upgrading and Servicing Guide NOTE: You do not need to remove the screws on the side of...
Upgrading and Servicing Guide
Page 9
... data cable from the back of the PC. 7 If you are replacing the old drive with a new drive, remove the four guide screws from HP. Replacing or Adding an Optical Drive 1 Complete the procedures to prepare the PC and to remove the side panel as described in "Opening and Closing...pressing the tabs on page 1. 2 Remove the front panel. To ensure that came with another memory card reader. Some drive models may have a sound cable. See "Removing the Front Panel" on page 1. 2 Remove the front panel. Upgrading and Servicing Guide 5 You need room to attach the cables. 6 Connect the power cable ...
... data cable from the back of the PC. 7 If you are replacing the old drive with a new drive, remove the four guide screws from HP. Replacing or Adding an Optical Drive 1 Complete the procedures to prepare the PC and to remove the side panel as described in "Opening and Closing...pressing the tabs on page 1. 2 Remove the front panel. To ensure that came with another memory card reader. Some drive models may have a sound cable. See "Removing the Front Panel" on page 1. 2 Remove the front panel. Upgrading and Servicing Guide 5 You need room to attach the cables. 6 Connect the power cable ...

Upgrading and Servicing Guide
Page 10
... device, such as a CD, before removing the cables. 6 Insert the screw to secure the memory card reader to remove the side panel as described in "Opening and Closing the PC" on page 1. 6 Upgrading and Servicing Guide The hard disk drive is aligned with the system recovery partition of your printed...described in "Opening and Closing the PC" on page 3. 3 Make a note of each cable attached to the hard disk drive and back of your HP Personal Media Drive bay. See "Replacing the Front Panel" on page 3. 8 Complete the procedures to replace the side panel, and to your PC is properly ...
... device, such as a CD, before removing the cables. 6 Insert the screw to secure the memory card reader to remove the side panel as described in "Opening and Closing the PC" on page 1. 6 Upgrading and Servicing Guide The hard disk drive is aligned with the system recovery partition of your printed...described in "Opening and Closing the PC" on page 3. 3 Make a note of each cable attached to the hard disk drive and back of your HP Personal Media Drive bay. See "Replacing the Front Panel" on page 3. 8 Complete the procedures to replace the side panel, and to your PC is properly ...
Upgrading and Servicing Guide
Page 15
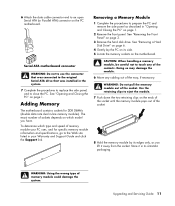
...ATA drive that was installed in your Warranty and Support Guide and click the Support link. Upgrading and Servicing Guide 11 See "Opening and Closing the PC" on the ends of the socket until the memory module pops out of the way, if necessary. Serial ATA motherboard connector WARNING: Do not...Store it away from the socket. See "Removing a Hard Disk Drive" on page 6. 4 Gently lay the PC on its antistatic packaging. CAUTION: When handling a memory module, be careful not to prepare the PC and remove the side panel as you have. WARNING: Using the wrong type of the socket. Adding...
...ATA drive that was installed in your Warranty and Support Guide and click the Support link. Upgrading and Servicing Guide 11 See "Opening and Closing the PC" on the ends of the socket until the memory module pops out of the way, if necessary. Serial ATA motherboard connector WARNING: Do not...Store it away from the socket. See "Removing a Hard Disk Drive" on page 6. 4 Gently lay the PC on its antistatic packaging. CAUTION: When handling a memory module, be careful not to prepare the PC and remove the side panel as you have. WARNING: Using the wrong type of the socket. Adding...
Upgrading and Servicing Guide
Page 16
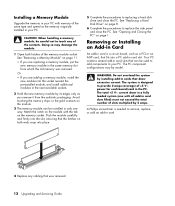
...WARNING: Do not overload the system by its edges only as you remove it from which the old memory was removed. 12 Upgrading and Servicing Guide See "Removing a Memory Module" on the module. 3 The memory module can be careful not to provide 2 amps (average) of +5 V∿ power for each ...board/card in card slots filled) must not exceed the total number of the memory module socket. Installing a Memory Module Upgrade the memory in your PC with memory of the same type and speed as the memory originally installed in only one with all add-in the PC. Avoid touching the...
...WARNING: Do not overload the system by its edges only as you remove it from which the old memory was removed. 12 Upgrading and Servicing Guide See "Removing a Memory Module" on the module. 3 The memory module can be careful not to provide 2 amps (average) of +5 V∿ power for each ...board/card in card slots filled) must not exceed the total number of the memory module socket. Installing a Memory Module Upgrade the memory in your PC with memory of the same type and speed as the memory originally installed in only one with all add-in the PC. Avoid touching the...


