Limited Warranty and Support Guide
Page 12
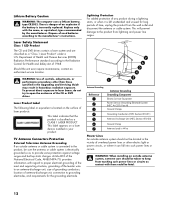
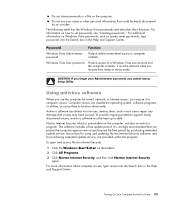
Dispose of used batteries according to open the enclosure of the CD or DVD drives. Should the unit ever require maintenance, contact an authorized service location. TV Antenna Connectors Protection External Television Antenna Grounding If an outside antenna or cable system is connected to the product, be fatal. 12 WARNING: Use of laser products: This label indicates that the product is electrically grounded so...
Dispose of used batteries according to open the enclosure of the CD or DVD drives. Should the unit ever require maintenance, contact an authorized service location. TV Antenna Connectors Protection External Television Antenna Grounding If an outside antenna or cable system is connected to the product, be fatal. 12 WARNING: Use of laser products: This label indicates that the product is electrically grounded so...
Limited Warranty and Support Guide
Page 14
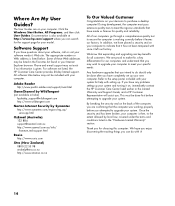
... the computer was working correctly before attempting to upgrade your decision to the setup poster included with your specific needs. Click the Windows Start Button, All Programs, and then click User Guides. Some of the computer, you are on your new computer. For software not listed, the HP Customer Care Center provides 30-day limited support. During development, the computer must be included with setting up. If...
... the computer was working correctly before attempting to upgrade your decision to the setup poster included with your specific needs. Click the Windows Start Button, All Programs, and then click User Guides. Some of the computer, you are on your new computer. For software not listed, the HP Customer Care Center provides 30-day limited support. During development, the computer must be included with setting up. If...
Start Here Guide
Page 20
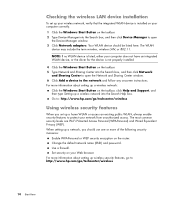
... the Windows Start Button on the taskbar. 2 Type Device Manager into the Search box, and then click Device Manager to open the Network and Sharing Center window. 6 Click Add a device to the network and follow any onscreen instructions. The WLAN device may include the term wireless, wireless LAN, or 802.11. The most common security levels are Wi-Fi Protected Access Personal (WPA-Personal) and Wired Equivalent Privacy (WEP). Checking the wireless LAN device installation To set...
... the Windows Start Button on the taskbar. 2 Type Device Manager into the Search box, and then click Device Manager to open the Network and Sharing Center window. 6 Click Add a device to the network and follow any onscreen instructions. The WLAN device may include the term wireless, wireless LAN, or 802.11. The most common security levels are Wi-Fi Protected Access Personal (WPA-Personal) and Wired Equivalent Privacy (WEP). Checking the wireless LAN device installation To set...
Start Here Guide
Page 26
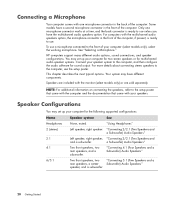
...may set up your speaker system to use. "Connecting 2/2.1 (Two Speakers and a Subwoofer) Audio Speakers" Left speaker, right speaker, "Connecting 2/2.1 (Two Speakers and and a subwoofer. HP computers support many different audio options, sound connections, and speaker configurations. For more details about connecting stereo speakers to the setup poster that came with the computer and the documentation that came with the multichannel audio speakers option, the microphone connector in the front of your speakers. a Subwoofer) Audio Speakers" Two front speakers, two rear speakers...
...may set up your speaker system to use. "Connecting 2/2.1 (Two Speakers and a Subwoofer) Audio Speakers" Left speaker, right speaker, "Connecting 2/2.1 (Two Speakers and and a subwoofer. HP computers support many different audio options, sound connections, and speaker configurations. For more details about connecting stereo speakers to the setup poster that came with the computer and the documentation that came with the multichannel audio speakers option, the microphone connector in the front of your speakers. a Subwoofer) Audio Speakers" Two front speakers, two rear speakers...
Getting Started Guide
Page 163
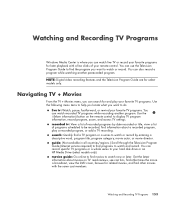
... the Television Program Guide (Internet service required) to find information about movies on the remote control to watch recorded TV programs while recording another prerecorded program. Get the latest information about a recorded program, play your favorite TV programs. Use the following menu items to help you locate what you can record specific TV programs or a whole series to do: live...
... the Television Program Guide (Internet service required) to find information about movies on the remote control to watch recorded TV programs while recording another prerecorded program. Get the latest information about a recorded program, play your favorite TV programs. Use the following menu items to help you locate what you can record specific TV programs or a whole series to do: live...

Getting Started Guide
Page 188
... 86 Internet connections 86 remote control and remote sensor 35 Shared Video folder 136 shortcuts keyboard 25 shutting down PC 10 sleep mode button 22 slide show displaying information about pictures 132 viewing pictures 132 viewing with music 132 software programs DVDPlay 46 Windows Movie Maker 48 sorting TV programs by category 172 by date 172 by name 172 Start menu Media Center 78 Support messages 2 SVCD 150 switching mouse button...
... 86 Internet connections 86 remote control and remote sensor 35 Shared Video folder 136 shortcuts keyboard 25 shutting down PC 10 sleep mode button 22 slide show displaying information about pictures 132 viewing pictures 132 viewing with music 132 software programs DVDPlay 46 Windows Movie Maker 48 sorting TV programs by category 172 by date 172 by name 172 Start menu Media Center 78 Support messages 2 SVCD 150 switching mouse button...

Getting Started Guide
Page 4
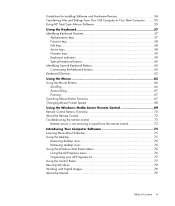
... 43 Using passwords 44 Using antivirus software 45 Using firewall software 46 Installing critical security updates 46 Turning On Your Computer for the First Time 47 Turning Off Your Computer 47 Using Shut Down 48 Using Lock ...48 Using sleep mode 48 Using hibernate mode 49 Automatic sleep, hibernate, or away mode 50 Restarting the Computer 50 Connecting to the Internet 51 Signing Up for Software Updates 52 Setting Up User Accounts on Your New Computer...
... 43 Using passwords 44 Using antivirus software 45 Using firewall software 46 Installing critical security updates 46 Turning On Your Computer for the First Time 47 Turning Off Your Computer 47 Using Shut Down 48 Using Lock ...48 Using sleep mode 48 Using hibernate mode 49 Automatic sleep, hibernate, or away mode 50 Restarting the Computer 50 Connecting to the Internet 51 Signing Up for Software Updates 52 Setting Up User Accounts on Your New Computer...
Getting Started Guide
Page 5
... Switching Mouse Button Functions 67 Changing Mouse Pointer Speed 68 Using the Windows Media Center Remote Control 69 Remote Control Buttons Overview 70 About the Remote Control 72 Troubleshooting the remote control 73 Remote sensor is not receiving a signal from the remote control 73 Introducing Your Computer Software 75 Learning More About Software 75 Using the Desktop 75 Removing desktop icons 76 Retrieving desktop icons 76 Using the Windows Start Button Menu 76 Using the All Programs menu 76 Organizing your All Programs list 77 Using the Control Panel 77 Resizing Windows...
... Switching Mouse Button Functions 67 Changing Mouse Pointer Speed 68 Using the Windows Media Center Remote Control 69 Remote Control Buttons Overview 70 About the Remote Control 72 Troubleshooting the remote control 73 Remote sensor is not receiving a signal from the remote control 73 Introducing Your Computer Software 75 Learning More About Software 75 Using the Desktop 75 Removing desktop icons 76 Retrieving desktop icons 76 Using the Windows Start Button Menu 76 Using the All Programs menu 76 Organizing your All Programs list 77 Using the Control Panel 77 Resizing Windows...

Getting Started Guide
Page 24
... Network and Sharing Center to open the Network and Sharing Center window. 6 Click Add a device to open the Device Manager window. 3 Click Network adapters. Change the default network name (SSID) and password. Set security on the router. For more information about setting up a wireless network: Click the Windows Start Button on the taskbar. 2 Type Device Manager into the Search Help box. Checking the wireless LAN device installation To set up a home WLAN or access an existing public WLAN, always enable security features to : http://www.hp...
... Network and Sharing Center to open the Network and Sharing Center window. 6 Click Add a device to open the Device Manager window. 3 Click Network adapters. Change the default network name (SSID) and password. Set security on the router. For more information about setting up a wireless network: Click the Windows Start Button on the taskbar. 2 Type Device Manager into the Search Help box. Checking the wireless LAN device installation To set up a home WLAN or access an existing public WLAN, always enable security features to : http://www.hp...
Getting Started Guide
Page 30
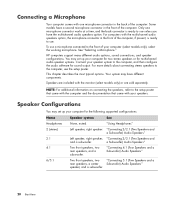
.... Connecting a Microphone Your computer comes with your speakers. HP computers support many different audio options, sound connections, and speaker configurations. Speaker Configurations You may set up your computer for two stereo speakers or for multichannel audio speaker systems. Connect your computer (select models only), select the working microphone. "Connecting 4.1 (Four Speakers and a Subwoofer) Audio Speakers" Two front speakers, two "Connecting 5.1 (Five Speakers and a rear speakers, a center Subwoofer) Audio Speakers" speaker, and a subwoofer. 20 Getting Started...
.... Connecting a Microphone Your computer comes with your speakers. HP computers support many different audio options, sound connections, and speaker configurations. Speaker Configurations You may set up your computer for two stereo speakers or for multichannel audio speaker systems. Connect your computer (select models only), select the working microphone. "Connecting 4.1 (Four Speakers and a Subwoofer) Audio Speakers" Two front speakers, two "Connecting 5.1 (Five Speakers and a rear speakers, a center Subwoofer) Audio Speakers" speaker, and a subwoofer. 20 Getting Started...
Getting Started Guide
Page 55
... software must be entered when you use your Administrator password, you cannot access Setup Utility. Using antivirus software When you resume from sleep or away mode. Instructions for using and updating Norton Internet Security software, and for purchasing extended update service, are provided within the program. The following table lists the Windows Vista passwords and describes their functions. Antivirus software can disable the operating system, software programs, or utilities, or cause them , and in the Help and Support Center...
... software must be entered when you use your Administrator password, you cannot access Setup Utility. Using antivirus software When you resume from sleep or away mode. Instructions for using and updating Norton Internet Security software, and for purchasing extended update service, are provided within the program. The following table lists the Windows Vista passwords and describes their functions. Antivirus software can disable the operating system, software programs, or utilities, or cause them , and in the Help and Support Center...

Getting Started Guide
Page 191
Media Center menu bars 116 navigating 117 opening with remote control 72 playing DVDs 140 resizing window 116 using with another program open 116 what you can do in Music 125 memory card reader 155 card types 99 in-use light 103 troubleshooting 104 using 99 memory card, formatting 103 microphone connector 4, 6 mini-jack 18 modem connection 15 modem connector 7 monitor adjusting 10 monitor connector 6 mouse autoscroll 67 cursor speed 68 panning 67 switching button functions 67 mouse connector 5 Music 125 copying music to...
Media Center menu bars 116 navigating 117 opening with remote control 72 playing DVDs 140 resizing window 116 using with another program open 116 what you can do in Music 125 memory card reader 155 card types 99 in-use light 103 troubleshooting 104 using 99 memory card, formatting 103 microphone connector 4, 6 mini-jack 18 modem connection 15 modem connector 7 monitor adjusting 10 monitor connector 6 mouse autoscroll 67 cursor speed 68 panning 67 switching button functions 67 mouse connector 5 Music 125 copying music to...
PC Troubleshooting
Page 3
...Audio ...5 CD and DVD Drives 7 Video...9 Display (Monitor)...9 Hard Disk Drive...10 Hardware Installation 11 Internet Access ...13 Keyboard and Mouse 15 Power ...17 Performance ...19 Bluetooth Wireless Devices 20 Miscellaneous ...21 Repairing Software Problems 22 Software Repair Overview 22 Restarting Your Computer 22 Turning Off Your Computer 22 Updating Drivers 22 Microsoft System Restore 23 Software Program and Hardware Driver Reinstallation 23 System Recovery 24 Creating Recovery Discs 24 System Recovery Options 25 Starting system recovery from the hard disk drive 25 Running...
...Audio ...5 CD and DVD Drives 7 Video...9 Display (Monitor)...9 Hard Disk Drive...10 Hardware Installation 11 Internet Access ...13 Keyboard and Mouse 15 Power ...17 Performance ...19 Bluetooth Wireless Devices 20 Miscellaneous ...21 Repairing Software Problems 22 Software Repair Overview 22 Restarting Your Computer 22 Turning Off Your Computer 22 Updating Drivers 22 Microsoft System Restore 23 Software Program and Hardware Driver Reinstallation 23 System Recovery 24 Creating Recovery Discs 24 System Recovery Options 25 Starting system recovery from the hard disk drive 25 Running...
PC Troubleshooting
Page 15
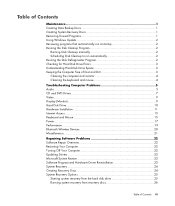
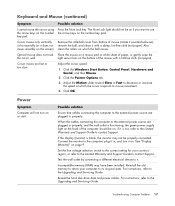
A Hardware Installation Symptom A new device is not recognized as part of the system. Disable the automatic settings in the operating system for Windows Vista. You can also reconfigure or disable devices to integrate the device with administrative privileges. A new device does not work. You may need to switch users, click the Windows Start Button, click the Arrow button next to the Limited Warranty and Support Guide for an update. For details, refer to the Lock button, and then...
A Hardware Installation Symptom A new device is not recognized as part of the system. Disable the automatic settings in the operating system for Windows Vista. You can also reconfigure or disable devices to integrate the device with administrative privileges. A new device does not work. You may need to switch users, click the Windows Start Button, click the Arrow button next to the Limited Warranty and Support Guide for an update. For details, refer to the Lock button, and then...
PC Troubleshooting
Page 17
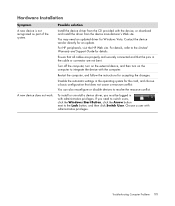
.... A modem uses a standard telephone cable to make a dial-up a connection or network to open the Help and Support Center. doing so may have a modem and an Ethernet network adapter (also called a network interface card, or NIC). I cannot connect to work with your ISP for your ISP, and start Internet programs. Web pages load slowly. Verify that you are selected: 1 Click the Windows Start Button, and then click Control Panel. 2 Click Hardware and Sound. 3 Double...
.... A modem uses a standard telephone cable to make a dial-up a connection or network to open the Help and Support Center. doing so may have a modem and an Ethernet network adapter (also called a network interface card, or NIC). I cannot connect to work with your ISP for your ISP, and start Internet programs. Web pages load slowly. Verify that you are selected: 1 Click the Windows Start Button, and then click Control Panel. 2 Click Hardware and Sound. 3 Double...
PC Troubleshooting
Page 21
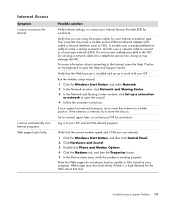
..., plug it . Cursor moves too fast or too slow. Connect the monitor to mouse movement. 4 Click OK. For instructions, refer to the Upgrading and Servicing Guide. Adjust the cursor speed: 1 Click the Windows Start Button, Control Panel, Hardware and Sound, and then Mouse. 2 Click the Pointer Options tab. 3 Adjust the Motion slider toward Slow or Fast to it in properly. if it with a lint-free cloth (not paper). Test the...
..., plug it . Cursor moves too fast or too slow. Connect the monitor to mouse movement. 4 Click OK. For instructions, refer to the Upgrading and Servicing Guide. Adjust the cursor speed: 1 Click the Windows Start Button, Control Panel, Hardware and Sound, and then Mouse. 2 Click the Pointer Options tab. 3 Adjust the Motion slider toward Slow or Fast to it in properly. if it with a lint-free cloth (not paper). Test the...
Upgrading and Servicing Guide
Page 9
... install the new drive. Upgrading and Servicing Guide 5 Some drive models may have a sound cable. If so, connect the sound cable. 7 Push the optical drive all the way in "Opening and Closing the PC" on page 3. 3 If your optical drive. You can replace it snaps into the PC, be sure to close the PC. Replacing or Adding an Optical Drive 1 Complete the procedures to prepare the PC and to the back of the optical drive, using...
... install the new drive. Upgrading and Servicing Guide 5 Some drive models may have a sound cable. If so, connect the sound cable. 7 Push the optical drive all the way in "Opening and Closing the PC" on page 3. 3 If your optical drive. You can replace it snaps into the PC, be sure to close the PC. Replacing or Adding an Optical Drive 1 Complete the procedures to prepare the PC and to the back of the optical drive, using...

Upgrading and Servicing Guide
Page 10
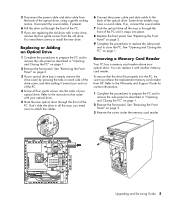
... the PC and to remove the side panel as described in "Opening and Closing the PC" on page 1. 2 Remove the front panel. See "Opening and Closing the PC" on page 3. 3 Make a note of each cable attached to the hard disk drive and back of the HP Personal Media Drive bay before removing the hard disk drive. See "Removing the Front Panel" on page 1. 6 Upgrading and Servicing Guide 4 Pull the memory card reader part way out of the...
... the PC and to remove the side panel as described in "Opening and Closing the PC" on page 1. 2 Remove the front panel. See "Opening and Closing the PC" on page 3. 3 Make a note of each cable attached to the hard disk drive and back of the HP Personal Media Drive bay before removing the hard disk drive. See "Removing the Front Panel" on page 1. 6 Upgrading and Servicing Guide 4 Pull the memory card reader part way out of the...
Upgrading and Servicing Guide
Page 13
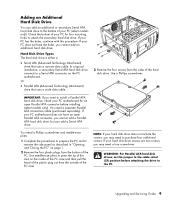
... open Parallel ATA connector before attaching the drive to press the tip of the stud on the inside of the PC case and then pull the head of the plastic plug out from the sides of your PC (select models only). Upgrading and Servicing Guide 9 In a typical installation, a secondary Serial ATA hard disk drive connects to the bottom of the hard disk drive. Use a Phillips screwdriver. Adding an Additional Hard Disk Drive You can add a Serial...
... open Parallel ATA connector before attaching the drive to press the tip of the stud on the inside of the PC case and then pull the head of the plastic plug out from the sides of your PC (select models only). Upgrading and Servicing Guide 9 In a typical installation, a secondary Serial ATA hard disk drive connects to the bottom of the hard disk drive. Use a Phillips screwdriver. Adding an Additional Hard Disk Drive You can add a Serial...
Upgrading and Servicing Guide
Page 17
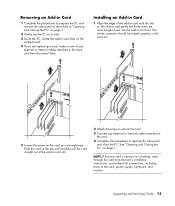
NOTE: If the new card or device isn't working, read through the card manufacturer's installation instructions, and recheck all connections, including those to the card, power supply, keyboard, and monitor. Hold the card at the top and carefully pull the card straight out of the add-in card slot. 2 Attach the screw to secure the card. 3 Connect any external or internal cables attached to the card, and then disconnect them. Installing an Add-in Card 1 Align the edge...
NOTE: If the new card or device isn't working, read through the card manufacturer's installation instructions, and recheck all connections, including those to the card, power supply, keyboard, and monitor. Hold the card at the top and carefully pull the card straight out of the add-in card slot. 2 Attach the screw to secure the card. 3 Connect any external or internal cables attached to the card, and then disconnect them. Installing an Add-in Card 1 Align the edge...


