Limited Warranty Statement
Page 5
...manganese dioxide-zinc AA, or Nickel Metal-Hydride batteries Disposal of implied warranties 3. Materials disposal This HP product contains the following materials that might require special handling at www.hp.com/support Upgraded warranty option HP offers a range of mind through extended service... coverage. For disposal or recycling information, please contact your one-stop source for your HP product, you with the Product name (HP Photosmart M437/M537 series Digital Cameras) or Product...
...manganese dioxide-zinc AA, or Nickel Metal-Hydride batteries Disposal of implied warranties 3. Materials disposal This HP product contains the following materials that might require special handling at www.hp.com/support Upgraded warranty option HP offers a range of mind through extended service... coverage. For disposal or recycling information, please contact your one-stop source for your HP product, you with the Product name (HP Photosmart M437/M537 series Digital Cameras) or Product...
Limited Warranty Statement
Page 6
.... • If moisture gets inside the camera, stop using the camera immediately. Exposing the camera to excessive moisture can cause it again. • When disposing of explosion if battery is replaced by HP for your camera's warranty. Allow the camera to the instructions. 4 HP M437/M537 Photosmart Warranty Caution: Risk of batteries, follow the battery manufacturer's disposal and recycling instructions or the...
.... • If moisture gets inside the camera, stop using the camera immediately. Exposing the camera to excessive moisture can cause it again. • When disposing of explosion if battery is replaced by HP for your camera's warranty. Allow the camera to the instructions. 4 HP M437/M537 Photosmart Warranty Caution: Risk of batteries, follow the battery manufacturer's disposal and recycling instructions or the...
Quick Start Guide
Page 5
Contents 1 Getting started 4 Viewing the electronic User Guide 4 Camera top and back 6 Camera front, side, and bottom 7 2 Setting up your camera 8 Install the batteries 8 Turn on the camera 8 Choose the language 9 Set the region 9 Set the date and time 9 Install and format an optional memory card 10 Install the software 11 3 Taking pictures ... video clips 14 Review images and video clips 14 Delete an image 14 5 Transferring and printing images 15 Transfer images 15 Print images from the camera 15 6 Camera quick reference 17 3
Contents 1 Getting started 4 Viewing the electronic User Guide 4 Camera top and back 6 Camera front, side, and bottom 7 2 Setting up your camera 8 Install the batteries 8 Turn on the camera 8 Choose the language 9 Set the region 9 Set the date and time 9 Install and format an optional memory card 10 Install the software 11 3 Taking pictures ... video clips 14 Review images and video clips 14 Delete an image 14 5 Transferring and printing images 15 Transfer images 15 Print images from the camera 15 6 Camera quick reference 17 3
Quick Start Guide
Page 6
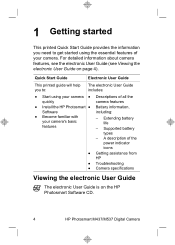
... (see Viewing the electronic User Guide on the HP Photosmart Software CD. 4 HP Photosmart M437/M537 Digital Camera Quick Start Guide Electronic User Guide This printed guide will help The electronic User Guide you need to : includes: ● Start using the essential features of your camera's basic features - Supported battery types - Extending battery life - A description of the power indicator icons...
... (see Viewing the electronic User Guide on the HP Photosmart Software CD. 4 HP Photosmart M437/M537 Digital Camera Quick Start Guide Electronic User Guide This printed guide will help The electronic User Guide you need to : includes: ● Start using the essential features of your camera's basic features - Supported battery types - Extending battery life - A description of the power indicator icons...
Quick Start Guide
Page 9
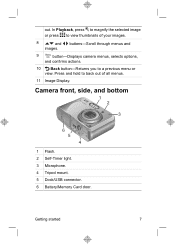
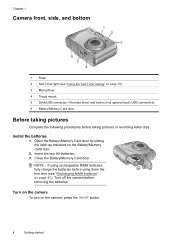
Getting started 7 buttons-Scroll through menus and 9 button-Displays camera menus, selects options, and confirms actions. 10 Back button-Returns you to back out of your images. 8 and images. In Playback, press to magnify the selected image or press to view thumbnails of all menus. 11 Image Display. out. Camera front, side, and bottom 1 2 3 6 5 4 1 Flash. 2 Self-Timer light. 3 Microphone. 4 Tripod mount. 5 Dock/USB connector. 6 Battery/Memory Card door. Press and hold to a previous menu or view.
Getting started 7 buttons-Scroll through menus and 9 button-Displays camera menus, selects options, and confirms actions. 10 Back button-Returns you to back out of your images. 8 and images. In Playback, press to magnify the selected image or press to view thumbnails of all menus. 11 Image Display. out. Camera front, side, and bottom 1 2 3 6 5 4 1 Flash. 2 Self-Timer light. 3 Microphone. 4 Tripod mount. 5 Dock/USB connector. 6 Battery/Memory Card door. Press and hold to a previous menu or view.
Quick Start Guide
Page 10
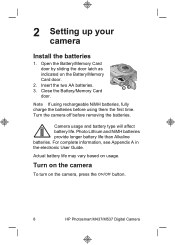
... the Battery/Memory Card door. 2. Close the Battery/Memory Card door. Camera usage and battery type will affect battery life. Note If using them the first time. Photo Lithium and NiMH batteries provide longer battery life than Alkaline batteries. Open the Battery/Memory Card door by sliding the door latch as indicated on the camera, press the button. 8 HP Photosmart M437/M537 Digital Camera For...
... the Battery/Memory Card door. 2. Close the Battery/Memory Card door. Camera usage and battery type will affect battery life. Note If using them the first time. Photo Lithium and NiMH batteries provide longer battery life than Alkaline batteries. Open the Battery/Memory Card door by sliding the door latch as indicated on the camera, press the button. 8 HP Photosmart M437/M537 Digital Camera For...
Quick Start Guide
Page 12
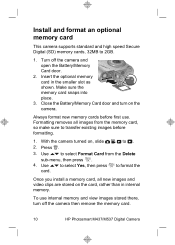
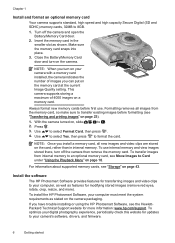
...use . Make sure the memory card snaps into place. 3. With the camera turned on, slide to format the card. Use to select Yes, then press to . 2. Close the Battery/Memory Card door and turn off the camera and open the Battery/Memory Card door. 2. Press . 3. Use to 2GB. 1. Install ... there, turn on the camera. Formatting removes all new images and video clips are stored on the card, rather than in the smaller slot as shown. Insert the optional memory card in internal memory. Turn off the camera then remove the memory card. 10 HP Photosmart M437/M537 Digital Camera
...use . Make sure the memory card snaps into place. 3. With the camera turned on, slide to format the card. Use to select Yes, then press to . 2. Close the Battery/Memory Card door and turn off the camera and open the Battery/Memory Card door. 2. Press . 3. Use to 2GB. 1. Install ... there, turn on the camera. Formatting removes all new images and video clips are stored on the card, rather than in the smaller slot as shown. Insert the optional memory card in internal memory. Turn off the camera then remove the memory card. 10 HP Photosmart M437/M537 Digital Camera
Quick Start Guide
Page 21
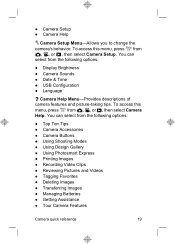
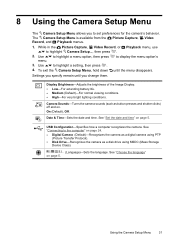
... ● Using Design Gallery ● Using Photosmart Express ● Printing Images ● Recording Video Clips ● Reviewing Pictures and Videos ● Tagging Favorites ● Deleting Images ● Transferring Images ● Managing Batteries ● Getting Assistance ● Tour Camera Features Camera quick reference 19 ● Camera Setup ● Camera Help Camera Setup Menu-Allows you to change the...
... ● Using Design Gallery ● Using Photosmart Express ● Printing Images ● Recording Video Clips ● Reviewing Pictures and Videos ● Tagging Favorites ● Deleting Images ● Transferring Images ● Managing Batteries ● Getting Assistance ● Tour Camera Features Camera quick reference 19 ● Camera Setup ● Camera Help Camera Setup Menu-Allows you to change the...
Quick Start Guide
Page 22
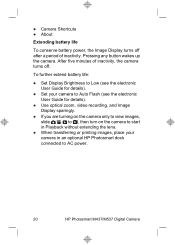
... off after a period of inactivity. To further extend battery life: ● Set Display Brightness to Low (see the electronic User Guide for details). ● Set your camera to Auto Flash (see the electronic User Guide for details). ● Use optical zoom...turn on the camera to start in Playback without extending the lens. ● When transferring or printing images, place your camera in an optional HP Photosmart dock connected to AC power. 20 HP Photosmart M437/M537 Digital Camera ● Camera Shortcuts ● About Extending battery life To conserve battery power, the ...
... off after a period of inactivity. To further extend battery life: ● Set Display Brightness to Low (see the electronic User Guide for details). ● Set your camera to Auto Flash (see the electronic User Guide for details). ● Use optical zoom...turn on the camera to start in Playback without extending the lens. ● When transferring or printing images, place your camera in an optional HP Photosmart dock connected to AC power. 20 HP Photosmart M437/M537 Digital Camera ● Camera Shortcuts ● About Extending battery life To conserve battery power, the ...
User Guide
Page 3
...and bottom 4 Before taking pictures...4 Install the batteries...4 Turn on the camera...4 Choose the language...5 Set the region...5 Set the date and time...5 Install and format an optional memory card 6 Install the software...6 Using your camera...7 2 Taking pictures and recording video clips Taking ...pictures...8 Recording video clips...9 Instant Review...9 Auto focus and exposure...9 Focusing on the subject...10 Optimizing focus...10 Using Focus Lock...11 Optimizing exposure...11 Using zoom...11 Optical zoom...12 Digital zoom...
...and bottom 4 Before taking pictures...4 Install the batteries...4 Turn on the camera...4 Choose the language...5 Set the region...5 Set the date and time...5 Install and format an optional memory card 6 Install the software...6 Using your camera...7 2 Taking pictures and recording video clips Taking ...pictures...8 Recording video clips...9 Instant Review...9 Auto focus and exposure...9 Focusing on the subject...10 Optimizing focus...10 Using Focus Lock...11 Optimizing exposure...11 Using zoom...11 Optical zoom...12 Digital zoom...
User Guide
Page 4
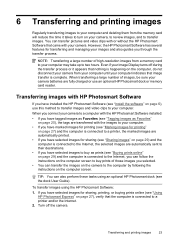
... with HP Photosmart Software 23 Transferring images without HP Photosmart Software 24 Connecting to the computer 24 Using a memory card reader 25 Printing images directly to a printer 25 7 Using HP Photosmart Express Using the Photosmart Express Menu 27 Marking images for printing...27 Buying prints online...29 Sharing images...29 Setting up online destinations in the camera 29...
... with HP Photosmart Software 23 Transferring images without HP Photosmart Software 24 Connecting to the computer 24 Using a memory card reader 25 Printing images directly to a printer 25 7 Using HP Photosmart Express Using the Photosmart Express Menu 27 Marking images for printing...27 Buying prints online...29 Sharing images...29 Setting up online destinations in the camera 29...
User Guide
Page 6
... taking pictures Complete the following procedures before removing the batteries. Chapter 1 Camera front, side, and bottom 1 2 3 6 5 4 1 Flash. 2 Self-Timer light (see "Recharging NiMH batteries" on page 41). Install the batteries 1. Insert the two AA batteries. 3. NOTE: If using rechargeable NiMH batteries, fully charge the batteries before using them the first time (see "Using the Self-Timer setting...
... taking pictures Complete the following procedures before removing the batteries. Chapter 1 Camera front, side, and bottom 1 2 3 6 5 4 1 Flash. 2 Self-Timer light (see "Recharging NiMH batteries" on page 41). Install the batteries 1. Insert the two AA batteries. 3. NOTE: If using rechargeable NiMH batteries, fully charge the batteries before using them the first time (see "Using the Self-Timer setting...
User Guide
Page 8
...requirements as stated on page 23). 1. Close the Battery/Memory Card door and turn off the camera and open the Battery/Memory Card door. 2. to select Format Card, ...and more information: www.hp.com/support. To install the HP Photosmart Software, your camera with a memory card installed, the camera indicates the number of 4000 images on the camera. Use to . 3....your digital photography experience, periodically check this website for more ). Chapter 1 Install and format an optional memory card Your camera supports standard, high speed and high capacity Secure Digital ...
...requirements as stated on page 23). 1. Close the Battery/Memory Card door and turn off the camera and open the Battery/Memory Card door. 2. to select Format Card, ...and more information: www.hp.com/support. To install the HP Photosmart Software, your camera with a memory card installed, the camera indicates the number of 4000 images on the camera. Use to . 3....your digital photography experience, periodically check this website for more ). Chapter 1 Install and format an optional memory card Your camera supports standard, high speed and high capacity Secure Digital ...
User Guide
Page 10
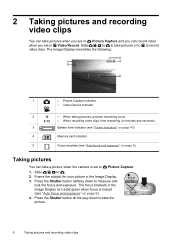
Slide to to take a picture when the camera is locked (see "Auto focus and exposure" on page 9). 4. Taking pictures You can record video when you are in the Image Display turn solid green ... button all the way down to take the picture. 8 Taking pictures and recording video clips Frame the subject for your picture in minutes and seconds). 3 Battery level indicator (see "Power indicators" on page 40). 4 Memory card indicator. 5 Focus brackets (see "Auto focus and exposure" on page 9). Press the Shutter button halfway...
Slide to to take a picture when the camera is locked (see "Auto focus and exposure" on page 9). 4. Taking pictures You can record video when you are in the Image Display turn solid green ... button all the way down to take the picture. 8 Taking pictures and recording video clips Frame the subject for your picture in minutes and seconds). 3 Battery level indicator (see "Power indicators" on page 40). 4 Memory card indicator. 5 Focus brackets (see "Auto focus and exposure" on page 9). Press the Shutter button halfway...
User Guide
Page 19
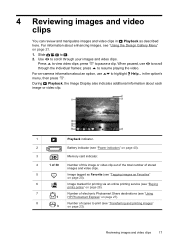
...and video clips. When paused, use menu, then press . Use to scroll For on-camera information about enhancing images, see "Using the Design Gallery Menu" on page 21. 1....printing service (see "Buying prints online" on page 29). 7 Number of electronic Photosmart Share destinations (see "Using 1 HP Photosmart Express" on page 27). 8 Number of stored images and video clips. 5 Image...Image Display also indicates additional information about each image or video clip. 1 Playback indicator. 2 Battery indicator (see "Power indicators" on page 40). 3 Memory card indicator. 4 1 of ...
...and video clips. When paused, use menu, then press . Use to scroll For on-camera information about enhancing images, see "Using the Design Gallery Menu" on page 21. 1....printing service (see "Buying prints online" on page 29). 7 Number of electronic Photosmart Share destinations (see "Using 1 HP Photosmart Express" on page 27). 8 Number of stored images and video clips. 5 Image...Image Display also indicates additional information about each image or video clip. 1 Playback indicator. 2 Battery indicator (see "Power indicators" on page 40). 3 Memory card indicator. 4 1 of ...
User Guide
Page 25
... video clips to your computer. If you have selected images to buy prints of images, be sure your camera batteries are transferred with your camera. When transferring a large number of those images you have installed the HP Photosmart Software (see "Buying prints online" on page 29) and the computer is connected to the Internet, you...
... video clips to your computer. If you have selected images to buy prints of images, be sure your camera batteries are transferred with your camera. When transferring a large number of those images you have installed the HP Photosmart Software (see "Buying prints online" on page 29) and the computer is connected to the Internet, you...
User Guide
Page 33
... • Low-For extending battery life. • Medium (Default)-For normal viewing conditions. • High-For very bright lighting conditions. See "Set the date and time" on page 24. • Digital Camera (Default)-Recognizes the camera as a digital camera using PTP (Picture Transfer Protocol...). • Disk Drive-Recognizes the camera as button presses and shutter clicks) off and on page 5. While in the...
... • Low-For extending battery life. • Medium (Default)-For normal viewing conditions. • High-For very bright lighting conditions. See "Set the date and time" on page 24. • Digital Camera (Default)-Recognizes the camera as a digital camera using PTP (Picture Transfer Protocol...). • Disk Drive-Recognizes the camera as button presses and shutter clicks) off and on page 5. While in the...
User Guide
Page 34
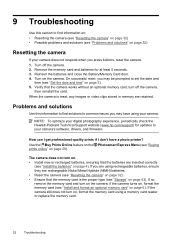
...on page 29). Use the Buy Prints Online feature on the Photosmart Express Menu (see "Buying prints online" on the camera. If the camera still does not turn on. • Install new or recharged batteries, ensuring that the memory card is reset, any images or ...video clips stored in memory are inserted correctly (see "Install the batteries" on , format the memory card using your camera. NOTE: To optimize your digital photography experience, periodically check the Hewlett-Packard Technical Support website (www.hp.com/support) for at least 5 seconds. 3. 9 Troubleshooting Use...
...on page 29). Use the Buy Prints Online feature on the Photosmart Express Menu (see "Buying prints online" on the camera. If the camera still does not turn on. • Install new or recharged batteries, ensuring that the memory card is reset, any images or ...video clips stored in memory are inserted correctly (see "Install the batteries" on , format the memory card using your camera. NOTE: To optimize your digital photography experience, periodically check the Hewlett-Packard Technical Support website (www.hp.com/support) for at least 5 seconds. 3. 9 Troubleshooting Use...
User Guide
Page 35
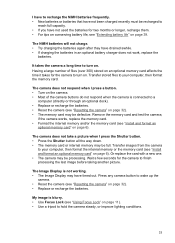
...Wait a few seconds for the camera to reach full capacity. • If you have not used the batteries for the camera to hold the camera steady, or improve lighting conditions. I have to recharge the NiMH batteries frequently. • New batteries or batteries that have not been charged recently... image before taking another picture. The NiMH batteries will not charge. • Try charging the batteries again after they have drained awhile. • If charging the batteries in an optional battery charger does not work, replace the batteries. The camera does not take a picture when I press...
...Wait a few seconds for the camera to reach full capacity. • If you have not used the batteries for the camera to hold the camera steady, or improve lighting conditions. I have to recharge the NiMH batteries frequently. • New batteries or batteries that have not been charged recently... image before taking another picture. The NiMH batteries will not charge. • Try charging the batteries again after they have drained awhile. • If charging the batteries in an optional battery charger does not work, replace the batteries. The camera does not take a picture when I press...
User Guide
Page 37
...back. • Remove the memory card and see "Resetting the camera" on page 32). Video recording terminates abruptly. This is stored in a cool place. Then examine the camera and the batteries for signs of deleting them . My camera indicates I can put on the memory card at the current Image... Quality setting. When you can store 4000 images regardless of the ordinary, turn off the camera and allow the camera to delete them , format...
...back. • Remove the memory card and see "Resetting the camera" on page 32). Video recording terminates abruptly. This is stored in a cool place. Then examine the camera and the batteries for signs of deleting them . My camera indicates I can put on the memory card at the current Image... Quality setting. When you can store 4000 images regardless of the ordinary, turn off the camera and allow the camera to delete them , format...


