HP LaserJet M5025/M5035 MFP - User Guide
Page 17
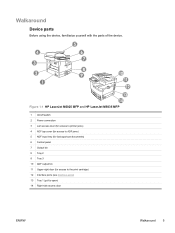
Figure 1-1 HP LaserJet M5025 MFP and HP LaserJet M5035 MFP 1 On/off switch 2 Power connection 3 Jam access door (for access to printer jams) 4 ADF top cover (for access to ADF jams) 5 ADF input tray (for fax/copy/scan documents) 6 Control panel 7 Output bin 8 Tray 2 9 Tray 3 10 ADF output bin 11 Upper-right door (for access to the print cartridge) 12 Interface ports (see Interface ports) 13 Tray 1 (pull to open) 14 Right-side access door ENWW Walkaround 5 Walkaround Device parts Before using the device, familiarize yourself with the parts of the device.
Figure 1-1 HP LaserJet M5025 MFP and HP LaserJet M5035 MFP 1 On/off switch 2 Power connection 3 Jam access door (for access to printer jams) 4 ADF top cover (for access to ADF jams) 5 ADF input tray (for fax/copy/scan documents) 6 Control panel 7 Output bin 8 Tray 2 9 Tray 3 10 ADF output bin 11 Upper-right door (for access to the print cartridge) 12 Interface ports (see Interface ports) 13 Tray 1 (pull to open) 14 Right-side access door ENWW Walkaround 5 Walkaround Device parts Before using the device, familiarize yourself with the parts of the device.
HP LaserJet M5025/M5035 MFP - User Guide
Page 18
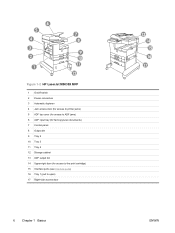
Figure 1-2 HP LaserJet M5035X MFP 1 On/off switch 2 Power connection 3 Automatic duplexer 4 Jam access door (for access to printer jams) 5 ADF top cover (for access to ADF jams) 6 ADF input tray (for fax/copy/scan documents) 7 Control panel 8 Output bin 9 Tray 2 10 Tray 3 11 Tray 4 12 Storage cabinet 13 ADF output bin 14 Upper-right door (for access to the print cartridge) 15 Interface ports (see Interface ports) 16 Tray 1 (pull to open) 17 Right-side access door 6 Chapter 1 Basics ENWW
Figure 1-2 HP LaserJet M5035X MFP 1 On/off switch 2 Power connection 3 Automatic duplexer 4 Jam access door (for access to printer jams) 5 ADF top cover (for access to ADF jams) 6 ADF input tray (for fax/copy/scan documents) 7 Control panel 8 Output bin 9 Tray 2 10 Tray 3 11 Tray 4 12 Storage cabinet 13 ADF output bin 14 Upper-right door (for access to the print cartridge) 15 Interface ports (see Interface ports) 16 Tray 1 (pull to open) 17 Right-side access door 6 Chapter 1 Basics ENWW
HP LaserJet M5025/M5035 MFP - User Guide
Page 19
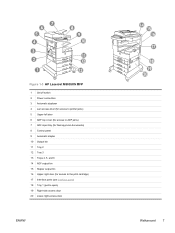
Figure 1-3 HP LaserJet M5035XS MFP 1 On/off switch 2 Power connection 3 Automatic duplexer 4 Jam access door (for access to printer jams) 5 Upper-left door 6 ADF top cover (for access to ADF jams) 7 ADF input tray (for fax/copy/scan documents) 8 Control panel 9 Automatic stapler 10 Output bin 11 Tray 2 12 Tray 3 13 Trays 4, 5, and 6 14 ADF output bin 15 Stapler output bin 16 Upper-right door (for access to the print cartridge) 17 Interface ports (see Interface ports) 18 Tray 1 (pull to open) 19 Right-side access door 20 Lower-right access door ENWW Walkaround 7
Figure 1-3 HP LaserJet M5035XS MFP 1 On/off switch 2 Power connection 3 Automatic duplexer 4 Jam access door (for access to printer jams) 5 Upper-left door 6 ADF top cover (for access to ADF jams) 7 ADF input tray (for fax/copy/scan documents) 8 Control panel 9 Automatic stapler 10 Output bin 11 Tray 2 12 Tray 3 13 Trays 4, 5, and 6 14 ADF output bin 15 Stapler output bin 16 Upper-right door (for access to the print cartridge) 17 Interface ports (see Interface ports) 18 Tray 1 (pull to open) 19 Right-side access door 20 Lower-right access door ENWW Walkaround 7
HP LaserJet M5025/M5035 MFP - User Guide
Page 190
...instructions in the onscreen dialog box, or see Clear jams from the tray 1 input area. 13.XX.YY - Jam inside middle-right door Media is jammed inside the lower-right door. Stapler jam inside stapler door A jam has occurred inside upper-right door Media is jammed in the onscreen dialog box. 13.XX.YY -... HP supply, visit us at the control panel. Follow the instructions in the onscreen dialog box, or see Clear jams from the input areas of trays 2 and 3 or Clear jams from the optional duplexer. 13.XX.YY - Jam inside lower-left door Media is jammed inside the upper-right door...
...instructions in the onscreen dialog box, or see Clear jams from the tray 1 input area. 13.XX.YY - Jam inside middle-right door Media is jammed inside the lower-right door. Stapler jam inside stapler door A jam has occurred inside upper-right door Media is jammed in the onscreen dialog box. 13.XX.YY -... HP supply, visit us at the control panel. Follow the instructions in the onscreen dialog box, or see Clear jams from the input areas of trays 2 and 3 or Clear jams from the optional duplexer. 13.XX.YY - Jam inside lower-left door Media is jammed inside the upper-right door...

HP LaserJet M5025/M5035 MFP - User Guide
Page 208
If a jam message persists, there is difficult to remove, try opening the upper-right door and removing the print cartridge to release pressure on the media. Grasp both sides of the media, and slowly pull the media out of the device. (There might be loose toner on the media. 4. Look for media in the device. Be careful not to spill it on yourself or into the device.) NOTE If media is still media in other locations. 196 Chapter 11 Problem solving ENWW Close the jam access door. 3.
If a jam message persists, there is difficult to remove, try opening the upper-right door and removing the print cartridge to release pressure on the media. Grasp both sides of the media, and slowly pull the media out of the device. (There might be loose toner on the media. 4. Look for media in the device. Be careful not to spill it on yourself or into the device.) NOTE If media is still media in other locations. 196 Chapter 11 Problem solving ENWW Close the jam access door. 3.
HP LaserJet M5025/M5035 MFP - User Guide
Page 210
CAUTION To prevent damage to the print cartridge, do not expose it to a jam in the printcartridge area. Lift the metal plate inside upper-right door alerts you to light for more than a few minutes. 3. To clear the jam, follow the instructions on the onscreen dialog box or follow the steps below. 1. Open the jam access door. 2. Clear jams from the print-cartridge area The control-panel message 13.XX.YY Jam inside the device. 198 Chapter 11 Problem solving ENWW Open the upper-right door and remove the print cartridge.
CAUTION To prevent damage to the print cartridge, do not expose it to a jam in the printcartridge area. Lift the metal plate inside upper-right door alerts you to light for more than a few minutes. 3. To clear the jam, follow the instructions on the onscreen dialog box or follow the steps below. 1. Open the jam access door. 2. Clear jams from the print-cartridge area The control-panel message 13.XX.YY Jam inside the device. 198 Chapter 11 Problem solving ENWW Open the upper-right door and remove the print cartridge.
HP LaserJet M5025/M5035 MFP - User Guide
Page 211
Loose toner should clear from the paper path after a few pages are printed. Close the jam access door. If a jam message persists, there is still media in other locations. Look for media in the device. Be careful to clean any toner that might cause temporary ... fabric.) 5. Slowly pull the media out of the device. If loose toner falls into the device. Replace the print cartridge, and then close the upper-right door. 6. ENWW Clear jams 199 CAUTION Avoid spilling loose toner. Use a dry, lint-free cloth, to not tear the media. If toner gets on your clothing, wipe it...
Loose toner should clear from the paper path after a few pages are printed. Close the jam access door. If a jam message persists, there is still media in other locations. Look for media in the device. Be careful to clean any toner that might cause temporary ... fabric.) 5. Slowly pull the media out of the device. If loose toner falls into the device. Replace the print cartridge, and then close the upper-right door. 6. ENWW Clear jams 199 CAUTION Avoid spilling loose toner. Use a dry, lint-free cloth, to not tear the media. If toner gets on your clothing, wipe it...

HP LaserJet M5025/M5035 MFP - User Guide
Page 215
... persists, there is stuck in the device. NOTE If you were not able to clear the jam from the print-cartridge area. Close the doors and slide the tray back into the device. ENWW Clear jams 203 If the edge of the paper is flat in the feed area, slowly pull the paper... tray, make sure the paper is visible in the tray at all four corners and below the tabs on the guides. See Clear jams from the input area, paper might be jammed in other locations. 3. NOTE Do not force the paper if it through the tray above (if applicable) or through the upper, right door. 4.
... persists, there is stuck in the device. NOTE If you were not able to clear the jam from the print-cartridge area. Close the doors and slide the tray back into the device. ENWW Clear jams 203 If the edge of the paper is flat in the feed area, slowly pull the paper... tray, make sure the paper is visible in the tray at all four corners and below the tabs on the guides. See Clear jams from the input area, paper might be jammed in other locations. 3. NOTE Do not force the paper if it through the tray above (if applicable) or through the upper, right door. 4.
HP LaserJet M5025/M5035 MFP - User Guide
Page 297
...or type error message 179 troubleshooting Alert Settings window, HP Toolbox 148 checklist 168 control panel messages, numerical 178 error messages, alphabetical list 178 error messages, numerical list 178 gateway addresses 227 jams 188, 204 output quality 208 speed 168 Troubleshooting menu,... unexpected size or type error messages 179 uninstalling Macintosh software 13 universal print driver 10 Update Now feature, drivers 11 upgrading memory 264 upper-right door, locating 5, 6, 7 usage page, printing 144 USB cable, part number 238 USB configuration 56 USB port locating 8 problem-solving ...
...or type error message 179 troubleshooting Alert Settings window, HP Toolbox 148 checklist 168 control panel messages, numerical 178 error messages, alphabetical list 178 error messages, numerical list 178 gateway addresses 227 jams 188, 204 output quality 208 speed 168 Troubleshooting menu,... unexpected size or type error messages 179 uninstalling Macintosh software 13 universal print driver 10 Update Now feature, drivers 11 upgrading memory 264 upper-right door, locating 5, 6, 7 usage page, printing 144 USB cable, part number 238 USB configuration 56 USB port locating 8 problem-solving ...


