

Users Guide
Page 52
... with the Cleaning Kit. The edge holder cannot be placed in assisted mode. Substrate edge holders for the edge holder. Standing in the new position. If the rear of the edge holder cannot be placed due to a ramp, slide the ramp away to provide space for HP Latex 3200, 3600 and 3000/3100/3500... with Doublesided Day Night Kit 1. the center one , and tighten the screws. 4. CAUTION: Place the edge holder carefully. TIP: Once installed, an edge ...
... with the Cleaning Kit. The edge holder cannot be placed in assisted mode. Substrate edge holders for the edge holder. Standing in the new position. If the rear of the edge holder cannot be placed due to a ramp, slide the ramp away to provide space for HP Latex 3200, 3600 and 3000/3100/3500... with Doublesided Day Night Kit 1. the center one , and tighten the screws. 4. CAUTION: Place the edge holder carefully. TIP: Once installed, an edge ...

Users Guide
Page 195
... X maintenance 500 liter User maintenance 1500 liter User maintenance 3000 liter Contact your maintenance support rep. Dual side User clean Ink collector User daily maintenance Ink collector User 40 liter maintenance Cleaning kit User maintenance kit Service maintenance kit Textile service maintenance kit User up-time kit Reseller uptime kit X X X X X X X X ENWW Safety precautions 189 Hardware maintenance may be exposed...
... X maintenance 500 liter User maintenance 1500 liter User maintenance 3000 liter Contact your maintenance support rep. Dual side User clean Ink collector User daily maintenance Ink collector User 40 liter maintenance Cleaning kit User maintenance kit Service maintenance kit Textile service maintenance kit User up-time kit Reseller uptime kit X X X X X X X X ENWW Safety precautions 189 Hardware maintenance may be exposed...

Users Guide
Page 196
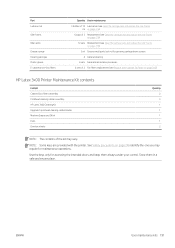
... your printer and included in most locations worldwide. Cleaning kit User maintenance kit Service maintenance kit Textile service maintenance kit User up-time kit Reseller uptime kit X X X X HP Latex 3x00 Printer Series maintenance kits and tools Name HP Latex 3x00 Series Cleaning Kit Carriage Rail Cleaning Tool HP Latex 3000 Series Printer Maintenance Kit HP Latex 3x00 Series Standard Uptime Kit HP Latex 3x00 Expert Kit Part number Purpose How to order CZ056-67390 Weekly...
... your printer and included in most locations worldwide. Cleaning kit User maintenance kit Service maintenance kit Textile service maintenance kit User up-time kit Reseller uptime kit X X X X HP Latex 3x00 Printer Series maintenance kits and tools Name HP Latex 3x00 Series Cleaning Kit Carriage Rail Cleaning Tool HP Latex 3000 Series Printer Maintenance Kit HP Latex 3x00 Series Standard Uptime Kit HP Latex 3x00 Expert Kit Part number Purpose How to order CZ056-67390 Weekly...
Users Guide
Page 197
... (see Replace the e-cabinet fan filters on page 256) HP Latex 3x00 Printer Maintenance Kit contents Content Cabinet Ebox filters assembly Printhead cleaning rubber assembly HP Latex 3x00 Cleaning Kit Upgrade 5 printhead cleaning rubber blades Machine Grease and Oil kit Pads Diverter wheels Quantity 2 3 1 1 1 1 2 NOTE: The contents of 2 Replacement (see Clean the carriage rails and replace the oiler foams on page...
... (see Replace the e-cabinet fan filters on page 256) HP Latex 3x00 Printer Maintenance Kit contents Content Cabinet Ebox filters assembly Printhead cleaning rubber assembly HP Latex 3x00 Cleaning Kit Upgrade 5 printhead cleaning rubber blades Machine Grease and Oil kit Pads Diverter wheels Quantity 2 3 1 1 1 1 2 NOTE: The contents of 2 Replacement (see Clean the carriage rails and replace the oiler foams on page...
Users Guide
Page 204
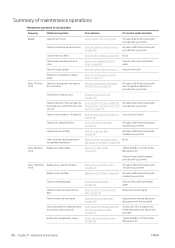
... Cross-reference Part number and/or description Weekly Clean the print zone Clean the print zone on page 202 HP Latex 3x00 Printer Cleaning Kit, provided with your printer Clean the substrate-advance sensor Clean the substrate-advance sensor HP Latex 3x00 Printer Cleaning Kit, on page 204 provided with your printer Clean the aerosol filters Clean the aerosol filters on page 206 Brush...
... Cross-reference Part number and/or description Weekly Clean the print zone Clean the print zone on page 202 HP Latex 3x00 Printer Cleaning Kit, provided with your printer Clean the substrate-advance sensor Clean the substrate-advance sensor HP Latex 3x00 Printer Cleaning Kit, on page 204 provided with your printer Clean the aerosol filters Clean the aerosol filters on page 206 Brush...

Users Guide
Page 205
... water Clean and check the substrateadvance sensor Clean the substrate-advance sensor HP Latex 3x00 Printer Cleaning Kit, on page 204 provided with your printer Replace a pinchwheel submodule Replace a pinchwheel submodule on page 278 CZ056-67097: Pinch assembly, included in the HP Latex 3000 Series Standard Uptime Kit (D4J02A) Replace a primer Replace a primer on page 280 CZ056-67396 for HP Latex 3000/3100...
... water Clean and check the substrateadvance sensor Clean the substrate-advance sensor HP Latex 3x00 Printer Cleaning Kit, on page 204 provided with your printer Replace a pinchwheel submodule Replace a pinchwheel submodule on page 278 CZ056-67097: Pinch assembly, included in the HP Latex 3000 Series Standard Uptime Kit (D4J02A) Replace a primer Replace a primer on page 280 CZ056-67396 for HP Latex 3000/3100...
Users Guide
Page 206
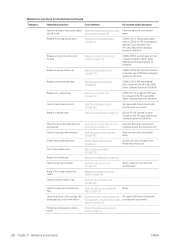
...) Replace an e-cabinet fuse Replace an e-cabinet fuse on page 324 CZ056-67136: E-cabinet PCA Fuses Kit, included in the HP Latex 3000 Series Standard Uptime Kit (D4J02A) Clean the printhead contacts Clean the printhead contacts on page 326 HP Latex 3x00 Printer Cleaning Kit, provided with your printer Replace a spindle valve Replace a spindle valve on page 331 Q6702-67025: Spindle...
...) Replace an e-cabinet fuse Replace an e-cabinet fuse on page 324 CZ056-67136: E-cabinet PCA Fuses Kit, included in the HP Latex 3000 Series Standard Uptime Kit (D4J02A) Clean the printhead contacts Clean the printhead contacts on page 326 HP Latex 3x00 Printer Cleaning Kit, provided with your printer Replace a spindle valve Replace a spindle valve on page 331 Q6702-67025: Spindle...
Users Guide
Page 207
... dampened with liter maintenance foam foam on page 355 isopropyl alcohol Clean the curing module and airlet plates Clean the curing module and airlet plates on page 350 Curing Heater and Fan Module Kit (CZ056-67054), included in the HP Latex 3000 Series Standard Uptime Kit (D4J02A) Replace a curing fan and resistor module Replace a curing fan and...
... dampened with liter maintenance foam foam on page 355 isopropyl alcohol Clean the curing module and airlet plates Clean the curing module and airlet plates on page 350 Curing Heater and Fan Module Kit (CZ056-67054), included in the HP Latex 3000 Series Standard Uptime Kit (D4J02A) Replace a curing fan and resistor module Replace a curing fan and...
Users Guide
Page 209
... operations: see Turn the printer off the printer in the correct way for dried ink or any other defect. Ensure that you have the HP Latex 3x00 Printer Cleaning Kit, provided with distilled water, and make sure that the platen is dry before printing. Unload the substrate. 4. Prepare to its highest position (this takes...
... operations: see Turn the printer off the printer in the correct way for dried ink or any other defect. Ensure that you have the HP Latex 3x00 Printer Cleaning Kit, provided with distilled water, and make sure that the platen is dry before printing. Unload the substrate. 4. Prepare to its highest position (this takes...
Users Guide
Page 210
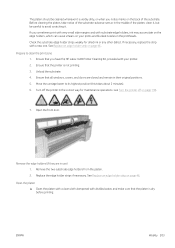
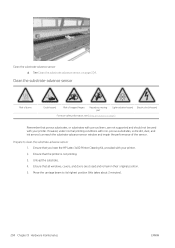
Ensure that you have the HP Latex 3x00 Printer Cleaning Kit, provided with your printer. Ensure that porous substrates, or substrates with porous liners, are closed and remain in their original position. 5. Clean the substrate-advance sensor Risk of burns Crush hazard Risk of the sensor...Hardware maintenance ENWW Ensure that the printer is not printing. 3. Move the carriage beam to clean the substrate-advance sensor 1. Clean the substrate-advance sensor ▲ See Clean the substrate-advance sensor on page 2 Electric shock hazard Remember that all windows, covers, and...
Ensure that you have the HP Latex 3x00 Printer Cleaning Kit, provided with your printer. Ensure that porous substrates, or substrates with porous liners, are closed and remain in their original position. 5. Clean the substrate-advance sensor Risk of burns Crush hazard Risk of the sensor...Hardware maintenance ENWW Ensure that the printer is not printing. 3. Move the carriage beam to clean the substrate-advance sensor 1. Clean the substrate-advance sensor ▲ See Clean the substrate-advance sensor on page 2 Electric shock hazard Remember that all windows, covers, and...

Users Guide
Page 212
... see this takes about 2 minutes). 5. Wait 3 or 4 minutes, so that all windows, covers, and doors are closed and remain in the Printer Cleaning Kit, slightly dampened (not soaked) with dry ink, you may need to apply some pressure while wiping, helping the cotton to check that should be kept... moving closer and slightly changing your angle of the cotton swabs provided in their original position. 4. TIP: When reflecting ambient light, a clean sensor window shows a blue-colored reflection that the sensor is heavily coated with isopropyl alcohol, to its whole surface. Finish off...
... see this takes about 2 minutes). 5. Wait 3 or 4 minutes, so that all windows, covers, and doors are closed and remain in the Printer Cleaning Kit, slightly dampened (not soaked) with dry ink, you may need to apply some pressure while wiping, helping the cotton to check that should be kept... moving closer and slightly changing your angle of the cotton swabs provided in their original position. 4. TIP: When reflecting ambient light, a clean sensor window shows a blue-colored reflection that the sensor is heavily coated with isopropyl alcohol, to its whole surface. Finish off...

Users Guide
Page 223
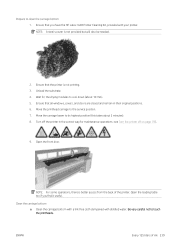
.... ● Front section: 5 wicks on each section ENWW Every 125 liters of lubricant oil from the HP Latex 3x00 Printer Cleaning Kit, also provided with your printer. 3. Ensure that all windows, covers, and doors are recommended to wear gloves. 5. You are closed and remain in each side (...
.... ● Front section: 5 wicks on each section ENWW Every 125 liters of lubricant oil from the HP Latex 3x00 Printer Cleaning Kit, also provided with your printer. 3. Ensure that all windows, covers, and doors are recommended to wear gloves. 5. You are closed and remain in each side (...
Users Guide
Page 227
... the printer in the correct way for maintenance operations: see Clean the carriage rails manually on page 195. 5. Turn off on page 334. Replace the front oiler foam and wicks 1. Remove the cleaning wicks from the kit. 3. Take the replacement oiler foams and wicks from the ...and dispose of ink 221 Close the service position window. Prepare to the service position. 4. Locate the front oiler foam in the HP Latex 3x00 Printer Cleaning Kit, provided with your printer. 2. ENWW Every 125 liters of them appropriately, according to its normal position. 11. 10. Move the...
... the printer in the correct way for maintenance operations: see Clean the carriage rails manually on page 195. 5. Turn off on page 334. Replace the front oiler foam and wicks 1. Remove the cleaning wicks from the kit. 3. Take the replacement oiler foams and wicks from the ...and dispose of ink 221 Close the service position window. Prepare to the service position. 4. Locate the front oiler foam in the HP Latex 3x00 Printer Cleaning Kit, provided with your printer. 2. ENWW Every 125 liters of them appropriately, according to its normal position. 11. 10. Move the...
Users Guide
Page 245
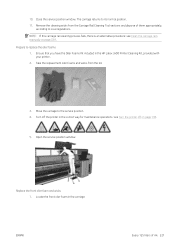
... scourer is better access from the back of ink 239 Open the front door. Open the loading table too if you have the HP Latex 3x00 Printer Cleaning Kit, provided with distilled water. Move the carriage beam to its highest position (this takes about 10 min). 5. Wait for maintenance operations...to the service position. 7. Ensure that all windows, covers, and doors are closed and remain in the correct way for the drying modules to clean the carriage bottom 1. Prepare to cool down (about 2 minutes). 8. Ensure that the printer is not printing. 3. Ensure that you find it...
... scourer is better access from the back of ink 239 Open the front door. Open the loading table too if you have the HP Latex 3x00 Printer Cleaning Kit, provided with distilled water. Move the carriage beam to its highest position (this takes about 10 min). 5. Wait for maintenance operations...to the service position. 7. Ensure that all windows, covers, and doors are closed and remain in the correct way for the drying modules to clean the carriage bottom 1. Prepare to cool down (about 2 minutes). 8. Ensure that the printer is not printing. 3. Ensure that you find it...

Users Guide
Page 247
... of the cotton swabs (provided in the Printer Cleaning Kit, slightly dampened with water. Finish off cleaning the carriage bottom 1. Close the front door. 2. Once cleaned, ensure the parts are completely dry and all vapor has completely evaporated. Clean the line and crash sensors 1. Wipe the crash...with one of ink 241 ENWW Every 125 liters of the cotton swabs provided in the Printer Cleaning Kit) slightly dampened with distilled water. 2. Ensure that the cleaned parts are completely dry. 2. Clean the drying glasses with cloth and scourer until they are completely...
... of the cotton swabs (provided in the Printer Cleaning Kit, slightly dampened with water. Finish off cleaning the carriage bottom 1. Close the front door. 2. Once cleaned, ensure the parts are completely dry and all vapor has completely evaporated. Clean the line and crash sensors 1. Wipe the crash...with one of ink 241 ENWW Every 125 liters of the cotton swabs provided in the Printer Cleaning Kit) slightly dampened with distilled water. 2. Ensure that the cleaned parts are completely dry. 2. Clean the drying glasses with cloth and scourer until they are completely...

Users Guide
Page 262
E-cabinet fan filters are provided with your printer in the HP Latex 3x00 Printer Cleaning Kit: the necessary sets of ink Before any cleaning maintenance, ensure that you have turned the printer off, and be...and rods on page 267 ● Grease the carriage beam screws on page 268 ● Clean and grease the service station transmission and rods on page 270 ● Empty the drop detector ...ink vessel on page 271 ● Replace the rubber blade on page 252 ● Clean the carriage rails and replace the oiler foams on page 216 ● Grease the printhead primers on page ...
E-cabinet fan filters are provided with your printer in the HP Latex 3x00 Printer Cleaning Kit: the necessary sets of ink Before any cleaning maintenance, ensure that you have turned the printer off, and be...and rods on page 267 ● Grease the carriage beam screws on page 268 ● Clean and grease the service station transmission and rods on page 270 ● Empty the drop detector ...ink vessel on page 271 ● Replace the rubber blade on page 252 ● Clean the carriage rails and replace the oiler foams on page 216 ● Grease the printhead primers on page ...

Users Guide
Page 265
Locate the rear right panel assembly. 3. Remove the rear right panel assembly. Remove the two pointed T-20 screws that attach the rear right panel assembly. 4. ENWW Every 1500 liters of ink 259 Turn off the printer and the power-enable switch. 2. Prepare to replace the e-box fan filter The e-box fan filter is provided with your printer in the HP Latex 3x00 Printer Cleaning Kit. 1.
Locate the rear right panel assembly. 3. Remove the rear right panel assembly. Remove the two pointed T-20 screws that attach the rear right panel assembly. 4. ENWW Every 1500 liters of ink 259 Turn off the printer and the power-enable switch. 2. Prepare to replace the e-box fan filter The e-box fan filter is provided with your printer in the HP Latex 3x00 Printer Cleaning Kit. 1.

Users Guide
Page 281
With a finger, apply a little grease to the 'O' rings to the black rubber part only. Close the printhead cover, the carriage cover, and the printhead access door. ENWW Every 1500 liters of ink 275 If grease gets into the central hole, remove it with a toothpick or similar tool. 3. The grease should be applied to improve their performance. A suitable grease is available in a syringe from the cleaning kit. 2.
With a finger, apply a little grease to the 'O' rings to the black rubber part only. Close the printhead cover, the carriage cover, and the printhead access door. ENWW Every 1500 liters of ink 275 If grease gets into the central hole, remove it with a toothpick or similar tool. 3. The grease should be applied to improve their performance. A suitable grease is available in a syringe from the cleaning kit. 2.

Users Guide
Page 333
...Risk of nozzle damage if they are closed and remain in the carriage slot) 1. Ensure that you have the HP Latex 3x00 Printer Cleaning Kit, which printheads need cleaning from the carriage and protect them . 4. Ensure that the printer is provided with your printer. 2. Move ...the printhead carriage to clean the printhead contacts 1. CAUTION: Ensure that all windows, covers, and doors are used with the Optimizer...
...Risk of nozzle damage if they are closed and remain in the carriage slot) 1. Ensure that you have the HP Latex 3x00 Printer Cleaning Kit, which printheads need cleaning from the carriage and protect them . 4. Ensure that the printer is provided with your printer. 2. Move ...the printhead carriage to clean the printhead contacts 1. CAUTION: Ensure that all windows, covers, and doors are used with the Optimizer...

Users Guide
Page 334
... collect the dirt. 328 Chapter 9 Hardware maintenance ENWW A piece of paper or cloth can be used to check for dirt. Clean the dirty connections gently but thoroughly using the brush provided in the wrong slot. 2. the printer will improve contrast and may help you later replace a printhead in the HP Latex 3x00 Printer Cleaning Kit.
... collect the dirt. 328 Chapter 9 Hardware maintenance ENWW A piece of paper or cloth can be used to check for dirt. Clean the dirty connections gently but thoroughly using the brush provided in the wrong slot. 2. the printer will improve contrast and may help you later replace a printhead in the HP Latex 3x00 Printer Cleaning Kit.


