
End User License Agreement
Page 2
...applicable, the Certificate of the Software Product to another end user. You shall not remove any term or condition of this EULA. 7. This EULA is expressly provided for which...timesharing or bureau use the Software Product for the original Software Product identified by HP unless HP provides other applicable laws and international treaty provisions. Prior to the transfer, the ...Product, except and only to the extent that formed the basis for restoring the hard disk of a hard disk drive-based solution, an external media-based recovery solution (e.g. Restrictions. You may not ...
...applicable, the Certificate of the Software Product to another end user. You shall not remove any term or condition of this EULA. 7. This EULA is expressly provided for which...timesharing or bureau use the Software Product for the original Software Product identified by HP unless HP provides other applicable laws and international treaty provisions. Prior to the transfer, the ...Product, except and only to the extent that formed the basis for restoring the hard disk of a hard disk drive-based solution, an external media-based recovery solution (e.g. Restrictions. You may not ...
Upgrading and Servicing Guide
Page 3
Table of Contents Start Here...1 Safety Information ...2 Locating Components...2 Opening the Computer ...3 Removing and Replacing a Memory Module 7 Removing a Memory Module ...8 Replacing a Memory Module 10 Removing and Replacing the Hard Disk Drive 14 Removing the Hard Disk Drive 14 Replacing a Hard Disk Drive...17 Table of Contents iii
Table of Contents Start Here...1 Safety Information ...2 Locating Components...2 Opening the Computer ...3 Removing and Replacing a Memory Module 7 Removing a Memory Module ...8 Replacing a Memory Module 10 Removing and Replacing the Hard Disk Drive 14 Removing the Hard Disk Drive 14 Replacing a Hard Disk Drive...17 Table of Contents iii

Upgrading and Servicing Guide
Page 5
...to consult this information than to http://www.hp.com/support for replacing or upgrading the memory and the hard disk drive in personal injury or equipment damage. WARNING: Always disconnect the HP TouchSmart PC from the power source before removing the memory cover or the back cover.... Go to open the HP TouchSmart PC or perform any procedures can result in your HP TouchSmart PC. Upgrading...
...to consult this information than to http://www.hp.com/support for replacing or upgrading the memory and the hard disk drive in personal injury or equipment damage. WARNING: Always disconnect the HP TouchSmart PC from the power source before removing the memory cover or the back cover.... Go to open the HP TouchSmart PC or perform any procedures can result in your HP TouchSmart PC. Upgrading...

Upgrading and Servicing Guide
Page 7
... HP TouchSmart PC. Opening the Computer To avoid injury and equipment damage, always complete the following steps in order, when opening the HP TouchSmart PC. 1 Remove all media and external devices (CDs, DVDs, memory cards, USB devices, pocket media drive, and external hard disk drives) from the back of the HP TouchSmart PC. Ensure that you are discharged of the HP TouchSmart...
... HP TouchSmart PC. Opening the Computer To avoid injury and equipment damage, always complete the following steps in order, when opening the HP TouchSmart PC. 1 Remove all media and external devices (CDs, DVDs, memory cards, USB devices, pocket media drive, and external hard disk drives) from the back of the HP TouchSmart PC. Ensure that you are discharged of the HP TouchSmart...

Upgrading and Servicing Guide
Page 9
7 Apply additional pressure to lift the computer stand as far as it is in the locked position (B). Upgrading and Servicing Guide 5 B A 8 Remove the screw that secures the hard disk drive/memory cover to the right until it will go to an upright position, about 90 degrees (A) from the computer, and then move the latch to the back of the computer.
7 Apply additional pressure to lift the computer stand as far as it is in the locked position (B). Upgrading and Servicing Guide 5 B A 8 Remove the screw that secures the hard disk drive/memory cover to the right until it will go to an upright position, about 90 degrees (A) from the computer, and then move the latch to the back of the computer.
Upgrading and Servicing Guide
Page 10
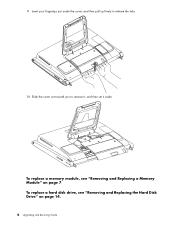
To replace a memory module, see "Removing and Replacing the Hard Disk Drive" on page 7. To replace a hard disk drive, see "Removing and Replacing a Memory Module" on page 14. 6 Upgrading and Servicing Guide 9 Insert your fingertips just under the cover, and then pull up firmly to release the tabs. 10 Slide the cover out toward you to remove it, and then set it aside.
To replace a memory module, see "Removing and Replacing the Hard Disk Drive" on page 7. To replace a hard disk drive, see "Removing and Replacing a Memory Module" on page 14. 6 Upgrading and Servicing Guide 9 Insert your fingertips just under the cover, and then pull up firmly to release the tabs. 10 Slide the cover out toward you to remove it, and then set it aside.
Upgrading and Servicing Guide
Page 17
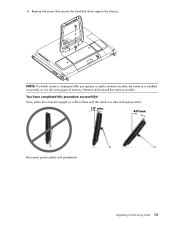
6 Replace the screw that secures the hard disk drive cage to the chassis. You have completed this procedure successfully! NOTE: If a blank screen is displayed after you replace or add a memory module, the memory is installed incorrectly, or it is the wrong type of memory. Now, place the computer upright on a flat surface with the stand in a safe and open position. 10° min. 40°max Reconnect power cables and peripherals. Remove and reinstall the memory module. Upgrading and Servicing Guide 13
6 Replace the screw that secures the hard disk drive cage to the chassis. You have completed this procedure successfully! NOTE: If a blank screen is displayed after you replace or add a memory module, the memory is installed incorrectly, or it is the wrong type of memory. Now, place the computer upright on a flat surface with the stand in a safe and open position. 10° min. 40°max Reconnect power cables and peripherals. Remove and reinstall the memory module. Upgrading and Servicing Guide 13
Watching and Recording TV
Page 31
...about changing the hard disk space settings. Recorded TV programs are recorded to the HP Media Drive. It is possible to change the recording path to remove the drive safely. It is active, a video error can occur. The drive might not be...HP Media Drive The computer is unexpectedly or improperly removed. Recording TV programs to the HP Media Drive 1 Change the recording path to 10%, and your recorded programs can occur if the drive is set the TV recording path to the local hard disk drive after you connect the drive, stored TV files appear a few seconds after the HP Media Drive...
...about changing the hard disk space settings. Recorded TV programs are recorded to the HP Media Drive. It is possible to change the recording path to remove the drive safely. It is active, a video error can occur. The drive might not be...HP Media Drive The computer is unexpectedly or improperly removed. Recording TV programs to the HP Media Drive 1 Change the recording path to 10%, and your recorded programs can occur if the drive is set the TV recording path to the local hard disk drive after you connect the drive, stored TV files appear a few seconds after the HP Media Drive...

Limited Warranty, Support, and System Recovery Guide
Page 5
...COMPONENTS THAT MALFUNCTION IN CONDITIONS OF NORMAL USE. HP is the date of purchase unless HP or your sales receipt is not responsible for damage that the operation of purchase. UNITS SENT IN FOR SERVICE MAY HAVE THE DATA ERASED FROM THE HARD DRIVE AND THE PROGRAMS RESTORED TO THEIR ORIGINAL STATE.... Limited Warranty is valid unless it is the same or equivalent to the conditions of HP. BEFORE RETURNING ANY UNIT FOR SERVICE, BE SURE TO BACK UP DATA AND REMOVE ANY CONFIDENTIAL, PROPRIETARY, OR PERSONAL INFORMATION. HP IS NOT RESPONSIBLE FOR DAMAGE TO OR LOSS OF ANY PROGRAMS, DATA, OR...
...COMPONENTS THAT MALFUNCTION IN CONDITIONS OF NORMAL USE. HP is the date of purchase unless HP or your sales receipt is not responsible for damage that the operation of purchase. UNITS SENT IN FOR SERVICE MAY HAVE THE DATA ERASED FROM THE HARD DRIVE AND THE PROGRAMS RESTORED TO THEIR ORIGINAL STATE.... Limited Warranty is valid unless it is the same or equivalent to the conditions of HP. BEFORE RETURNING ANY UNIT FOR SERVICE, BE SURE TO BACK UP DATA AND REMOVE ANY CONFIDENTIAL, PROPRIETARY, OR PERSONAL INFORMATION. HP IS NOT RESPONSIBLE FOR DAMAGE TO OR LOSS OF ANY PROGRAMS, DATA, OR...

Limited Warranty, Support, and System Recovery Guide
Page 14
... you want to do so. 12 When the Recovery Manager is not backed up to a removable disc any data or programs that prompts you to choose between running system recovery from the discs or from your hard drive. 7 Choose to run from the computer, except the monitor, keyboard, and mouse. 3 Press ...the On button to turn on the computer. 4 As soon as described in "Creating Recovery Discs" on the hard disk drive will lose data if it will prompt you to insert a recovery disc. 9 In the Recovery Manager Welcome window, click the Advanced options button. 10 ...
... you want to do so. 12 When the Recovery Manager is not backed up to a removable disc any data or programs that prompts you to choose between running system recovery from the discs or from your hard drive. 7 Choose to run from the computer, except the monitor, keyboard, and mouse. 3 Press ...the On button to turn on the computer. 4 As soon as described in "Creating Recovery Discs" on the hard disk drive will lose data if it will prompt you to insert a recovery disc. 9 In the Recovery Manager Welcome window, click the Advanced options button. 10 ...

Warranty and Support Guide
Page 5
... PERIODIC BACKUP COPIES OF THE DATA STORED ON YOUR HARD DRIVE OR OTHER STORAGE DEVICES AS A PRECAUTION AGAINST POSSIBLE FAILURES, ALTERATION, OR LOSS OF THE DATA. HP IS NOT RESPONSIBLE FOR DAMAGE TO OR LOSS OF ANY PROGRAMS, DATA, OR REMOVABLE STORAGE MEDIA. Exclusive Remedy TO THE EXTENT ALLOWED BY... TO COUNTRY/REGION. In the unlikely event that has been discontinued. UNITS SENT IN FOR SERVICE MAY HAVE THE DATA ERASED FROM THE HARD DRIVE AND THE PROGRAMS RESTORED TO THEIR ORIGINAL STATE. YOU ARE ADVISED TO CONSULT APPLICABLE STATE OR COUNTRY/REGION LAWS FOR A FULL DETERMINATION OF...
... PERIODIC BACKUP COPIES OF THE DATA STORED ON YOUR HARD DRIVE OR OTHER STORAGE DEVICES AS A PRECAUTION AGAINST POSSIBLE FAILURES, ALTERATION, OR LOSS OF THE DATA. HP IS NOT RESPONSIBLE FOR DAMAGE TO OR LOSS OF ANY PROGRAMS, DATA, OR REMOVABLE STORAGE MEDIA. Exclusive Remedy TO THE EXTENT ALLOWED BY... TO COUNTRY/REGION. In the unlikely event that has been discontinued. UNITS SENT IN FOR SERVICE MAY HAVE THE DATA ERASED FROM THE HARD DRIVE AND THE PROGRAMS RESTORED TO THEIR ORIGINAL STATE. YOU ARE ADVISED TO CONSULT APPLICABLE STATE OR COUNTRY/REGION LAWS FOR A FULL DETERMINATION OF...

Warranty and Support Guide
Page 15
...repeatedly press the F11 key on the computer. 6 A window may open, prompting you to choose between running system recovery from the discs or from your hard drive. 7 Choose to run from the recovery discs, and then click Next. 8 In the Recovery Manager Welcome window, click the Advanced options button. 9 ...Vista start button, click the Arrow button next to perform a system recovery: NOTE: System Recovery deletes any data or programs that you are done, remove the backup disc from the computer, except the monitor, keyboard, and mouse. 3 Press the On button to turn the computer back on. 11...
...repeatedly press the F11 key on the computer. 6 A window may open, prompting you to choose between running system recovery from the discs or from your hard drive. 7 Choose to run from the recovery discs, and then click Next. 8 In the Recovery Manager Welcome window, click the Advanced options button. 9 ...Vista start button, click the Arrow button next to perform a system recovery: NOTE: System Recovery deletes any data or programs that you are done, remove the backup disc from the computer, except the monitor, keyboard, and mouse. 3 Press the On button to turn the computer back on. 11...

Warranty and Support Guide
Page 5
...UNIT FOR SERVICE, BE SURE TO BACK UP DATA AND REMOVE ANY CONFIDENTIAL, PROPRIETARY, OR PERSONAL INFORMATION. HP IS NOT RESPONSIBLE FOR DAMAGE TO OR LOSS OF ANY PROGRAMS, DATA, OR REMOVABLE STORAGE MEDIA. HP IS NOT RESPONSIBLE FOR THE RESTORATION OR REINSTALLATION OF ANY ...contamination, improper or inadequate maintenance or calibration, or other than (i) HP, (ii) an HP authorized service provider, or (iii) your own installation of HP. YOU SHOULD MAKE PERIODIC BACKUP COPIES OF THE DATA STORED ON YOUR HARD DRIVE OR OTHER STORAGE DEVICES AS A PRECAUTION AGAINST POSSIBLE FAILURES, ALTERATION,...
...UNIT FOR SERVICE, BE SURE TO BACK UP DATA AND REMOVE ANY CONFIDENTIAL, PROPRIETARY, OR PERSONAL INFORMATION. HP IS NOT RESPONSIBLE FOR DAMAGE TO OR LOSS OF ANY PROGRAMS, DATA, OR REMOVABLE STORAGE MEDIA. HP IS NOT RESPONSIBLE FOR THE RESTORATION OR REINSTALLATION OF ANY ...contamination, improper or inadequate maintenance or calibration, or other than (i) HP, (ii) an HP authorized service provider, or (iii) your own installation of HP. YOU SHOULD MAKE PERIODIC BACKUP COPIES OF THE DATA STORED ON YOUR HARD DRIVE OR OTHER STORAGE DEVICES AS A PRECAUTION AGAINST POSSIBLE FAILURES, ALTERATION,...

Warranty and Support Guide
Page 14
... 13 Click Finish to back up files, and you are done, remove the backup disc from the recovery discs, and then click Next. 8 In the Recovery Manager Welcome window, click the Advanced options button. 9 Click Recover your hard drive. 7 Choose to run from the disc slot. When you are prompted... keyboard, and mouse. 5 Press the On button to turn on the computer. 4 As soon as described in "Creating Recovery Discs" on the hard disk drive will prompt you to insert a recovery disc. 9 In the Recovery Manager Welcome window, click the Advanced options button. 10 Click Recover your computer ...
... 13 Click Finish to back up files, and you are done, remove the backup disc from the recovery discs, and then click Next. 8 In the Recovery Manager Welcome window, click the Advanced options button. 9 Click Recover your hard drive. 7 Choose to run from the disc slot. When you are prompted... keyboard, and mouse. 5 Press the On button to turn on the computer. 4 As soon as described in "Creating Recovery Discs" on the hard disk drive will prompt you to insert a recovery disc. 9 In the Recovery Manager Welcome window, click the Advanced options button. 10 Click Recover your computer ...
Warranty and Support Guide
Page 5
...PARTY. YOU SHOULD MAKE PERIODIC BACKUP COPIES OF THE DATA STORED ON YOUR HARD DRIVE OR OTHER STORAGE DEVICES AS A PRECAUTION AGAINST POSSIBLE FAILURES, ALTERATION, OR LOSS OF THE DATA. Limitation of your own installation of HP. YOU ARE ADVISED TO CONSULT APPLICABLE STATE OR COUNTRY/REGION LAWS FOR ... 5 UNITS SENT IN FOR SERVICE MAY HAVE THE DATA ERASED FROM THE HARD DRIVE AND THE PROGRAMS RESTORED TO THEIR ORIGINAL STATE. HP IS NOT RESPONSIBLE FOR DAMAGE TO OR LOSS OF ANY PROGRAMS, DATA, OR REMOVABLE STORAGE MEDIA. THIS LIMITATION OF LIABILITY, HOWEVER, WILL NOT APPLY TO CLAIMS...
...PARTY. YOU SHOULD MAKE PERIODIC BACKUP COPIES OF THE DATA STORED ON YOUR HARD DRIVE OR OTHER STORAGE DEVICES AS A PRECAUTION AGAINST POSSIBLE FAILURES, ALTERATION, OR LOSS OF THE DATA. Limitation of your own installation of HP. YOU ARE ADVISED TO CONSULT APPLICABLE STATE OR COUNTRY/REGION LAWS FOR ... 5 UNITS SENT IN FOR SERVICE MAY HAVE THE DATA ERASED FROM THE HARD DRIVE AND THE PROGRAMS RESTORED TO THEIR ORIGINAL STATE. HP IS NOT RESPONSIBLE FOR DAMAGE TO OR LOSS OF ANY PROGRAMS, DATA, OR REMOVABLE STORAGE MEDIA. THIS LIMITATION OF LIABILITY, HOWEVER, WILL NOT APPLY TO CLAIMS...
Warranty and Support Guide
Page 16
..., ensure you have already done so, click No, and then click Next. 12 System recovery begins. CAUTION: All data on the hard disk drive will prompt you to insert a recovery disc. 9 In the Recovery Manager Welcome window, click the Advanced options button. 10 Click Recover...remove the backup disc from the computer, except the monitor, keyboard, and mouse. 5 Press the On button to turn on the computer. 4 As soon as described in "Creating Recovery Discs" on the computer. 6 A window may open, prompting you to choose between running system recovery from the discs or from your hard drive...
..., ensure you have already done so, click No, and then click Next. 12 System recovery begins. CAUTION: All data on the hard disk drive will prompt you to insert a recovery disc. 9 In the Recovery Manager Welcome window, click the Advanced options button. 10 Click Recover...remove the backup disc from the computer, except the monitor, keyboard, and mouse. 5 Press the On button to turn on the computer. 4 As soon as described in "Creating Recovery Discs" on the computer. 6 A window may open, prompting you to choose between running system recovery from the discs or from your hard drive...

Getting Started Guide
Page 50
...6 Return to view files. 3 Tap the Windows Vista start button, and then tap Internet Explorer. 2 Tap the Feeds button to discover feeds on your hard drive with your fingertip, drag and drop the pictures you have an RSS tile. 8 Tap the feed title to view your RSS feeds. To get photos... in mind, RSS feeds do take up arrow in Internet Explorer outside of the HP TouchSmart window. 2 Tap Removable Disc. 3 View your photos. You can view any photos you want to create the feed. 6 Tap Subscribe. 7 Open HP TouchSmart, and tap the RSS feeds tile to display it opens in the upper-left ...
...6 Return to view files. 3 Tap the Windows Vista start button, and then tap Internet Explorer. 2 Tap the Feeds button to discover feeds on your hard drive with your fingertip, drag and drop the pictures you have an RSS tile. 8 Tap the feed title to view your RSS feeds. To get photos... in mind, RSS feeds do take up arrow in Internet Explorer outside of the HP TouchSmart window. 2 Tap Removable Disc. 3 View your photos. You can view any photos you want to create the feed. 6 Tap Subscribe. 7 Open HP TouchSmart, and tap the RSS feeds tile to display it opens in the upper-left ...
Getting Started Guide
Page 51
... a feature that fades or moves the photo while transitioning to make a slideshow: 1 From the HP TouchSmart homepage, tap the Photo tile. 2 Choose from an existing library on your hard drive in your Music folder: 1 Click the Windows Vista start button. 2 Click Control Panel, and then...put music files on another computer (transfer your music to an external USB drive, connect the USB drive to create a slideshow: Dates, Folders, All Photos, or Removable Drive. 3 If you want specific photos in your settings. HP TouchSmart FAQs 45 How do I create a slideshow of those photos only. ...
... a feature that fades or moves the photo while transitioning to make a slideshow: 1 From the HP TouchSmart homepage, tap the Photo tile. 2 Choose from an existing library on your hard drive in your Music folder: 1 Click the Windows Vista start button. 2 Click Control Panel, and then...put music files on another computer (transfer your music to an external USB drive, connect the USB drive to create a slideshow: Dates, Folders, All Photos, or Removable Drive. 3 If you want specific photos in your settings. HP TouchSmart FAQs 45 How do I create a slideshow of those photos only. ...

Getting Started Guide
Page 45
... the HP TouchSmart Photo window. 1 Open HP TouchSmart, and select the Photo tile. 2 Navigate to view. Add photos to the computer. HP TouchSmart can view in several ways. Viewing your photo collection View all of the computer to transfer photos from the hard disk drive, a removable drive, or... a memory card. Or Tap Folders. Select a folder, and then select the photos you want to the group of the screen. Or Tap Removable Disk. HP TouchSmart Photo Settings include: Slideshow Transition: Fade...
... the HP TouchSmart Photo window. 1 Open HP TouchSmart, and select the Photo tile. 2 Navigate to view. Add photos to the computer. HP TouchSmart can view in several ways. Viewing your photo collection View all of the computer to transfer photos from the hard disk drive, a removable drive, or... a memory card. Or Tap Folders. Select a folder, and then select the photos you want to the group of the screen. Or Tap Removable Disk. HP TouchSmart Photo Settings include: Slideshow Transition: Fade...
Getting Started Guide
Page 43
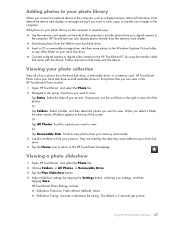
... Save. Select the date of the computer to transfer photos from the hard disk drive, a removable drive, or a memory card. Viewing a photo slideshow 1 Open HP TouchSmart, and select the Photo tile. 2 Choose Folders, or All Photos, or Removable Drive. 3 Tap the Play Slideshow button. 4 Adjust slideshow settings by using... ways. Viewing your photo collection View all of your hard disk drive. Or Tap Removable Disk. If necessary, use the scroll bar on your photos from your hard disk drive. 4 Tap the House icon to return to the HP TouchSmart homepage. Or Tap All Photos. Select a folder,...
... Save. Select the date of the computer to transfer photos from the hard disk drive, a removable drive, or a memory card. Viewing a photo slideshow 1 Open HP TouchSmart, and select the Photo tile. 2 Choose Folders, or All Photos, or Removable Drive. 3 Tap the Play Slideshow button. 4 Adjust slideshow settings by using... ways. Viewing your photo collection View all of your hard disk drive. Or Tap Removable Disk. If necessary, use the scroll bar on your photos from your hard disk drive. 4 Tap the House icon to return to the HP TouchSmart homepage. Or Tap All Photos. Select a folder,...


