
User Guide
Page 8
... The wireless network connection is not working 65 Contacting customer support ...65 Appendix B Cleaning your computer ...66 Cleaning the display ...66 Cleaning the sides and cover ...66 Cleaning the TouchPad and keyboard 66 Appendix C Traveling with the computer ...67 viii
... The wireless network connection is not working 65 Contacting customer support ...65 Appendix B Cleaning your computer ...66 Cleaning the display ...66 Cleaning the sides and cover ...66 Cleaning the TouchPad and keyboard 66 Appendix C Traveling with the computer ...67 viii

User Guide
Page 76
Be sure that the display is dry before closing the display. Cleaning the sides and cover To clean and disinfect the sides and cover, use a soft microfiber cloth or a static-free cloth without oil (such as a chamois) moistened with an alcohol-free glass cleaner or use a can... TouchPad and keyboard CAUTION: When cleaning the TouchPad and keyboard, do not use a circular motion to clean the keyboard. NOTE: When cleaning the cover of electric shock or damage to remove dust, lint, and particles from the keyboard, use an acceptable germicidal disposable wipe. B Cleaning your computer
Be sure that the display is dry before closing the display. Cleaning the sides and cover To clean and disinfect the sides and cover, use a soft microfiber cloth or a static-free cloth without oil (such as a chamois) moistened with an alcohol-free glass cleaner or use a can... TouchPad and keyboard CAUTION: When cleaning the TouchPad and keyboard, do not use a circular motion to clean the keyboard. NOTE: When cleaning the cover of electric shock or damage to remove dust, lint, and particles from the keyboard, use an acceptable germicidal disposable wipe. B Cleaning your computer

HP Folio 13 - Maintenance and Service Guide
Page 6
Service tag ...26 Computer feet ...27 Base enclosure ...27 Keyboard ...29 Top cover ...31 Power button board 33 TouchPad button board 34 Battery ...35 Display panel ...36 WLAN module ...38 USB/Audio board 40 RTC battery ...41 Hard ... Setup Utility 54 Updating the BIOS 54 Determining the BIOS version 55 Downloading a BIOS update 55 Using System Diagnostics ...56 6 Specifications ...57 Computer specifications ...57 13.3-inch display specifications 58 7 Backup and recovery ...59 Restoring the system ...60 Creating restore media ...60 Performing a system recovery 61 vi
Service tag ...26 Computer feet ...27 Base enclosure ...27 Keyboard ...29 Top cover ...31 Power button board 33 TouchPad button board 34 Battery ...35 Display panel ...36 WLAN module ...38 USB/Audio board 40 RTC battery ...41 Hard ... Setup Utility 54 Updating the BIOS 54 Determining the BIOS version 55 Downloading a BIOS update 55 Using System Diagnostics ...56 6 Specifications ...57 Computer specifications ...57 13.3-inch display specifications 58 7 Backup and recovery ...59 Restoring the system ...60 Creating restore media ...60 Performing a system recovery 61 vi
HP Folio 13 - Maintenance and Service Guide
Page 9
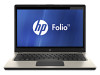
...Supports the following configuration: 4096-MB total system memory (4096×1). Supports 16:9 wide aspect ratio Support for non-flush glass panel cover (non-PMMA) One memory module slot DDR3-1333MHz single channel support (DDR3-1600 downgrade to 1333) Supports up to 4096 GB of... microphone Two integrated stereo speakers 1 1 Product description Category Product Name Processors Chipset Graphics Panel Memory Hard drives Optical drive Audio and video Description HP Folio 13 PC Intel® Core™ i5-2467M 1.6GHz processor SC turbo up to 2.3GHz (3MB L3 cache, dual core 17 W) Intel...
...Supports the following configuration: 4096-MB total system memory (4096×1). Supports 16:9 wide aspect ratio Support for non-flush glass panel cover (non-PMMA) One memory module slot DDR3-1333MHz single channel support (DDR3-1600 downgrade to 1333) Supports up to 4096 GB of... microphone Two integrated stereo speakers 1 1 Product description Category Product Name Processors Chipset Graphics Panel Memory Hard drives Optical drive Audio and video Description HP Folio 13 PC Intel® Core™ i5-2467M 1.6GHz processor SC turbo up to 2.3GHz (3MB L3 cache, dual core 17 W) Intel...

HP Folio 13 - Maintenance and Service Guide
Page 23
... power button board and cable and TouchPad and TouchPad cable): 672357-001 TouchPad button board (includes cable) 672357-001 NOTE: The top cover spare part kit includes the power button board and cable and the TouchPad and cable. Item (3) (4) (5) (6) (7) (8) (9) (10) Component Spare part number In...673656-071 For use in Switzerland 673656-BG1 For use in Denmark, Finland, Norway 673656-DH1 Power button board 672357-001 NOTE: The top cover spare part kit includes the power button board and cable and the TouchPad and cable. Power connector cable (includes bracket) 672361-001 Memory ...
... power button board and cable and TouchPad and TouchPad cable): 672357-001 TouchPad button board (includes cable) 672357-001 NOTE: The top cover spare part kit includes the power button board and cable and the TouchPad and cable. Item (3) (4) (5) (6) (7) (8) (9) (10) Component Spare part number In...673656-071 For use in Switzerland 673656-BG1 For use in Denmark, Finland, Norway 673656-DH1 Power button board 672357-001 NOTE: The top cover spare part kit includes the power button board and cable and the TouchPad and cable. Power connector cable (includes bracket) 672361-001 Memory ...

HP Folio 13 - Maintenance and Service Guide
Page 28
...071 673656-121 673656-161 673656-171 673656-251 673656-281 673656-291 673656-AB1 673656-AD1 673656-B31 673656-BG1 673656-DH1 Description Top cover in black finish (includes power button board and cable and TouchPad and TouchPad cable) USB/Audio board Screw Kit Power connector cable (includes ...bracket) Thermal pad Rubber Kit (includes two rear corner covers and four rubber feet) 128-GB solid-state drive only (does not include bracket, connector cable, isolators, or screws) Keyboard in black finish ...
...071 673656-121 673656-161 673656-171 673656-251 673656-281 673656-291 673656-AB1 673656-AD1 673656-B31 673656-BG1 673656-DH1 Description Top cover in black finish (includes power button board and cable and TouchPad and TouchPad cable) USB/Audio board Screw Kit Power connector cable (includes ...bracket) Thermal pad Rubber Kit (includes two rear corner covers and four rubber feet) 128-GB solid-state drive only (does not include bracket, connector cable, isolators, or screws) Keyboard in black finish ...

HP Folio 13 - Maintenance and Service Guide
Page 30
... removing or inserting a hard drive, shut down through the operating system. Even if the spark is off or in Hibernation, turn the computer on surfaces covered with care. If you are discharged of sensitivity. After removing a hard drive, an optical drive, or a diskette drive, place it down the computer. Circuitry design...
... removing or inserting a hard drive, shut down through the operating system. Even if the spark is off or in Hibernation, turn the computer on surfaces covered with care. If you are discharged of sensitivity. After removing a hard drive, an optical drive, or a diskette drive, place it down the computer. Circuitry design...

HP Folio 13 - Maintenance and Service Guide
Page 32
When grounding is wired to ground and that proper materials are selected to dissipate electric charges. Workstation guidelines Follow these grounding workstation guidelines: ● Cover the workstation with conductive or approved containers or packaging. ● Keep ESD-sensitive parts in their containers until the parts arrive at static-free workstations. &#...
When grounding is wired to ground and that proper materials are selected to dissipate electric charges. Workstation guidelines Follow these grounding workstation guidelines: ● Cover the workstation with conductive or approved containers or packaging. ● Keep ESD-sensitive parts in their containers until the parts arrive at static-free workstations. &#...

HP Folio 13 - Maintenance and Service Guide
Page 37
... the AC adapter from the computer. At the right side of the computer, insert a screwdriver or similar thin tool into the top cover release area, pressing upwards until the top cover starts to the computer. 3. Keyboard NOTE: The keyboard spare part kit includes a keyboard cable. Remove the base enclosure screws (see Base...
... the AC adapter from the computer. At the right side of the computer, insert a screwdriver or similar thin tool into the top cover release area, pressing upwards until the top cover starts to the computer. 3. Keyboard NOTE: The keyboard spare part kit includes a keyboard cable. Remove the base enclosure screws (see Base...

HP Folio 13 - Maintenance and Service Guide
Page 38
Reverse this procedure to release the keyboard from the top cover. 5. 4. Remove the keyboard (3). Lift the rear edge of the top cover, and then press upwards behind the Backspace key to install the keyboard. 30 Chapter 4 Removal and replacement procedures Lift the right side of the keyboard, gently swing the keyboard forward slightly, and disconnect the keyboard's zero insertion force (ZIF) cable (1). 6. Disconnect the keyboard light cable (2) . 7.
Reverse this procedure to release the keyboard from the top cover. 5. 4. Remove the keyboard (3). Lift the rear edge of the top cover, and then press upwards behind the Backspace key to install the keyboard. 30 Chapter 4 Removal and replacement procedures Lift the right side of the keyboard, gently swing the keyboard forward slightly, and disconnect the keyboard's zero insertion force (ZIF) cable (1). 6. Disconnect the keyboard light cable (2) . 7.

HP Folio 13 - Maintenance and Service Guide
Page 39
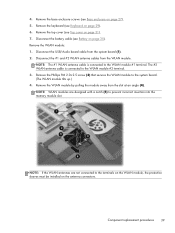
...on page 34) are unsure whether the computer is off or in Hibernation, turn the computer on page 29). Description Top cover Spare part number 672357-001 Before removing the top cover, follow these steps: 1. Turn the computer right-side up, with the front toward you are removed from the computer....power from the computer by first unplugging the power cord from the AC outlet and then unplugging the AC adapter from the defective top cover and installed on page 27). 5. Remove the keyboard (see Keyboard on , and then shut it down the computer. Component replacement procedures 31 If...
...on page 34) are unsure whether the computer is off or in Hibernation, turn the computer on page 29). Description Top cover Spare part number 672357-001 Before removing the top cover, follow these steps: 1. Turn the computer right-side up, with the front toward you are removed from the computer....power from the computer by first unplugging the power cord from the AC outlet and then unplugging the AC adapter from the defective top cover and installed on page 27). 5. Remove the keyboard (see Keyboard on , and then shut it down the computer. Component replacement procedures 31 If...

HP Folio 13 - Maintenance and Service Guide
Page 40
3. Reverse this procedure to install the top cover. 32 Chapter 4 Removal and replacement procedures Lift the rear edge of the top cover until the left and right sides disengage from the base enclosure, and remove the top cover. Disconnect the following cables: (1) Power button board cable (2) TouchPad button board cable 4.
3. Reverse this procedure to install the top cover. 32 Chapter 4 Removal and replacement procedures Lift the rear edge of the top cover until the left and right sides disengage from the base enclosure, and remove the top cover. Disconnect the following cables: (1) Power button board cable (2) TouchPad button board cable 4.
HP Folio 13 - Maintenance and Service Guide
Page 41
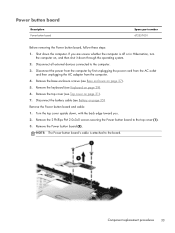
... the computer is attached to the board. Remove the keyboard (see Top cover on page 29). 6. Remove the Power button board and cable: 1. If you . 2. Turn the top cover upside down through the operating system. 2. Remove the top cover (see Keyboard on page 31). 7. Remove the Power button board (2). ...Disconnect all external devices connected to the top cover (1). 3. Remove the 2 Phillips PM 2.0x3x0 screws securing the Power button board to the computer. 3. Disconnect the battery cable (see Base enclosure on ...
... the computer is attached to the board. Remove the keyboard (see Top cover on page 29). 6. Remove the Power button board and cable: 1. If you . 2. Turn the top cover upside down through the operating system. 2. Remove the top cover (see Keyboard on page 31). 7. Remove the Power button board (2). ...Disconnect all external devices connected to the top cover (1). 3. Remove the 2 Phillips PM 2.0x3x0 screws securing the Power button board to the computer. 3. Disconnect the battery cable (see Base enclosure on ...

HP Folio 13 - Maintenance and Service Guide
Page 42
...the computer. Remove the TouchPad button board and cable (3). Remove the keyboard (see Keyboard on page 31). Reverse this procedure to the top cover. 3. TouchPad button board Description TouchPad button board (includes cable) Spare part number 672357-001 Before removing the TouchPad button board, follow these... the back edge toward you are unsure whether the computer is off or in Hibernation, turn the computer on page 27). 5. Remove the top cover (see Base enclosure on , and then shut it down through the operating system. 2. If you . 2. Remove the TouchPad bracket (2). 4. Remove...
...the computer. Remove the TouchPad button board and cable (3). Remove the keyboard (see Keyboard on page 31). Reverse this procedure to the top cover. 3. TouchPad button board Description TouchPad button board (includes cable) Spare part number 672357-001 Before removing the TouchPad button board, follow these... the back edge toward you are unsure whether the computer is off or in Hibernation, turn the computer on page 27). 5. Remove the top cover (see Base enclosure on , and then shut it down through the operating system. 2. If you . 2. Remove the TouchPad bracket (2). 4. Remove...

HP Folio 13 - Maintenance and Service Guide
Page 43
Disconnect all external devices connected to the computer (1). Remove the top cover (see Base enclosure on , and then shut it down the computer. Disconnect the battery cable. 3. Disconnect the power from the computer by first unplugging the ... toward you are unsure whether the computer is off or in Hibernation, turn the computer on page 27). 5. Remove the base enclosure screws (see Top cover on page 29). 6. Remove the 2 Phillips PM 2.0×3.0 screws that secure the battery to the computer. 3. If you . 2. Remove the battery: 1. Battery Description 6-cell, 59...
Disconnect all external devices connected to the computer (1). Remove the top cover (see Base enclosure on , and then shut it down the computer. Disconnect the battery cable. 3. Disconnect the power from the computer by first unplugging the ... toward you are unsure whether the computer is off or in Hibernation, turn the computer on page 27). 5. Remove the base enclosure screws (see Top cover on page 29). 6. Remove the 2 Phillips PM 2.0×3.0 screws that secure the battery to the computer. 3. If you . 2. Remove the battery: 1. Battery Description 6-cell, 59...
HP Folio 13 - Maintenance and Service Guide
Page 44
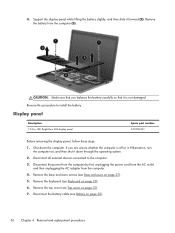
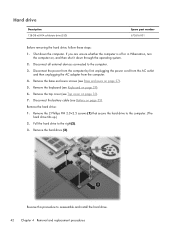
...power cord from the AC outlet and then unplugging the AC adapter from the computer (3). Remove the keyboard (see Top cover on page 31). 7. Remove the top cover (see Keyboard on page 35). 36 Chapter 4 Removal and replacement procedures If you balance the battery carefully so that... the computer. 4. Shut down through the operating system. 2. Remove the base enclosure screws (see Battery on page 29). 6. Display panel Description 13.3-in Hibernation, turn the computer on page 27). 5. CAUTION: Make sure that you are unsure whether the computer is not damaged. Disconnect all ...
...power cord from the AC outlet and then unplugging the AC adapter from the computer (3). Remove the keyboard (see Top cover on page 31). 7. Remove the top cover (see Keyboard on page 35). 36 Chapter 4 Removal and replacement procedures If you balance the battery carefully so that... the computer. 4. Shut down through the operating system. 2. Remove the base enclosure screws (see Battery on page 29). 6. Display panel Description 13.3-in Hibernation, turn the computer on page 27). 5. CAUTION: Make sure that you are unsure whether the computer is not damaged. Disconnect all ...
HP Folio 13 - Maintenance and Service Guide
Page 47
... must be installed on page 35). Remove the base enclosure screws (see Keyboard on page 31). 7. Disconnect the battery cable (see Top cover on page 29). 6. NOTE: The #1 WLAN antenna cable is connected to the WLAN module #1 terminal. Component replacement procedures 39 Remove the top... cover (see Battery on the antenna connectors. The #2 WLAN antenna cable is connected to the WLAN module #2 terminal. 3. NOTE: If the WLAN antennas are...
... must be installed on page 35). Remove the base enclosure screws (see Keyboard on page 31). 7. Disconnect the battery cable (see Top cover on page 29). 6. NOTE: The #1 WLAN antenna cable is connected to the WLAN module #1 terminal. Component replacement procedures 39 Remove the top... cover (see Battery on the antenna connectors. The #2 WLAN antenna cable is connected to the WLAN module #2 terminal. 3. NOTE: If the WLAN antennas are...
HP Folio 13 - Maintenance and Service Guide
Page 48
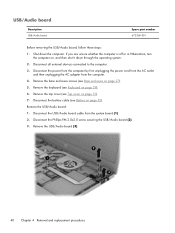
... enclosure on page 35). Remove the base enclosure screws (see Keyboard on , and then shut it down the computer. Disconnect the battery cable (see Top cover on page 31). 7. Disconnect the power from the computer by first unplugging the power cord from the AC outlet and then unplugging the AC adapter... system board (1) 2. Disconnect the USB/Audio board cable from the computer. 4. Remove the USB/Audio board (3). 40 Chapter 4 Removal and replacement procedures Remove the top cover (see Battery on page 27). 5. Remove the USB/Audio board: 1.
... enclosure on page 35). Remove the base enclosure screws (see Keyboard on , and then shut it down the computer. Disconnect the battery cable (see Top cover on page 31). 7. Disconnect the power from the computer by first unplugging the power cord from the AC outlet and then unplugging the AC adapter... system board (1) 2. Disconnect the USB/Audio board cable from the computer. 4. Remove the USB/Audio board (3). 40 Chapter 4 Removal and replacement procedures Remove the top cover (see Battery on page 27). 5. Remove the USB/Audio board: 1.
HP Folio 13 - Maintenance and Service Guide
Page 49
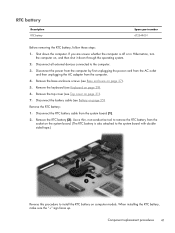
... Battery on page 31). 7. Disconnect the battery cable (see Top cover on page 35). Remove the RTC battery: 1. Remove the RTC battery (2). When installing the RTC battery, make sure the "+" sign faces up. Remove the base ...
... Battery on page 31). 7. Disconnect the battery cable (see Top cover on page 35). Remove the RTC battery: 1. Remove the RTC battery (2). When installing the RTC battery, make sure the "+" sign faces up. Remove the base ...
HP Folio 13 - Maintenance and Service Guide
Page 50
... unplugging the AC adapter from the computer. 4. Remove the keyboard (see Base enclosure on page 35). Remove the top cover (see Battery on page 27). 5. Disconnect the battery cable (see Top cover on , and then shut it down the computer. If you are unsure whether the computer is off or in Hibernation...
... unplugging the AC adapter from the computer. 4. Remove the keyboard (see Base enclosure on page 35). Remove the top cover (see Battery on page 27). 5. Disconnect the battery cable (see Top cover on , and then shut it down the computer. If you are unsure whether the computer is off or in Hibernation...

