Security - Windows Vista
Page 8
... models include a separate numeric keypad, which functions exactly like the keyboard number keys. ● A password must be set in the non-Windows Setup Utility preinstalled on the computer. For example, if you set . Use the following tips for more than one Setup Utility feature. For additional information about Windows passwords, such as they are not displayed as screen-saver passwords, select Start > Help and Support. 2 Chapter 2 Using passwords ENWW CAUTION: To prevent being locked...
... models include a separate numeric keypad, which functions exactly like the keyboard number keys. ● A password must be set in the non-Windows Setup Utility preinstalled on the computer. For example, if you set . Use the following tips for more than one Setup Utility feature. For additional information about Windows passwords, such as they are not displayed as screen-saver passwords, select Start > Help and Support. 2 Chapter 2 Using passwords ENWW CAUTION: To prevent being locked...
Drives - Windows Vista
Page 14
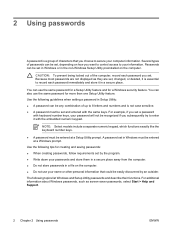
... or password for more information. 4 Improving hard drive performance Using Disk Defragmenter As you can run more efficiently. Disk Defragmenter consolidates the fragmented files and folders on the hard drive so that you use the computer, files on -screen instructions. 8 Chapter 4 Improving hard drive performance To run Disk Cleanup: 1. Refer to Windows online Help for tasks such as installing applications, running utilities, or changing Windows settings. For additional information, access the Disk...
... or password for more information. 4 Improving hard drive performance Using Disk Defragmenter As you can run more efficiently. Disk Defragmenter consolidates the fragmented files and folders on the hard drive so that you use the computer, files on -screen instructions. 8 Chapter 4 Improving hard drive performance To run Disk Cleanup: 1. Refer to Windows online Help for tasks such as installing applications, running utilities, or changing Windows settings. For additional information, access the Disk...
Notebook Tour - Windows Vista
Page 9
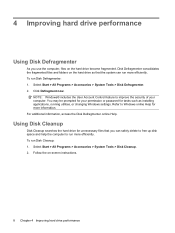
... hard drive or optical drive is pressed. Top components 3 Lights Component (1) Power lights (2)* (2) Battery light (3) Drive light (4) Caps lock light (5) Media button light (6) DVD button light (7) Previous/rewind light (8) Play/pause light (9) Next/fast forward light (10) Stop light (11) Volume mute light (12) Volume down light (13) Volume up light ENWW Description ● On: The computer is on. ● Blinking: The computer is in the Sleep state. ● Off: The computer is off or in the computer are fully charged. Blinks...
... hard drive or optical drive is pressed. Top components 3 Lights Component (1) Power lights (2)* (2) Battery light (3) Drive light (4) Caps lock light (5) Media button light (6) DVD button light (7) Previous/rewind light (8) Play/pause light (9) Next/fast forward light (10) Stop light (11) Volume mute light (12) Volume down light (13) Volume up light ENWW Description ● On: The computer is on. ● Blinking: The computer is in the Sleep state. ● Off: The computer is off or in the computer are fully charged. Blinks...
Notebook Tour - Windows Vista
Page 12
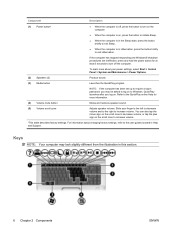
... the power button for more about changing factory settings, refer to increase volume. *This table describes factory settings. Slide your power settings, select Start > Control Panel > System and Maintenance > Power Options. (2) Speakers (2) Produce sound. (3) Media button Launches the QuickPlay program. You can also tap the minus sign on the scroll zone to decrease volume, or tap the plus sign on to Windows. To learn more information. (4) Volume mute button Mutes and restores speaker sound. (5) Volume scroll zone Adjusts speaker volume...
... the power button for more about changing factory settings, refer to increase volume. *This table describes factory settings. Slide your power settings, select Start > Control Panel > System and Maintenance > Power Options. (2) Speakers (2) Produce sound. (3) Media button Launches the QuickPlay program. You can also tap the minus sign on the scroll zone to decrease volume, or tap the plus sign on to Windows. To learn more information. (4) Volume mute button Mutes and restores speaker sound. (5) Volume scroll zone Adjusts speaker volume...
Security - Windows Vista
Page 8
... a Setup Utility prompt. NOTE: Select models include a separate numeric keypad, which functions exactly like the keyboard number keys. ● A password must be set , changed, or deleted, it is essential to record each password you set and entered with keyboard number keys, your information. Use the following tips for more than one Setup Utility feature. For additional information about Windows passwords, such as they are not displayed as screen-saver passwords, select Start > Help and Support. 2 Chapter 2 Using passwords Passwords...
... a Setup Utility prompt. NOTE: Select models include a separate numeric keypad, which functions exactly like the keyboard number keys. ● A password must be set , changed, or deleted, it is essential to record each password you set and entered with keyboard number keys, your information. Use the following tips for more than one Setup Utility feature. For additional information about Windows passwords, such as they are not displayed as screen-saver passwords, select Start > Help and Support. 2 Chapter 2 Using passwords Passwords...
Software Update, Backup, and Recovery - Windows Vista
Page 5
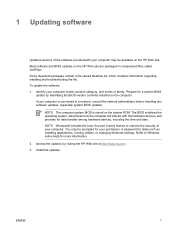
... stored on the computer. Access the updates by identifying the BIOS version currently installed on the system ROM. NOTE The computer system BIOS is connected to Windows online Help for your computer model, product category, and series or family. You may be prompted for more information. 2. Prepare for tasks such as installing applications, running utilities, or changing Windows settings. To update the software: 1. ENWW 1 If your computer...
... stored on the computer. Access the updates by identifying the BIOS version currently installed on the system ROM. NOTE The computer system BIOS is connected to Windows online Help for your computer model, product category, and series or family. You may be prompted for more information. 2. Prepare for tasks such as installing applications, running utilities, or changing Windows settings. To update the software: 1. ENWW 1 If your computer...
Software Update, Backup, and Recovery - Windows Vista
Page 6
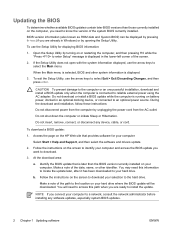
... your hard drive. CAUTION To prevent damage to a network, consult the network administrator before installing any device, cable, or cord. To download a BIOS update: 1. Open the Setup Utility by turning on or restarting the computer, and then pressing f10 while the "Press to enter Setup" message is displayed in Windows) or by unplugging the power cord from the AC outlet. To exit the Setup Utility, use the arrow keys to reliable external power using the AC adapter...
... your hard drive. CAUTION To prevent damage to a network, consult the network administrator before installing any device, cable, or cord. To download a BIOS update: 1. Open the Setup Utility by turning on or restarting the computer, and then pressing f10 while the "Press to enter Setup" message is displayed in Windows) or by unplugging the power cord from the AC outlet. To exit the Setup Utility, use the arrow keys to reliable external power using the AC adapter...
Software Update, Backup, and Recovery - Windows Vista
Page 13
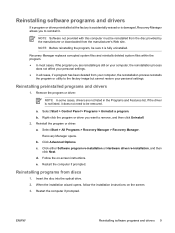
... program or driver: a. Select Start > All Programs > Recovery Manager > Recovery Manager. b. c. Follow the on the screen. 3. e. Insert the disc into the optical drive. 2. Reinstalling preinstalled programs and drivers 1. Recovery Manager opens. Click Advanced Options. Select Start > Control Panel > Programs > Uninstall a program. Right-click the program or driver you want to the factory image but cannot restore your personal settings. When the installation wizard opens, follow the installation instructions on -screen instructions. Recovery Manager replaces corrupted system...
... program or driver: a. Select Start > All Programs > Recovery Manager > Recovery Manager. b. c. Follow the on the screen. 3. e. Insert the disc into the optical drive. 2. Reinstalling preinstalled programs and drivers 1. Recovery Manager opens. Click Advanced Options. Select Start > Control Panel > Programs > Uninstall a program. Right-click the program or driver you want to the factory image but cannot restore your personal settings. When the installation wizard opens, follow the installation instructions on -screen instructions. Recovery Manager replaces corrupted system...
Software Updates - Windows Vista
Page 7
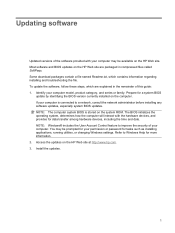
... the hardware devices, and provides for tasks such as installing applications, running utilities, or changing Windows settings. To update the software, follow these steps, which contains information regarding installing and troubleshooting the file. If your computer may be available on the HP Web site are explained in compressed files called SoftPaqs. Refer to a network, consult the network administrator before installing any software updates, especially system BIOS updates. Some download packages...
... the hardware devices, and provides for tasks such as installing applications, running utilities, or changing Windows settings. To update the software, follow these steps, which contains information regarding installing and troubleshooting the file. If your computer may be available on the HP Web site are explained in compressed files called SoftPaqs. Refer to a network, consult the network administrator before installing any software updates, especially system BIOS updates. Some download packages...

Software Updates - Windows Vista
Page 8
... those currently installed on battery power, docked in an optional docking device, or connected to the hard drive. 2 Updating software Open the Setup Utility by turning on the screen to download your computer: Select Start > Help and Support, and then select the software and drivers update. 2. Do not shut down the computer or initiate Sleep or Hibernation. Identify the BIOS update that provides software for displaying BIOS information: 1. You may need to select the Main menu. Follow the instructions on...
... those currently installed on battery power, docked in an optional docking device, or connected to the hard drive. 2 Updating software Open the Setup Utility by turning on the screen to download your computer: Select Start > Help and Support, and then select the software and drivers update. 2. Do not shut down the computer or initiate Sleep or Hibernation. Identify the BIOS update that provides software for displaying BIOS information: 1. You may need to select the Main menu. Follow the instructions on...
Touchpad and Keyboard - Windows Vista
Page 15
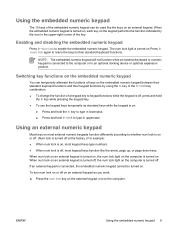
... 9 When the embedded numeric keypad is turned on, each key on the keypad performs the function indicated by using the fn key or the fn+shift key combination. ● To change the function of the key. When num lock on an external keypad is turned on, the num lock light on the computer is connected to the computer or to enable the embedded numeric keypad. NOTE: The...
... 9 When the embedded numeric keypad is turned on, each key on the keypad performs the function indicated by using the fn key or the fn+shift key combination. ● To change the function of the key. When num lock on an external keypad is turned on, the num lock light on the computer is connected to the computer or to enable the embedded numeric keypad. NOTE: The...
Wireless (Select Models Only) - Windows Vista
Page 28
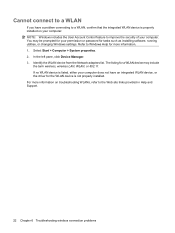
.... 1. If no WLAN device is listed, either your permission or password for tasks such as installing software, running utilities, or changing Windows settings. You may include the term wireless, wireless LAN, WLAN, or 802.11. The listing for more information on your computer: NOTE: Windows includes the User Account Control feature to improve the security of your computer. Identify the WLAN device from the Network adapters list. Select Start > Computer > System...
.... 1. If no WLAN device is listed, either your permission or password for tasks such as installing software, running utilities, or changing Windows settings. You may include the term wireless, wireless LAN, WLAN, or 802.11. The listing for more information on your computer: NOTE: Windows includes the User Account Control feature to improve the security of your computer. Identify the WLAN device from the Network adapters list. Select Start > Computer > System...

HP Pavilion dv6500, dv6600, and dv6700 Entertainment PCs - Maintenance and Service Guide
Page 31
... Spare part number Rubber Kit (not illustrated; includes base enclosure rubber feet and display bezel screw covers) 431430-001 (17) Batteries 12-cell, 8.80-Ah 451864-001 6-cell, 2.55-Ah 446507-001 6-cell, 2.20-Ah 446506-001 (18) Hard drives (include hard drive bracket and hard drive connector)...; For use in South Korea 441086-AD1 Intel 802.11a/b/g WLAN modules: ● For use in Antigua & Barbuda, Argentina, Australia, the Bahamas, Barbados, Brunei, 451861-001 Canada, Chile, the Dominican Republic, Guam, Guatemala, Hong Kong, India, Indonesia, Malaysia, Mexico, New Zealand, Panama...
... Spare part number Rubber Kit (not illustrated; includes base enclosure rubber feet and display bezel screw covers) 431430-001 (17) Batteries 12-cell, 8.80-Ah 451864-001 6-cell, 2.55-Ah 446507-001 6-cell, 2.20-Ah 446506-001 (18) Hard drives (include hard drive bracket and hard drive connector)...; For use in South Korea 441086-AD1 Intel 802.11a/b/g WLAN modules: ● For use in Antigua & Barbuda, Argentina, Australia, the Bahamas, Barbados, Brunei, 451861-001 Canada, Chile, the Dominican Republic, Guam, Guatemala, Hong Kong, India, Indonesia, Malaysia, Mexico, New Zealand, Panama...
HP Pavilion dv6500, dv6600, and dv6700 Entertainment PCs - Maintenance and Service Guide
Page 102
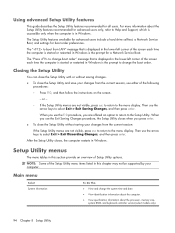
... processor, memory size, system BIOS, and keyboard controller version (select models only). 94 Chapter 5 Setup Utility Using advanced Setup Utility features This guide describes the Setup Utility features recommended for advanced users only, refer to Help and Support, which is accessible only when the computer is in Windows. Then use the arrow keys to the Setup Utility. The " to the menu display. Closing the Setup Utility You can close the Setup Utility and save your changes from the...
... processor, memory size, system BIOS, and keyboard controller version (select models only). 94 Chapter 5 Setup Utility Using advanced Setup Utility features This guide describes the Setup Utility features recommended for advanced users only, refer to Help and Support, which is accessible only when the computer is in Windows. Then use the arrow keys to the Setup Utility. The " to the menu display. Closing the Setup Utility You can close the Setup Utility and save your changes from the...
HP Pavilion dv6500, dv6600, and dv6700 Entertainment PCs - Maintenance and Service Guide
Page 155
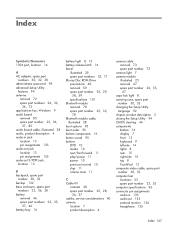
... part number 73 camera light 7 camera module illustrated 25 removal 47 spare part number 26, 35, 47 caps lock light 8 carrying case, spare part number 30, 32 changing the Setup Utility language 92 chipset, product description 2 closing the Setup Utility 94 CMOS clearing 44 components bottom 16 display 7 front 13 keyboard 9 left-side 14 lights 8 rear 15 right-side 15 top 8 TouchPad 12 composite video cable, spare part number 30, 32 computer feet locations 53 spare part number 23, 53 computer specifications...
... part number 73 camera light 7 camera module illustrated 25 removal 47 spare part number 26, 35, 47 caps lock light 8 carrying case, spare part number 30, 32 changing the Setup Utility language 92 chipset, product description 2 closing the Setup Utility 94 CMOS clearing 44 components bottom 16 display 7 front 13 keyboard 9 left-side 14 lights 8 rear 15 right-side 15 top 8 TouchPad 12 composite video cable, spare part number 30, 32 computer feet locations 53 spare part number 23, 53 computer specifications...
HP Pavilion dv6500, dv6600, and dv6700 Entertainment PCs - Maintenance and Service Guide
Page 158
...audio 4 camera 4 chipset 2 diskette drive 4 display panel 3 docking support 5 Ethernet 4 external media cards 5 graphics 2 hard drives 3 keyboard 5 memory module 3 microphone 4 modem module 4 operating system 6 optical drives 3 pointing devices 5 ports 5 power requirements 5 processors 1 product name 1 security 6 serviceability 6 wireless 4 product name 1 R rear component 15 recovery discs 131 recovery, system 131, 134 remote control, spare part numbers 30, 33 removal/replacement preliminaries 39 procedures 45 restore points 133 restoring default settings 93 RF input adapter cable, spare part...
...audio 4 camera 4 chipset 2 diskette drive 4 display panel 3 docking support 5 Ethernet 4 external media cards 5 graphics 2 hard drives 3 keyboard 5 memory module 3 microphone 4 modem module 4 operating system 6 optical drives 3 pointing devices 5 ports 5 power requirements 5 processors 1 product name 1 security 6 serviceability 6 wireless 4 product name 1 R rear component 15 recovery discs 131 recovery, system 131, 134 remote control, spare part numbers 30, 33 removal/replacement preliminaries 39 procedures 45 restore points 133 restoring default settings 93 RF input adapter cable, spare part...
HP Pavilion dv9500, dv9600, and dv9700 Entertainment PCs - Maintenance and Service Guide
Page 25
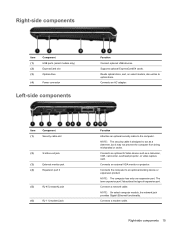
... a network cable. Item (1) Component Security cable slot (2) S-Video-out jack (3) External monitor port (4) Expansion port 3 (5) RJ-45 (network) jack (6) RJ-11 (modem) jack Function Attaches an optional security cable to an optional docking device or expansion product. Connects an external VGA monitor or projector. The term expansion port 3 describes the type of expansion port. Connects a modem cable. Reads optical discs, and, on select models, also writes to act as a television, VCR, camcorder, overhead projector, or video capture card. Connects an optional S-Video device...
... a network cable. Item (1) Component Security cable slot (2) S-Video-out jack (3) External monitor port (4) Expansion port 3 (5) RJ-45 (network) jack (6) RJ-11 (modem) jack Function Attaches an optional security cable to an optional docking device or expansion product. Connects an external VGA monitor or projector. The term expansion port 3 describes the type of expansion port. Connects a modem cable. Reads optical discs, and, on select models, also writes to act as a television, VCR, camcorder, overhead projector, or video capture card. Connects an optional S-Video device...

HP Pavilion dv9500, dv9600, and dv9700 Entertainment PCs - Maintenance and Service Guide
Page 118
... use either of the following procedures: ◦ Press f10, and then follow the instructions on the screen. - Setup Utility menus The menu tables in Windows. The Setup Utility features available for advanced users include a hard drive self-test, a Network Service Boot, and settings for all users. The " to boot from LAN" message that is displayed in the lower-left corner of the Setup Utility menu items listed in Windows is started or restarted in Windows. After the Setup Utility...
... use either of the following procedures: ◦ Press f10, and then follow the instructions on the screen. - Setup Utility menus The menu tables in Windows. The Setup Utility features available for advanced users include a hard drive self-test, a Network Service Boot, and settings for all users. The " to boot from LAN" message that is displayed in the lower-left corner of the Setup Utility menu items listed in Windows is started or restarted in Windows. After the Setup Utility...
HP Pavilion dv9500, dv9600, and dv9700 Entertainment PCs - Maintenance and Service Guide
Page 175
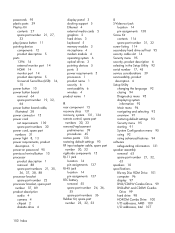
... media cards 7 graphics 2 hard drives 4 keyboard 8 memory module 4 modem 6 operating system 8 optical drives 5 pointing device 8 ports 7 power requirements 8 processors 1 product name 1 security 8 serviceability 8 wireless 6 product name 1 Q QuickPlay buttons 11 R rear USB board removal 90 spare part number 22, 37, 90 rear USB board cable, illustrated 29 recovery discs 146 recovery, system 146, 149 remote control spare part numbers 34 remote control, spare part numbers 31, 34 removal/replacement preliminaries 40 procedures 46 restore points 148 restoring default settings 107 RF input adapter...
... media cards 7 graphics 2 hard drives 4 keyboard 8 memory module 4 modem 6 operating system 8 optical drives 5 pointing device 8 ports 7 power requirements 8 processors 1 product name 1 security 8 serviceability 8 wireless 6 product name 1 Q QuickPlay buttons 11 R rear USB board removal 90 spare part number 22, 37, 90 rear USB board cable, illustrated 29 recovery discs 146 recovery, system 146, 149 remote control spare part numbers 34 remote control, spare part numbers 31, 34 removal/replacement preliminaries 40 procedures 46 restore points 148 restoring default settings 107 RF input adapter...
Multimedia - Windows Vista
Page 27
... playback 19 Q Quick Launch buttons 5 QuickPlay 5 J jacks audio-in (microphone) 1, 3 audio-out (headphone) 1, 3 S-Video-out 7 M media activity buttons 14 media activity hotkeys 13 media button 5 microphone, internal 1 microphones, supported 3 monitor, connecting 6 multimedia software described 16 using 18 R region codes, DVD 20 S S-Video-out jack 7 software multimedia 16 using 18 speakers 1 T TV 3 V VCR 3 volume, adjusting 4 O optical disc inserting 10 removing, with power 11 removing, without power 12 writing to 16 optical drive playing 19 protecting 16 P ports external monitor 6 ENWW...
... playback 19 Q Quick Launch buttons 5 QuickPlay 5 J jacks audio-in (microphone) 1, 3 audio-out (headphone) 1, 3 S-Video-out 7 M media activity buttons 14 media activity hotkeys 13 media button 5 microphone, internal 1 microphones, supported 3 monitor, connecting 6 multimedia software described 16 using 18 R region codes, DVD 20 S S-Video-out jack 7 software multimedia 16 using 18 speakers 1 T TV 3 V VCR 3 volume, adjusting 4 O optical disc inserting 10 removing, with power 11 removing, without power 12 writing to 16 optical drive playing 19 protecting 16 P ports external monitor 6 ENWW...


