HP ENVY 15 User Guide - Windows 7
Page 21
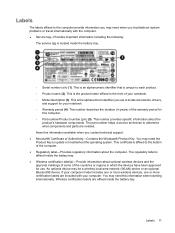
...or an optional Bluetooth® device. Have this information available when you contact technical support. ● Microsoft® Certificate of your notebook. ◦ Model description (3). This certificate is located inside the battery bay. An optional device may need the Product Key to ... computer model includes one or more wireless devices, one or more certification labels are needed. Labels 11 This number provides specific information about the product's hardware components. Labels The labels affixed to the computer provide information you may need when you troubleshoot...
...or an optional Bluetooth® device. Have this information available when you contact technical support. ● Microsoft® Certificate of your notebook. ◦ Model description (3). This certificate is located inside the battery bay. An optional device may need the Product Key to ... computer model includes one or more wireless devices, one or more certification labels are needed. Labels 11 This number provides specific information about the product's hardware components. Labels The labels affixed to the computer provide information you may need when you troubleshoot...

HP ENVY 15 User Guide - Windows 7
Page 35
.... Action keys are assigned to Setup Utility (BIOS) on page 84 for additional information. Refer to specific keys on the application you are using, pressing fn and one of the action keys will open a specific shortcut menu within that are customized actions that application. Decreases the screen brightness level incrementally when you...
.... Action keys are assigned to Setup Utility (BIOS) on page 84 for additional information. Refer to specific keys on the application you are using, pressing fn and one of the action keys will open a specific shortcut menu within that are customized actions that application. Decreases the screen brightness level incrementally when you...

HP ENVY 15 User Guide - Windows 7
Page 57
...support 2 batteries: ● One lithium-ion primary battery is included with the computer, a replacement battery provided by HP, or a compatible battery purchased from HP. Finding battery information in Help and Support Help and Support provides the following tools and information about the battery: ...if the AC adapter is disconnected from external power. WARNING! If the computer contains a charged battery and is running on battery types, specifications, life cycles, and capacity To access battery information: ▲ Select Start > Help and Support > Learn > Power Plans: Frequently ...
...support 2 batteries: ● One lithium-ion primary battery is included with the computer, a replacement battery provided by HP, or a compatible battery purchased from HP. Finding battery information in Help and Support Help and Support provides the following tools and information about the battery: ...if the AC adapter is disconnected from external power. WARNING! If the computer contains a charged battery and is running on battery types, specifications, life cycles, and capacity To access battery information: ▲ Select Start > Help and Support > Learn > Power Plans: Frequently ...

HP ENVY 15 User Guide - Windows 7
Page 73
...area, at the far right of information or an unresponsive system, use the following procedure to a USB connector, do not pull on your HP ENVY 15 comes equipped with the device. External devices Using a USB device NOTE: If your computer, select Start > Control Panel > Network and ... eSATA/USB 2.0 port may require additional support software, which support USB 1.0, USB 1.1, USB 2.0 devices. To add more information about device-specific software, refer to remove the USB device. External devices 63 To view the shared optical drive on the cable to the manufacturer's instructions....
...area, at the far right of information or an unresponsive system, use the following procedure to a USB connector, do not pull on your HP ENVY 15 comes equipped with the device. External devices Using a USB device NOTE: If your computer, select Start > Control Panel > Network and ... eSATA/USB 2.0 port may require additional support software, which support USB 1.0, USB 1.1, USB 2.0 devices. To add more information about device-specific software, refer to remove the USB device. External devices 63 To view the shared optical drive on the cable to the manufacturer's instructions....

HP ENVY 15 User Guide - Windows 7
Page 74
... the computer, connect the eSATA cable for the device to safely remove the device. 64 Chapter 7 Drives and external devices For more information about device-specific software, refer to remove the hardware device. 3. Click the Safely Remove Hardware and Eject Media icon in the list.
... the computer, connect the eSATA cable for the device to safely remove the device. 64 Chapter 7 Drives and external devices For more information about device-specific software, refer to remove the hardware device. 3. Click the Safely Remove Hardware and Eject Media icon in the list.

HP ENVY 15 User Guide - Windows 7
Page 97
... Fan Always On Fast Charge Mode To do this Enter, change the system time and date. ● View identification information about the computer. ● View specification information, such as processor information, memory size, and system BIOS. When enabled, the computer fan will always be supported by your computer. Setup Utility menus...
... Fan Always On Fast Charge Mode To do this Enter, change the system time and date. ● View identification information about the computer. ● View specification information, such as processor information, memory size, and system BIOS. When enabled, the computer fan will always be supported by your computer. Setup Utility menus...

HP ENVY 15 User Guide - Windows 7
Page 104
... if you want to provide increased protection for your permission or password for your system files and settings. NOTE: Recovering to a restore point (created at a specific point in time. Select Start > Control Panel > System and Security > System. 2. Click Create. 6. Restore to a previous date and time To revert to an earlier restore...
... if you want to provide increased protection for your permission or password for your system files and settings. NOTE: Recovering to a restore point (created at a specific point in time. Select Start > Control Panel > System and Security > System. 2. Click Create. 6. Restore to a previous date and time To revert to an earlier restore...


