
Hardware Reference Guide
Page 5
... Tower (TWR) ...1 Small Form Factor (SFF) ...2 Ultra-slim Desktop (USDT 2 Tower (TWR) front panel components 3 Small Form Factor (SFF) front panel components 4 Ultra-slim Desktop (USDT) front panel components 5 Tower (TWR) rear panel components 6 Small Form Factor (SFF) rear panel components 7 Ultra-slim Desktop ...reader components ...9 Keyboard ...10 Using the Windows logo key 10 Serial number location ...12 Tower (TWR) ...12 Small Form Factor (SFF 12 Ultra-slim Desktop (USDT 13 2 Tower (TWR) hardware upgrades ...14 Serviceability features ...14 Warnings and cautions ...14 Removing the...
... Tower (TWR) ...1 Small Form Factor (SFF) ...2 Ultra-slim Desktop (USDT 2 Tower (TWR) front panel components 3 Small Form Factor (SFF) front panel components 4 Ultra-slim Desktop (USDT) front panel components 5 Tower (TWR) rear panel components 6 Small Form Factor (SFF) rear panel components 7 Ultra-slim Desktop ...reader components ...9 Keyboard ...10 Using the Windows logo key 10 Serial number location ...12 Tower (TWR) ...12 Small Form Factor (SFF 12 Ultra-slim Desktop (USDT 13 2 Tower (TWR) hardware upgrades ...14 Serviceability features ...14 Warnings and cautions ...14 Removing the...

Hardware Reference Guide
Page 6
... hard drive 44 Installing a 3.5-inch or 2.5-inch hard drive 45 Installing a security lock ...50 Cable lock ...50 Padlock ...50 HP business PC security lock 51 Front bezel security ...55 3 Small Form Factor (SFF) hardware upgrades 57 Serviceability features ...57 Warnings and cautions ...57 Removing the computer access panel 58 Replacing the computer...
... hard drive 44 Installing a 3.5-inch or 2.5-inch hard drive 45 Installing a security lock ...50 Cable lock ...50 Padlock ...50 HP business PC security lock 51 Front bezel security ...55 3 Small Form Factor (SFF) hardware upgrades 57 Serviceability features ...57 Warnings and cautions ...57 Removing the computer access panel 58 Replacing the computer...
Hardware Reference Guide
Page 12
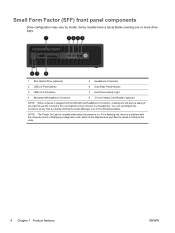
..., there is a problem with the computer and it is displaying a diagnostic code. You can reconfigure the connector at any time by model. Small Form Factor (SFF) front panel components Drive configuration may vary by double-clicking the Audio Manager icon in the Windows taskbar.
..., there is a problem with the computer and it is displaying a diagnostic code. You can reconfigure the connector at any time by model. Small Form Factor (SFF) front panel components Drive configuration may vary by double-clicking the Audio Manager icon in the Windows taskbar.

Hardware Reference Guide
Page 15
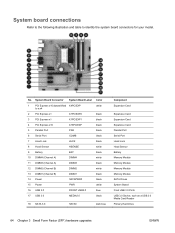
...powered audio devices (green) 6 Power Cord Connector NOTE: An optional second serial port and an optional parallel port are available from HP. When a graphics card is plugged into the blue Line-In Audio Connector, a dialog box will display POST messages. The system... doubleclicking the Audio Manager icon in Computer Setup. You can be used at any time by changing settings in the Windows taskbar. Small Form Factor (SFF) rear panel components 1 PS/2 Mouse Connector (green) 7 PS/2 Keyboard Connector (purple) 2 RJ-45 Network Connector 8 DisplayPort Monitor Connectors 3 Serial ...
...powered audio devices (green) 6 Power Cord Connector NOTE: An optional second serial port and an optional parallel port are available from HP. When a graphics card is plugged into the blue Line-In Audio Connector, a dialog box will display POST messages. The system... doubleclicking the Audio Manager icon in Computer Setup. You can be used at any time by changing settings in the Windows taskbar. Small Form Factor (SFF) rear panel components 1 PS/2 Mouse Connector (green) 7 PS/2 Keyboard Connector (purple) 2 RJ-45 Network Connector 8 DisplayPort Monitor Connectors 3 Serial ...

Hardware Reference Guide
Page 20
Tower (TWR) Small Form Factor (SFF) 12 Chapter 1 Product features ENWW Keep these numbers available for use when contacting customer service for assistance. Windows Logo Key + Windows 7 - (on numpad) Zooms out ...
Tower (TWR) Small Form Factor (SFF) 12 Chapter 1 Product features ENWW Keep these numbers available for use when contacting customer service for assistance. Windows Logo Key + Windows 7 - (on numpad) Zooms out ...

Hardware Reference Guide
Page 65
... cool before touching. To reduce the risk of serious injury, read all times. This guide is easily accessible at http://www.hp.com/ergo. Energized and moving parts inside. CAUTION: Static electricity can damage the electrical components of static electricity by briefly touching ...the Safety & Comfort Guide. When the computer is plugged into the network interface controller (NIC) receptacles. 3 Small Form Factor (SFF) hardware upgrades Serviceability features The computer includes features that make it easy to the equipment before removing the enclosure. Do not plug ...
... cool before touching. To reduce the risk of serious injury, read all times. This guide is easily accessible at http://www.hp.com/ergo. Energized and moving parts inside. CAUTION: Static electricity can damage the electrical components of static electricity by briefly touching ...the Safety & Comfort Guide. When the computer is plugged into the network interface controller (NIC) receptacles. 3 Small Form Factor (SFF) hardware upgrades Serviceability features The computer includes features that make it easy to the equipment before removing the enclosure. Do not plug ...

Hardware Reference Guide
Page 66
... computer. 5. Remove/disengage any external devices. 4. Turn off the computer properly through the operating system, then turn off the computer (2). 58 Chapter 3 Small Form Factor (SFF) hardware upgrades ENWW If the computer is plugged into an active AC outlet. Disconnect the power cord from the computer. 3. You must remove the access...
... computer. 5. Remove/disengage any external devices. 4. Turn off the computer properly through the operating system, then turn off the computer (2). 58 Chapter 3 Small Form Factor (SFF) hardware upgrades ENWW If the computer is plugged into an active AC outlet. Disconnect the power cord from the computer. 3. You must remove the access...

Hardware Reference Guide
Page 68
... computer. 3. Remove the computer access panel. 7. Turn off the computer properly through the operating system, then turn off the chassis (2). 60 Chapter 3 Small Form Factor (SFF) hardware upgrades ENWW Lift up the three tabs on the system board as long as compact discs or USB flash drives, from the power outlet...
... computer. 3. Remove the computer access panel. 7. Turn off the computer properly through the operating system, then turn off the chassis (2). 60 Chapter 3 Small Form Factor (SFF) hardware upgrades ENWW Lift up the three tabs on the system board as long as compact discs or USB flash drives, from the power outlet...

Hardware Reference Guide
Page 70
Replacing the front bezel Insert the four hooks on the bottom side of the bezel into the rectangular holes on the chassis (1) then rotate the top side of the bezel onto the chassis (2) and snap it into place. 62 Chapter 3 Small Form Factor (SFF) hardware upgrades ENWW
Replacing the front bezel Insert the four hooks on the bottom side of the bezel into the rectangular holes on the chassis (1) then rotate the top side of the bezel onto the chassis (2) and snap it into place. 62 Chapter 3 Small Form Factor (SFF) hardware upgrades ENWW
Hardware Reference Guide
Page 72
... Memory Module SATA Drives System Board Front USB 3.0 Ports USB 3.0 Device, such as a USB 3.0 Media Card Reader Primary Hard Drive 64 Chapter 3 Small Form Factor (SFF) hardware upgrades ENWW
... Memory Module SATA Drives System Board Front USB 3.0 Ports USB 3.0 Device, such as a USB 3.0 Media Card Reader Primary Hard Drive 64 Chapter 3 Small Form Factor (SFF) hardware upgrades ENWW

Hardware Reference Guide
Page 74
... memory is present may damage the module. 1. Remove all removable media, such as single channel. ● In any external devices. 66 Chapter 3 Small Form Factor (SFF) hardware upgrades ENWW The system will automatically operate in single channel mode, dual channel mode, or flex mode, depending on how the DIMMs are discharged...
... memory is present may damage the module. 1. Remove all removable media, such as single channel. ● In any external devices. 66 Chapter 3 Small Form Factor (SFF) hardware upgrades ENWW The system will automatically operate in single channel mode, dual channel mode, or flex mode, depending on how the DIMMs are discharged...

Hardware Reference Guide
Page 76
... dual graphics card configurations, the first (primary) card must disconnect the power cord to avoid damage to the open position. 68 Chapter 3 Small Form Factor (SFF) hardware upgrades ENWW To remove, replace, or add an expansion card: 1. If the computer is always present on the latch and rotating the latch to...
... dual graphics card configurations, the first (primary) card must disconnect the power cord to avoid damage to the open position. 68 Chapter 3 Small Form Factor (SFF) hardware upgrades ENWW To remove, replace, or add an expansion card: 1. If the computer is always present on the latch and rotating the latch to...

Hardware Reference Guide
Page 78
.... If you are removing a PCI Express x16 card, pull the retention arm on the back of internal components during operation. 70 Chapter 3 Small Form Factor (SFF) hardware upgrades ENWW Be sure not to scrape the card against the other components. 10. c.
.... If you are removing a PCI Express x16 card, pull the retention arm on the back of internal components during operation. 70 Chapter 3 Small Form Factor (SFF) hardware upgrades ENWW Be sure not to scrape the card against the other components. 10. c.

Hardware Reference Guide
Page 80
To verify the type and size of the storage devices installed in the computer, run Computer Setup. 72 Chapter 3 Small Form Factor (SFF) hardware upgrades ENWW Drive positions 1 Slim optical drive bay 2 3.5-inch internal hard drive bay 3 3.5-inch drive bay for optional drives (media card reader shown) 4 2.5-inch internal hard drive bay NOTE: The drive configuration on your computer may be different than the drive configuration shown above. Reconfigure the computer, if necessary. Lock any security devices that were disengaged when the access panel was removed. 19. 18.
To verify the type and size of the storage devices installed in the computer, run Computer Setup. 72 Chapter 3 Small Form Factor (SFF) hardware upgrades ENWW Drive positions 1 Slim optical drive bay 2 3.5-inch internal hard drive bay 3 3.5-inch drive bay for optional drives (media card reader shown) 4 2.5-inch internal hard drive bay NOTE: The drive configuration on your computer may be different than the drive configuration shown above. Reconfigure the computer, if necessary. Lock any security devices that were disengaged when the access panel was removed. 19. 18.

Hardware Reference Guide
Page 82
... Electrostatic discharge on or in a bubble-pack mailer or other protective packaging and label the package "Fragile: Handle With Care." 74 Chapter 3 Small Form Factor (SFF) hardware upgrades ENWW CAUTION: To prevent loss of work and damage to liquids, temperature extremes, or products that you are discharged of static electricity. Do...
... Electrostatic discharge on or in a bubble-pack mailer or other protective packaging and label the package "Fragile: Handle With Care." 74 Chapter 3 Small Form Factor (SFF) hardware upgrades ENWW CAUTION: To prevent loss of work and damage to liquids, temperature extremes, or products that you are discharged of static electricity. Do...

Hardware Reference Guide
Page 84
Disconnect the drive cables from the rear of the drive bay (2). 76 Chapter 3 Small Form Factor (SFF) hardware upgrades ENWW Press inward on the release lever at the rear of the drive (1) and slide the drive out of the rear of the drive, or, if you are removing a media card reader, disconnect the USB cable from the system board as indicated in the following illustration. 9. 8.
Disconnect the drive cables from the rear of the drive bay (2). 76 Chapter 3 Small Form Factor (SFF) hardware upgrades ENWW Press inward on the release lever at the rear of the drive (1) and slide the drive out of the rear of the drive, or, if you are removing a media card reader, disconnect the USB cable from the system board as indicated in the following illustration. 9. 8.

Hardware Reference Guide
Page 86
Rotate the drive cage to align the guide screws with the guide slots, until the drive snaps into the drive bay, making sure to its upright position. 10. 9. Slide the drive into place. 78 Chapter 3 Small Form Factor (SFF) hardware upgrades ENWW
Rotate the drive cage to align the guide screws with the guide slots, until the drive snaps into the drive bay, making sure to its upright position. 10. 9. Slide the drive into place. 78 Chapter 3 Small Form Factor (SFF) hardware upgrades ENWW

Hardware Reference Guide
Page 88
..., remove the computer from the stand. 6. You must disconnect the power cord to avoid damage to avoid damaging the cable. 80 Chapter 3 Small Form Factor (SFF) hardware upgrades ENWW Removing a slim optical drive CAUTION: All removable media should be taken out of the power-on state, voltage is always present on...
..., remove the computer from the stand. 6. You must disconnect the power cord to avoid damage to avoid damaging the cable. 80 Chapter 3 Small Form Factor (SFF) hardware upgrades ENWW Removing a slim optical drive CAUTION: All removable media should be taken out of the power-on state, voltage is always present on...

Hardware Reference Guide
Page 90
... computer. 3. NOTE: Refer to one of the light blue SATA connectors on page 64 for an illustration of the computer. 82 Chapter 3 Small Form Factor (SFF) hardware upgrades ENWW Disconnect the power cord from the old hard drive so that you remove the old hard drive, be sure to the internal.... 11. Slide the optical drive through the operating system, then turn on the system board as long as compact discs or USB flash drives, from HP.
... computer. 3. NOTE: Refer to one of the light blue SATA connectors on page 64 for an illustration of the computer. 82 Chapter 3 Small Form Factor (SFF) hardware upgrades ENWW Disconnect the power cord from the old hard drive so that you remove the old hard drive, be sure to the internal.... 11. Slide the optical drive through the operating system, then turn on the system board as long as compact discs or USB flash drives, from HP.

Hardware Reference Guide
Page 92
To install a hard drive, you must transfer the silver and blue isolation mounting guide screws from the old hard drive to the new hard drive. 10. 9. Align the guide screws with the slots on the chassis drive cage, press the hard drive down into the bay, then slide it forward until it stops and locks in place. 84 Chapter 3 Small Form Factor (SFF) hardware upgrades ENWW
To install a hard drive, you must transfer the silver and blue isolation mounting guide screws from the old hard drive to the new hard drive. 10. 9. Align the guide screws with the slots on the chassis drive cage, press the hard drive down into the bay, then slide it forward until it stops and locks in place. 84 Chapter 3 Small Form Factor (SFF) hardware upgrades ENWW


