Hardware Reference Guide
Page 1
Hardware Reference Guide HP EliteDesk 800 G1 Tower HP EliteDesk 800 G1 Small Form Factor HP EliteDesk 800 G1 Ultra-slim Desktop
Hardware Reference Guide HP EliteDesk 800 G1 Tower HP EliteDesk 800 G1 Small Form Factor HP EliteDesk 800 G1 Ultra-slim Desktop
Hardware Reference Guide
Page 2
The only warranties for technical or editorial errors or omissions contained herein. Nothing herein should be liable for HP products and services are U.S. Microsoft® and Windows® are set forth in the express warranty statements accompanying...written consent of Hewlett-Packard Company. No part of Microsoft Corporation. HP shall not be construed as constituting an additional warranty. Hardware Reference Guide HP EliteDesk 800 G1 Tower HP EliteDesk 800 G1 Small Form Factor HP EliteDesk 800 G1 Ultra-slim Desktop First Edition (April 2013) Document part number: 719014-001 The ...
The only warranties for technical or editorial errors or omissions contained herein. Nothing herein should be liable for HP products and services are U.S. Microsoft® and Windows® are set forth in the express warranty statements accompanying...written consent of Hewlett-Packard Company. No part of Microsoft Corporation. HP shall not be construed as constituting an additional warranty. Hardware Reference Guide HP EliteDesk 800 G1 Tower HP EliteDesk 800 G1 Small Form Factor HP EliteDesk 800 G1 Ultra-slim Desktop First Edition (April 2013) Document part number: 719014-001 The ...

Hardware Reference Guide
Page 5
... front panel components 3 Small Form Factor (SFF) front panel components 4 Ultra-slim Desktop (USDT) front panel components 5 Tower (TWR) rear panel components 6 Small Form Factor (SFF) rear panel components 7 Ultra-slim Desktop (USDT) rear panel components 8 Media card reader components ...9 Keyboard ...10 Using the... Windows logo key 10 Serial number location ...12 Tower (TWR) ...12 Small Form Factor (SFF 12 Ultra-slim Desktop (USDT 13 2 Tower (TWR) hardware upgrades ...14 Serviceability features ...14 Warnings and cautions ...14 Removing the computer access panel 15 ...
... front panel components 3 Small Form Factor (SFF) front panel components 4 Ultra-slim Desktop (USDT) front panel components 5 Tower (TWR) rear panel components 6 Small Form Factor (SFF) rear panel components 7 Ultra-slim Desktop (USDT) rear panel components 8 Media card reader components ...9 Keyboard ...10 Using the... Windows logo key 10 Serial number location ...12 Tower (TWR) ...12 Small Form Factor (SFF 12 Ultra-slim Desktop (USDT 13 2 Tower (TWR) hardware upgrades ...14 Serviceability features ...14 Warnings and cautions ...14 Removing the computer access panel 15 ...

Hardware Reference Guide
Page 6
...or 2.5-inch hard drive 44 Installing a 3.5-inch or 2.5-inch hard drive 45 Installing a security lock ...50 Cable lock ...50 Padlock ...50 HP business PC security lock 51 Front bezel security ...55 3 Small Form Factor (SFF) hardware upgrades 57 Serviceability features ...57 Warnings and cautions ...... the computer access panel 59 Removing the front bezel ...60 Removing bezel blanks ...61 Replacing the front bezel ...62 Changing from desktop to tower configuration 63 System board connections ...64 Installing additional memory ...65 DIMMs ...65 DDR3-SDRAM DIMMs ...65 Populating DIMM sockets...
...or 2.5-inch hard drive 44 Installing a 3.5-inch or 2.5-inch hard drive 45 Installing a security lock ...50 Cable lock ...50 Padlock ...50 HP business PC security lock 51 Front bezel security ...55 3 Small Form Factor (SFF) hardware upgrades 57 Serviceability features ...57 Warnings and cautions ...... the computer access panel 59 Removing the front bezel ...60 Removing bezel blanks ...61 Replacing the front bezel ...62 Changing from desktop to tower configuration 63 System board connections ...64 Installing additional memory ...65 DIMMs ...65 DDR3-SDRAM DIMMs ...65 Populating DIMM sockets...
Hardware Reference Guide
Page 7
...86 Installing a 2.5-inch hard drive 88 Installing a security lock ...91 Cable lock ...91 Padlock ...91 HP business PC security lock 92 Front bezel security ...96 4 Ultra-slim Desktop (USDT) hardware upgrades 98 Serviceability features ...98 Warnings and cautions ...98 Connecting the power cord ...99 ... access panel 101 Removing the front bezel ...102 Removing a bezel blank ...103 Replacing the front bezel ...104 Changing from desktop to tower configuration 105 System board connections ...106 Installing additional memory ...107 SODIMMs ...107 DDR3-SDRAM SODIMMs 107 Populating SODIMM sockets...
...86 Installing a 2.5-inch hard drive 88 Installing a security lock ...91 Cable lock ...91 Padlock ...91 HP business PC security lock 92 Front bezel security ...96 4 Ultra-slim Desktop (USDT) hardware upgrades 98 Serviceability features ...98 Warnings and cautions ...98 Connecting the power cord ...99 ... access panel 101 Removing the front bezel ...102 Removing a bezel blank ...103 Replacing the front bezel ...104 Changing from desktop to tower configuration 105 System board connections ...106 Installing additional memory ...107 SODIMMs ...107 DDR3-SDRAM SODIMMs 107 Populating SODIMM sockets...

Hardware Reference Guide
Page 9
For a complete listing of the hardware and software installed in a tower orientation or a desktop orientation. 1 Product features Standard configuration features Features may vary depending on some computer models only). Tower (TWR) ENWW Standard configuration features 1 NOTE: All three computer models can be used in the computer, run the diagnostic utility (included on the model.
For a complete listing of the hardware and software installed in a tower orientation or a desktop orientation. 1 Product features Standard configuration features Features may vary depending on some computer models only). Tower (TWR) ENWW Standard configuration features 1 NOTE: All three computer models can be used in the computer, run the diagnostic utility (included on the model.
Hardware Reference Guide
Page 13
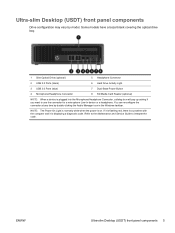
...) front panel components 5 Ultra-slim Desktop (USDT) front panel components Drive configuration may vary by double-clicking the Audio Manager icon in the Windows taskbar. If it is flashing red, there ...
...) front panel components 5 Ultra-slim Desktop (USDT) front panel components Drive configuration may vary by double-clicking the Audio Manager icon in the Windows taskbar. If it is flashing red, there ...
Hardware Reference Guide
Page 16
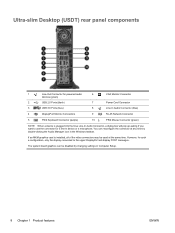
... blue Line-In Audio Connector, a dialog box will display POST messages. The system board graphics can reconfigure the connector at the same time. Ultra-slim Desktop (USDT) rear panel components 1 Line-Out Connector for a line-in the Windows taskbar. However, for such a configuration, only the display connected to the upper DisplayPort...
... blue Line-In Audio Connector, a dialog box will display POST messages. The system board graphics can reconfigure the connector at the same time. Ultra-slim Desktop (USDT) rear panel components 1 Line-Out Connector for a line-in the Windows taskbar. However, for such a configuration, only the display connected to the upper DisplayPort...

Hardware Reference Guide
Page 18
... Using the Windows logo key Use the Windows Logo key in combination with other key Displays the Start menu c d Displays the Desktop e Launches My Computer f Launches Find Document Ctrl + f Launches Find Computer g Cycles through gadgets h i k Windows 8 Displays the Start screen Opens ...charms Displays the Desktop Opens Windows Explorer Goes to files in Search charm Launches Find Computer Cycles through gadgets Goes to Share charm Goes to Settings charm Goes...
... Using the Windows logo key Use the Windows Logo key in combination with other key Displays the Start menu c d Displays the Desktop e Launches My Computer f Launches Find Document Ctrl + f Launches Find Computer g Cycles through gadgets h i k Windows 8 Displays the Start screen Opens ...charms Displays the Desktop Opens Windows Explorer Goes to files in Search charm Launches Find Computer Cycles through gadgets Goes to Share charm Goes to Settings charm Goes...

Hardware Reference Guide
Page 19
...of the screen right arrow Snaps the window to the right side of the screen Snaps the desktop window to the right side of the screen down arrow Minimizes the window Minimizes the desktop window Shift + left arrow or right Moves a window from one monitor to arrow another ...Moves a window from one monitor to another , (comma) Peeks at the desktop . (period) Snap a metro application to the right Shift + . (period) Snap a metro application to the left Enter Launches Narrator Esc Exits Magnifier + (...
...of the screen right arrow Snaps the window to the right side of the screen Snaps the desktop window to the right side of the screen down arrow Minimizes the window Minimizes the desktop window Shift + left arrow or right Moves a window from one monitor to arrow another ...Moves a window from one monitor to another , (comma) Peeks at the desktop . (period) Snap a metro application to the right Shift + . (period) Snap a metro application to the left Enter Launches Narrator Esc Exits Magnifier + (...

Hardware Reference Guide
Page 20
Windows Logo Key + Windows 7 - (on numpad) Zooms out Home Minimizes non-active desktop windows Break Displays System Properties PgUp PgDn Windows 8 Zooms out (Magnifier) Minimizes non-active desktop windows Displays System Properties Moves Start screen to left monitor Moves Start screen to right monitor Serial number location Each computer has a unique serial number...
Windows Logo Key + Windows 7 - (on numpad) Zooms out Home Minimizes non-active desktop windows Break Displays System Properties PgUp PgDn Windows 8 Zooms out (Magnifier) Minimizes non-active desktop windows Displays System Properties Moves Start screen to left monitor Moves Start screen to right monitor Serial number location Each computer has a unique serial number...

Hardware Reference Guide
Page 71
Changing from desktop to tower configuration The Small Form Factor computer can be used in a tower orientation, HP recommends the use of obstructions. 7. Remove all sides... cord to avoid damage to tower configuration 63 Orient the computer so that can be purchased from HP. 1. Turn off the computer properly through the operating system, then turn on all removable media,... Changing from the power outlet and disconnect any external devices. 4. Disconnect the power cord from desktop to the internal components of the power-on state, voltage is always present on the system ...
Changing from desktop to tower configuration The Small Form Factor computer can be used in a tower orientation, HP recommends the use of obstructions. 7. Remove all sides... cord to avoid damage to tower configuration 63 Orient the computer so that can be purchased from HP. 1. Turn off the computer properly through the operating system, then turn on all removable media,... Changing from the power outlet and disconnect any external devices. 4. Disconnect the power cord from desktop to the internal components of the power-on state, voltage is always present on the system ...

Hardware Reference Guide
Page 106
... CAUTION: Static electricity can damage the electrical components of static electricity by briefly touching a grounded metal object. 4 Ultra-slim Desktop (USDT) hardware upgrades Serviceability features The computer includes features that make it easy to carefully read the Safety & Comfort Guide. ... outlet that is plugged into the network interface controller (NIC) receptacles. When the computer is easily accessible at http://www.hp.com/ergo. No tools are discharged of the computer or optional equipment. Do not plug telecommunications or telephone connectors into an ...
... CAUTION: Static electricity can damage the electrical components of static electricity by briefly touching a grounded metal object. 4 Ultra-slim Desktop (USDT) hardware upgrades Serviceability features The computer includes features that make it easy to carefully read the Safety & Comfort Guide. ... outlet that is plugged into the network interface controller (NIC) receptacles. When the computer is easily accessible at http://www.hp.com/ergo. No tools are discharged of the computer or optional equipment. Do not plug telecommunications or telephone connectors into an ...

Hardware Reference Guide
Page 108
... off any security devices that prohibit opening the computer. 2. Turn off the computer properly through the operating system, then turn off (2). 100 Chapter 4 Ultra-slim Desktop (USDT) hardware upgrades ENWW
... off any security devices that prohibit opening the computer. 2. Turn off the computer properly through the operating system, then turn off (2). 100 Chapter 4 Ultra-slim Desktop (USDT) hardware upgrades ENWW

Hardware Reference Guide
Page 110
... the stand and lay the computer down. 6. Turn off the computer properly through the operating system, then turn off the chassis (2). 102 Chapter 4 Ultra-slim Desktop (USDT) hardware upgrades ENWW Remove the computer access panel. 7. Remove all removable media, such as the system is on the system board as long as...
... the stand and lay the computer down. 6. Turn off the computer properly through the operating system, then turn off the chassis (2). 102 Chapter 4 Ultra-slim Desktop (USDT) hardware upgrades ENWW Remove the computer access panel. 7. Remove all removable media, such as the system is on the system board as long as...

Hardware Reference Guide
Page 112
Replacing the front bezel Insert the three hooks on the bottom side of the bezel into the rectangular holes on the chassis (1) then rotate the top side of the bezel onto the chassis (2) and snap it into place. 104 Chapter 4 Ultra-slim Desktop (USDT) hardware upgrades ENWW
Replacing the front bezel Insert the three hooks on the bottom side of the bezel into the rectangular holes on the chassis (1) then rotate the top side of the bezel onto the chassis (2) and snap it into place. 104 Chapter 4 Ultra-slim Desktop (USDT) hardware upgrades ENWW
Hardware Reference Guide
Page 113
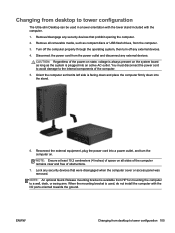
... tower configuration The Ultra-slim Desktop can be used , do not install the computer with the computer. 1. Remove/disengage any security devices that were disengaged when the computer cover or access ... Release mounting bracket is used in a tower orientation with the tower stand included with the I/O ports oriented towards the ground. Disconnect the power cord from HP for mounting the computer to tower configuration 105 NOTE: Ensure at least 10.2 centimeters (4 inches) of space on the system board as long as compact...
... tower configuration The Ultra-slim Desktop can be used , do not install the computer with the computer. 1. Remove/disengage any security devices that were disengaged when the computer cover or access ... Release mounting bracket is used in a tower orientation with the tower stand included with the I/O ports oriented towards the ground. Disconnect the power cord from HP for mounting the computer to tower configuration 105 NOTE: Ensure at least 10.2 centimeters (4 inches) of space on the system board as long as compact...
Hardware Reference Guide
Page 114
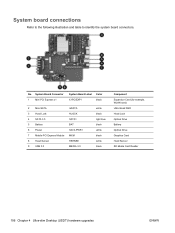
... example, WLAN card) Ultra-Small SSD Hood Lock Optical Drive Battery Optical Drive Graphics Card Hood Sensor SD Media Card Reader 106 Chapter 4 Ultra-slim Desktop (USDT) hardware upgrades ENWW No.
... example, WLAN card) Ultra-Small SSD Hood Lock Optical Drive Battery Optical Drive Graphics Card Hood Sensor SD Media Card Reader 106 Chapter 4 Ultra-slim Desktop (USDT) hardware upgrades ENWW No.

Hardware Reference Guide
Page 116
... the total amount of the SODIMM in memory channel A. If one socket per channel. The DIMM1 socket operates in the system. 108 Chapter 4 Ultra-slim Desktop (USDT) hardware upgrades ENWW Populating SODIMM sockets There are two SODIMM sockets on how the SODIMMs are installed. ● The system will operate in single...
... the total amount of the SODIMM in memory channel A. If one socket per channel. The DIMM1 socket operates in the system. 108 Chapter 4 Ultra-slim Desktop (USDT) hardware upgrades ENWW Populating SODIMM sockets There are two SODIMM sockets on how the SODIMMs are installed. ● The system will operate in single...

Hardware Reference Guide
Page 118
... pull the SODIMM out of the socket (2). To remove a SODIMM, press outward on the two latches on a stand, replace the stand. 110 Chapter 4 Ultra-slim Desktop (USDT) hardware upgrades ENWW NOTE: If a solenoid hood lock is installed in the computer, it in only one way. Slide the new SODIMM into the...
... pull the SODIMM out of the socket (2). To remove a SODIMM, press outward on the two latches on a stand, replace the stand. 110 Chapter 4 Ultra-slim Desktop (USDT) hardware upgrades ENWW NOTE: If a solenoid hood lock is installed in the computer, it in only one way. Slide the new SODIMM into the...


