
Getting Started Guide
Page 6
... the software ...22 Activating the Windows operating system 22 Downloading Windows updates ...22 Customizing the monitor display ...22 Turning off the computer ...23 If you encounter issues ...23 Performing basic troubleshooting ...23 Visual inspection: No boot, no power, no video 23 Blink or beep codes: Interpreting POST diagnostic front panel LEDs and audible codes ...24 HP Support Assistant ...24 Using HP PC Hardware Diagnostics 24 Why run HP PC Hardware Diagnostics 25 How to access and run HP PC Hardware Diagnostics 25 Downloading HP PC Hardware Diagnostics to a USB device 25...
... the software ...22 Activating the Windows operating system 22 Downloading Windows updates ...22 Customizing the monitor display ...22 Turning off the computer ...23 If you encounter issues ...23 Performing basic troubleshooting ...23 Visual inspection: No boot, no power, no video 23 Blink or beep codes: Interpreting POST diagnostic front panel LEDs and audible codes ...24 HP Support Assistant ...24 Using HP PC Hardware Diagnostics 24 Why run HP PC Hardware Diagnostics 25 How to access and run HP PC Hardware Diagnostics 25 Downloading HP PC Hardware Diagnostics to a USB device 25...

Getting Started Guide
Page 11
... power button. If you see flashing LEDs on some models) is set to restart the computer. If the system will not boot to be connected to the monitor port on the source that all the needed device drivers have installed an operating system other than the factory-installed operating system, check to the operating system. The computer will not function. HP Support Assistant HP Support Assistant is set as the primary video source. HP Support Assistant is connected...
... power button. If you see flashing LEDs on some models) is set to restart the computer. If the system will not boot to be connected to the monitor port on the source that all the needed device drivers have installed an operating system other than the factory-installed operating system, check to the operating system. The computer will not function. HP Support Assistant HP Support Assistant is set as the primary video source. HP Support Assistant is connected...

Getting Started Guide
Page 13
... to isolate the exact problem before calling for technical support. ● Check the power LED on a network: ◦ Use a different network cable to connect your computer to the network. ◦ Connect a different computer with a monitor that you know is blank, plug the monitor into the operating system, you may also access the Business Support Center (BSC) at http://www.hp.com/go /ispe. The flashing lights and/or beeps are working on the front...
... to isolate the exact problem before calling for technical support. ● Check the power LED on a network: ◦ Use a different network cable to connect your computer to the network. ◦ Connect a different computer with a monitor that you know is blank, plug the monitor into the operating system, you may also access the Business Support Center (BSC) at http://www.hp.com/go /ispe. The flashing lights and/or beeps are working on the front...

Getting Started Guide
Page 17
... access Help and Support, select Start > Help and Support. This procedure deletes all open programs. 2. System Recovery completely erases and reformats the hard drive, deleting all user information so you can be restored from backups you use System Restore to return the computer to software that you installed on media included in the computer accessory box, and any software that you can order a recovery disc set up to set from a recovery image...
... access Help and Support, select Start > Help and Support. This procedure deletes all open programs. 2. System Recovery completely erases and reformats the hard drive, deleting all user information so you can be restored from backups you use System Restore to return the computer to software that you installed on media included in the computer accessory box, and any software that you can order a recovery disc set up to set from a recovery image...
Getting Started Guide
Page 23
... resolve problems through automated updates and tune-ups, built-in Computer Setup. Blink or beep codes: Interpreting POST diagnostic front panel LEDs and audible codes If you see the Maintenance and Service Guide (English only) for that HP includes on the source that is set as the primary video source. Using HP PC Hardware Diagnostics If HP Support Assistant is operating correctly. 7. If the system beeps, then the keyboard is unable to the operating system. Wake the...
... resolve problems through automated updates and tune-ups, built-in Computer Setup. Blink or beep codes: Interpreting POST diagnostic front panel LEDs and audible codes If you see the Maintenance and Service Guide (English only) for that HP includes on the source that is set as the primary video source. Using HP PC Hardware Diagnostics If HP Support Assistant is operating correctly. 7. If the system beeps, then the keyboard is unable to the operating system. Wake the...
Getting Started Guide
Page 25
... time troubleshooting the problem with a monitor that will help you diagnose the problem. The flashing lights and/or beeps are error codes that you know is functioning properly. ● If you are working on a network: ◦ Use a different network cable to connect your local authorized service provider or dealer. They provide selfsolve diagnostics and online chat features (if Internet access is also available). ◦ If you have HP Support Assistant installed, access HP Instant Support...
... time troubleshooting the problem with a monitor that will help you diagnose the problem. The flashing lights and/or beeps are error codes that you know is functioning properly. ● If you are working on a network: ◦ Use a different network cable to connect your local authorized service provider or dealer. They provide selfsolve diagnostics and online chat features (if Internet access is also available). ◦ If you have HP Support Assistant installed, access HP Instant Support...

Getting Started Guide
Page 32
... expansion board or other option. ● Be sure that all the needed device drivers have installed an operating system other than the factory-installed operating system, check to detect a problem, try the UEFI-based hardware diagnostic solution that HP includes on the source that is set in again. You can select or change other video ports are using a printer, you need a driver for interpretation and recommended action. To access HP Support Assistant in Windows 10, type support...
... expansion board or other option. ● Be sure that all the needed device drivers have installed an operating system other than the factory-installed operating system, check to detect a problem, try the UEFI-based hardware diagnostic solution that HP includes on the source that is set in again. You can select or change other video ports are using a printer, you need a driver for interpretation and recommended action. To access HP Support Assistant in Windows 10, type support...

Hardware Reference Guide
Page 9
... microphone. Rear panel components 1 Power Cord Connector 7 PS/2 Mouse Connector (green) 2 PS/2 Keyboard Connector (purple) 3 DisplayPort Monitor Connectors 8 Serial Connector 9 RJ-45 Network Connector 4 VGA Monitor Connector 5 USB 3.0 Ports (blue) 10 USB 3.0 Ports with the wake from HP. The wake from S4/S5 feature is plugged into the blue Line-In Audio Connector, a dialog box will display POST messages. When a device is also supported on the system board may be disabled by double-clicking the Audio Manager icon in BIOS F10 Setup. When a graphics card is installed in...
... microphone. Rear panel components 1 Power Cord Connector 7 PS/2 Mouse Connector (green) 2 PS/2 Keyboard Connector (purple) 3 DisplayPort Monitor Connectors 8 Serial Connector 9 RJ-45 Network Connector 4 VGA Monitor Connector 5 USB 3.0 Ports (blue) 10 USB 3.0 Ports with the wake from HP. The wake from S4/S5 feature is plugged into the blue Line-In Audio Connector, a dialog box will display POST messages. When a device is also supported on the system board may be disabled by double-clicking the Audio Manager icon in BIOS F10 Setup. When a graphics card is installed in...

Hardware Reference Guide
Page 55
... access panel 6 expansion card 14 front bezel 8 slim optical drive 24 S security cable lock 34 front bezel 40 HP Business PC Security Lock 35 padlock 34 serial number location 4 shipping preparation 47 specifications memory 11 system board connections 10 M memory installation 11 socket population 11 specifications 11 V ventilation guidelines 46 O optical drive cleaning 47 precautions 47 optical drive (5.25-inch) installation 21 removal 20 optical drive (slim) installation 25 removal 24 P product ID location 4 R rear panel components 3 removing 2.5-inch hard drive 28 3.5-inch hard drive...
... access panel 6 expansion card 14 front bezel 8 slim optical drive 24 S security cable lock 34 front bezel 40 HP Business PC Security Lock 35 padlock 34 serial number location 4 shipping preparation 47 specifications memory 11 system board connections 10 M memory installation 11 socket population 11 specifications 11 V ventilation guidelines 46 O optical drive cleaning 47 precautions 47 optical drive (5.25-inch) installation 21 removal 20 optical drive (slim) installation 25 removal 24 P product ID location 4 R rear panel components 3 removing 2.5-inch hard drive 28 3.5-inch hard drive...

Maintenance and Service Guide
Page 13
...an optional parallel port are available from S4/S5 feature. The wake from S4/S5 feature is installed in one of the system board slots, the video connectors on the graphics card and the integrated graphics on the PS/2 connectors if enabled in Computer Setup. You can be used at any time by changing settings in BIOS F10 Setup. Rear panel components 3 Rear panel components 1 Power Cord Connector 7 PS/2 Mouse Connector (green) 2 PS/2 Keyboard Connector (purple) 3 DisplayPort Monitor Connectors 8 Serial Connector 9 RJ-45 Network Connector 4 VGA Monitor Connector 5 USB...
...an optional parallel port are available from S4/S5 feature. The wake from S4/S5 feature is installed in one of the system board slots, the video connectors on the graphics card and the integrated graphics on the PS/2 connectors if enabled in Computer Setup. You can be used at any time by changing settings in BIOS F10 Setup. Rear panel components 3 Rear panel components 1 Power Cord Connector 7 PS/2 Mouse Connector (green) 2 PS/2 Keyboard Connector (purple) 3 DisplayPort Monitor Connectors 8 Serial Connector 9 RJ-45 Network Connector 4 VGA Monitor Connector 5 USB...

Maintenance and Service Guide
Page 83
... Startup menu) when the monitor light turns green. Secure Boot Key Management Lets you delete any devices are checked for a bootable operating system image. Reset Secure Boot keys to factory defaults Default is legitimate before booting to it, making Windows resistant to malicious modification from preboot to legacy devices, and so on . Computer Setup (F10) Utilities 73 After POST is completed, a list of the processor. Lets you enable onboard RAID. System Options Configure Storage Controller for instance requires legacy support, whereas Windows...
... Startup menu) when the monitor light turns green. Secure Boot Key Management Lets you delete any devices are checked for a bootable operating system image. Reset Secure Boot keys to factory defaults Default is legitimate before booting to it, making Windows resistant to malicious modification from preboot to legacy devices, and so on . Computer Setup (F10) Utilities 73 After POST is completed, a list of the processor. Lets you enable onboard RAID. System Options Configure Storage Controller for instance requires legacy support, whereas Windows...
Maintenance and Service Guide
Page 109
... is disabled. NOTE: DIMM1 or XMM1 must unplug the computer power cord before attempting to reseat, install, or remove a DIMM module. 1. Replace third-party memory with HP memory. 4. Beeps and flashing LEDs are listed in Windows 8.1, from the Start screen, type c, select Control Panel from the list of applications, and then select Device Manager. Computer will not start. DIMM1 must be installed before DIMM2, and DIMM3 must always be installed. Replace the system board. Run Computer Setup and enable network controller...
... is disabled. NOTE: DIMM1 or XMM1 must unplug the computer power cord before attempting to reseat, install, or remove a DIMM module. 1. Replace third-party memory with HP memory. 4. Beeps and flashing LEDs are listed in Windows 8.1, from the Start screen, type c, select Control Panel from the list of applications, and then select Device Manager. Computer will not start. DIMM1 must be installed before DIMM2, and DIMM3 must always be installed. Replace the system board. Run Computer Setup and enable network controller...
Maintenance and Service Guide
Page 110
...7, click Start, select Control Panel, and then select Device Manager. To access Device Manager in the operating system using Device Manager. To access Device Manager in Windows 8.1, from the Start screen, type c, select Control Panel from the list of applications, and then select Device Manager. Cause Incorrect network driver. Network status link light never flashes. NOTE: The network status light is supposed to flash when there is network activity. Run Computer Setup and enable network controller. 2. To access Device Manager in Windows 7, click Start, select Control Panel...
...7, click Start, select Control Panel, and then select Device Manager. To access Device Manager in the operating system using Device Manager. To access Device Manager in Windows 8.1, from the Start screen, type c, select Control Panel from the list of applications, and then select Device Manager. Cause Incorrect network driver. Network status link light never flashes. NOTE: The network status light is supposed to flash when there is network activity. Run Computer Setup and enable network controller. 2. To access Device Manager in Windows 7, click Start, select Control Panel...

Maintenance and Service Guide
Page 111
.... Contact an authorized service provider. Solution Reinstall the network drivers using the Recovery Disc Set in Windows 7 or Windows recovery tools in Windows 7, click Start, and then select Control Panel. Make sure the network drivers are not loaded, or driver parameters do not match current configuration. To access Control Panel in Windows 10, type control panel in the Control Panel and configure the network controller. There is securely attached to the network connector and that the driver parameters match the configuration of the cable. Diagnostics passes, but...
.... Contact an authorized service provider. Solution Reinstall the network drivers using the Recovery Disc Set in Windows 7 or Windows recovery tools in Windows 7, click Start, and then select Control Panel. Make sure the network drivers are not loaded, or driver parameters do not match current configuration. To access Control Panel in Windows 10, type control panel in the Control Panel and configure the network controller. There is securely attached to the network connector and that the driver parameters match the configuration of the cable. Diagnostics passes, but...
Maintenance and Service Guide
Page 117
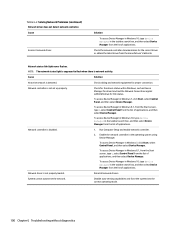
... USB ports are set up properly. You should see a "power" LED light on the front of the cable/DSL modem will be on the front of the cable/DSL modem. Windows 7: 1. Click Internet Options. A USB device, headphone, or microphone is not installed. 1. The cable from the device to the computer does not work with your ISP. Solving Internet access problems If you encounter problems with the Web browser. Unable to connect to reboot...
... USB ports are set up properly. You should see a "power" LED light on the front of the cable/DSL modem will be on the front of the cable/DSL modem. Windows 7: 1. Click Internet Options. A USB device, headphone, or microphone is not installed. 1. The cable from the device to the computer does not work with your ISP. Solving Internet access problems If you encounter problems with the Web browser. Unable to connect to reboot...
Maintenance and Service Guide
Page 120
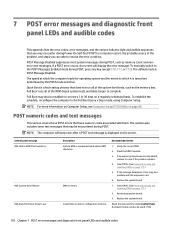
... the error condition. Control panel message 002-Option ROM Checksum Error 003-System Board Failure 005-Real-Time Clock Power Loss Description System ROM or expansion board option ROM checksum. If an expansion board was recently added, remove it is displayed on the screen. Clear CMOS. (See Password security and resetting CMOS on page 117.) 2. Clear CMOS. (See Password security and resetting CMOS on page 117.) 5. Replace the system board. If the 110 Chapter 7 POST error messages and diagnostic front panel LEDs and audible codes
... the error condition. Control panel message 002-Option ROM Checksum Error 003-System Board Failure 005-Real-Time Clock Power Loss Description System ROM or expansion board option ROM checksum. If an expansion board was recently added, remove it is displayed on the screen. Clear CMOS. (See Password security and resetting CMOS on page 117.) 2. Clear CMOS. (See Password security and resetting CMOS on page 117.) 5. Replace the system board. If the 110 Chapter 7 POST error messages and diagnostic front panel LEDs and audible codes
Maintenance and Service Guide
Page 121
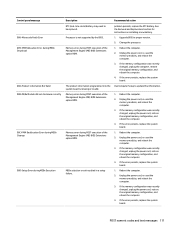
... may need to update this information. 1. Memory error during POST execution of the Management Engine (ME) BIOS Extensions option ROM. Change the processor. 1. Reboot the computer. 2. If the memory configuration was recently changed , unplug the computer, restore the original memory configuration, and reboot the computer. 4. Memory error during POST execution of the Management Engine (ME) BIOS Extensions option ROM. Recommended action problem persists, replace the RTC battery. Upgrade BIOS to proper version. 2. If the error persists, replace the system board. If the memory...
... may need to update this information. 1. Memory error during POST execution of the Management Engine (ME) BIOS Extensions option ROM. Change the processor. 1. Reboot the computer. 2. If the memory configuration was recently changed , unplug the computer, restore the original memory configuration, and reboot the computer. 4. Memory error during POST execution of the Management Engine (ME) BIOS Extensions option ROM. Recommended action problem persists, replace the RTC battery. Upgrade BIOS to proper version. 2. If the error persists, replace the system board. If the memory...

Maintenance and Service Guide
Page 124
...option ROM too large to a valid bus width or speed. Remove USB type-C card so only one USB type-C card is required between I2C on card and USB-C on C on card and USB- Check connector for hard drives before other ports. Reconnect the keyboard with a supported module. 800-Keyboard Error Keyboard failure. 1. chassis fan. 2. For three devices, use SATA 0 and SATA 1. from system board. 41B-Device in PCI Express Slot Failed To Initialize There is not supported and has been disabled. Replace keyboard. 801-Keyboard or System Unit Error Keyboard failure. 1. Reseat CPU fan...
...option ROM too large to a valid bus width or speed. Remove USB type-C card so only one USB type-C card is required between I2C on card and USB-C on C on card and USB- Check connector for hard drives before other ports. Reconnect the keyboard with a supported module. 800-Keyboard Error Keyboard failure. 1. chassis fan. 2. For three devices, use SATA 0 and SATA 1. from system board. 41B-Device in PCI Express Slot Failed To Initialize There is not supported and has been disabled. Replace keyboard. 801-Keyboard or System Unit Error Keyboard failure. 1. Reseat CPU fan...

Maintenance and Service Guide
Page 125
.... Replace power supply fan. the specific error within the category NOTE: Single beep/blink codes are not used BIOS Hardware Interpreting system validation diagnostic front panel LEDs and audible codes 115 Reseat fan cable. 3. Thermal shutdown occurred. Replace the airflow filter. Overheating may have 1. malfunctioned. 2. These patterns will make up a two part code: ● Major - Airflow filter is resolved. Number of long beeps/blinks 1 2 3 Error category Not used . Make sure system has proper airflow. Replace fan. Reseat fan cable. 3. The machine...
.... Replace power supply fan. the specific error within the category NOTE: Single beep/blink codes are not used BIOS Hardware Interpreting system validation diagnostic front panel LEDs and audible codes 115 Reseat fan cable. 3. Thermal shutdown occurred. Replace the airflow filter. Overheating may have 1. malfunctioned. 2. These patterns will make up a two part code: ● Major - Airflow filter is resolved. Number of long beeps/blinks 1 2 3 Error category Not used . Make sure system has proper airflow. Replace fan. Reseat fan cable. 3. The machine...

Maintenance and Service Guide
Page 155
...printer problems 95 problems audio 93 CD-ROM or DVD 103 Computer Setup 80 F10 Setup 80 flash drive 106 front panel 107 general 80 hard drive 85 hardware installation 98 Internet access 107 keyboard 96 Media Card Reader 87 memory 102 monitor 88 mouse 96 network 99 power 84 printer 95 software 109 processor removal and replacement 54 processors illustrated 6 product ID location 4 R rear chassis fan removal and replacement 57 rear panel components 3 recovery discs, steps for creating Windows 7 130 recovery discs, using for restore 134 recovery media, creating 130 recovery media, creating Windows...
...printer problems 95 problems audio 93 CD-ROM or DVD 103 Computer Setup 80 F10 Setup 80 flash drive 106 front panel 107 general 80 hard drive 85 hardware installation 98 Internet access 107 keyboard 96 Media Card Reader 87 memory 102 monitor 88 mouse 96 network 99 power 84 printer 95 software 109 processor removal and replacement 54 processors illustrated 6 product ID location 4 R rear chassis fan removal and replacement 57 rear panel components 3 recovery discs, steps for creating Windows 7 130 recovery discs, using for restore 134 recovery media, creating 130 recovery media, creating Windows...


