

HP ENVY 14 Getting Started - Windows 7
Page 8
... 25 Scrolling 26 Pinching/Zooming 26 5 Maintenance ...27 Removing or inserting the battery ...27 Removing the battery ...27 Inserting the battery ...28 Using the accessory battery (select models only 29 Identifying the accessory battery components 29 Inserting or removing an accessory battery 30 Battery charging and discharging sequence 31 Replacing or upgrading the hard drive 32 Removing...
... 25 Scrolling 26 Pinching/Zooming 26 5 Maintenance ...27 Removing or inserting the battery ...27 Removing the battery ...27 Inserting the battery ...28 Using the accessory battery (select models only 29 Identifying the accessory battery components 29 Inserting or removing an accessory battery 30 Battery charging and discharging sequence 31 Replacing or upgrading the hard drive 32 Removing...
HP ENVY 14 Getting Started - Windows 7
Page 15
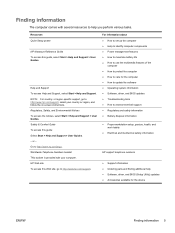
...Software, driver, and BIOS updates ● Troubleshooting tools ● How to http://www.hp.com/ergo. Go to access technical support ● Regulatory and safety information ● Battery disposal information ● Proper workstation setup, posture, health, and work habits ●... Electrical and mechanical safety information HP support telephone numbers ● Support information ● Ordering parts ...
...Software, driver, and BIOS updates ● Troubleshooting tools ● How to http://www.hp.com/ergo. Go to access technical support ● Regulatory and safety information ● Battery disposal information ● Proper workstation setup, posture, health, and work habits ●... Electrical and mechanical safety information HP support telephone numbers ● Support information ● Ordering parts ...

HP ENVY 14 Getting Started - Windows 7
Page 23
ENWW Right side 13 Connects an AC adapter. Component (9) Battery light (10) Power connector Description ● Off: The computer is running on battery power. ● Blinking amber: The battery has reached a low battery level, a critical battery level, or there is a battery error. ● Amber: A battery is charging. ● White: The computer is connected to external power and the battery is fully charged.
ENWW Right side 13 Connects an AC adapter. Component (9) Battery light (10) Power connector Description ● Off: The computer is running on battery power. ● Blinking amber: The battery has reached a low battery level, a critical battery level, or there is a battery error. ● Amber: A battery is charging. ● White: The computer is connected to external power and the battery is fully charged.
HP ENVY 14 Getting Started - Windows 7
Page 26
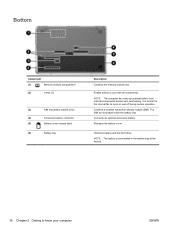
... slot is normal for the internal fan to cool internal components and prevent overheating. Releases the battery cover. NOTE: The computer fan starts up automatically to cycle on and off during routine operation. Holds the battery and the hard drive. Contains a wireless subscriber identity module (SIM). Bottom Component (1) Memory module compartment (2) Vents...
... slot is normal for the internal fan to cool internal components and prevent overheating. Releases the battery cover. NOTE: The computer fan starts up automatically to cycle on and off during routine operation. Holds the battery and the hard drive. Contains a wireless subscriber identity module (SIM). Bottom Component (1) Memory module compartment (2) Vents...
HP ENVY 14 Getting Started - Windows 7
Page 32
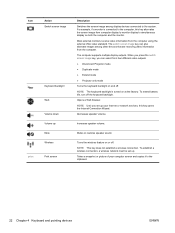
... external VGA video standard. Opens a Web browser. NOTE: The keyboard backlight is connected to the computer, this key opens the Internet Connection Wizard. To extend battery life, turn off . Increases speaker volume.
... external VGA video standard. Opens a Web browser. NOTE: The keyboard backlight is connected to the computer, this key opens the Internet Connection Wizard. To extend battery life, turn off . Increases speaker volume.

HP ENVY 14 Getting Started - Windows 7
Page 37
... To prevent loss of information. Slide the right battery release latch (1) to the HP Notebook Reference Guide. NOTE: For additional information on using the battery, refer to unlock the battery. 4. Removing the battery CAUTION: Removing a battery that is preinstalled in the battery bay at the factory. Slide the battery cover (2) away from the computer, and then remove the...
... To prevent loss of information. Slide the right battery release latch (1) to the HP Notebook Reference Guide. NOTE: For additional information on using the battery, refer to unlock the battery. 4. Removing the battery CAUTION: Removing a battery that is preinstalled in the battery bay at the factory. Slide the battery cover (2) away from the computer, and then remove the...
HP ENVY 14 Getting Started - Windows 7
Page 38
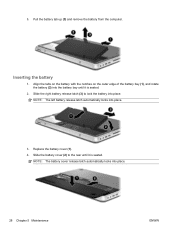
... notches on the outer edge of the battery bay (1), and rotate the battery (2) into place. Slide the battery cover (2) to lock the battery into the battery bay until it is seated. Inserting the battery 1. 5. Slide the right battery release latch (3) to the rear until it is seated. 2. NOTE: The left battery release latch automatically locks into place. 28...
... notches on the outer edge of the battery bay (1), and rotate the battery (2) into place. Slide the battery cover (2) to lock the battery into the battery bay until it is seated. Inserting the battery 1. 5. Slide the right battery release latch (3) to the rear until it is seated. 2. NOTE: The left battery release latch automatically locks into place. 28...

HP ENVY 14 Getting Started - Windows 7
Page 39
...; Two lights on: The accessory battery has 50 percent remaining battery charge. ● Three lights on: The accessory battery has 75 percent remaining battery charge. ● Four lights on: The accessory battery is fully charged. Identifying the accessory battery components Component (1) Battery fuel gauge (2) Battery charge lights (4) (3) Battery release latches (2) Description When pressed, the battery fuel gauge checks the amount...
...; Two lights on: The accessory battery has 50 percent remaining battery charge. ● Three lights on: The accessory battery has 75 percent remaining battery charge. ● Four lights on: The accessory battery is fully charged. Identifying the accessory battery components Component (1) Battery fuel gauge (2) Battery charge lights (4) (3) Battery release latches (2) Description When pressed, the battery fuel gauge checks the amount...
HP ENVY 14 Getting Started - Windows 7
Page 40
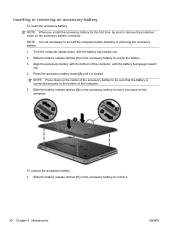
... removing an accessory battery To insert the accessory battery: NOTE: When you install the accessory battery for the first time, be sure that the battery is connected securely to the bottom of the computer. 5. Slide the battery release latches (1) on the accessory battery to unlock the battery. 3. Slide the battery release latches (3) on the accessory battery to turn off...
... removing an accessory battery To insert the accessory battery: NOTE: When you install the accessory battery for the first time, be sure that the battery is connected securely to the bottom of the computer. 5. Slide the battery release latches (1) on the accessory battery to unlock the battery. 3. Slide the battery release latches (3) on the accessory battery to turn off...
HP ENVY 14 Getting Started - Windows 7
Page 41
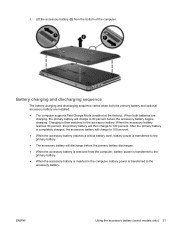
... models only) 31 When both the primary battery and optional accessory battery are charging, the primary battery will discharge before the accessory battery begins charging. After the primary battery is completely charged, the accessory battery will charge to 100 percent. ● When the accessory battery reaches a critical battery level, battery power is then switched to 90 percent before the...
... models only) 31 When both the primary battery and optional accessory battery are charging, the primary battery will discharge before the accessory battery begins charging. After the primary battery is completely charged, the accessory battery will charge to 100 percent. ● When the accessory battery reaches a critical battery level, battery power is then switched to 90 percent before the...
HP ENVY 14 Getting Started - Windows 7
Page 42
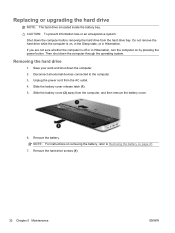
... the computer, and then remove the battery cover. 6. Remove the battery. If you are not sure whether the computer is located inside the battery bay. Disconnect all external devices connected to Removing the battery on page 27. 7. NOTE: For instructions on removing the battery, refer to the computer. 3. Slide the battery cover (2) away from the AC...
... the computer, and then remove the battery cover. 6. Remove the battery. If you are not sure whether the computer is located inside the battery bay. Disconnect all external devices connected to Removing the battery on page 27. 7. NOTE: For instructions on removing the battery, refer to the computer. 3. Slide the battery cover (2) away from the AC...

HP ENVY 14 Getting Started - Windows 7
Page 44
... the hard drive bay, and then slide the hard drive to the left until it snaps into place. 6. Replace the hard drive screws (2). 3. Replace the battery cover (1). 5. NOTE: For instructions on replacing the battery, refer to the rear until it is seated. Turn on page 28. 4. Slide the...
... the hard drive bay, and then slide the hard drive to the left until it snaps into place. 6. Replace the hard drive screws (2). 3. Replace the battery cover (1). 5. NOTE: For instructions on replacing the battery, refer to the rear until it is seated. Turn on page 28. 4. Slide the...
HP ENVY 14 Getting Started - Windows 7
Page 45
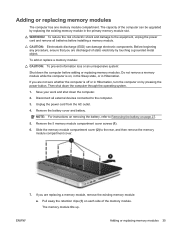
...To add or replace a memory module: CAUTION: To prevent information loss or an unresponsive system: Shut down the computer. 2. Remove the battery cover and battery. If you are discharged of the memory module. Unplug the power cord from the AC outlet. 4. Pull away the retention clips (1) ... compartment cover. 7. Do not remove a memory module while the computer is off or in the primary memory module slot. Disconnect all batteries before adding or replacing memory modules. Then shut down the computer through the operating system. 1. NOTE: For instructions on each side of...
...To add or replace a memory module: CAUTION: To prevent information loss or an unresponsive system: Shut down the computer. 2. Remove the battery cover and battery. If you are discharged of the memory module. Unplug the power cord from the AC outlet. 4. Pull away the retention clips (1) ... compartment cover. 7. Do not remove a memory module while the computer is off or in the primary memory module slot. Disconnect all batteries before adding or replacing memory modules. Then shut down the computer through the operating system. 1. NOTE: For instructions on each side of...
HP ENVY 14 Getting Started - Windows 7
Page 47
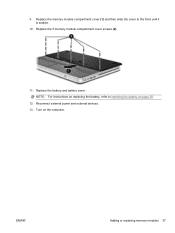
9. Replace the battery and battery cover. Turn on page 28. 12. Replace the 5 memory module compartment cover screws (2). 11. ENWW Adding or replacing memory modules 37 NOTE: For instructions on replacing the battery, refer to the front until it is seated. 10. Reconnect external power and external devices. 13. Replace the memory module compartment cover (1) and then slide the cover to Inserting the battery on the computer.
9. Replace the battery and battery cover. Turn on page 28. 12. Replace the 5 memory module compartment cover screws (2). 11. ENWW Adding or replacing memory modules 37 NOTE: For instructions on replacing the battery, refer to the front until it is seated. 10. Reconnect external power and external devices. 13. Replace the memory module compartment cover (1) and then slide the cover to Inserting the battery on the computer.
HP ENVY 14 Getting Started - Windows 7
Page 57
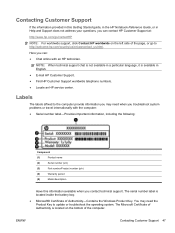
..., it is located inside the battery bay. ● Microsoft® Certificate of Authenticity-Contains the Windows Product Key. Labels The labels affixed to the computer provide information you may need when you troubleshoot system problems or travel internationally with an HP technician. The serial number label...The Microsoft Certificate of Authenticity is located on the left side of the page, or go /contactHP NOTE: For worldwide support, click Contact HP worldwide on the bottom of the computer. Here you can: ● Chat online with the computer: ● Serial number label-Provides...
..., it is located inside the battery bay. ● Microsoft® Certificate of Authenticity-Contains the Windows Product Key. Labels The labels affixed to the computer provide information you may need when you troubleshoot system problems or travel internationally with an HP technician. The serial number label...The Microsoft Certificate of Authenticity is located on the left side of the page, or go /contactHP NOTE: For worldwide support, click Contact HP worldwide on the bottom of the computer. Here you can: ● Chat online with the computer: ● Serial number label-Provides...
HP ENVY 14 Getting Started - Windows 7
Page 58
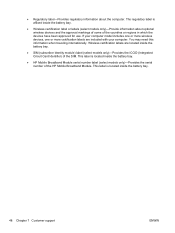
... internationally. If your computer model includes one or more wireless devices, one or more certification labels are located inside the battery bay. ● HP Mobile Broadband Module serial number label (select models only)-Provides the serial number of the SIM. Wireless certification labels are ...included with your computer. This label is located inside the battery bay. ● SIM (subscriber identity module) label (select models only)-Provides the ICCID (Integrated Circuit Card Identifier) of the HP Mobile Broadband Module.
... internationally. If your computer model includes one or more wireless devices, one or more certification labels are located inside the battery bay. ● HP Mobile Broadband Module serial number label (select models only)-Provides the serial number of the SIM. Wireless certification labels are ...included with your computer. This label is located inside the battery bay. ● SIM (subscriber identity module) label (select models only)-Provides the ICCID (Integrated Circuit Card Identifier) of the HP Mobile Broadband Module.
HP ENVY 14 Getting Started - Windows 7
Page 59
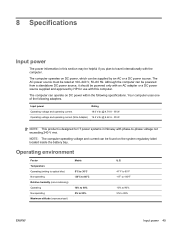
... phase-to-phase voltage not exceeding 240 V rms. NOTE: The computer operating voltage and current can operate on the system regulatory label located inside the battery bay. The computer operates on DC power, which can be powered from a standalone DC power source, it should be found on DC power within the... an AC adapter or a DC power source supplied and approved by an AC or a DC power source. The AC power source must be supplied by HP for IT power systems in this section may be helpful if you plan to 95% ENWW Input power 49 Input power Rating Operating voltage and...
... phase-to-phase voltage not exceeding 240 V rms. NOTE: The computer operating voltage and current can operate on the system regulatory label located inside the battery bay. The computer operates on DC power, which can be powered from a standalone DC power source, it should be found on DC power within the... an AC adapter or a DC power source supplied and approved by an AC or a DC power source. The AC power source must be supplied by HP for IT power systems in this section may be helpful if you plan to 95% ENWW Input power 49 Input power Rating Operating voltage and...
HP ENVY 14 Getting Started - Windows 7
Page 61
...identifying 14 audio-out (headphone) jack, identifying 14 B backing up customized window, toolbar, and menu bar settings 44 personal files 44 bass settings hotkey 23 battery charging sequence 31 Fast Charge Mode 31 replacing 27 battery bay 48 battery bay, identifying 16 battery cover release latch 16 battery light 13 bays battery ... bay, identifying 16 HDMI port, identifying 12, 38 headphone (audio-out) jack 14 Help and Support key 21 hotkeys bass settings 23 description 23 display system information 23 using 23 HP HDMI to VGA Display Adapter, using 38 I input power 49 integrated webcam light,...
...identifying 14 audio-out (headphone) jack, identifying 14 B backing up customized window, toolbar, and menu bar settings 44 personal files 44 bass settings hotkey 23 battery charging sequence 31 Fast Charge Mode 31 replacing 27 battery bay 48 battery bay, identifying 16 battery cover release latch 16 battery light 13 bays battery ... bay, identifying 16 HDMI port, identifying 12, 38 headphone (audio-out) jack 14 Help and Support key 21 hotkeys bass settings 23 description 23 display system information 23 using 23 HP HDMI to VGA Display Adapter, using 38 I input power 49 integrated webcam light,...
HP ENVY 14 Getting Started - Windows 7
Page 62
... 10 Windows applications 10 Windows logo 10 L labels Bluetooth 48 HP Mobile Broadband Module 48 Microsoft Certificate of Authenticity 47 regulatory 48 serial number 47 SIM 48 wireless certification 48 WLAN 48 latch, battery cover release 16 lights battery 13 drive 12 mute 8 power 8, 12 TouchPad 8 webcam...26 scrolling 26 using 25 zooming 26 TouchPad light, identifying 8 TouchPad zone, identifying 7 traveling with the computer 48 U USB ports, identifying 14 using system restore 44 V vents, identifying 12, 16 volume keys, identifying 22 W Web key, identifying 22 webcam light, identifying 15 webcam,...
... 10 Windows applications 10 Windows logo 10 L labels Bluetooth 48 HP Mobile Broadband Module 48 Microsoft Certificate of Authenticity 47 regulatory 48 serial number 47 SIM 48 wireless certification 48 WLAN 48 latch, battery cover release 16 lights battery 13 drive 12 mute 8 power 8, 12 TouchPad 8 webcam...26 scrolling 26 using 25 zooming 26 TouchPad light, identifying 8 TouchPad zone, identifying 7 traveling with the computer 48 U USB ports, identifying 14 using system restore 44 V vents, identifying 12, 16 volume keys, identifying 22 W Web key, identifying 22 webcam light, identifying 15 webcam,...
HP ENVY 14 Notebook PC - Maintenance and Service Guide
Page 6
Packaging and transporting guidelines 36 Component replacement procedures 38 Service tag ...38 Computer feet ...39 Battery ...39 SIM ...41 Mass storage device 41 WWAN module ...44 WLAN module ...47 RTC battery ...51 Memory module ...52 Battery connector board 54 Top cover ...56 Keyboard ...58 Audio/USB board 61 Bluetooth module ...62 SIM/...Utility 82 Exiting Setup Utility 83 Updating the BIOS ...83 Determining the BIOS version 83 Downloading a BIOS update 84 6 Specifications ...86 Computer specifications ...86 14.5-inch, SVA display specifications 87 Hard drive specifications ...88 vi
Packaging and transporting guidelines 36 Component replacement procedures 38 Service tag ...38 Computer feet ...39 Battery ...39 SIM ...41 Mass storage device 41 WWAN module ...44 WLAN module ...47 RTC battery ...51 Memory module ...52 Battery connector board 54 Top cover ...56 Keyboard ...58 Audio/USB board 61 Bluetooth module ...62 SIM/...Utility 82 Exiting Setup Utility 83 Updating the BIOS ...83 Determining the BIOS version 83 Downloading a BIOS update 84 6 Specifications ...86 Computer specifications ...86 14.5-inch, SVA display specifications 87 Hard drive specifications ...88 vi


