Setup Poster
Page 2
www.hp.com/support www.hp.com/go/wirelessprinting www.hp.com/go/ePrintCenter Printed in [Country] Printed in [Country] Printed in [Country] Printed in [Country] Printed in [Country] Printed in [Country] © 2012 Hewlett-Packard Development Company, L.P.
www.hp.com/support www.hp.com/go/wirelessprinting www.hp.com/go/ePrintCenter Printed in [Country] Printed in [Country] Printed in [Country] Printed in [Country] Printed in [Country] Printed in [Country] © 2012 Hewlett-Packard Development Company, L.P.
User Guide
Page 3
...-in-One series Help...3 2 Get to know the HP ENVY 120 series Printer parts...5 Control panel features...7 3 How do I?...9 4 Print Print photos...11 Print documents...12 Print labels and envelopes...13 Select Print Media...14 Load ......28 Clean back of page ink smearing...28 Clean paper feed...28 Cartridge warranty information...29 Tips for working with ink...29 8 Connectivity Add the HP ENVY 120 series to a network...31 Change from a USB connection to a wireless network...33 Connect a new printer...34 Change network settings...34 Wireless Direct...34 Tips for...
...-in-One series Help...3 2 Get to know the HP ENVY 120 series Printer parts...5 Control panel features...7 3 How do I?...9 4 Print Print photos...11 Print documents...12 Print labels and envelopes...13 Select Print Media...14 Load ......28 Clean back of page ink smearing...28 Clean paper feed...28 Cartridge warranty information...29 Tips for working with ink...29 8 Connectivity Add the HP ENVY 120 series to a network...31 Change from a USB connection to a wireless network...33 Connect a new printer...34 Change network settings...34 Wireless Direct...34 Tips for...
User Guide
Page 5
HP ENVY 120 e-All-in-One series Help 1 HP ENVY 120 e-All-in-One series Help For information about the HP ENVY 120 series, see: • Get to know the HP ENVY 120 series on page 42 HP ENVY 120 e-All-in-One series Help 3 on page 9 • Print on page 11 • Copy and scan on page 19 • Use Web Services on page 23 • Work with cartridges on page 25 • Connectivity on page 31 • Solve a problem on page 37 • Technical information on page 45 • HP support on page 5 • How do I?
HP ENVY 120 e-All-in-One series Help 1 HP ENVY 120 e-All-in-One series Help For information about the HP ENVY 120 series, see: • Get to know the HP ENVY 120 series on page 42 HP ENVY 120 e-All-in-One series Help 3 on page 9 • Print on page 11 • Copy and scan on page 19 • Use Web Services on page 23 • Work with cartridges on page 25 • Connectivity on page 31 • Solve a problem on page 37 • Technical information on page 45 • HP support on page 5 • How do I?

User Guide
Page 6
Chapter 1 HP ENVY 120 e-All-in-One series Help 4 HP ENVY 120 e-All-in-One series Help
Chapter 1 HP ENVY 120 e-All-in-One series Help 4 HP ENVY 120 e-All-in-One series Help

User Guide
Page 7
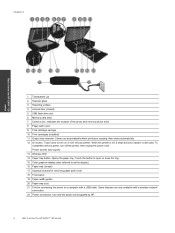
2 Get to know the HP ENVY 120 series • Printer parts • Control panel features Printer parts Front view of the printer Get to know the HP ENVY 120 series Get to know the HP ENVY 120 series 5
2 Get to know the HP ENVY 120 series • Printer parts • Control panel features Printer parts Front view of the printer Get to know the HP ENVY 120 series Get to know the HP ENVY 120 series 5
User Guide
Page 8
... 8 Paper path cover 9 Print cartridge carriage 10 Print cartridges (installed) 11 Output tray extender. Chapter 2 Get to know the HP ENVY 120 series Use only the power cord supplied by HP. 6 Get to know the HP ENVY 120 series 1 Transparent Lid 2 Scanner glass 3 Scanning surface 4 Access door (closed ) 17 Squeeze buttons for removing paper path cover 18...
... 8 Paper path cover 9 Print cartridge carriage 10 Print cartridges (installed) 11 Output tray extender. Chapter 2 Get to know the HP ENVY 120 series Use only the power cord supplied by HP. 6 Get to know the HP ENVY 120 series 1 Transparent Lid 2 Scanner glass 3 Scanning surface 4 Access door (closed ) 17 Squeeze buttons for removing paper path cover 18...

User Guide
Page 9
... can preview your scan. 13 Cancel: Stops the current operation. You can also change settings and, if Web Services is available. Get to know the HP ENVY 120 series Control panel features The touch screen display shows menus, photos, and messages.
... can preview your scan. 13 Cancel: Stops the current operation. You can also change settings and, if Web Services is available. Get to know the HP ENVY 120 series Control panel features The touch screen display shows menus, photos, and messages.

User Guide
Page 10
Chapter 2 Get to know the HP ENVY 120 series 8 Get to know the HP ENVY 120 series
Chapter 2 Get to know the HP ENVY 120 series 8 Get to know the HP ENVY 120 series

User Guide
Page 11
3 How do I? 9 How do I ? This section contains links to commonly performed tasks, such as printing photos, scanning, and making copies. • Load media on page 15 • Replace the cartridges on page 25 • Get more help on page 37 • Print with HP ePrint on page 23 • Clear a paper jam on page 40 • Copy text or mixed documents on page 19 • Scan to a computer, memory device, or email on page 21 How do I ?
3 How do I? 9 How do I ? This section contains links to commonly performed tasks, such as printing photos, scanning, and making copies. • Load media on page 15 • Replace the cartridges on page 25 • Get more help on page 37 • Print with HP ePrint on page 23 • Clear a paper jam on page 40 • Copy text or mixed documents on page 19 • Scan to a computer, memory device, or email on page 21 How do I ?
User Guide
Page 13
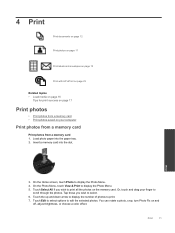
... brightness, or choose a color effect. 4 Print Print documents on page 12 Print photos on page 11 Print labels and envelopes on page 13 Print with HP ePrint on page 23 Related topics • Load media on page 15 Tips for print success on page 17 Print photos • Print photos from...
... brightness, or choose a color effect. 4 Print Print documents on page 12 Print photos on page 11 Print labels and envelopes on page 13 Print with HP ePrint on page 23 Related topics • Load media on page 15 Tips for print success on page 17 Print photos • Print photos from...
User Guide
Page 14
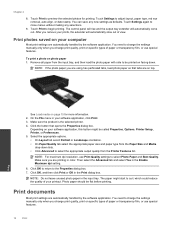
Touch Settings to begin printing. Touch Print to adjust layout, paper type, red eye removal, auto align, or date stamp. The paper might be called Properties, Options, Printer Setup, Printer, or Preferences. 5. Photo paper should be printed on top. Print documents Most print settings are printing in color. You need to change the settings manually only when you change print quality, print on your software application, this button might start to preview the selected photos for more information. 2. Chapter 4 8. Touch Print to curl, which could reduce the quality of ...
Touch Settings to begin printing. Touch Print to adjust layout, paper type, red eye removal, auto align, or date stamp. The paper might be called Properties, Options, Printer Setup, Printer, or Preferences. 5. Photo paper should be printed on top. Print documents Most print settings are printing in color. You need to change the settings manually only when you change print quality, print on your software application, this button might start to preview the selected photos for more information. 2. Chapter 4 8. Touch Print to curl, which could reduce the quality of ...
User Guide
Page 15
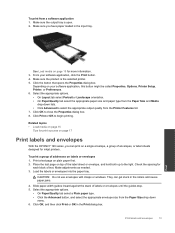
... print a group of the label sheet or envelope, and hold both up to begin printing. Depending on page 17 Print labels and envelopes With the HP ENVY 120 series, you have paper loaded in the Print dialog box. From your software application, this button might be called Properties, Options, Printer Setup, Printer, or...
... print a group of the label sheet or envelope, and hold both up to begin printing. Depending on page 17 Print labels and envelopes With the HP ENVY 120 series, you have paper loaded in the Print dialog box. From your software application, this button might be called Properties, Options, Printer Setup, Printer, or...
User Guide
Page 16
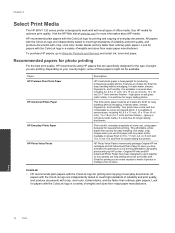
... worth of these papers might not be available. Get sharp, crisp images when you are specifically designed for easy handling without smudging. Original HP inks and HP Advanced Photo Paper have a look and feel comparable to a store processed photo. All papers with the ColorLok logo are long lasting and vivid... acid-free for papers with the ColorLok logo in a variety of weights and sizes from major paper manufacturers. Chapter 4 Select Print Media The HP ENVY 120 series printer is designed to work together so your country/region, some of photos or multiple prints to share.
... worth of these papers might not be available. Get sharp, crisp images when you are specifically designed for easy handling without smudging. Original HP inks and HP Advanced Photo Paper have a look and feel comparable to a store processed photo. All papers with the ColorLok logo are long lasting and vivid... acid-free for papers with the ColorLok logo in a variety of weights and sizes from major paper manufacturers. Chapter 4 Select Print Media The HP ENVY 120 series printer is designed to work together so your country/region, some of photos or multiple prints to share.
User Guide
Page 17
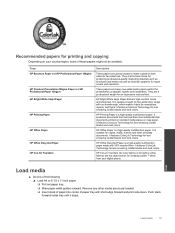
...paper tray. ❑ Slide paper-width guides outward. It features ColorLok Technology for report covers and calendars. Print Load media 15 HP Printing Paper is a high-quality multifunction paper made with short edge forward and print side down. Load media ▲ Do ... of paper tray with 30% recycled fiber. Paper HP Brochure Paper and HP Professional Paper 180gsm HP Premium Presentation120gsm Paper and HP Professional Paper 120gsm HP Bright White Inkjet Paper HP Printing Paper HP Office Paper HP Office Recycled Paper HP Iron-On Transfers Description These papers are the best choice...
...paper tray. ❑ Slide paper-width guides outward. It features ColorLok Technology for report covers and calendars. Print Load media 15 HP Printing Paper is a high-quality multifunction paper made with short edge forward and print side down. Load media ▲ Do ... of paper tray with 30% recycled fiber. Paper HP Brochure Paper and HP Professional Paper 180gsm HP Premium Presentation120gsm Paper and HP Professional Paper 120gsm HP Bright White Inkjet Paper HP Printing Paper HP Office Paper HP Office Recycled Paper HP Iron-On Transfers Description These papers are the best choice...
User Guide
Page 18
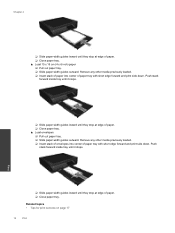
Remove any other media previously loaded. ❑ Insert stack of paper into center of paper tray with short edge forward and print side down . Remove any other media previously loaded. ❑ Insert stack of envelopes into center of paper. ❑ Close paper tray. ▲ Load envelopes ❑ Pull out paper tray. ❑ Slide paper-width guides outward. Push stack forward inside tray until it stops. Related topics • Tips for print success on page 17 16 Print Push stack forward inside tray until it stops. ❑ Slide paper-width guides inward until they ...
Remove any other media previously loaded. ❑ Insert stack of paper into center of paper tray with short edge forward and print side down . Remove any other media previously loaded. ❑ Insert stack of envelopes into center of paper. ❑ Close paper tray. ▲ Load envelopes ❑ Pull out paper tray. ❑ Slide paper-width guides outward. Push stack forward inside tray until it stops. Related topics • Tips for print success on page 17 16 Print Push stack forward inside tray until it stops. ❑ Slide paper-width guides inward until they ...
User Guide
Page 19
...bottom of the dialog to choose the Paper Type/Quality pane. • When copying or scanning a multipage document with HP printers to print successfully. • Use genuine HP cartridges. Learn about Apps Manager for printing recipes, coupons, and other content from computer. Use clean and flat paper of... sure only one type of the following tips to help you want to your operating system. ◦ On Windows: Open your computer. Genuine HP cartridges are designed for and tested with staples or paper clips, press down list under Printer Features. ◦ On Mac: From the Print ...
...bottom of the dialog to choose the Paper Type/Quality pane. • When copying or scanning a multipage document with HP printers to print successfully. • Use genuine HP cartridges. Learn about Apps Manager for printing recipes, coupons, and other content from computer. Use clean and flat paper of... sure only one type of the following tips to help you want to your operating system. ◦ On Windows: Open your computer. Genuine HP cartridges are designed for and tested with staples or paper clips, press down list under Printer Features. ◦ On Mac: From the Print ...

User Guide
Page 20
Chapter 4 Print 18 Print
Chapter 4 Print 18 Print
User Guide
Page 21
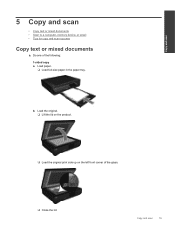
Load the original. ❑ Lift the lid on the product. ❑ Load the original print side up on the left front corner of the following: 1-sided copy a. Load paper. ❑ Load full-size paper in the paper tray. b. Copy and scan 5 Copy and scan • Copy text or mixed documents • Scan to a computer, memory device, or email • Tips for copy and scan success Copy text or mixed documents ▲ Do one of the glass. ❑ Close the lid. Copy and scan 19
Load the original. ❑ Lift the lid on the product. ❑ Load the original print side up on the left front corner of the following: 1-sided copy a. Load paper. ❑ Load full-size paper in the paper tray. b. Copy and scan 5 Copy and scan • Copy text or mixed documents • Scan to a computer, memory device, or email • Tips for copy and scan success Copy text or mixed documents ▲ Do one of the glass. ❑ Close the lid. Copy and scan 19
User Guide
Page 22
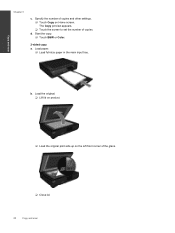
Start the copy. ❑ Touch B&W or Color. 2-sided copy a. b. The Copy preview appears. ❑ Touch the screen to set the number of the glass. ❑ Close lid. 20 Copy and scan Copy and scan Chapter 5 c. Load paper. ❑ Load full-size paper in the main input tray. d. Load the original. ❑ Lift lid on product. ❑ Load the original print side up on Home screen. Specify the number of copies and other settings. ❑ Touch Copy on the left front corner of copies.
Start the copy. ❑ Touch B&W or Color. 2-sided copy a. b. The Copy preview appears. ❑ Touch the screen to set the number of the glass. ❑ Close lid. 20 Copy and scan Copy and scan Chapter 5 c. Load paper. ❑ Load full-size paper in the main input tray. d. Load the original. ❑ Lift lid on product. ❑ Load the original print side up on Home screen. Specify the number of copies and other settings. ❑ Touch Copy on the left front corner of copies.
User Guide
Page 23
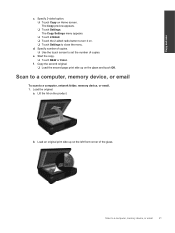
Load the original. Lift the lid on Home screen. e. b. Specify 2-sided option. ❑ Touch Copy on the product. Specify number of copies. ❑ Use the touch screen to a computer, memory device, or email 21 The Copy Settings menu appears. ❑ Touch 2-Sided. ❑ Touch the 2-sided radio button to turn it on. ❑ Touch Settings to a computer, network folder, memory device, or email. 1. Scan to a computer, memory device, or email To scan to close the menu. Load an original print side up on the left front corner of copies. a. Copy the second original...
Load the original. Lift the lid on Home screen. e. b. Specify 2-sided option. ❑ Touch Copy on the product. Specify number of copies. ❑ Use the touch screen to a computer, memory device, or email 21 The Copy Settings menu appears. ❑ Touch 2-Sided. ❑ Touch the 2-sided radio button to turn it on. ❑ Touch Settings to a computer, network folder, memory device, or email. 1. Scan to a computer, memory device, or email To scan to close the menu. Load an original print side up on the left front corner of copies. a. Copy the second original...
