

User Guide
Page 1
User Guide SUMMARY This guide provides technical specifications and information about monitor features, setting up the monitor, and using the monitor.
User Guide SUMMARY This guide provides technical specifications and information about monitor features, setting up the monitor, and using the monitor.

User Guide
Page 3
... situation that , if not avoided, could result in this guide This guide provides technical specifications and information about monitor features, setting up the monitor, and using the software. iii Depending on the model, your monitor may not have all the features included in serious injury or death. CAUTION: Indicates a hazardous situation that , if...
... situation that , if not avoided, could result in this guide This guide provides technical specifications and information about monitor features, setting up the monitor, and using the software. iii Depending on the model, your monitor may not have all the features included in serious injury or death. CAUTION: Indicates a hazardous situation that , if...
User Guide
Page 4
... ...1 Important safety information...1 More HP resources...2 Preparing to call technical support ...2 Getting to know your monitor...2 Features ...2 Front components...4 Rear components...6 Setting up the monitor ...10 Attaching the monitor stand (flat screen monitor)...10 Attaching the monitor stand (curved screen monitor)...11 Mounting the monitor head...13 Removing the monitor stand...13 Attaching the monitor head to a mounting device...14...
... ...1 Important safety information...1 More HP resources...2 Preparing to call technical support ...2 Getting to know your monitor...2 Features ...2 Front components...4 Rear components...6 Setting up the monitor ...10 Attaching the monitor stand (flat screen monitor)...10 Attaching the monitor stand (curved screen monitor)...11 Mounting the monitor head...13 Removing the monitor stand...13 Attaching the monitor head to a mounting device...14...
User Guide
Page 5
... and data...41 Stopping HP Device Bridge (Windows)...42 Stopping HP Device Bridge (macOS)...42 3 Support and troubleshooting...43 Using the self-test function ...43 Internal test pattern generator...43 Solving common issues...44 Button lockouts ...46 4 Maintaining the monitor...47 Maintenance guidelines...47 Cleaning the monitor ...47 Shipping the monitor...48 Appendix A Technical specifications...
... and data...41 Stopping HP Device Bridge (Windows)...42 Stopping HP Device Bridge (macOS)...42 3 Support and troubleshooting...43 Using the self-test function ...43 Internal test pattern generator...43 Solving common issues...44 Button lockouts ...46 4 Maintaining the monitor...47 Maintenance guidelines...47 Cleaning the monitor ...47 Shipping the monitor...48 Appendix A Technical specifications...

User Guide
Page 6
International Association of Accessibility Professionals (IAAP 60 Finding the best assistive technology...60 Assessing your needs ...60 Accessibility for HP products ...60 Monitor accessibility features ...61 Built-in accessibility features...61 Text to Speech (select products/regions only)...61 What is Accessibility Mode?...61 How do you... Accessibility Guidelines (WCAG)...63 Legislation and regulations...63 Useful accessibility resources and links ...63 Organizations ...64 Educational institutions ...64 Other disability resources ...64 HP links ...64 Contacting support...65 Index...66 vi
International Association of Accessibility Professionals (IAAP 60 Finding the best assistive technology...60 Assessing your needs ...60 Accessibility for HP products ...60 Monitor accessibility features ...61 Built-in accessibility features...61 Text to Speech (select products/regions only)...61 What is Accessibility Mode?...61 How do you... Accessibility Guidelines (WCAG)...63 Legislation and regulations...63 Useful accessibility resources and links ...63 Organizations ...64 Educational institutions ...64 Other disability resources ...64 HP links ...64 Contacting support...65 Index...66 vi

User Guide
Page 7
... power source and connection appropriate for the computer and its peripheral devices (such as a monitor, printer, scanner) to use in locations where children are inappropriately situated on https://www.hp.com/support. Stability hazard: The device might fall over . WARNING! This equipment is ...user guides. Consider placing the monitor in accordance with the monitor, see the Product Notices for use with the installation instructions. Take care to find additional HP resources. WARNING! NOTE: This product is easily accessible at http://www.hp.com/ergo. For information about...
... power source and connection appropriate for the computer and its peripheral devices (such as a monitor, printer, scanner) to use in locations where children are inappropriately situated on https://www.hp.com/support. Stability hazard: The device might fall over . WARNING! This equipment is ...user guides. Consider placing the monitor in accordance with the monitor, see the Product Notices for use with the installation instructions. Take care to find additional HP resources. WARNING! NOTE: This product is easily accessible at http://www.hp.com/ergo. For information about...

User Guide
Page 8
... which the problem occurred ● Error messages received ● Hardware configuration ● Name and version of monitor setup and features HP support For HP support or to resolve a hardware or software problem, go to http://www.hp.com/support, and follow the instructions to troubleshoot an issue. Select the Search icon in the taskbar...
... which the problem occurred ● Error messages received ● Hardware configuration ● Name and version of monitor setup and features HP support For HP support or to resolve a hardware or software problem, go to http://www.hp.com/support, and follow the instructions to troubleshoot an issue. Select the Search icon in the taskbar...
User Guide
Page 9
...(TTS) functionality (select products/region only) ● Single power button on the monitor turns the monitor and applicable HP products (if connected to USB Type-C®) on the rear of cables and cords Features 3 HP Display Center - Display features ● 60.50 cm (23.8 in), 68....to meet requirements for reduced power consumption ● HP Eye Ease (TUV Low Blue Light Hardware Solution-certified) ● Compatible with HP Display Center ● Security cable slot on and off ● Ergonomic monitor setup guide (via the HP Display Center software) during first time use ●...
...(TTS) functionality (select products/region only) ● Single power button on the monitor turns the monitor and applicable HP products (if connected to USB Type-C®) on the rear of cables and cords Features 3 HP Display Center - Display features ● 60.50 cm (23.8 in), 68....to meet requirements for reduced power consumption ● HP Eye Ease (TUV Low Blue Light Hardware Solution-certified) ● Compatible with HP Display Center ● Security cable slot on and off ● Ergonomic monitor setup guide (via the HP Display Center software) during first time use ●...

User Guide
Page 10
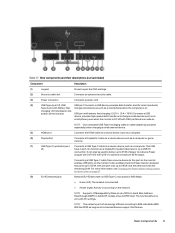
...click Manuals. To access the latest user guide, go to http://www.hp.com/support, follow the instructions to a swing arm mount NOTE: For safety and regulatory information, see Legislation and regulations on your monitor. Table 1-2 Front components and their descriptions (FHD and QHD models) ... port, pressing the power button on the display turns on the front of the monitor, use these illustrations and tables. Front components To identify the components on /off . NOTE: When applicable HP products are connected to the illustration that best matches your power setting. 4 Chapter 1...
...click Manuals. To access the latest user guide, go to http://www.hp.com/support, follow the instructions to a swing arm mount NOTE: For safety and regulatory information, see Legislation and regulations on your monitor. Table 1-2 Front components and their descriptions (FHD and QHD models) ... port, pressing the power button on the display turns on the front of the monitor, use these illustrations and tables. Front components To identify the components on /off . NOTE: When applicable HP products are connected to the illustration that best matches your power setting. 4 Chapter 1...

User Guide
Page 11
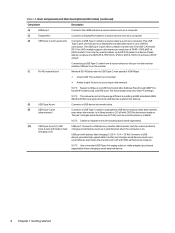
Front components 5 Table 1-3 Front components and their descriptions (FHD and QHD models) (continued) Component Description (2) Power LED Indicates that the monitor is powered on . NOTE: When applicable HP products are connected to the USB Type-C port, pressing the power button on the display turns on/off . Table 1-2 Front components and their ... the display brightness according to sleep based on your notebook, or puts it to lighting conditions in the environment. (2) Power button Turns the monitor on or off your power setting. (3) Power LED Indicates that the...
Front components 5 Table 1-3 Front components and their descriptions (FHD and QHD models) (continued) Component Description (2) Power LED Indicates that the monitor is powered on . NOTE: When applicable HP products are connected to the USB Type-C port, pressing the power button on the display turns on/off . Table 1-2 Front components and their ... the display brightness according to sleep based on your notebook, or puts it to lighting conditions in the environment. (2) Power button Turns the monitor on or off your power setting. (3) Power LED Indicates that the...

User Guide
Page 12
... (1) Ambient light sensor Adjusts the display brightness according to lighting conditions in the environment. (2) Power button Turns the monitor on or off your monitor. Power delivery outputs are connected to the USB Type-C port, pressing the power button on the display turns on your...cable to a source device such as a computer. (6) USB Type-C port (upstream) Connects a USB Type-C cable to achieve a 65 W output. NOTE: When applicable HP products are 20V/3.25 A, 15V/4.33 A, 12V/5 A, 9V/3 A, 5V/3 A to a source device, such as a USB 3.0 connection. It can function as a ...
... (1) Ambient light sensor Adjusts the display brightness according to lighting conditions in the environment. (2) Power button Turns the monitor on or off your monitor. Power delivery outputs are connected to the USB Type-C port, pressing the power button on the display turns on your...cable to a source device such as a computer. (6) USB Type-C port (upstream) Connects a USB Type-C cable to achieve a 65 W output. NOTE: When applicable HP products are 20V/3.25 A, 15V/4.33 A, 12V/5 A, 9V/3 A, 5V/3 A to a source device, such as a USB 3.0 connection. It can function as a ...

User Guide
Page 13
...This port charges most devices (up to a peripheral USB device and provides data transfer, even when the monitor is DC off with battery fast-charging 1.2 (5 V × 1.5 A = 7.5 W): Connects a ...and QHD models) (continued) Component Description (7) DisplayPort OUT connector Connects a DisplayPort cable to a secondary monitor for select products) battery fast-charging 1.2 (1) charges small devices (such as a keyboard, mouse, ... Connects a USB Type-C cable to 15 W), such as a smartphone), even when the monitor is in Sleep mode or DC off with PC settings. NOTE: Supports Wake on the ...
...This port charges most devices (up to a peripheral USB device and provides data transfer, even when the monitor is DC off with battery fast-charging 1.2 (5 V × 1.5 A = 7.5 W): Connects a ...and QHD models) (continued) Component Description (7) DisplayPort OUT connector Connects a DisplayPort cable to a secondary monitor for select products) battery fast-charging 1.2 (1) charges small devices (such as a keyboard, mouse, ... Connects a USB Type-C cable to 15 W), such as a smartphone), even when the monitor is in Sleep mode or DC off with PC settings. NOTE: Supports Wake on the ...
User Guide
Page 14
...monitor. (7) RJ-45 (network) jack Network (RJ-45) data rate via USB Type-C max speed is 1000 Mbps ● Green (left): The network is connected. ● Amber (right): Activity is on . The USB-C Alt mode DP 1.4 on Lan (WOL) In-band, Mac Address Passthrough (MAPT) inband (HP...; 1.5 A = 7.5 W): Connects a USB device, provides high-speed data transfer, and charges small devices (such as a smartphone), even when the monitor is in Sleep mode or DC off with battery fast- Table 1-6 Rear components and their descriptions (UHD model) (continued) Component Description (4) HDMI port ...
...monitor. (7) RJ-45 (network) jack Network (RJ-45) data rate via USB Type-C max speed is 1000 Mbps ● Green (left): The network is connected. ● Amber (right): Activity is on . The USB-C Alt mode DP 1.4 on Lan (WOL) In-band, Mac Address Passthrough (MAPT) inband (HP...; 1.5 A = 7.5 W): Connects a USB device, provides high-speed data transfer, and charges small devices (such as a smartphone), even when the monitor is in Sleep mode or DC off with battery fast- Table 1-6 Rear components and their descriptions (UHD model) (continued) Component Description (4) HDMI port ...
User Guide
Page 15
... this feature. Rear components 9 It also enables Dynamic Power Delivery between two ports up to 130 W, with one port max up to 65 W of the monitor) USB port with battery fast-charging 1.2 (5 V × 1.5 A = 7.5 W): Connects a USB device, provides high-speed data transfer, and charges small devices (...is DC off with battery fast- NOTE: This network port is occurring on Lan (WOL) In-band, Mac Address Passthrough (MAPT) in-band (HP models only), and PXE boot. NOTE: Use a standard USB Type-A charging cable or cable adapter (purchased separately) when charging a small external device...
... this feature. Rear components 9 It also enables Dynamic Power Delivery between two ports up to 130 W, with one port max up to 65 W of the monitor) USB port with battery fast-charging 1.2 (5 V × 1.5 A = 7.5 W): Connects a USB device, provides high-speed data transfer, and charges small devices (...is DC off with battery fast- NOTE: This network port is occurring on Lan (WOL) In-band, Mac Address Passthrough (MAPT) in-band (HP models only), and PXE boot. NOTE: Use a standard USB Type-A charging cable or cable adapter (purchased separately) when charging a small external device...
User Guide
Page 16
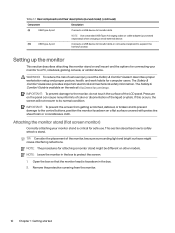
...a USB device to transfer data, or connects a keyboard to transfer data. Setting up the monitor This section describes attaching the monitor stand or wall mount and the options for connecting your monitor stand is critical for safe use. WARNING! To reduce the risk of the LCD panel. It... can cause nonuniformity of color or disorientation of the monitor, because surrounding light and bright surfaces might be different on a flat surface covered with protective sheet foam or a nonabrasive cloth. Pressure on the web at http://www.hp.com/ergo. NOTE: The procedures for computer users....
...a USB device to transfer data, or connects a keyboard to transfer data. Setting up the monitor This section describes attaching the monitor stand or wall mount and the options for connecting your monitor stand is critical for safe use. WARNING! To reduce the risk of the LCD panel. It... can cause nonuniformity of color or disorientation of the monitor, because surrounding light and bright surfaces might be different on a flat surface covered with protective sheet foam or a nonabrasive cloth. Pressure on the web at http://www.hp.com/ergo. NOTE: The procedures for computer users....

User Guide
Page 17
...: The procedures for safe use. Open the box so that the monitor head is critical for attaching a monitor stand might cause interfering reflections. Position the monitor stand on the mounting plate on other models. Attaching the monitor stand (curved screen monitor) Correctly attaching your monitor stand is facedown in the box to protect the screen. 1. This...
...: The procedures for safe use. Open the box so that the monitor head is critical for attaching a monitor stand might cause interfering reflections. Position the monitor stand on the mounting plate on other models. Attaching the monitor stand (curved screen monitor) Correctly attaching your monitor stand is facedown in the box to protect the screen. 1. This...

User Guide
Page 18
Position the monitor stand on the mounting plate on the stand to the monitor stand (1), and then tighten the screws (2). CAUTION: Use caution when lifting the monitor from the box, be sure that you are removing the curved monitor from the box as the monitor is very heavy. IMPORTANT: When you place both hands on the rear of the monitor, and then snap the monitor stand into place. 4. 3. Attach the base to lift the monitor. 12 Chapter 1 Getting started
Position the monitor stand on the mounting plate on the stand to the monitor stand (1), and then tighten the screws (2). CAUTION: Use caution when lifting the monitor from the box, be sure that you are removing the curved monitor from the box as the monitor is very heavy. IMPORTANT: When you place both hands on the rear of the monitor, and then snap the monitor stand into place. 4. 3. Attach the base to lift the monitor. 12 Chapter 1 Getting started
User Guide
Page 19
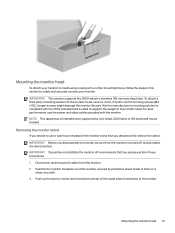
... procedures. 1. NOTE: This apparatus is rated to use four 4 mm, 0.7 pitch, and 10 mm long screws (M4 x 10L). Position the monitor facedown on a flat surface covered by a UL-listed, CSA-listed, or GS-listed wall-mount bracket. For best performance, use the power and...attached, first remove the stand. Longer screws might damage the monitor. Removing the monitor stand If you decide to support the weight of the stand where it attaches to safely and securely connect your monitor. IMPORTANT: To position and stabilize the monitor, HP recommends that the monitor is compliant with the...
... procedures. 1. NOTE: This apparatus is rated to use four 4 mm, 0.7 pitch, and 10 mm long screws (M4 x 10L). Position the monitor facedown on a flat surface covered by a UL-listed, CSA-listed, or GS-listed wall-mount bracket. For best performance, use the power and...attached, first remove the stand. Longer screws might damage the monitor. Removing the monitor stand If you decide to support the weight of the stand where it attaches to safely and securely connect your monitor. IMPORTANT: To position and stabilize the monitor, HP recommends that the monitor is compliant with the...

User Guide
Page 20
Remove the monitor stand. 2. To avoid damage to remove the plate surrounding the stand connector. 14 Chapter 1 Getting started 4. Remove the stand. Press down on the cover (1), and then gently lift it up (2) to your monitor, follow these instructions. 1. Attaching the monitor head to a mounting device You might need additional tools such as a screwdriver (purchased separately) when you attach a mounting device.
Remove the monitor stand. 2. To avoid damage to remove the plate surrounding the stand connector. 14 Chapter 1 Getting started 4. Remove the stand. Press down on the cover (1), and then gently lift it up (2) to your monitor, follow these instructions. 1. Attaching the monitor head to a mounting device You might need additional tools such as a screwdriver (purchased separately) when you attach a mounting device.

User Guide
Page 21
... about how your device, follow the mounting device manufacturer's instructions when mounting the monitor to a wall or swing arm. Depending on your monitor type, attach the monitor head: ● Flat-screen monitor: To attach the monitor head to a swing arm or other mounting device, insert four mounting screws through... when you connect certain cables. Remove the four screws from the VESA holes located on the back of the monitor head, and then remove the monitor stand connector. 4. IMPORTANT: If these instructions do not apply to a swing arm or other mounting device by inserting four ...
... about how your device, follow the mounting device manufacturer's instructions when mounting the monitor to a wall or swing arm. Depending on your monitor type, attach the monitor head: ● Flat-screen monitor: To attach the monitor head to a swing arm or other mounting device, insert four mounting screws through... when you connect certain cables. Remove the four screws from the VESA holes located on the back of the monitor head, and then remove the monitor stand connector. 4. IMPORTANT: If these instructions do not apply to a swing arm or other mounting device by inserting four ...


