
User Guide
Page 5
... Features ...1 Z24x Display ...1 2 Safety and Maintenance Guidelines ...3 Important Safety Information ...3 Maintenance Guidelines ...4 Cleaning the Monitor ...4 Shipping the Monitor ...4 3 Setting Up the Monitor ...5 Use Caution When Setting Up the Monitor 5 Installing the Stand ...6 Rear Components ...7 Connecting the Cables ...8 Front Panel Controls ...13 Adjusting the Monitor ...14 Turning on the Monitor ...17 HP Watermark and...
... Features ...1 Z24x Display ...1 2 Safety and Maintenance Guidelines ...3 Important Safety Information ...3 Maintenance Guidelines ...4 Cleaning the Monitor ...4 Shipping the Monitor ...4 3 Setting Up the Monitor ...5 Use Caution When Setting Up the Monitor 5 Installing the Stand ...6 Rear Components ...7 Connecting the Cables ...8 Front Panel Controls ...13 Adjusting the Monitor ...14 Turning on the Monitor ...17 HP Watermark and...
User Guide
Page 6
... 30 Color Management ...36 Color Presets ...36 Color Calibration - User 36 Auto EDID Update ...37 Appendix A Technical Specifications ...38 Z24x Model ...38 Recognizing Preset Display Resolutions 39 Appendix B Support and Troubleshooting 40 Solving Common Problems ...40 Product Support ...41 Preparing to Call Technical Support 41 Appendix C Agency Regulatory Notices ...43 ...
... 30 Color Management ...36 Color Presets ...36 Color Calibration - User 36 Auto EDID Update ...37 Appendix A Technical Specifications ...38 Z24x Model ...38 Recognizing Preset Display Resolutions 39 Appendix B Support and Troubleshooting 40 Solving Common Problems ...40 Product Support ...41 Preparing to Call Technical Support 41 Appendix C Agency Regulatory Notices ...43 ...

User Guide
Page 9
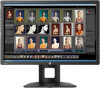
...re-calibrate to a standard or custom color space by specifying the color primaries, white point, gamma, and luminance (requires the separately purchased HP DreamColor Calibration Solution kit) ● Option to return to Factory Calibration settings or User Calibration settings to easily restore the monitor to the factory... sliding tab release ● Optional thin client mounting bracket that attaches to the rear of the stand (purchased separately) Z24x Display 1 1 Product Features Z24x Display The LCD (liquid crystal display) monitor has an active matrix, In-Plane Switching (IPS) panel.
...re-calibrate to a standard or custom color space by specifying the color primaries, white point, gamma, and luminance (requires the separately purchased HP DreamColor Calibration Solution kit) ● Option to return to Factory Calibration settings or User Calibration settings to easily restore the monitor to the factory... sliding tab release ● Optional thin client mounting bracket that attaches to the rear of the stand (purchased separately) Z24x Display 1 1 Product Features Z24x Display The LCD (liquid crystal display) monitor has an active matrix, In-Plane Switching (IPS) panel.

User Guide
Page 10
...and HDMI digital (cable not provided) ● DisplayPort output connector for DisplayPort multistreaming ● Analog audio output for headphones or an optional HP speaker bar ● USB 3.0 hub with one upstream port (cable provided) that connects to the computer and four downstream ports that connect... provision on rear of monitor for optional cable lock ● Cable management feature for placement of cables and cords ● On-Screen Display (OSD) adjustments in several languages for easy setup and screen optimization ● PIP functionality to enable the DisplayPort, DVI, and HDMI ...
...and HDMI digital (cable not provided) ● DisplayPort output connector for DisplayPort multistreaming ● Analog audio output for headphones or an optional HP speaker bar ● USB 3.0 hub with one upstream port (cable provided) that connects to the computer and four downstream ports that connect... provision on rear of monitor for optional cable lock ● Cable management feature for placement of cables and cords ● On-Screen Display (OSD) adjustments in several languages for easy setup and screen optimization ● PIP functionality to enable the DisplayPort, DVI, and HDMI ...

User Guide
Page 14
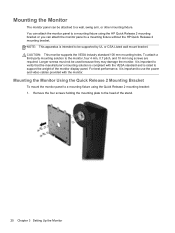
Pressure on a flat surface covered by a clean, dry cloth. 2. The display uses the HP Quick Release 2 for easy moving of the stand's mounting plate (2) into the recess until it snaps into place. 4. Slide the top of the liquid crystals. ... nonuniformity of color or disorientation of the mounting plate (1) on page 20. 6 Chapter 3 Setting Up the Monitor To mount the panel onto the stand: 1. The HP Quick Release 2 latch (3) pops up when the stand is locked in the back of the stand refer to its normal condition. NOTE: If you are...
Pressure on a flat surface covered by a clean, dry cloth. 2. The display uses the HP Quick Release 2 for easy moving of the stand's mounting plate (2) into the recess until it snaps into place. 4. Slide the top of the liquid crystals. ... nonuniformity of color or disorientation of the mounting plate (1) on page 20. 6 Chapter 3 Setting Up the Monitor To mount the panel onto the stand: 1. The HP Quick Release 2 latch (3) pops up when the stand is locked in the back of the stand refer to its normal condition. NOTE: If you are...

User Guide
Page 17
..., connect either the DisplayPort, DVI, or HDMI video cable between the DisplayPort OUT connector and the computer. The inputs can be selected through the OnScreen Display (OSD) feature by the video cable used. NOTE: You must connect the DisplayPort cable to open the OSD. The monitor will automatically determine which inputs...
..., connect either the DisplayPort, DVI, or HDMI video cable between the DisplayPort OUT connector and the computer. The inputs can be selected through the OnScreen Display (OSD) feature by the video cable used. NOTE: You must connect the DisplayPort cable to open the OSD. The monitor will automatically determine which inputs...

User Guide
Page 24
NOTE: The monitor includes an auto-rotation sensor that automatically changes the displayed OSD from portrait to portrait when rotated. Use the operating system's display settings to rotate the image on the screen from landscape to landscape. 16 Chapter 3 Setting Up the Monitor
NOTE: The monitor includes an auto-rotation sensor that automatically changes the displayed OSD from portrait to portrait when rotated. Use the operating system's display settings to rotate the image on the screen from landscape to landscape. 16 Chapter 3 Setting Up the Monitor

User Guide
Page 25
...a condition that input for an active input and uses that may be enabled. CAUTION: Burn-in image" are active, the monitor will display the highest ranking priority input. You can select the input source in image damage on the Monitor 17 Turning on . Press the power button... not in use for 10 seconds. If two or more inputs are not covered under the HP warranty. * A prolonged period of time is DisplayPort), the current preset display resolution, and the recommended preset display resolution. NOTE: If pressing the power button has no effect, the Power Button Lockout feature...
...a condition that input for an active input and uses that may be enabled. CAUTION: Burn-in image" are active, the monitor will display the highest ranking priority input. You can select the input source in image damage on the Monitor 17 Turning on . Press the power button... not in use for 10 seconds. If two or more inputs are not covered under the HP warranty. * A prolonged period of time is DisplayPort), the current preset display resolution, and the recommended preset display resolution. NOTE: If pressing the power button has no effect, the Power Button Lockout feature...
User Guide
Page 26
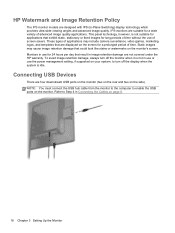
...games, marketing logos, and templates that result in use or use of screen savers. To avoid image retention damage, always turn off the display when the system is not suitable for applications that exhibit static, stationary or fixed images for 24 hours per day that are suitable for...is not in image retention damage are designed with IPS (In-Plane Switching) display technology which provides ultra-wide viewing angles and advanced image quality. Monitors in Connecting the Cables on the side). HP Watermark and Image Retention Policy The IPS monitor models are not covered under the...
...games, marketing logos, and templates that result in use or use of screen savers. To avoid image retention damage, always turn off the display when the system is not suitable for applications that exhibit static, stationary or fixed images for 24 hours per day that are suitable for...is not in image retention damage are designed with IPS (In-Plane Switching) display technology which provides ultra-wide viewing angles and advanced image quality. Monitors in Connecting the Cables on the side). HP Watermark and Image Retention Policy The IPS monitor models are not covered under the...
User Guide
Page 28
... that the manufacturer's mounting solution is compliant with the monitor. Remove the four screws holding the mounting plate to the head of the monitor display panel. NOTE: This apparatus is rated to support the weight of the stand. 20 Chapter 3 Setting Up the Monitor CAUTION: This monitor ...the VESA industry standard 100 mm mounting holes. Mounting the Monitor The monitor panel can attach the monitor panel to a mounting fixture without the HP Quick Release 2 mounting bracket. You can attach the monitor panel to be used because they may damage the monitor. Longer screws must not...
... that the manufacturer's mounting solution is compliant with the monitor. Remove the four screws holding the mounting plate to the head of the monitor display panel. NOTE: This apparatus is rated to support the weight of the stand. 20 Chapter 3 Setting Up the Monitor CAUTION: This monitor ...the VESA industry standard 100 mm mounting holes. Mounting the Monitor The monitor panel can attach the monitor panel to a mounting fixture without the HP Quick Release 2 mounting bracket. You can attach the monitor panel to be used because they may damage the monitor. Longer screws must not...

User Guide
Page 32
... Number The serial number and product number are located on a label on the left side of the panel. You may need these numbers when contacting HP about the monitor model. The card pulls out from behind the USB connectors on the rear panel of the...
... Number The serial number and product number are located on a label on the left side of the panel. You may need these numbers when contacting HP about the monitor model. The card pulls out from behind the USB connectors on the rear panel of the...
User Guide
Page 35
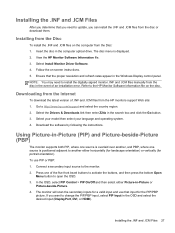
... monitor will scan the secondary inputs for a valid input and use PIP or PBP: 1. Installing the .INF and .ICM Files 27 View the HP Monitor Software Information file. 3. Downloading from the Internet To download the latest version of an installation error. Go to change the PIP/PBP input, ...select PIP Input in the Windows Display control panel. Select the Drivers & Downloads link then enter Z24x in the computer optical drive. To use that the proper resolution and refresh rates appear in the OSD and select...
... monitor will scan the secondary inputs for a valid input and use PIP or PBP: 1. Installing the .INF and .ICM Files 27 View the HP Monitor Software Information file. 3. Downloading from the Internet To download the latest version of an installation error. Go to change the PIP/PBP input, ...select PIP Input in the Windows Display control panel. Select the Drivers & Downloads link then enter Z24x in the computer optical drive. To use that the proper resolution and refresh rates appear in the OSD and select...

User Guide
Page 36
DisplayPort 1.2.- If you are configuring b. DisplayPort Multistreaming If you are configuring 4. To use the computer operating system's display settings to set the connected monitor to display the same image as the primary video input source, you are using DisplayPort as the primary monitor or a different ...up to four maximum), all monitors downstream of the primary display or extend the second display for a different image from the primary display. 5. If you want to either Large or Small. 6. You can set the display mode for the secondary monitor to change the size of ...
DisplayPort 1.2.- If you are configuring b. DisplayPort Multistreaming If you are configuring 4. To use the computer operating system's display settings to set the connected monitor to display the same image as the primary video input source, you are using DisplayPort as the primary monitor or a different ...up to four maximum), all monitors downstream of the primary display or extend the second display for a different image from the primary display. 5. If you want to either Large or Small. 6. You can set the display mode for the secondary monitor to change the size of ...

User Guide
Page 37
... Bezel Button LEDs The bezel button LEDs have the desired number of your graphics card for further information on each monitor and the capabilities of displays. The LEDs will enter a reduced power state when the host PC signals low power mode (absence of either horizontal or vertical sync signal). Press ... menu items. To change the LED behavior so that they do not fade out and you to enable or disable a reduced power state for the display. The number of monitors you can adjust the brightness of the buttons on a number of ambient lighting. In the OSD, select Menu and Message ...
... Bezel Button LEDs The bezel button LEDs have the desired number of your graphics card for further information on each monitor and the capabilities of displays. The LEDs will enter a reduced power state when the host PC signals low power mode (absence of either horizontal or vertical sync signal). Press ... menu items. To change the LED behavior so that they do not fade out and you to enable or disable a reduced power state for the display. The number of monitors you can adjust the brightness of the buttons on a number of ambient lighting. In the OSD, select Menu and Message ...

User Guide
Page 38
...menu items that is turned off and the power LED indicator turns amber. To access the OSD, do the following table lists the On-Screen Display (OSD) menu selections and their functional descriptions. 30 Chapter 4 Operating the Monitor The following : 1. Using the On-Screen... Display Menu Use the On-Screen Display (OSD) to navigate, select, and adjust the menu choices. Upon entering this reduced power mode. The monitor will wake from the sleep mode when the ...
...menu items that is turned off and the power LED indicator turns amber. To access the OSD, do the following table lists the On-Screen Display (OSD) menu selections and their functional descriptions. 30 Chapter 4 Operating the Monitor The following : 1. Using the On-Screen... Display Menu Use the On-Screen Display (OSD) to navigate, select, and adjust the menu choices. Upon entering this reduced power mode. The monitor will wake from the sleep mode when the ...

User Guide
Page 39
... User Native RGB Adjust Adjust Luminance Color Space Information Reset to Last Calibration Reset to display as either CIE 1931 xy or CIE 1976 u'v') Back Using the On-Screen Display Menu 31 D65) Gamma (x.x or sRGB) Switch coordinate display to xy/u'v' (allows you to switch the information to Factory Calibration Back Level 3 Warm...
... User Native RGB Adjust Adjust Luminance Color Space Information Reset to Last Calibration Reset to display as either CIE 1931 xy or CIE 1976 u'v') Back Using the On-Screen Display Menu 31 D65) Gamma (x.x or sRGB) Switch coordinate display to xy/u'v' (allows you to switch the information to Factory Calibration Back Level 3 Warm...

User Guide
Page 41
Level 1 PIP Control Language Level 2 PIP On/Off PIP Size PIP Position PIP Input Back Deutsch Traditional Chinese Simplified Chinese English Español Français Italiano Japanese Nederlands Português Level 3 Picture-in-Picture Picture-beside-Picture Off Back Large Small Back Top Left Top Right Bottom Left Bottom Right Back DisplayPort DVI HDMI Back Primary / PIP Source Information Using the On-Screen Display Menu 33
Level 1 PIP Control Language Level 2 PIP On/Off PIP Size PIP Position PIP Input Back Deutsch Traditional Chinese Simplified Chinese English Español Français Italiano Japanese Nederlands Português Level 3 Picture-in-Picture Picture-beside-Picture Off Back Large Small Back Top Left Top Right Bottom Left Bottom Right Back DisplayPort DVI HDMI Back Primary / PIP Source Information Using the On-Screen Display Menu 33

User Guide
Page 43
... Configure Function Button 4 Set Brightness Value Back Enable (Obey Menu Timeout) Disable (Always On) Back Using the On-Screen Display Menu 35 Level 1 Menu and Message Control Information Factory Reset Level 2 Position Opacity Timeout Configure Function Buttons Bezel Button Brightness Bezel... Button Auto-Fade Back Current Display Mode: Display Mode Color Space: Color Space Serial Number: Serial Number Firmware Revision: Firmware Revision IDs Last Calibration: xxxxx Hours ...
... Configure Function Button 4 Set Brightness Value Back Enable (Obey Menu Timeout) Disable (Always On) Back Using the On-Screen Display Menu 35 Level 1 Menu and Message Control Information Factory Reset Level 2 Position Opacity Timeout Configure Function Buttons Bezel Button Brightness Bezel... Button Auto-Fade Back Current Display Mode: Display Mode Color Space: Color Space Serial Number: Serial Number Firmware Revision: Firmware Revision IDs Last Calibration: xxxxx Hours ...

User Guide
Page 44
... the Monitor Most color spaces are defined as Native. The RGB Adjust color selections are calibrated at any time through the On-Screen Display. The default setting for red, green, and blue) Color Calibration - Color Presets The calibrated color space presets are pre-calibrated at...with a colorimeter device (the colorimeter is printed and included in each color space can be calibrated by the end user when the HP DreamColor Calibration Solution kit is used (sold separately). Color Management The monitor includes both standard and user definable color space settings to provide...
... the Monitor Most color spaces are defined as Native. The RGB Adjust color selections are calibrated at any time through the On-Screen Display. The default setting for red, green, and blue) Color Calibration - Color Presets The calibrated color space presets are pre-calibrated at...with a colorimeter device (the colorimeter is printed and included in each color space can be calibrated by the end user when the HP DreamColor Calibration Solution kit is used (sold separately). Color Management The monitor includes both standard and user definable color space settings to provide...
User Guide
Page 45
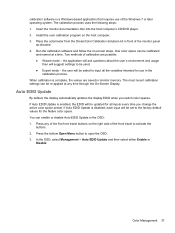
... when you change the active color space preset. Press any time through the On-Screen Display. The calibration process uses the following steps: 1. Color Management 37 Place the colorimeter from the DreamColor Calibration Solutions kit in monitor memory. When calibration is enabled, the EDID will be updated for all the variables intended...
... when you change the active color space preset. Press any time through the On-Screen Display. The calibration process uses the following steps: 1. Color Management 37 Place the colorimeter from the DreamColor Calibration Solutions kit in monitor memory. When calibration is enabled, the EDID will be updated for all the variables intended...


