
User Guide
Page 5
... Cables ...8 Front Panel Controls ...13 Adjusting the Monitor ...14 Turning on the Monitor ...17 HP Watermark and Image Retention Policy 18 Connecting USB Devices ...18 Removing the Monitor Stand ...19 Mounting the Monitor ...20 Mounting the Monitor Using the Quick Release 2 Mounting Bracket 20 Mounting the Monitor Without Using the Quick Release 2 Mounting Bracket 23 Locating the Serial Number and Product Number 24 Locating the Information Card ...24 Installing a Cable Lock ...25 4 Operating the Monitor ...26 Software and Utilities ...26 The Information File ...26 The Image Color...
... Cables ...8 Front Panel Controls ...13 Adjusting the Monitor ...14 Turning on the Monitor ...17 HP Watermark and Image Retention Policy 18 Connecting USB Devices ...18 Removing the Monitor Stand ...19 Mounting the Monitor ...20 Mounting the Monitor Using the Quick Release 2 Mounting Bracket 20 Mounting the Monitor Without Using the Quick Release 2 Mounting Bracket 23 Locating the Serial Number and Product Number 24 Locating the Information Card ...24 Installing a Cable Lock ...25 4 Operating the Monitor ...26 Software and Utilities ...26 The Information File ...26 The Image Color...
User Guide
Page 6
... Power Cord Requirements 45 Product Environmental Notices ...46 ENERGY STAR® Qualification 46 Materials Disposal ...46 vi Factory 36 Color Calibration - Installing the .INF and .ICM Files ...27 Installing from the Disc ...27 Downloading from the Internet 27 Using Picture-in-Picture (PIP) and Picture-beside-Picture (PBP 27 DisplayPort Multistreaming ...28 Changing the Bezel Button Functions 29 Adjusting the Bezel Button LEDs ...29 Using Auto-Sleep Mode ...29 Using the On-Screen Display Menu 30 Color...
... Power Cord Requirements 45 Product Environmental Notices ...46 ENERGY STAR® Qualification 46 Materials Disposal ...46 vi Factory 36 Color Calibration - Installing the .INF and .ICM Files ...27 Installing from the Disc ...27 Downloading from the Internet 27 Using Picture-in-Picture (PIP) and Picture-beside-Picture (PBP 27 DisplayPort Multistreaming ...28 Changing the Bezel Button Functions 29 Adjusting the Bezel Button LEDs ...29 Using Auto-Sleep Mode ...29 Using the On-Screen Display Menu 30 Color...

User Guide
Page 9
... the factory or user settings ● User calibration that requires the DreamColor calibration solution kit (sold separately) ● User adjustable color settings for customers who do not have calibration equipment ● Four reconfigurable front bezel Function buttons to quickly select the most commonly used operations ● Wide viewing angle to allow viewing from a sitting or standing position, or moving from side-toside ● Adjustable tilt, height, swivel, and pivot capabilities ● Removable stand for flexible monitor panel mounting...
... the factory or user settings ● User calibration that requires the DreamColor calibration solution kit (sold separately) ● User adjustable color settings for customers who do not have calibration equipment ● Four reconfigurable front bezel Function buttons to quickly select the most commonly used operations ● Wide viewing angle to allow viewing from a sitting or standing position, or moving from side-toside ● Adjustable tilt, height, swivel, and pivot capabilities ● Removable stand for flexible monitor panel mounting...

User Guide
Page 10
... placement of cables and cords ● On-Screen Display (OSD) adjustments in several languages for easy setup and screen optimization ● PIP functionality to enable the DisplayPort, DVI, and HDMI inputs to be viewed in a small secondary window or side-by-side on the main window ● HDCP (High-Bandwidth Digital Content Protection) copy protection on all digital inputs ● Software and documentation disc that includes monitor drivers, product documentation, and Windows-based calibration software 2 Chapter...
... placement of cables and cords ● On-Screen Display (OSD) adjustments in several languages for easy setup and screen optimization ● PIP functionality to enable the DisplayPort, DVI, and HDMI inputs to be viewed in a small secondary window or side-by-side on the main window ● HDCP (High-Bandwidth Digital Content Protection) copy protection on all digital inputs ● Software and documentation disc that includes monitor drivers, product documentation, and Windows-based calibration software 2 Chapter...

User Guide
Page 11
... Web at all cords and cables connected to the Power Cord Set Requirements on page 45. To reduce the risk of surge protection device such as a power strip or Uninterruptible Power Supply (UPS). Arrange them so that are inappropriately situated on or trip over them. This guide is used, use with the monitor. WARNING! Do not disable the power cord grounding pin, for computer users, and provides...
... Web at all cords and cables connected to the Power Cord Set Requirements on page 45. To reduce the risk of surge protection device such as a power strip or Uninterruptible Power Supply (UPS). Arrange them so that are inappropriately situated on or trip over them. This guide is used, use with the monitor. WARNING! Do not disable the power cord grounding pin, for computer users, and provides...

User Guide
Page 12
... connected to the cord does not exceed the rating of water and Isopropyl alcohol. Turn off the monitor when not in a storage area. Adjust only those controls that you must not be blocked or covered. Shipping the Monitor Keep the original packing box in use cleaners that contain any petroleum based materials such as indicated on a soft area to gently wipe the screen...
... connected to the cord does not exceed the rating of water and Isopropyl alcohol. Turn off the monitor when not in a storage area. Adjust only those controls that you must not be blocked or covered. Shipping the Monitor Keep the original packing box in use cleaners that contain any petroleum based materials such as indicated on a soft area to gently wipe the screen...

User Guide
Page 13
... monitor may cause non-uniformity of color or disorientation of the monitor, is turned off to the monitor. NOTE: Be sure the master power switch, located on a flat surface covered with a protective sheet foam or non-abrasive cloth. Use Caution When Setting Up the Monitor 5 The master power switch turns off all power to the monitor, computer system, and other attached devices, then follow the instructions below. If installing a base, lay the monitor...
... monitor may cause non-uniformity of color or disorientation of the monitor, is turned off to the monitor. NOTE: Be sure the master power switch, located on a flat surface covered with a protective sheet foam or non-abrasive cloth. Use Caution When Setting Up the Monitor 5 The master power switch turns off all power to the monitor, computer system, and other attached devices, then follow the instructions below. If installing a base, lay the monitor...

User Guide
Page 15
... panel) Master Power Switch AC Power Connector Function Connects optional USB devices to the monitor. Connects the AC power cord to the monitor. DisplayPort IN Connects the DisplayPort cable to the monitor. Connects headphones or optional HP Speaker Bar to the monitor. Connects optional USB devices to the monitor. Rear Components 7 NOTE: Putting the switch in the Off position will yield the lowest power state for the monitor when not in use. Connects a second monitor. HDMI DisplayPort OUT Audio Out USB 3.0 Upstream Connector USB 3.0 Downstream Connectors Connects...
... panel) Master Power Switch AC Power Connector Function Connects optional USB devices to the monitor. Connects the AC power cord to the monitor. DisplayPort IN Connects the DisplayPort cable to the monitor. Connects headphones or optional HP Speaker Bar to the monitor. Connects optional USB devices to the monitor. Rear Components 7 NOTE: Putting the switch in the Off position will yield the lowest power state for the monitor when not in use. Connects a second monitor. HDMI DisplayPort OUT Audio Out USB 3.0 Upstream Connector USB 3.0 Downstream Connectors Connects...

User Guide
Page 25
... not covered under the HP warranty. * A prolonged period of a static image. Press one of the monitor to open the OSD. If the default source is not in image" are active, the monitor will display the highest ranking priority input. Turning on the Monitor 1. The monitor automatically scans the signal inputs for a prolonged period of the auto-switch source setting (On or Off; Set the master power switch on the rear of the five front bezel buttons...
... not covered under the HP warranty. * A prolonged period of a static image. Press one of the monitor to open the OSD. If the default source is not in image" are active, the monitor will display the highest ranking priority input. Turning on the Monitor 1. The monitor automatically scans the signal inputs for a prolonged period of the auto-switch source setting (On or Off; Set the master power switch on the rear of the five front bezel buttons...
User Guide
Page 26
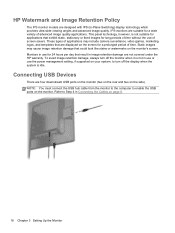
... time without the use the power management setting, if supported on the screen for a wide variety of time. NOTE: You must connect the USB hub cable from the monitor to the computer to Step 4 in use or use of applications may cause image retention damage that result in image retention damage are designed with IPS (In-Plane Switching) display technology which provides ultra-wide viewing angles and advanced...
... time without the use the power management setting, if supported on the screen for a wide variety of time. NOTE: You must connect the USB hub cable from the monitor to the computer to Step 4 in use or use of applications may cause image retention damage that result in image retention damage are designed with IPS (In-Plane Switching) display technology which provides ultra-wide viewing angles and advanced...
User Guide
Page 35
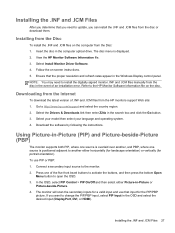
... over another either Picture-in the Windows Display control panel. In the OSD, select PIP Control > PIP On/Off and then select either horizontally (for landscape orientation) or vertically (for the PIP/PBP picture. Follow the on-screen instructions. 5. Select the Drivers & Downloads link then enter Z24x in the computer optical drive. Connect a secondary input source to open the OSD. 3. If you want to http://www.hp.com/support and select the...
... over another either Picture-in the Windows Display control panel. In the OSD, select PIP Control > PIP On/Off and then select either horizontally (for landscape orientation) or vertically (for the PIP/PBP picture. Follow the on-screen instructions. 5. Select the Drivers & Downloads link then enter Z24x in the computer optical drive. Connect a secondary input source to open the OSD. 3. If you want to http://www.hp.com/support and select the...

User Guide
Page 37
... PC signals low power mode (absence of either horizontal or vertical sync signal). You can change the top-level front bezel button functions from the DisplayPort OUT of one of the five front bezel buttons to activate the buttons, and then press the bottom Open Menu button to open the OSD. 2. To change the bezel button functions: 1. When Auto-Sleep Mode is enabled (enabled by default. Changing the Bezel Button Functions You can change the LED...
... PC signals low power mode (absence of either horizontal or vertical sync signal). You can change the top-level front bezel button functions from the DisplayPort OUT of one of the five front bezel buttons to activate the buttons, and then press the bottom Open Menu button to open the OSD. 2. To change the bezel button functions: 1. When Auto-Sleep Mode is enabled (enabled by default. Changing the Bezel Button Functions You can change the LED...

User Guide
Page 38
... settings. Press one of power when in the OSD. Press the bottom Open Menu button to open the OSD. 3. NOTE: OSD menu items that are grayed out are variable depending on the menu or sub-menu that is turned off and the power LED indicator turns amber. You can disable the Auto-Sleep Mode in this reduced power state sleep mode, the monitor screen is blanked, the backlight is active. Use the top four Function buttons to adjust the screen image based...
... settings. Press one of power when in the OSD. Press the bottom Open Menu button to open the OSD. 3. NOTE: OSD menu items that are grayed out are variable depending on the menu or sub-menu that is turned off and the power LED indicator turns amber. You can disable the Auto-Sleep Mode in this reduced power state sleep mode, the monitor screen is blanked, the backlight is active. Use the top four Function buttons to adjust the screen image based...

User Guide
Page 43
...Function Buttons Bezel Button Brightness Bezel Button Auto-Fade Back Current Display Mode: Display Mode Color Space: Color Space Serial Number: Serial Number Firmware Revision: Firmware Revision IDs Last Calibration: xxxxx Hours Backlight Hours: xxxxx Hours Back Level 3 Use the buttons to adjust the position of the Menu. Set Opacity Value Back Set Timeout Value Back Configure Function Button 1 Configure Function Button 2 Configure Function Button 3 Configure Function Button 4 Set Brightness Value Back Enable (Obey Menu Timeout) Disable (Always On) Back Using the On-Screen Display Menu 35...
...Function Buttons Bezel Button Brightness Bezel Button Auto-Fade Back Current Display Mode: Display Mode Color Space: Color Space Serial Number: Serial Number Firmware Revision: Firmware Revision IDs Last Calibration: xxxxx Hours Backlight Hours: xxxxx Hours Back Level 3 Use the buttons to adjust the position of the Menu. Set Opacity Value Back Set Timeout Value Back Configure Function Button 1 Configure Function Button 2 Configure Function Button 3 Configure Function Button 4 Set Brightness Value Back Enable (Obey Menu Timeout) Disable (Always On) Back Using the On-Screen Display Menu 35...

User Guide
Page 44
... the HP DreamColor Calibration Solution kit is configured at the factory to support a variety of the monitor's color gamut, RGB primaries, gamma, and luminance. User With the exception of the native panel color space, each color space can be calibrated. Color Calibration - Color Presets The calibrated color space presets are calibrated at any time through the On-Screen Display. The default setting for red, green, and blue) Color Calibration - The user 36 Chapter 4 Operating the Monitor Calibration includes control of customer uses. Color Management The monitor...
... the HP DreamColor Calibration Solution kit is configured at the factory to support a variety of the monitor's color gamut, RGB primaries, gamma, and luminance. User With the exception of the native panel color space, each color space can be calibrated. Color Calibration - Color Presets The calibrated color space presets are calibrated at any time through the On-Screen Display. The default setting for red, green, and blue) Color Calibration - The user 36 Chapter 4 Operating the Monitor Calibration includes control of customer uses. Color Management The monitor...

User Guide
Page 46
Z24x Model Display Type Viewable Image Size Maximum Weight (Unpacked) Dimensions (include base) Height (highest position) Height (lowest position) Depth Width Maximum Graphic Resolution Optimum Graphic Resolution Environmental Requirements Temperature 61.0 cm wide screen IPS LCD 61.0 cm diagonal 7.08 kg 52.5 cm 40.5 cm 23.798 cm 55.94 cm 1920 x 1200 (60 Hz) digital input 1920 x 1200 (60 Hz) digital input 24 inches wide screen 24-inch diagonal 15.61 lbs 20...
Z24x Model Display Type Viewable Image Size Maximum Weight (Unpacked) Dimensions (include base) Height (highest position) Height (lowest position) Depth Width Maximum Graphic Resolution Optimum Graphic Resolution Environmental Requirements Temperature 61.0 cm wide screen IPS LCD 61.0 cm diagonal 7.08 kg 52.5 cm 40.5 cm 23.798 cm 55.94 cm 1920 x 1200 (60 Hz) digital input 1920 x 1200 (60 Hz) digital input 24 inches wide screen 24-inch diagonal 15.61 lbs 20...
User Guide
Page 48
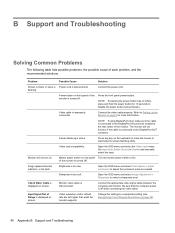
... OSD menu and select the Video Input menu. Video resolution and/or refresh rate are set higher than what the monitor supports. Press any key on screen. flashing. NOTE: If pressing the power button has no effect, press and hold the power button for more information. Brightness is off . Image appears blurred, indistinct, or too dark. Video card compatibility. Problem Possible Cause Solution Screen is blank or video is Power cord is disconnected. Connect the power cord. Open the OSD menu and select Color Space > Adjust...
... OSD menu and select the Video Input menu. Video resolution and/or refresh rate are set higher than what the monitor supports. Press any key on screen. flashing. NOTE: If pressing the power button has no effect, press and hold the power button for more information. Brightness is off . Image appears blurred, indistinct, or too dark. Video card compatibility. Problem Possible Cause Solution Screen is blank or video is Power cord is disconnected. Connect the power cord. Open the OSD menu and select Color Space > Adjust...
User Guide
Page 49
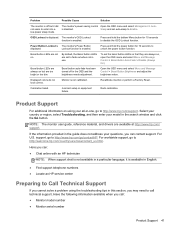
..., you cannot solve a problem using your model in a particular language, it did not seem to Enable. support, go to http://www.hp.com/go to unlock the power button function. The monitor's power saving control Open the OSD menu and select Management > Auto- Sleep and set auto-sleep to enter into a low-power sleep mode. Bezel button LEDs are always on but it is available in English. ● Find support telephone numbers ● Locate an HP service center Preparing to Call...
..., you cannot solve a problem using your model in a particular language, it did not seem to Enable. support, go to http://www.hp.com/go to unlock the power button function. The monitor's power saving control Open the OSD menu and select Management > Auto- Sleep and set auto-sleep to enter into a low-power sleep mode. Bezel button LEDs are always on but it is available in English. ● Find support telephone numbers ● Locate an HP service center Preparing to Call...

User Guide
Page 53
... Korean Notice Power Cord Set Requirements The monitor power supply is not likely to operate on the product. The power cord set (flexible cord or wall plug) received with the monitor meets the requirements for use only the power cord received with this product. If you need to the plug, electrical outlet, and the point where the cord exits from the product. The voltage and current rating of power cord to use in...
... Korean Notice Power Cord Set Requirements The monitor power supply is not likely to operate on the product. The power cord set (flexible cord or wall plug) received with the monitor meets the requirements for use only the power cord received with this product. If you need to the plug, electrical outlet, and the point where the cord exits from the product. The voltage and current rating of power cord to use in...

User Guide
Page 54
... feature also supports similar power management features for displays and computers were created by using the Microsoft Windows power management feature to initiate a low-power or "sleep" mode after 30 minutes of -life. When used with the Wake On LAN (WOL) feature enabled, etc. Examples include the user pressing the power/sleep button, receiving an input signal from an input device, receiving an input signal from a network connection with an...
... feature also supports similar power management features for displays and computers were created by using the Microsoft Windows power management feature to initiate a low-power or "sleep" mode after 30 minutes of -life. When used with the Wake On LAN (WOL) feature enabled, etc. Examples include the user pressing the power/sleep button, receiving an input signal from an input device, receiving an input signal from a network connection with an...


