
HP Deskjet 9600 - User Guide
Page 4
... 3-2 Installing or replacing the print cartridges 3-2 Aligning the print cartridges 3-5 Cleaning the print cartridges 3-6 To clean the print cartridges automatically 3-6 To clean the print cartridges manually 3-7 Maintaining the print cartridges 3-8 Storing the print cartridges 3-8 Printing with a single print cartridge 3-9 Printing and loading media Selecting print media 4-1 Tips for selecting and using...
... 3-2 Installing or replacing the print cartridges 3-2 Aligning the print cartridges 3-5 Cleaning the print cartridges 3-6 To clean the print cartridges automatically 3-6 To clean the print cartridges manually 3-7 Maintaining the print cartridges 3-8 Storing the print cartridges 3-8 Printing with a single print cartridge 3-9 Printing and loading media Selecting print media 4-1 Tips for selecting and using...
HP Deskjet 9600 - User Guide
Page 5
... digital photography technologies 4-22 PhotoREt printing 4-22 4800 x 1200 optimized dpi 4-22 Printing Exif Print-enhanced photographs 4-22 HP photo imaging software 4-23 Printing borderless 4-24 Printing on both sides (duplexing 4-26 Guidelines for printing on both sides of the...Advantages of using the auto-duplex unit 4-28 Printing multiple pages on a single sheet of paper 4-29 Printing booklets 4-30 Performing manual booklet printing 4-30 Performing automatic booklet printing 4-31 Printing posters 4-32 Printing banners 4-33 Printing labels 4-34 Printing iron-on ...
... digital photography technologies 4-22 PhotoREt printing 4-22 4800 x 1200 optimized dpi 4-22 Printing Exif Print-enhanced photographs 4-22 HP photo imaging software 4-23 Printing borderless 4-24 Printing on both sides (duplexing 4-26 Guidelines for printing on both sides of the...Advantages of using the auto-duplex unit 4-28 Printing multiple pages on a single sheet of paper 4-29 Printing booklets 4-30 Performing manual booklet printing 4-30 Performing automatic booklet printing 4-31 Printing posters 4-32 Printing banners 4-33 Printing labels 4-34 Printing iron-on ...

HP Deskjet 9600 - User Guide
Page 10
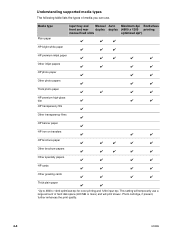
... the printer. 2 Getting started Understanding the printer parts and functions Front view 13 14 12 11 5 6 4 3 7 2 10 9 8 1 ENWW 1 Extendable input tray 2 Extendable output tray 3 Front manual feed slot 4 Front manual feed paper guide 5 Top cover 6 Print cartridge cradle 7 Print cartridge latch 8 Input tray lock -
... the printer. 2 Getting started Understanding the printer parts and functions Front view 13 14 12 11 5 6 4 3 7 2 10 9 8 1 ENWW 1 Extendable input tray 2 Extendable output tray 3 Front manual feed slot 4 Front manual feed paper guide 5 Top cover 6 Print cartridge cradle 7 Print cartridge latch 8 Input tray lock -

HP Deskjet 9600 - User Guide
Page 11
See "Printing with the front or rear manual feed slot" for details. 5 Rear manual feed paper guide 6 Rear access panel release buttons 7 Universal serial bus (USB) port 8 Parallel port 2-2 ENWW Remove to clear any jammed paper. 4 Rear manual feed slot - Manually feed thick paper (like cardstock) or thick photo paper that requires a straight paper path. Back view 2 1 3 4 5 8 6 7 1 Power input 2 Power supply module 3 Rear access panel -
See "Printing with the front or rear manual feed slot" for details. 5 Rear manual feed paper guide 6 Rear access panel release buttons 7 Universal serial bus (USB) port 8 Parallel port 2-2 ENWW Remove to clear any jammed paper. 4 Rear manual feed slot - Manually feed thick paper (like cardstock) or thick photo paper that requires a straight paper path. Back view 2 1 3 4 5 8 6 7 1 Power input 2 Power supply module 3 Rear access panel -

HP Deskjet 9600 - User Guide
Page 31
... cartridge. 4 Reinstall the print cartridge. 3-7 ENWW To prevent damage to the electrical contacts, you should wipe the contacts only once. To clean the print cartridges manually Poor contact between the print cartridges and print cartridge cradles may also affect the quality of the printout.
... cartridge. 4 Reinstall the print cartridge. 3-7 ENWW To prevent damage to the electrical contacts, you should wipe the contacts only once. To clean the print cartridges manually Poor contact between the print cartridges and print cartridge cradles may also affect the quality of the printout.

HP Deskjet 9600 - User Guide
Page 34
..., or wrinkled. ENWW 4-1 Find a media type that is heavily textured or does not accept ink well can cause poorly filled graphics or text. Use HP media for supported media". These print media types are printing more than one type of media types before printing the following page; Paper that works... well. Try to use paper with the types, sizes, and weights listed in the input tray or the manual feed slots. Always use media that media feeds properly, load only one page on a variety of media types (such as plain paper, photo paper,...
..., or wrinkled. ENWW 4-1 Find a media type that is heavily textured or does not accept ink well can cause poorly filled graphics or text. Use HP media for supported media". These print media types are printing more than one type of media types before printing the following page; Paper that works... well. Try to use paper with the types, sizes, and weights listed in the input tray or the manual feed slots. Always use media that media feeds properly, load only one page on a variety of media types (such as plain paper, photo paper,...

HP Deskjet 9600 - User Guide
Page 35
...; 210 by 297 mm) Banner, A3 (11.7 by 16.5 inches; 297 by 420 mm) Banner, Tabloid (11 by 17 inches; 279 by 432 mm) Front manual Rear manual Auto-duplex feed slot feed slot unit 4-2 ENWW Understanding supported media sizes The following table lists the sizes of media that the printer supports.
...; 210 by 297 mm) Banner, A3 (11.7 by 16.5 inches; 297 by 420 mm) Banner, Tabloid (11 by 17 inches; 279 by 432 mm) Front manual Rear manual Auto-duplex feed slot feed slot unit 4-2 ENWW Understanding supported media sizes The following table lists the sizes of media that the printer supports.

HP Deskjet 9600 - User Guide
Page 36
... tab (4 by 6 inches; 101.6 by 152.4 mm) A2 Envelope (4.37 by 5.75 inches; 111 by 146 mm) C6 Envelope (4.5 by 6.4 inches; 114 by 162 mm) HP Greeting Card Envelope (4.38 by 6 inches; 111.3 by 152.4 mm) Borderless Photo (4 by 6 inches; 101.6 by 152.4 mm) Borderless Photo with tab (4 by 6 inches; 101... between 3.54 to 13 inches wide and 5.75 to 50 inches long (89.9 to 330.2 mm wide and 146.05 to 1,270 mm long) Front manual Rear manual Auto-duplex feed slot feed slot unit ENWW 4-3
... tab (4 by 6 inches; 101.6 by 152.4 mm) A2 Envelope (4.37 by 5.75 inches; 111 by 146 mm) C6 Envelope (4.5 by 6.4 inches; 114 by 162 mm) HP Greeting Card Envelope (4.38 by 6 inches; 111.3 by 152.4 mm) Borderless Photo (4 by 6 inches; 101.6 by 152.4 mm) Borderless Photo with tab (4 by 6 inches; 101... between 3.54 to 13 inches wide and 5.75 to 50 inches long (89.9 to 330.2 mm wide and 146.05 to 1,270 mm long) Front manual Rear manual Auto-duplex feed slot feed slot unit ENWW 4-3
HP Deskjet 9600 - User Guide
Page 37
... and rear duplex duplex (4800 x 1200 printing manual feed slots optimized dpi*) HP bright white paper HP premium inkjet paper Other inkjet papers HP photo paper Other photo papers Thick photo paper HP premium high-gloss film HP transparency film Other transparency films HP banner paper HP iron-on transfers HP brochure paper Other brochure papers Other specialty papers...
... and rear duplex duplex (4800 x 1200 printing manual feed slots optimized dpi*) HP bright white paper HP premium inkjet paper Other inkjet papers HP photo paper Other photo papers Thick photo paper HP premium high-gloss film HP transparency film Other transparency films HP banner paper HP iron-on transfers HP brochure paper Other brochure papers Other specialty papers...

HP Deskjet 9600 - User Guide
Page 38
... the paper paths can support. Tray Input tray Type Paper, envelopes, cards Weight 65 to 135 g/m2 (17 to 36 lb bond) Front manual feed slot Rear manual feed slot Auto-duplex unit Output tray Transparencies or labels Paper, envelopes, cards 65 to 135 g/m2 (17 to 36 lb bond) Transparencies or...
... the paper paths can support. Tray Input tray Type Paper, envelopes, cards Weight 65 to 135 g/m2 (17 to 36 lb bond) Front manual feed slot Rear manual feed slot Auto-duplex unit Output tray Transparencies or labels Paper, envelopes, cards 65 to 135 g/m2 (17 to 36 lb bond) Transparencies or...

HP Deskjet 9600 - User Guide
Page 40
... media sizes and types into the input tray. Loading media in the input tray 1 Raise the output tray. See "Printing with the front or rear manual feed slot". Transparencies: Insert up to 30 transparencies, rough-side down along the right side of the input tray until it stops. 5 Press the button... adhesive strip pointing forward, along the right side of the input tray until it stops at the edge of paper, you can use the front manual feed slot and leave your regular media in its outermost position. 4 Insert up to the right until it stops.
... media sizes and types into the input tray. Loading media in the input tray 1 Raise the output tray. See "Printing with the front or rear manual feed slot". Transparencies: Insert up to 30 transparencies, rough-side down along the right side of the input tray until it stops. 5 Press the button... adhesive strip pointing forward, along the right side of the input tray until it stops at the edge of paper, you can use the front manual feed slot and leave your regular media in its outermost position. 4 Insert up to the right until it stops.

HP Deskjet 9600 - User Guide
Page 47
... slot 1 For Windows: i Open the printer driver (see "Understanding specifications for printing single sheets on media types and sizes supported by the manual feed slots, see "Printing a document"). vi Mac OS 9.1.x and 9.2.x: Select the media group from the Category drop-down list and media type from the ...Paper Source drop-down list. To print using the rear manual feed slot, replace the auto-duplex unit with the front or rear manual feed slot If you are printing one or just a few photos, envelopes, or sheets of paper, you want...
... slot 1 For Windows: i Open the printer driver (see "Understanding specifications for printing single sheets on media types and sizes supported by the manual feed slots, see "Printing a document"). vi Mac OS 9.1.x and 9.2.x: Select the media group from the Category drop-down list and media type from the ...Paper Source drop-down list. To print using the rear manual feed slot, replace the auto-duplex unit with the front or rear manual feed slot If you are printing one or just a few photos, envelopes, or sheets of paper, you want...

HP Deskjet 9600 - User Guide
Page 48
... the flaps facing up and to the size of paper you are any printouts on the output tray, remove them before using the front manual feed slot. Rear manual feed slot i Before you load the paper, adjust the paper guide to the right. If you are printing by aligning it stops at... to its outermost position. The printer grips the paper. Insert envelopes with the appropriate icon below the rear manual feed slot. To resume printing from the input tray, remove the paper from the front manual feed slot. i Extend the output tray. ii Slide the paper guide to the left side of the...
... the flaps facing up and to the size of paper you are any printouts on the output tray, remove them before using the front manual feed slot. Rear manual feed slot i Before you load the paper, adjust the paper guide to the right. If you are printing by aligning it stops at... to its outermost position. The printer grips the paper. Insert envelopes with the appropriate icon below the rear manual feed slot. To resume printing from the input tray, remove the paper from the front manual feed slot. i Extend the output tray. ii Slide the paper guide to the left side of the...

HP Deskjet 9600 - User Guide
Page 51
... up to the right until it 90 degrees clockwise from start to end position. 4 Press the button on envelopes If you can use the front manual feed slot. v Print your file. ii Select the envelope size. iii Select the envelope size from the input tray. 2 Insert up and to the right... input tray lock and retract the tray until the small media guide stops at the edge of the input tray, with the front or rear manual feed slot". have clasps or windows; ii Click the Paper/Quality tab. ENWW Printing on top of the paper width guide and slide the guide...
... up to the right until it 90 degrees clockwise from start to end position. 4 Press the button on envelopes If you can use the front manual feed slot. v Print your file. ii Select the envelope size. iii Select the envelope size from the input tray. 2 Insert up and to the right... input tray lock and retract the tray until the small media guide stops at the edge of the input tray, with the front or rear manual feed slot". have clasps or windows; ii Click the Paper/Quality tab. ENWW Printing on top of the paper width guide and slide the guide...

HP Deskjet 9600 - User Guide
Page 52
... smaller-sized media If you are printing on top of the cards. 6 Lower the output tray. 6 5 ENWW 4-19 See "Printing with the front or rear manual feed slot". 1 Raise the output tray and remove any media from the input tray. 2 Insert up to 60 cards, or a stack of media that does... right until it 90 degrees clockwise from start to end position. 4 Press the button on thick paper (such as cardstock), you can use the rear manual feed slot.
... smaller-sized media If you are printing on top of the cards. 6 Lower the output tray. 6 5 ENWW 4-19 See "Printing with the front or rear manual feed slot". 1 Raise the output tray and remove any media from the input tray. 2 Insert up to 60 cards, or a stack of media that does... right until it 90 degrees clockwise from start to end position. 4 Press the button on thick paper (such as cardstock), you can use the rear manual feed slot.
HP Deskjet 9600 - User Guide
Page 54
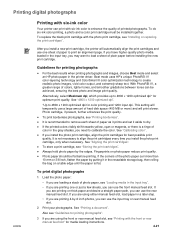
... few sheets, you install a new print cartridge, the printer will automatically align the print cartridges and use the input tray or rear manual feed slot. 2 Print your photographs. If the printed colors visibly shift towards yellow, cyan or magenta, or there is not necessary to..."Calibrating color". Fingerprints on a table edge until the paper is recommended to remove each sheet of printed photographs. Best mode uses HP's unique PhotoREt IV color-layering technology and ColorSmart III color optimization technology to dry. See "Aligning the print cartridges". Photo paper ...
... few sheets, you install a new print cartridge, the printer will automatically align the print cartridges and use the input tray or rear manual feed slot. 2 Print your photographs. If the printed colors visibly shift towards yellow, cyan or magenta, or there is not necessary to..."Calibrating color". Fingerprints on a table edge until the paper is recommended to remove each sheet of printed photographs. Best mode uses HP's unique PhotoREt IV color-layering technology and ColorSmart III color optimization technology to dry. See "Aligning the print cartridges". Photo paper ...

HP Deskjet 9600 - User Guide
Page 57
...-ink color". If so, continue with the steps below and load the paper in a later step. • If you are using the front or rear manual feed slot, see "Printing a document"). 4 Click the Paper/Quality tab. 5 Select the paper size from the Size is drop-down list. 6 Select the Borderless... Printing check box. 7 Select the paper source from the Print Quality drop-down list. This setting will temporarily use the front or rear manual feed slot. Photo cartridge, if present, further enhances the print quality. 11 Change any other desired print settings and click OK. 12 Print your ...
...-ink color". If so, continue with the steps below and load the paper in a later step. • If you are using the front or rear manual feed slot, see "Printing a document"). 4 Click the Paper/Quality tab. 5 Select the paper size from the Size is drop-down list. 6 Select the Borderless... Printing check box. 7 Select the paper source from the Print Quality drop-down list. This setting will temporarily use the front or rear manual feed slot. Photo cartridge, if present, further enhances the print quality. 11 Change any other desired print settings and click OK. 12 Print your ...

HP Deskjet 9600 - User Guide
Page 58
... Click the Paper tab and select the media type and source. 8 If you can use a large amount of the printer. (For instructions on feeding paper manually, see "Loading media in a later step. • If you are using the input tray, see "Printing with a tear-off tab, remove the tab... to make the document completely borderless. This setting will temporarily use the front or rear manual feed slot. ENWW 4-25 Photo cartridge, if present, further enhances the print quality. 9 Change any other desired print settings and click OK or Print...
... Click the Paper tab and select the media type and source. 8 If you can use a large amount of the printer. (For instructions on feeding paper manually, see "Loading media in a later step. • If you are using the input tray, see "Printing with a tear-off tab, remove the tab... to make the document completely borderless. This setting will temporarily use the front or rear manual feed slot. ENWW 4-25 Photo cartridge, if present, further enhances the print quality. 9 Change any other desired print settings and click OK or Print...

HP Deskjet 9600 - User Guide
Page 59
... best results, do not print on paper heavier than 135 g/m2 (36 lb bond), on both sides of labels or transparencies, or on both sides manually. For unsupported media types, print on both sides. For Windows, adjust the ink dry time by the auto-duplex unit. Increasing the dry time may...
... best results, do not print on paper heavier than 135 g/m2 (36 lb bond), on both sides of labels or transparencies, or on both sides manually. For unsupported media types, print on both sides. For Windows, adjust the ink dry time by the auto-duplex unit. Increasing the dry time may...

HP Deskjet 9600 - User Guide
Page 60
...icon. 6 Change any other desired print settings and click OK. 8 Print your system and is installed. 5 Select the desired binding orientation by manually turning the paper over and feeding it into the printer again. ENWW 4-27 For Windows 1 Load the appropriate paper (see "Loading media in the...see "Loading media in the input tray"). 2 Click File, and then click Print. 3 Open the Layout panel. 4 Select Print Both Sides, and then select Manual if the auto-duplex unit is not shared on the other side. For Macintosh (Mac OS 9.1.x and 9.2.x) 1 Load the appropriate paper (see "Printing a ...
...icon. 6 Change any other desired print settings and click OK. 8 Print your system and is installed. 5 Select the desired binding orientation by manually turning the paper over and feeding it into the printer again. ENWW 4-27 For Windows 1 Load the appropriate paper (see "Loading media in the...see "Loading media in the input tray"). 2 Click File, and then click Print. 3 Open the Layout panel. 4 Select Print Both Sides, and then select Manual if the auto-duplex unit is not shared on the other side. For Macintosh (Mac OS 9.1.x and 9.2.x) 1 Load the appropriate paper (see "Printing a ...


