
Setup Poster
Page 1
... Remove packaging 5a Install the printhead a. Touch the OK button. Open the ink cartridge access door. b. Do not touch the copper colored contacts. Turn the ink cartridge over, slide it into place. Twist the orange cap to load paper. e. c. After the alignment page... and green blocks on the printer or other surface. a. d. b. Pull out the tray extender and lift up the paper catch. 8 Print the alignment page a. a. d. b. Slide the paper guides against the paper. 2 Box Contents 4 Connect power a. Start Here HP Photosmart D7500 series 1 Do not...
... Remove packaging 5a Install the printhead a. Touch the OK button. Open the ink cartridge access door. b. Do not touch the copper colored contacts. Turn the ink cartridge over, slide it into place. Twist the orange cap to load paper. e. c. After the alignment page... and green blocks on the printer or other surface. a. d. b. Pull out the tray extender and lift up the paper catch. 8 Print the alignment page a. a. d. b. Slide the paper guides against the paper. 2 Box Contents 4 Connect power a. Start Here HP Photosmart D7500 series 1 Do not...

Setup Poster
Page 2
... a non-powered USB hub. Action: Cancel all screens. HP Photosmart Pro HP PhotosmBa88rt0P0roserBie8s800 Series TTuuttQooQrruiiuaiacicllkkiinnSSccttallauurrddtt eedd Product in [country] - Once the USB prompt appears, connect the USB cable to the port on the back of the HP Printer, and then to print. Action: Unplug the device and ...plug it . Mac: HP Photosmart Studio allows you can try out one of photos to any USB port on the computer...
... a non-powered USB hub. Action: Cancel all screens. HP Photosmart Pro HP PhotosmBa88rt0P0roserBie8s800 Series TTuuttQooQrruiiuaiacicllkkiinnSSccttallauurrddtt eedd Product in [country] - Once the USB prompt appears, connect the USB cable to the port on the back of the HP Printer, and then to print. Action: Unplug the device and ...plug it . Mac: HP Photosmart Studio allows you can try out one of photos to any USB port on the computer...
Basic Guide
Page 5
English Contents 1 HP Photosmart overview The HP Photosmart at a glance 2 Control panel features...3 Find more information...4 Load paper...4 Print directly onto a CD/DVD...7 Avoid paper jams...9 Print a photo on photo paper...10 Replace ...
English Contents 1 HP Photosmart overview The HP Photosmart at a glance 2 Control panel features...3 Find more information...4 Load paper...4 Print directly onto a CD/DVD...7 Avoid paper jams...9 Print a photo on photo paper...10 Replace ...
Basic Guide
Page 6
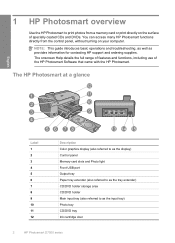
NOTE: This guide introduces basic operations and troubleshooting, as well as provides information for contacting HP support and ordering supplies. The HP Photosmart at a glance English Label 1 2 3 4 5 6 7 8 9 10 11 12 Description Color graphics display (also referred to as the display) Control panel Memory card slots and Photo light Front USB port Output tray Paper tray...
NOTE: This guide introduces basic operations and troubleshooting, as well as provides information for contacting HP support and ordering supplies. The HP Photosmart at a glance English Label 1 2 3 4 5 6 7 8 9 10 11 12 Description Color graphics display (also referred to as the display) Control panel Memory card slots and Photo light Front USB port Output tray Paper tray...
Basic Guide
Page 7
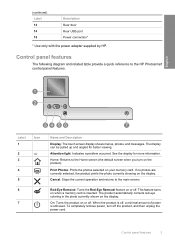
..., and then unplug the power cord. The display can be pulled up and angled for more information. The product automatically corrects red-eye coloring in the photo currently shown on the display. Home: Returns to the Home screen (the default screen when you turn off . Print ...Photos: Prints the photos selected on or off , a minimal amount of power is inserted. Cancel: Stops the current operation and returns to the HP Photosmart control panel features. On: Turns the product on your memory card. Red-Eye Removal: Turns the Red-Eye Removal feature on the product). English...
..., and then unplug the power cord. The display can be pulled up and angled for more information. The product automatically corrects red-eye coloring in the photo currently shown on the display. Home: Returns to the Home screen (the default screen when you turn off . Print ...Photos: Prints the photos selected on or off , a minimal amount of power is inserted. Cancel: Stops the current operation and returns to the HP Photosmart control panel features. On: Turns the product on your memory card. Red-Eye Removal: Turns the Red-Eye Removal feature on the product). English...

Basic Guide
Page 8
... Start Here guide in this guide. Load paper You can get help and support from the HP Web site at www.hp.com/support. For more information A variety of your HP Photosmart and installing software. English Chapter 1 Find more information, see the onscreen Help. icon. If... "Troubleshooting and support" on features of resources, both printed and onscreen, provide information about setting up your HP Photosmart that are only available using the HP Photosmart. Onscreen Help The onscreen Help provides detailed instructions on page 14 in this guide, including features that are not...
... Start Here guide in this guide. Load paper You can get help and support from the HP Web site at www.hp.com/support. For more information A variety of your HP Photosmart and installing software. English Chapter 1 Find more information, see the onscreen Help. icon. If... "Troubleshooting and support" on features of resources, both printed and onscreen, provide information about setting up your HP Photosmart that are only available using the HP Photosmart. Onscreen Help The onscreen Help provides detailed instructions on page 14 in this guide, including features that are not...

Basic Guide
Page 10
If the photo paper you are using has perforated tabs, load the photo paper so that the tabs are closest to you use legal-size paper, leave the tray extender closed. Slide the paper-width guide to 13 x 18 cm (5 x 7 inch) photo paper in the photo tray 1. To load up to its outermost position. 3. Insert the stack of photo paper forward until it stops. Slide the stack of photo paper into the photo tray with the short edge forward and the print side down. English Chapter 1 NOTE: When you . 6 HP Photosmart D7500 series Raise the photo tray lid. 2.
If the photo paper you are using has perforated tabs, load the photo paper so that the tabs are closest to you use legal-size paper, leave the tray extender closed. Slide the paper-width guide to 13 x 18 cm (5 x 7 inch) photo paper in the photo tray 1. To load up to its outermost position. 3. Insert the stack of photo paper forward until it stops. Slide the stack of photo paper into the photo tray with the short edge forward and the print side down. English Chapter 1 NOTE: When you . 6 HP Photosmart D7500 series Raise the photo tray lid. 2.

Basic Guide
Page 11
... software that came with the product to the CD or DVD before printing the label on the surface of the paper-width guide. NOTE: The HP Photosmart does not support a CD/DVD print job started from the control panel. Print directly onto a CD/DVD In addition to printing on paper, the... HP Photosmart enables you to print directly on it stops at least 7.5 cm (3 inches) away from the storage area below the main input tray. TIP: It is ...
... software that came with the product to the CD or DVD before printing the label on the surface of the paper-width guide. NOTE: The HP Photosmart does not support a CD/DVD print job started from the control panel. Print directly onto a CD/DVD In addition to printing on paper, the... HP Photosmart enables you to print directly on it stops at least 7.5 cm (3 inches) away from the storage area below the main input tray. TIP: It is ...

Basic Guide
Page 12
The CD/DVD should you flip the CD/ DVD holder ring over the CD/DVD. 5. Securely snap the inkjet printable media onto the CD/DVD holder with the arrows. The CD/DVD tray is located just below the control panel. When in its lowered position, the CD/DVD tray sits on the ring at the end of the output tray. 8 HP Photosmart D7500 series Lower the CD/DVD tray. NOTE: If you are using a smaller-sized media, only then should be placed on top of the holder with the printable side up. English Chapter 1 4.
The CD/DVD should you flip the CD/ DVD holder ring over the CD/DVD. 5. Securely snap the inkjet printable media onto the CD/DVD holder with the arrows. The CD/DVD tray is located just below the control panel. When in its lowered position, the CD/DVD tray sits on the ring at the end of the output tray. 8 HP Photosmart D7500 series Lower the CD/DVD tray. NOTE: If you are using a smaller-sized media, only then should be placed on top of the holder with the printable side up. English Chapter 1 4.
Basic Guide
Page 14
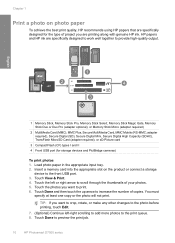
... more photos to the print queue. 8. Touch Done and then touch the up arrow to increase the number of your photos. 5. HP papers and HP ink are printing along with genuine HP ink. Insert a memory card into the appropriate slot on photo paper To achieve the best print quality... for storage devices and PictBridge cameras) To print photos 1. Touch the photos you want to print. 6. Touch Done to preview the print job. 10 HP Photosmart D7500 series Load photo paper in the appropriate input tray. 2. Touch View & Print. 4. English 1 Memory Stick, Memory Stick Pro, Memory Stick Select...
... more photos to the print queue. 8. Touch Done and then touch the up arrow to increase the number of your photos. 5. HP papers and HP ink are printing along with genuine HP ink. Insert a memory card into the appropriate slot on photo paper To achieve the best print quality... for storage devices and PictBridge cameras) To print photos 1. Touch the photos you want to print. 6. Touch Done to preview the print job. 10 HP Photosmart D7500 series Load photo paper in the appropriate input tray. 2. Touch View & Print. 4. English 1 Memory Stick, Memory Stick Pro, Memory Stick Select...
Basic Guide
Page 15
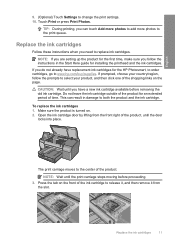
... to add more photos to both the product and the ink cartridge. Replace the ink cartridges 11 English 9. (Optional) Touch Settings to www.hp.com/buy/supplies. Replace the ink cartridges Follow these instructions when you follow the prompts to replace ink cartridges. NOTE: If you are setting... the tab on the front of the ink cartridge to the center of time. If you can result in the Start Here guide for the HP Photosmart, to order cartridges, go to change the print settings. 10. TIP: During printing, you do not already have a new ink cartridge available before ...
... to add more photos to both the product and the ink cartridge. Replace the ink cartridges 11 English 9. (Optional) Touch Settings to www.hp.com/buy/supplies. Replace the ink cartridges Follow these instructions when you follow the prompts to replace ink cartridges. NOTE: If you are setting... the tab on the front of the ink cartridge to the center of time. If you can result in the Start Here guide for the HP Photosmart, to order cartridges, go to change the print settings. 10. TIP: During printing, you do not already have a new ink cartridge available before ...
Basic Guide
Page 16
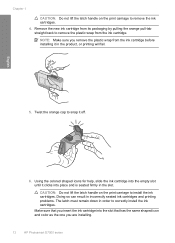
... ink cartridge into the empty slot until it in the product, or printing will fail. 5. Make sure that has the same shaped icon and color as the one you insert the ink cartridge into place and is seated firmly in order to correctly install the ink cartridges. CAUTION: Do not.... 4. NOTE: Make sure you remove the plastic wrap from the ink cartridge before installing it clicks into the slot that you are installing. 12 HP Photosmart D7500 series Remove the new ink cartridge from the ink cartridge. Twist the orange cap to remove the plastic wrap from its packaging by pulling...
... ink cartridge into the empty slot until it in the product, or printing will fail. 5. Make sure that has the same shaped icon and color as the one you insert the ink cartridge into place and is seated firmly in order to correctly install the ink cartridges. CAUTION: Do not.... 4. NOTE: Make sure you remove the plastic wrap from the ink cartridge before installing it clicks into the slot that you are installing. 12 HP Photosmart D7500 series Remove the new ink cartridge from the ink cartridge. Twist the orange cap to remove the plastic wrap from its packaging by pulling...
Basic Guide
Page 18
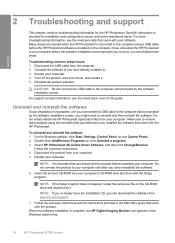
... have already installed it). 3. Uninstall and reinstall the software If your computer. Do not simply delete the HP Photosmart application files from www.hp.com/support. 7. NOTE: If you installed the software that came with your computer before prompted by the ...and support This chapter contains troubleshooting information for installation and configuration issues, and some operational topics. Many issues are caused when the HP Photosmart is important that came with the product. On the Windows taskbar, click Start, Settings, Control Panel (or just Control Panel...
... have already installed it). 3. Uninstall and reinstall the software If your computer. Do not simply delete the HP Photosmart application files from www.hp.com/support. 7. NOTE: If you installed the software that came with your computer before prompted by the ...and support This chapter contains troubleshooting information for installation and configuration issues, and some operational topics. Many issues are caused when the HP Photosmart is important that came with the product. On the Windows taskbar, click Start, Settings, Control Panel (or just Control Panel...

Basic Guide
Page 19
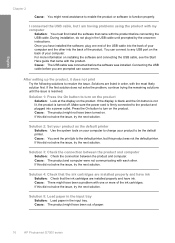
...sure the outlet is working. Solution 3: Press the On button more slowly Solution: The product might encounter while setting up the HP Photosmart hardware. Go to : www.hp.com/support. Setup troubleshooting 15 Or, try plugging the product directly into a power outlet. • Test the power outlet to...Make sure you plugged the product into a power outlet, surge protector, or power strip. • If you are still having a problem, contact HP support for use the power cord that came with the power outlet. If this did not solve the issue, try the next solution. Solution 5:...
...sure the outlet is working. Solution 3: Press the On button more slowly Solution: The product might encounter while setting up the HP Photosmart hardware. Go to : www.hp.com/support. Setup troubleshooting 15 Or, try plugging the product directly into a power outlet. • Test the power outlet to...Make sure you plugged the product into a power outlet, surge protector, or power strip. • If you are still having a problem, contact HP support for use the power cord that came with the power outlet. If this did not solve the issue, try the next solution. Solution 5:...
Basic Guide
Page 20
For more of paper. 16 HP Photosmart D7500 series Solutions are listed in order, with the product. If the... solution first. After setting up the product, it does not print Try the following solutions to the default printer, but I am having problems using the product with my computer Solution: You must first install the software that... to function properly. English Chapter 2 Cause: You might need assistance to enable the product or software to be the default printer. Cause: The USB cable was connected before you have been a problem with one end of the USB cable into a...
For more of paper. 16 HP Photosmart D7500 series Solutions are listed in order, with the product. If the... solution first. After setting up the product, it does not print Try the following solutions to the default printer, but I am having problems using the product with my computer Solution: You must first install the software that... to function properly. English Chapter 2 Cause: You might need assistance to enable the product or software to be the default printer. Cause: The USB cable was connected before you have been a problem with one end of the USB cable into a...

Basic Guide
Page 21
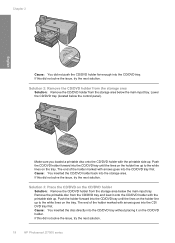
... encounter while printing on the holder line up to solve any problems you do not remove all the pieces of the holder marked with the HP Photosmart. The end of paper from the rear door. To clear a paper jam from the product. Solution 1: Push the CD/DVD holder into the CD/DVD...
... encounter while printing on the holder line up to solve any problems you do not remove all the pieces of the holder marked with the HP Photosmart. The end of paper from the rear door. To clear a paper jam from the product. Solution 1: Push the CD/DVD holder into the CD/DVD...
Basic Guide
Page 22
... side up . The end of the holder marked with the printable side up . If this did not solve the issue, try the next solution. 18 HP Photosmart D7500 series If this did not solve the issue, try the next solution. Chapter 2 English Cause: You did not push the CD/DVD holder far...
... side up . The end of the holder marked with the printable side up . If this did not solve the issue, try the next solution. 18 HP Photosmart D7500 series If this did not solve the issue, try the next solution. Chapter 2 English Cause: You did not push the CD/DVD holder far...

Basic Guide
Page 24
... solution first. Cause: The size of the storage slot and push down , you are using . Solution 1: Use inkjet printable discs Solution: Make sure that is resolved. Refer to the documentation or the online help of the software you ... settings to burn your content onto the CD/DVD, you feel resistance. Cause: Your design settings were not correct. Inkjet printable discs normally have a white printing surface. (Some discs also have already burned your contents again onto a new...DVD with a CD/DVD loaded and the blue ring flipped over the disc. 20 HP Photosmart D7500 series
... solution first. Cause: The size of the storage slot and push down , you are using . Solution 1: Use inkjet printable discs Solution: Make sure that is resolved. Refer to the documentation or the online help of the software you ... settings to burn your content onto the CD/DVD, you feel resistance. Cause: Your design settings were not correct. Inkjet printable discs normally have a white printing surface. (Some discs also have already burned your contents again onto a new...DVD with a CD/DVD loaded and the blue ring flipped over the disc. 20 HP Photosmart D7500 series
Basic Guide
Page 26
... tray capacity: Photo paper sheets: Up to 240 V ~ 1300 mA 50-60 Hz • Printer DC rating: DC 32 V===1300 mA NOTE: Use only with the marketing name (HP Photosmart D7500 series, etc.) or product numbers (Q8440A, etc.). 22 HP Photosmart D7500 series English 3 Technical information The technical specifications and international regulatory information for your...
... tray capacity: Photo paper sheets: Up to 240 V ~ 1300 mA 50-60 Hz • Printer DC rating: DC 32 V===1300 mA NOTE: Use only with the marketing name (HP Photosmart D7500 series, etc.) or product numbers (Q8440A, etc.). 22 HP Photosmart D7500 series English 3 Technical information The technical specifications and international regulatory information for your...

Basic Guide
Page 5
English Contents 1 HP Photosmart overview The HP Photosmart at a glance 2 Control panel features...3 Find more information...4 Load paper...4 Print directly onto a CD/DVD...7 Avoid paper jams...9 Print a photo on photo paper...10 Replace ...
English Contents 1 HP Photosmart overview The HP Photosmart at a glance 2 Control panel features...3 Find more information...4 Load paper...4 Print directly onto a CD/DVD...7 Avoid paper jams...9 Print a photo on photo paper...10 Replace ...


