Reference Guide
Page 3
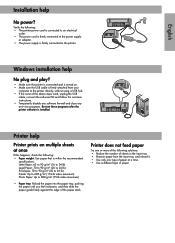
...of paper at once If this happens, check the following: • Paper weight: Use paper that is within the recommended specifications. English Installation help Printer prints on . • Make sure the USB cable is firmly attached from the input tray, and reload it. • Use only one or... CD and follow the onscreen instructions. • Temporarily disable any software firewall and close any anti-virus programs. Re-start these programs after the printer software is firmly connected to 280 g/m² (75-lb index maximum) • Paper tray: Reload the paper into the paper tray, pushing ...
...of paper at once If this happens, check the following: • Paper weight: Use paper that is within the recommended specifications. English Installation help Printer prints on . • Make sure the USB cable is firmly attached from the input tray, and reload it. • Use only one or... CD and follow the onscreen instructions. • Temporarily disable any software firewall and close any anti-virus programs. Re-start these programs after the printer software is firmly connected to 280 g/m² (75-lb index maximum) • Paper tray: Reload the paper into the paper tray, pushing ...
Reference Guide
Page 4
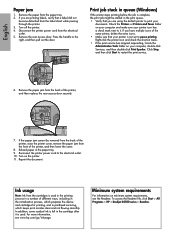
.../inkusage. Turn off the printer. 4. Print job stuck in the cartridge after it . If you are printing labels, verify that your computer, double-click Services, and then double-click Print Spooler. To access the Readme file, click Start > All Programs > HP > Deskjet D2500 series > Readme. ...Ink usage Note: Ink from the back of the same printer, delete the extra icons. • Make sure that a label did not become detached from the ...
.../inkusage. Turn off the printer. 4. Print job stuck in the cartridge after it . If you are printing labels, verify that your computer, double-click Services, and then double-click Print Spooler. To access the Readme file, click Start > All Programs > HP > Deskjet D2500 series > Readme. ...Ink usage Note: Ink from the back of the same printer, delete the extra icons. • Make sure that a label did not become detached from the ...
Reference Guide
Page 10
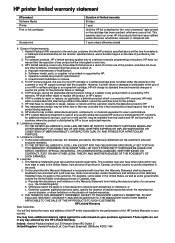
... in countries where the product is distributed by HP's warranty, HP shall, within a reasonable time after being replaced. 9. For example, some governments outside the product's specifications; HP Limited Warranty Dear Customer, You will be consistent with . 1 year unless otherwise stated A. HP printer limited warranty statement HP product Software Media Printer Print or Ink cartridges Accessories Duration of...
... in countries where the product is distributed by HP's warranty, HP shall, within a reasonable time after being replaced. 9. For example, some governments outside the product's specifications; HP Limited Warranty Dear Customer, You will be consistent with . 1 year unless otherwise stated A. HP printer limited warranty statement HP product Software Media Printer Print or Ink cartridges Accessories Duration of...
Full User Guide
Page 3
... of Microsoft Corporation. For users who are color blind, colored buttons and tabs used in this product and HP's commitment to change without prior written permission of features that convey the appropriate action. Hewlett-Packard Company notices The information contained in the software and on the HP printer have simple text or icon labels that...
... of Microsoft Corporation. For users who are color blind, colored buttons and tabs used in this product and HP's commitment to change without prior written permission of features that convey the appropriate action. Hewlett-Packard Company notices The information contained in the software and on the HP printer have simple text or icon labels that...
Full User Guide
Page 4
Contents Contents 1 Welcome...5 2 Special features...7 3 Get started The printer at a glance...8 Buttons and lights...9 Power button and light...10 Cancel button...10 Resume button and light...11 Print Cartridge Status lights 11 Paper tray......-backup mode...16 Ink-backup mode output...17 Exit ink-backup mode...17 4 Connect the printer USB...18 5 Print photos Print borderless photos...19 Print photos with a border...20 Print photos on plain paper...22 HP Real Life Technologies photo fix 23 Exif Print...23 Store and handle photo paper 24 Save...
Contents Contents 1 Welcome...5 2 Special features...7 3 Get started The printer at a glance...8 Buttons and lights...9 Power button and light...10 Cancel button...10 Resume button and light...11 Print Cartridge Status lights 11 Paper tray......-backup mode...16 Ink-backup mode output...17 Exit ink-backup mode...17 4 Connect the printer USB...18 5 Print photos Print borderless photos...19 Print photos with a border...20 Print photos on plain paper...22 HP Real Life Technologies photo fix 23 Exif Print...23 Store and handle photo paper 24 Save...
Full User Guide
Page 5
... two-sided documents...46 Print a Web page...47 Presentation printing...48 8 Printer software Make the HP Deskjet the default printer 49 Set default print settings...49 Printer Properties dialog box...50 What's This? help...51 Download printer software updates 51 9 Maintenance Install print cartridges...52 Choose the right print cartridges......53 Align print cartridges...55 Automatically clean print cartridges 56 View estimated ink levels...56 Maintain the printer body...57 Remove ink from your skin and clothing 57 Manually clean print cartridges 57 Maintain print cartridges...58...
... two-sided documents...46 Print a Web page...47 Presentation printing...48 8 Printer software Make the HP Deskjet the default printer 49 Set default print settings...49 Printer Properties dialog box...50 What's This? help...51 Download printer software updates 51 9 Maintenance Install print cartridges...52 Choose the right print cartridges......53 Align print cartridges...55 Automatically clean print cartridges 56 View estimated ink levels...56 Maintain the printer body...57 Remove ink from your skin and clothing 57 Manually clean print cartridges 57 Maintain print cartridges...58...
Full User Guide
Page 6
... 64 Out of paper...65 There was an error writing to USB port 65 Two-way communication cannot be established or Printer not responding 65 Installation problems...65 Printer lights are on or flashing 68 Power light is flashing ...69 Resume light is flashing...69 Both Power and Resume lights...horizontal band of distortion near the bottom of a borderless print...97 Printouts have horizontal streaks or lines 98 Printouts are faded or have dull colors 100 Printouts seem blurry or fuzzy 101 Printouts are slanted or skewed 102 Ink streaks on the back of the paper 102 Document is misprinted...
... 64 Out of paper...65 There was an error writing to USB port 65 Two-way communication cannot be established or Printer not responding 65 Installation problems...65 Printer lights are on or flashing 68 Power light is flashing ...69 Resume light is flashing...69 Both Power and Resume lights...horizontal band of distortion near the bottom of a borderless print...97 Printouts have horizontal streaks or lines 98 Printouts are faded or have dull colors 100 Printouts seem blurry or fuzzy 101 Printouts are slanted or skewed 102 Ink streaks on the back of the paper 102 Document is misprinted...
Full User Guide
Page 7
...107 Placing a call...107 After the phone support period 107 B Technical information Printer specifications...108 Notice to Windows 2000 users 108 Environmental product stewardship program 108 Paper use...109 Plastics...109 Material safety data sheets 109 Recycling program...109 HP inkjet supplies recycling program 109 Energy Star® notice...109 Disposal of waste... (Class B) compliance statement for users in Japan 113 Notice to users in Japan about the power cord 113 Toxic and hazardous substance table 113 HP Deskjet D2500 Printer series declaration of conformity 114 Index...115 4
...107 Placing a call...107 After the phone support period 107 B Technical information Printer specifications...108 Notice to Windows 2000 users 108 Environmental product stewardship program 108 Paper use...109 Plastics...109 Material safety data sheets 109 Recycling program...109 HP inkjet supplies recycling program 109 Energy Star® notice...109 Disposal of waste... (Class B) compliance statement for users in Japan 113 Notice to users in Japan about the power cord 113 Toxic and hazardous substance table 113 HP Deskjet D2500 Printer series declaration of conformity 114 Index...115 4
Full User Guide
Page 8
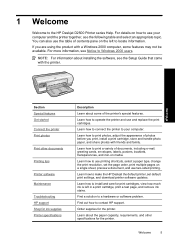
... pane on how to locate information. Find a solution to install and care for the printer. 1 Welcome Welcome to Windows 2000 users. Learn how to connect the printer to your computer and the printer together, see Notice to the HP Deskjet D2500 Printer series Help. If you print, install a print cartridge, store and handle photo paper, and...
... pane on how to locate information. Find a solution to install and care for the printer. 1 Welcome Welcome to Windows 2000 users. Learn how to connect the printer to your computer and the printer together, see Notice to the HP Deskjet D2500 Printer series Help. If you print, install a print cartridge, store and handle photo paper, and...
Full User Guide
Page 10
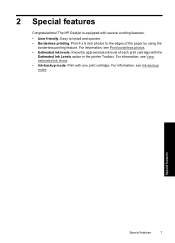
... to install and operate. • Borderless printing: Print 4 x 6 inch photos to the edges of each print cartridge with the Estimated Ink Levels option in the printer Toolbox. For information, see Print borderless photos. • Estimated ink levels: Know the approximate ink level of the paper by using the borderless printing feature...
... to install and operate. • Borderless printing: Print 4 x 6 inch photos to the edges of each print cartridge with the Estimated Ink Levels option in the printer Toolbox. For information, see Print borderless photos. • Estimated ink levels: Know the approximate ink level of the paper by using the borderless printing feature...
Full User Guide
Page 11
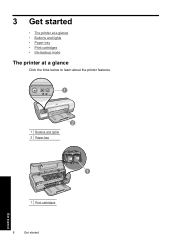
3 Get started • The printer at a glance • Buttons and lights • Paper tray • Print cartridges • Ink-backup mode The printer at a glance Click the links below to learn about the printer features. 1 Buttons and lights 2 Paper tray Get started 1 Print cartridges 8 Get started
3 Get started • The printer at a glance • Buttons and lights • Paper tray • Print cartridges • Ink-backup mode The printer at a glance Click the links below to learn about the printer features. 1 Buttons and lights 2 Paper tray Get started 1 Print cartridges 8 Get started
Full User Guide
Page 12
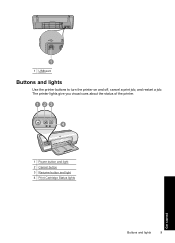
1 USB port Buttons and lights Use the printer buttons to turn the printer on and off, cancel a print job, and restart a job. The printer lights give you visual cues about the status of the printer. 1 Power button and light 2 Cancel button 3 Resume button and light 4 Print Cartridge Status lights Buttons and lights 9 Get started
1 USB port Buttons and lights Use the printer buttons to turn the printer on and off, cancel a print job, and restart a job. The printer lights give you visual cues about the status of the printer. 1 Power button and light 2 Cancel button 3 Resume button and light 4 Print Cartridge Status lights Buttons and lights 9 Get started
Full User Guide
Page 13
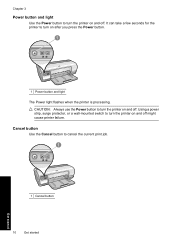
Using a power strip, surge protector, or a wall-mounted switch to turn on after you press the Power button. 1 Power button and light The Power light flashes when the printer is processing. It can take a few seconds for the printer to turn the printer on and off might cause printer failure. Cancel button Use the Cancel button to turn the printer on and off. Chapter 3 Power button and light Use the Power button to turn the printer on and off. CAUTION: Always use the Power button to cancel the current print job. 1 Cancel button 10 Get started Get started
Using a power strip, surge protector, or a wall-mounted switch to turn on after you press the Power button. 1 Power button and light The Power light flashes when the printer is processing. It can take a few seconds for the printer to turn the printer on and off might cause printer failure. Cancel button Use the Cancel button to turn the printer on and off. Chapter 3 Power button and light Use the Power button to turn the printer on and off. CAUTION: Always use the Power button to cancel the current print job. 1 Cancel button 10 Get started Get started

Full User Guide
Page 16
2. Use the paper tray Print on the top of media by sliding the paper guide to the right or to the left. Pull out the tray extension. 3. Get started Paper tray 13 If you are printing in the Fast Draft mode, fold out the tray extension stop. The printer deposits printed pages on different sizes of the paper tray.
2. Use the paper tray Print on the top of media by sliding the paper guide to the right or to the left. Pull out the tray extension. 3. Get started Paper tray 13 If you are printing in the Fast Draft mode, fold out the tray extension stop. The printer deposits printed pages on different sizes of the paper tray.
Full User Guide
Page 18
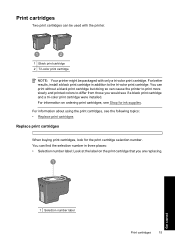
... print cartridge and a tri-color print cartridge were installed. You can print without a black print cartridge but doing so can cause the printer to print more slowly and printed colors to the tri-color print cartridge. You can be used with the printer. 1 Black print cartridge 2 Tri-color print cartridge NOTE: Your printer might be packaged with...
... print cartridge and a tri-color print cartridge were installed. You can print without a black print cartridge but doing so can cause the printer to print more slowly and printed colors to the tri-color print cartridge. You can be used with the printer. 1 Black print cartridge 2 Tri-color print cartridge NOTE: Your printer might be packaged with...

Full User Guide
Page 19
...tape from a print cartridge ▲ Hold the print cartridge so that the copper strips are on screen. NOTE: When the printer operates in the printer, verify that the print cartridge is removed from each print cartridge. Do not remove the copper strips. The ink-backup mode is... mode, a message is displayed and two print cartridges are required electrical contacts. When plastic tape covers the print cartridge contacts, the printer cannot detect that the protective piece of plastic tape has been removed from the print cartridge carriage. For information about ink-backup mode,...
...tape from a print cartridge ▲ Hold the print cartridge so that the copper strips are on screen. NOTE: When the printer operates in the printer, verify that the print cartridge is removed from each print cartridge. Do not remove the copper strips. The ink-backup mode is... mode, a message is displayed and two print cartridges are required electrical contacts. When plastic tape covers the print cartridge contacts, the printer cannot detect that the protective piece of plastic tape has been removed from the print cartridge carriage. For information about ink-backup mode,...
Full User Guide
Page 20
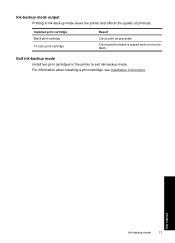
Exit ink-backup mode Install two print cartridges in ink-backup mode slows the printer and affects the quality of printouts. Get started Ink-backup mode 17 For information about installing a print cartridge, see Installation instructions. Installed print cartridge Black print cartridge Tri-color print cartridge Result Colors print as grayscale. Ink-backup mode output Printing in the printer to exit ink-backup mode. Colors print but black is grayed and is not a true black.
Exit ink-backup mode Install two print cartridges in ink-backup mode slows the printer and affects the quality of printouts. Get started Ink-backup mode 17 For information about installing a print cartridge, see Installation instructions. Installed print cartridge Black print cartridge Tri-color print cartridge Result Colors print as grayscale. Ink-backup mode output Printing in the printer to exit ink-backup mode. Colors print but black is grayed and is not a true black.
Full User Guide
Page 21
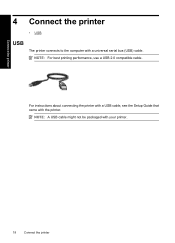
Connect the printer 4 Connect the printer • USB USB The printer connects to the computer with your printer. 18 Connect the printer NOTE: For best printing performance, use a USB 2.0 compatible cable. NOTE: A USB cable might not be packaged with a universal serial bus (USB) cable. For instructions about connecting the printer with a USB cable, see the Setup Guide that came with the printer.
Connect the printer 4 Connect the printer • USB USB The printer connects to the computer with your printer. 18 Connect the printer NOTE: For best printing performance, use a USB 2.0 compatible cable. NOTE: A USB cable might not be packaged with a universal serial bus (USB) cable. For instructions about connecting the printer with a USB cable, see the Setup Guide that came with the printer.
Full User Guide
Page 22
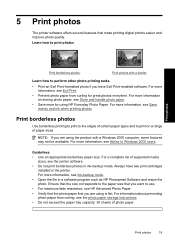
...8226; Print an Exif Print-formatted photo if you are using is flat. NOTE: If you have two print cartridges installed in the printer. For information about preventing photo paper from curling for great photos everytime. Print borderless photos Use borderless printing to print to the edges of... you are using the product with a border. Learn how to print on storing photo paper, see the printer software. • Do not print borderless photos in a software program such as HP Photosmart Software and resize the photo. For more information, see Ink-backup mode. • Open the file...
...8226; Print an Exif Print-formatted photo if you are using is flat. NOTE: If you have two print cartridges installed in the printer. For information about preventing photo paper from curling for great photos everytime. Print borderless photos Use borderless printing to print to the edges of... you are using the product with a border. Learn how to print on storing photo paper, see the printer software. • Do not print borderless photos in a software program such as HP Photosmart Software and resize the photo. For more information, see Ink-backup mode. • Open the file...
Full User Guide
Page 23
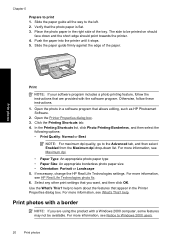
... the short edge should face down list. Push the paper into the printer until it stops. 5. If necessary, change the HP Real Life Technologies settings. Select any other print settings that appear in the Printer Properties dialog box. Slide the paper guide all the way to print ...1. Open the Printer Properties dialog box. 3. Click the Printing Shortcuts tab. 4. For more information, see What's This? Use the What's This? Chapter 5 Prepare to the left. 2. For more information, see HP Real Life Technologies photo fix. 6. help to Windows ...
... the short edge should face down list. Push the paper into the printer until it stops. 5. If necessary, change the HP Real Life Technologies settings. Select any other print settings that appear in the Printer Properties dialog box. Slide the paper guide all the way to print ...1. Open the Printer Properties dialog box. 3. Click the Printing Shortcuts tab. 4. For more information, see What's This? Use the What's This? Chapter 5 Prepare to the left. 2. For more information, see HP Real Life Technologies photo fix. 6. help to Windows ...


