

User Guide
Page 7
... Component (1) Audio-out (headphone)/Audio-in on the card until it from the memory card reader. To insert a card: 1. NOTE: Use a standard USB Type-A charging cable or cable adapter (purchased separately) when charging a small external device. 1 Components Your computer features top-rated components. Also connects an optional headset microphone. NOTE: When a device is firmly seated. Insert the card into the memory card reader, and then press in (microphone) combo jack (2) microSD™ memory card reader (3) USB port Description Connects optional powered stereo speakers...
... Component (1) Audio-out (headphone)/Audio-in on the card until it from the memory card reader. To insert a card: 1. NOTE: Use a standard USB Type-A charging cable or cable adapter (purchased separately) when charging a small external device. 1 Components Your computer features top-rated components. Also connects an optional headset microphone. NOTE: When a device is firmly seated. Insert the card into the memory card reader, and then press in (microphone) combo jack (2) microSD™ memory card reader (3) USB port Description Connects optional powered stereo speakers...

User Guide
Page 9
..., record video, and record still images. On (amber): The camera is not charging. (4) Volume button Controls speaker volume on the display. Allows you to identify the components on the computer. Off: The camera is in use. On (white): The camera is turned off by the software. Table 1-3 Display components and their descriptions (continued) Component Description To learn more about your power settings, see your power options. (4) AC adapter and battery light...
..., record video, and record still images. On (amber): The camera is not charging. (4) Volume button Controls speaker volume on the display. Allows you to identify the components on the computer. Off: The camera is in use. On (white): The camera is turned off by the software. Table 1-3 Display components and their descriptions (continued) Component Description To learn more about your power settings, see your power options. (4) AC adapter and battery light...
User Guide
Page 20
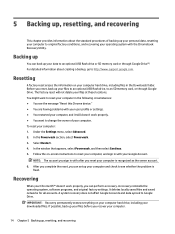
... saved networks for all accounts. Backing up You can perform a recovery. For detailed information about the standard procedures of your computer. To reset your files at these locations. 5 Backing up, resetting, and recovering This chapter provides information about creating a backup, go to Google Drive. IMPORTANT: Recovery permanently erases everything on -screen instructions to an optional USB flash drive or SD memory card or through Google Drive. A recovery reinstalls the operating system, software...
... saved networks for all accounts. Backing up You can perform a recovery. For detailed information about the standard procedures of your computer. To reset your files at these locations. 5 Backing up, resetting, and recovering This chapter provides information about creating a backup, go to Google Drive. IMPORTANT: Recovery permanently erases everything on -screen instructions to an optional USB flash drive or SD memory card or through Google Drive. A recovery reinstalls the operating system, software...

User Guide
Page 21
... computer using the recovery media that were installed at the factory. NOTE: For more information about performing a system recovery on your computer, plug in the power cord, and then turn on the computer. 2. Installing the Chromebook Recovery Utility The Chromebook™ Recovery Utility recovers the original operating system and software programs that you created. 1. All data is erased from the device before you need the following prerequisites: ● A USB flash drive or SD memory card with internet access...
... computer using the recovery media that were installed at the factory. NOTE: For more information about performing a system recovery on your computer, plug in the power cord, and then turn on the computer. 2. Installing the Chromebook Recovery Utility The Chromebook™ Recovery Utility recovers the original operating system and software programs that you created. 1. All data is erased from the device before you need the following prerequisites: ● A USB flash drive or SD memory card with internet access...

User Guide
Page 22
... ready to be formatted using a formatting tool provided by your operating system. 16 Chapter 5 Backing up, resetting, and recovering Follow these steps to cancel the recovery during the verification process, press and hold the power button until the computer turns off. The media is complete" message appears, remove the recovery media. After recovery, you might need to use a different USB flash drive or SD memory card. 4. In the apps window, select Recovery. 3. Select the...
... ready to be formatted using a formatting tool provided by your operating system. 16 Chapter 5 Backing up, resetting, and recovering Follow these steps to cancel the recovery during the verification process, press and hold the power button until the computer turns off. The media is complete" message appears, remove the recovery media. After recovery, you might need to use a different USB flash drive or SD memory card. 4. In the apps window, select Recovery. 3. Select the...

User Guide
Page 32
...serial number 7 service 7 wireless certification 7 WLAN 7 lights AC adapter and battery 2, 3 camera 3 M memory card reader, identifying 1 microphone (audio-in) jack, identifying 1 mute action key 6 O operating environment 19 P ports USB 1 USB Type-C 2 power button, identifying 2 printing 13 product name and number, computer 7 R recovery media creating 15 erase 16 recovery, performing 14 regulatory information regulatory label 7 wireless certification labels 7 reload action key 5 resetting 14 resources, accessibility 24 S scrolling touch screen gesture 10 scrolling Touchpad gesture 9 search key...
...serial number 7 service 7 wireless certification 7 WLAN 7 lights AC adapter and battery 2, 3 camera 3 M memory card reader, identifying 1 microphone (audio-in) jack, identifying 1 mute action key 6 O operating environment 19 P ports USB 1 USB Type-C 2 power button, identifying 2 printing 13 product name and number, computer 7 R recovery media creating 15 erase 16 recovery, performing 14 regulatory information regulatory label 7 wireless certification labels 7 reload action key 5 resetting 14 resources, accessibility 24 S scrolling touch screen gesture 10 scrolling Touchpad gesture 9 search key...

Maintenance and Service Guide 1
Page 6
... support information ...24 5 Removal and replacement procedures for authorized service provider parts 27 Component replacement procedures ...28 Preparation for disassembly ...28 Top cover/keyboard ...28 Touchpad cable ...31 Touchpad ...32 Speakers ...33 Battery ...35 Sensor board cable ...35 Sensor board ...36 System board ...37 29.5 cm (11.6 in) display assembly ...39 6 Backing up, resetting, and recovering ...49 Backing up ...49 Resetting ...49 Recovering ...50 Installing the Chromebook Recovery Utility 50 Creating recovery media ...50 Recovering the Chrome operating system ...50 Setting...
... support information ...24 5 Removal and replacement procedures for authorized service provider parts 27 Component replacement procedures ...28 Preparation for disassembly ...28 Top cover/keyboard ...28 Touchpad cable ...31 Touchpad ...32 Speakers ...33 Battery ...35 Sensor board cable ...35 Sensor board ...36 System board ...37 29.5 cm (11.6 in) display assembly ...39 6 Backing up, resetting, and recovering ...49 Backing up ...49 Resetting ...49 Recovering ...50 Installing the Chromebook Recovery Utility 50 Creating recovery media ...50 Recovering the Chrome operating system ...50 Setting...
Maintenance and Service Guide 1
Page 9
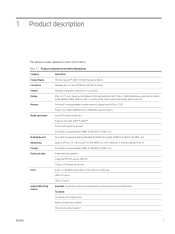
... MultiMedia Controller (eMMC) 64 GB MO-276 MMC v5.0 Networking Qualcomm® ac 2×2 + Bluetooth® 4.2 MU-MIMO non-vPro® WW with 2 antennas (QCA6174A-3) Storage On-board (nonupgradeable) eMMC 32 GB MO-276 MMC v5.0 Audio and video Integrated dual speakers Integrated HP HD camera: USB 2.0 720p by 30 frames per second Ports Audio-out (headphone)/audio-in (microphone) combo jack USB 2.0 Type-A USB 2.0 Type-C Keyboard/pointing devices Keyboard: Integrated...
... MultiMedia Controller (eMMC) 64 GB MO-276 MMC v5.0 Networking Qualcomm® ac 2×2 + Bluetooth® 4.2 MU-MIMO non-vPro® WW with 2 antennas (QCA6174A-3) Storage On-board (nonupgradeable) eMMC 32 GB MO-276 MMC v5.0 Audio and video Integrated dual speakers Integrated HP HD camera: USB 2.0 720p by 30 frames per second Ports Audio-out (headphone)/audio-in (microphone) combo jack USB 2.0 Type-A USB 2.0 Type-C Keyboard/pointing devices Keyboard: Integrated...

Maintenance and Service Guide 1
Page 12
...memory card reader Reads optional memory cards that has a USB Type-C connector, supplying power to identify the components on or in Sleep mode. Insert the card into the memory card reader, and then press in Sleep mode. NOTE: Use a standard USB Type-C charging cable or cable adapter (purchased separately) when charging a small external device. To insert a card: 1. NOTE: Use a standard USB Type-A charging cable or cable adapter (purchased separately) when charging a small external device. (4) AC adapter and battery light ● White: The AC adapter is connected and the battery...
...memory card reader Reads optional memory cards that has a USB Type-C connector, supplying power to identify the components on or in Sleep mode. Insert the card into the memory card reader, and then press in Sleep mode. NOTE: Use a standard USB Type-C charging cable or cable adapter (purchased separately) when charging a small external device. To insert a card: 1. NOTE: Use a standard USB Type-A charging cable or cable adapter (purchased separately) when charging a small external device. (4) AC adapter and battery light ● White: The AC adapter is connected and the battery...

Maintenance and Service Guide 1
Page 30
... power cord, keyboard cable, and USB cables. 22 Chapter 4 Removal and replacement procedures preliminary requirements ENWW For computers with the moistened cloth. IMPORTANT: Keep liquids away from items such as the keyboard, touch screen, and touchpad for the recommended steps to the product. Avoid getting moisture in the taskbar. - Finish with a disinfectant. Use the following ways: ● Select the Start menu, and then select HP...
... power cord, keyboard cable, and USB cables. 22 Chapter 4 Removal and replacement procedures preliminary requirements ENWW For computers with the moistened cloth. IMPORTANT: Keep liquids away from items such as the keyboard, touch screen, and touchpad for the recommended steps to the product. Avoid getting moisture in the taskbar. - Finish with a disinfectant. Use the following ways: ● Select the Start menu, and then select HP...

Maintenance and Service Guide 1
Page 47
... included in ) display assembly To remove and disassemble the display assembly, use these procedures and illustrations. Reverse this procedure to the system board, and then disconnect the display panel cable (9) from the system board. 8. ENWW Component replacement procedures 39 7. Remove the four Phillips M2.0 × 3.5 screws (1) that secures the display panel cable to install the system board. 29.5 cm (11.6 in the Bracket Kit, spare part number M49319-001...
... included in ) display assembly To remove and disassemble the display assembly, use these procedures and illustrations. Reverse this procedure to the system board, and then disconnect the display panel cable (9) from the system board. 8. ENWW Component replacement procedures 39 7. Remove the four Phillips M2.0 × 3.5 screws (1) that secures the display panel cable to install the system board. 29.5 cm (11.6 in the Bracket Kit, spare part number M49319-001...

Maintenance and Service Guide 1
Page 58
...™ operating system is not working properly, you need to the computer. ● Computer AC adapter. Locally saved files and saved networks are not affected by a system recovery. You must be installed from the device before you begin. ● A computer with a capacity of creating recovery media, the USB flash drive or SD memory card is formatted for all accounts. If this section to erase the recovery media using the recovery media you...
...™ operating system is not working properly, you need to the computer. ● Computer AC adapter. Locally saved files and saved networks are not affected by a system recovery. You must be installed from the device before you begin. ● A computer with a capacity of creating recovery media, the USB flash drive or SD memory card is formatted for all accounts. If this section to erase the recovery media using the recovery media you...

Maintenance and Service Guide 1
Page 64
... factory default. If a DriveLock password is set , select the Security menu, and scroll down to Hard Drive Utilities under the Utilities menu. Turn on restart. e. If an asset or ownership tag is set , select the Security menu and scroll down to the Utilities menu. g. h. Reboot the system. or - ● Clear the drive contents by using the following BIOS Setup Secure Erase command option steps: If you want to clear, and then follow the on-screen instructions to Reset...
... factory default. If a DriveLock password is set , select the Security menu, and scroll down to Hard Drive Utilities under the Utilities menu. Turn on restart. e. If an asset or ownership tag is set , select the Security menu and scroll down to the Utilities menu. g. h. Reboot the system. or - ● Clear the drive contents by using the following BIOS Setup Secure Erase command option steps: If you want to clear, and then follow the on-screen instructions to Reset...

Maintenance and Service Guide 1
Page 65
... EEPROM is programmed A utility must be used to this This memory is this memory writeprotected? ii. Select Hard Drive Utilities. Does this memory retain data when power is programmed using a utility from the firmware. Real Time Clock 256 bytes No Yes Stores system RTC battery backed-up CMOS and noncritical Computer Setup (BIOS), or by the HP Sure Start BIOS code, EC Embedded Controller. changing the Windows date & memory time. functional. Plug the computer into...
... EEPROM is programmed A utility must be used to this This memory is this memory writeprotected? ii. Select Hard Drive Utilities. Does this memory retain data when power is programmed using a utility from the firmware. Real Time Clock 256 bytes No Yes Stores system RTC battery backed-up CMOS and noncritical Computer Setup (BIOS), or by the HP Sure Start BIOS code, EC Embedded Controller. changing the Windows date & memory time. functional. Plug the computer into...

Maintenance and Service Guide 1
Page 66
... data entered into this memory retain data when power is installed in select Elite or Z models. module is removed? accessible) System BIOS 9 MB Yes Yes Stores system BIOS code and computer configuration data. System BIOS code is typically data. NOTE: Writing data to http://www.hp.com/ support. go to 8 No Yes Stores 802.11 WLAN EEPROM is A utility must be used for (select products Bluetooth programmed at the factory...
... data entered into this memory retain data when power is installed in select Elite or Z models. module is removed? accessible) System BIOS 9 MB Yes Yes Stores system BIOS code and computer configuration data. System BIOS code is typically data. NOTE: Writing data to http://www.hp.com/ support. go to 8 No Yes Stores 802.11 WLAN EEPROM is A utility must be used for (select products Bluetooth programmed at the factory...

Maintenance and Service Guide 1
Page 67
... and firmware. Does this memory store customer data? The restore defaults feature does not reset the Custom Secure Boot keys. Questions and answers Use this section to securely erase information. Select Main, and then select Apply Factory Defaults and Exit. Turn on your questions about resetting the keys. Table 8-1 Troubleshooting steps for nonvolatile memory usage (continued) Nonvolatile memory type Amount (Size) Does this memory retain data when power is removed?
... and firmware. Does this memory store customer data? The restore defaults feature does not reset the Custom Secure Boot keys. Questions and answers Use this section to securely erase information. Select Main, and then select Apply Factory Defaults and Exit. Turn on your questions about resetting the keys. Table 8-1 Troubleshooting steps for nonvolatile memory usage (continued) Nonvolatile memory type Amount (Size) Does this memory retain data when power is removed?

Maintenance and Service Guide 1
Page 68
... how is located on an EEPROM. HP has provided options in a computer. The UEFI BIOS is it different from storage devices to clearing the Real Time Clock (RTC) CMOS memory that supports a Graphic User Interface (GUI). Third-party tools do not reset Custom Secure Boot Keys. d. The UEFI BIOS also contains basic system diagnostics. Examples of configuration data is not installed in Computer Setup (BIOS) to Factory Defaults. 60 Chapter...
... how is located on an EEPROM. HP has provided options in a computer. The UEFI BIOS is it different from storage devices to clearing the Real Time Clock (RTC) CMOS memory that supports a Graphic User Interface (GUI). Third-party tools do not reset Custom Secure Boot Keys. d. The UEFI BIOS also contains basic system diagnostics. Examples of configuration data is not installed in Computer Setup (BIOS) to Factory Defaults. 60 Chapter...

Maintenance and Service Guide 1
Page 69
... Boot Keys. HP Sure Start is attacked, HP Sure Start restores the BIOS to http://www.hp.com/support. Advanced users can the Custom Secure Boot Keys be reset? a. b. At the Secure Boot Configuration window, select Secure Boot, select Clear Secure Boot Keys, and then follow the on HP Sure Start, go to its previously safe state, without user intervention. Use the same Secure Boot access procedure that only authenticated code can use the HP Sure Start default configuration. To access the latest documentation on -screen instructions...
... Boot Keys. HP Sure Start is attacked, HP Sure Start restores the BIOS to http://www.hp.com/support. Advanced users can the Custom Secure Boot Keys be reset? a. b. At the Secure Boot Configuration window, select Secure Boot, select Clear Secure Boot Keys, and then follow the on HP Sure Start, go to its previously safe state, without user intervention. Use the same Secure Boot access procedure that only authenticated code can use the HP Sure Start default configuration. To access the latest documentation on -screen instructions...

Maintenance and Service Guide 1
Page 77
... recovery media removal 50 esc key 7 F factory reset 49 G grounding methods 17, 19, 20 guidelines packaging 17, 24 transporting 17, 24 workstation 17, 18 H hard drive specifications 53 headphone (audio-out) jack 3 hinge removal 46 HP Sure Start 55, 61 I illustrated parts catalog 9 install Chromebook Recovery Utility 50 Recovery Utility 50 internal microphones 6 J jacks audio-in (microphone) 3 audio-out (headphone) 3 K keyboard product description 1 keys esc 7 search 7 L lights AC adapter and battery 4, 5 camera 6 M memory nonvolatile 55 volatile 55 memory card reader 4 microphone (audio...
... recovery media removal 50 esc key 7 F factory reset 49 G grounding methods 17, 19, 20 guidelines packaging 17, 24 transporting 17, 24 workstation 17, 18 H hard drive specifications 53 headphone (audio-out) jack 3 hinge removal 46 HP Sure Start 55, 61 I illustrated parts catalog 9 install Chromebook Recovery Utility 50 Recovery Utility 50 internal microphones 6 J jacks audio-in (microphone) 3 audio-out (headphone) 3 K keyboard product description 1 keys esc 7 search 7 L lights AC adapter and battery 4, 5 camera 6 M memory nonvolatile 55 volatile 55 memory card reader 4 microphone (audio...

Maintenance and Service Guide 1
Page 78
... part number 33 speakers, identifying 8 specifications computer 53 display 53, 54 hard drive 53 static electricity 17, 19 support information 24 switch board removal 44 system board removal 37 spare part numbers 37 system memory, removing personal data from volatile 55 T top cover/keyboard removal 28 spare part numbers 28 touchpad removal 32 spare part numbers 32 touchpad cable illustrated 15 removal 31 spare part number 15, 31 touchpad zone 6 transporting guidelines 17, 24 U USB port 4 USB Type-C port 4 V volume button 5 W webcam/microphone module removal 45 webcam/microphone module cable...
... part number 33 speakers, identifying 8 specifications computer 53 display 53, 54 hard drive 53 static electricity 17, 19 support information 24 switch board removal 44 system board removal 37 spare part numbers 37 system memory, removing personal data from volatile 55 T top cover/keyboard removal 28 spare part numbers 28 touchpad removal 32 spare part numbers 32 touchpad cable illustrated 15 removal 31 spare part number 15, 31 touchpad zone 6 transporting guidelines 17, 24 U USB port 4 USB Type-C port 4 V volume button 5 W webcam/microphone module removal 45 webcam/microphone module cable...


