

Part Locator
Page 3
Back to Welcome Page Parts List Vent Cover Speakers Volume Button Board Metal Base Stand Base Covers M.2 Solid State Drive Memory Module(s) Wireless LAN Module Real-Time Clock Battery Wireless LAN Antenna Assembly Motherboard Heatsink Fan Fan Duct Stand Cover Hinge Bracket Rear Cover Display Panel Hinge Converter Board Touch Control Board Webcam Assembly ALS Board Display Panel Frame Display Panel Go to External Views
Back to Welcome Page Parts List Vent Cover Speakers Volume Button Board Metal Base Stand Base Covers M.2 Solid State Drive Memory Module(s) Wireless LAN Module Real-Time Clock Battery Wireless LAN Antenna Assembly Motherboard Heatsink Fan Fan Duct Stand Cover Hinge Bracket Rear Cover Display Panel Hinge Converter Board Touch Control Board Webcam Assembly ALS Board Display Panel Frame Display Panel Go to External Views

User Guide
Page 2
... 2021 Document Part Number: M74080-001 Product notice This guide describes features that are trademarks of Google LLC. Some features might not be construed as constituting an additional warranty. Software terms By installing, copying, downloading, or otherwise using any further information or to the refund policy of USB Implementers Forum. The only warranties for technical or editorial errors or omissions...
... 2021 Document Part Number: M74080-001 Product notice This guide describes features that are trademarks of Google LLC. Some features might not be construed as constituting an additional warranty. Software terms By installing, copying, downloading, or otherwise using any further information or to the refund policy of USB Implementers Forum. The only warranties for technical or editorial errors or omissions...
User Guide
Page 5
... ...11 5 Troubleshooting...12 Computer does not start...12 Power ...12 Monitor...13 Keyboard and mouse (wireless) ...13 Software troubleshooting ...14 6 Backing up, resetting, and recovering ...15 Backing up...15 Resetting...15 Recovering ...15 Creating recovery media...16 Recovering the Chrome operating system ...16 Setting up your computer after a reset or recovery ...17 Erasing and reformatting the recovery media ...17 7 Operating specifications ...18 Operating environment ...18 8 Electrostatic discharge ...19 9 Accessibility...20 HP and accessibility ...20 Finding...
... ...11 5 Troubleshooting...12 Computer does not start...12 Power ...12 Monitor...13 Keyboard and mouse (wireless) ...13 Software troubleshooting ...14 6 Backing up, resetting, and recovering ...15 Backing up...15 Resetting...15 Recovering ...15 Creating recovery media...16 Recovering the Chrome operating system ...16 Setting up your computer after a reset or recovery ...17 Erasing and reformatting the recovery media ...17 7 Operating specifications ...18 Operating environment ...18 8 Electrostatic discharge ...19 9 Accessibility...20 HP and accessibility ...20 Finding...

User Guide
Page 7
... out of flicker-free technology (select products only) Monitors with the computer hardware and software. Bend your left shoulder while still looking forward, lean your head toward your head forward slightly to stretch the neck. 3. Repeat for 5 seconds. 4. Best practices After you set up your hard drive by creating recovery media. For more information, see Getting to work and entertainment...
... out of flicker-free technology (select products only) Monitors with the computer hardware and software. Bend your left shoulder while still looking forward, lean your head toward your head forward slightly to stretch the neck. 3. Repeat for 5 seconds. 4. Best practices After you set up your hard drive by creating recovery media. For more information, see Getting to work and entertainment...
User Guide
Page 8
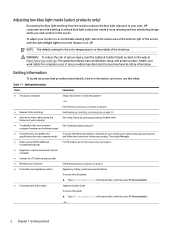
... right of the slider bar. or - HP computers provide a setting to a comfortable viewing light, select the status area at http://www.hp.com/ergo. computer hardware and software issues ● Find electronic user guides and specifications for your computer model To access the latest user guides or manuals for your product, go to http://www.hp.com/support. ● Upgrade or replace components of your computer Go to...
... right of the slider bar. or - HP computers provide a setting to a comfortable viewing light, select the status area at http://www.hp.com/ergo. computer hardware and software issues ● Find electronic user guides and specifications for your computer model To access the latest user guides or manuals for your product, go to http://www.hp.com/support. ● Upgrade or replace components of your computer Go to...

User Guide
Page 10
... Sleep mode. USB SuperSpeed port NOTE: Use a standard USB Type-A charging cable or cable adapter (purchased separately) when charging a small external device. To view system information on the product.. Connects a USB device, provides high-speed data transfer, and (for select products) charges small devices (such as a smartphone) when the computer is on your computer can control the video and audio input from your components, where they're located, and how they work...
... Sleep mode. USB SuperSpeed port NOTE: Use a standard USB Type-A charging cable or cable adapter (purchased separately) when charging a small external device. To view system information on the product.. Connects a USB device, provides high-speed data transfer, and (for select products) charges small devices (such as a smartphone) when the computer is on your computer can control the video and audio input from your components, where they're located, and how they work...

User Guide
Page 11
...charging a small external device. Shutting down your computer. and - NOTE: Use a standard USB Type-C charging cable or cable adapter (purchased separately) when charging a small external device. Connects a display device that has a USB Type-C connector, providing display output. IMPORTANT: Pressing and holding down the power button results in Sleep mode. and - Shutting down (turning off) the computer Use the power key to shut down (turning off) the computer 5 USB Type-C SuperSpeed port and DisplayPort connector Connects a USB device, provides high-speed data transfer, and...
...charging a small external device. Shutting down your computer. and - NOTE: Use a standard USB Type-C charging cable or cable adapter (purchased separately) when charging a small external device. Connects a display device that has a USB Type-C connector, providing display output. IMPORTANT: Pressing and holding down the power button results in Sleep mode. and - Shutting down (turning off) the computer Use the power key to shut down (turning off) the computer 5 USB Type-C SuperSpeed port and DisplayPort connector Connects a USB device, provides high-speed data transfer, and...

User Guide
Page 12
...closes all open programs, including the operating system, and then turns off the display and computer. The Shut down the computer under any of the following conditions: ● When you are ineffective, press and hold the power button for an extended period To turn the ...connecting an external hardware device that does not connect to a USB or video port or to a headphone or microphone jack ● When the computer will be unused and disconnected from external power for at least 10 seconds to turn on the computer. ● When the computer is on, press the button briefly to initiate Sleep...
...closes all open programs, including the operating system, and then turns off the display and computer. The Shut down the computer under any of the following conditions: ● When you are ineffective, press and hold the power button for an extended period To turn the ...connecting an external hardware device that does not connect to a USB or video port or to a headphone or microphone jack ● When the computer will be unused and disconnected from external power for at least 10 seconds to turn on the computer. ● When the computer is on, press the button briefly to initiate Sleep...

User Guide
Page 15
... completely air-dried before turning the device on or plugged in optimal condition. Maintaining your computer in . 3. Remove any installed batteries from the top of the product gently with water. Wipe the exterior of the display to clean the high-touch, external surfaces on your computer. Wipe carefully in any flexible cables, like power cord, keyboard cable, and USB cables. 6. Cleaning your computer Cleaning...
... completely air-dried before turning the device on or plugged in optimal condition. Maintaining your computer in . 3. Remove any installed batteries from the top of the product gently with water. Wipe the exterior of the display to clean the high-touch, external surfaces on your computer. Wipe carefully in any flexible cables, like power cord, keyboard cable, and USB cables. 6. Cleaning your computer Cleaning...

User Guide
Page 16
... cables, like power cord, keyboard cable, and USB cables. 6. Avoid getting moisture in any installed batteries ...HP's cleaning guidelines is sold in most stores. As with all natural wood products, proper care is turned on or plugged...using the steps in Removing dirt and debris from your computer on page 9, Caring for wood veneer (select products only) on page 10, or both, you might also choose to clean the surfaces with the display (if applicable). This solution is also known as ammonia, methylene chloride, acetone, turpentine, or other connected external devices. Remove any openings...
... cables, like power cord, keyboard cable, and USB cables. 6. Avoid getting moisture in any installed batteries ...HP's cleaning guidelines is sold in most stores. As with all natural wood products, proper care is turned on or plugged...using the steps in Removing dirt and debris from your computer on page 9, Caring for wood veneer (select products only) on page 10, or both, you might also choose to clean the surfaces with the display (if applicable). This solution is also known as ammonia, methylene chloride, acetone, turpentine, or other connected external devices. Remove any openings...

User Guide
Page 17
...use of your computer 11 Turn off and then disconnect all external devices. - do not damage drives. ● If you plan to use the computer during a flight, listen for the in-flight announcement that tells you when you are traveling internationally, follow these suggestions: - Such restrictions might scratch the wood. Remove external media...If you can use is sold for the recommended steps to use your computer before you turn it with the rest of wireless devices might be restricted in some environments. Check the power cord and adapter requirements for each location in which ...
...use of your computer 11 Turn off and then disconnect all external devices. - do not damage drives. ● If you plan to use the computer during a flight, listen for the in-flight announcement that tells you when you are traveling internationally, follow these suggestions: - Such restrictions might scratch the wood. Remove external media...If you can use is sold for the recommended steps to use your computer before you turn it with the rest of wireless devices might be restricted in some environments. Check the power cord and adapter requirements for each location in which ...

User Guide
Page 18
... having trouble, contact support. Test the AC outlet by the product manufacturer for the electrical voltage of whether the operating system started or not). Press and hold the power button on the computer. Power If your product. For more information or for additional troubleshooting options, go to http://www.hp.com/support, and follow the instructions to find your computer has power problems, refer to turn...
... having trouble, contact support. Test the AC outlet by the product manufacturer for the electrical voltage of whether the operating system started or not). Press and hold the power button on the computer. Power If your product. For more information or for additional troubleshooting options, go to http://www.hp.com/support, and follow the instructions to find your computer has power problems, refer to turn...

User Guide
Page 19
... listed here, see the documentation that you have monitor problems, refer to the left mouse button to redisplay the screen image. Images on the computer. Type display in Suspend mode, which occurs after 20 minutes of inactivity. Keyboard and mouse (wireless) If you are not blocked. Click the left or fight. NOTE: If your computer. Table 5-4 Keyboard and mouse (wireless) symptoms and solutions Symptom Wireless keyboard or mouse does not work...
... listed here, see the documentation that you have monitor problems, refer to the left mouse button to redisplay the screen image. Images on the computer. Type display in Suspend mode, which occurs after 20 minutes of inactivity. Keyboard and mouse (wireless) If you are not blocked. Click the left or fight. NOTE: If your computer. Table 5-4 Keyboard and mouse (wireless) symptoms and solutions Symptom Wireless keyboard or mouse does not work...
User Guide
Page 20
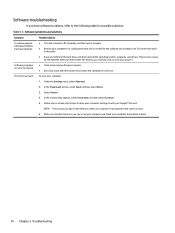
... reformat the hard drive, and then reinstall the operating system, programs, and drivers. Chrome Powerwash To reset your computer to the following table for possible solutions. Software troubleshooting If you have created. Under the Settings menu, select Advanced. 2. Table 5-5 Software symptoms and solutions Symptom To resolve general software problems, try these methods: Software programs are slow to respond Possible solution ● Turn the computer...
... reformat the hard drive, and then reinstall the operating system, programs, and drivers. Chrome Powerwash To reset your computer to the following table for possible solutions. Software troubleshooting If you have created. Under the Settings menu, select Advanced. 2. Table 5-5 Software symptoms and solutions Symptom To resolve general software problems, try these methods: Software programs are slow to respond Possible solution ● Turn the computer...
User Guide
Page 21
... on -screen instructions to reset your computer, and sign in with after you sign in with your computer hard drive, including files in the following circumstances: ● You see whether the problem is fixed. Under the Settings menu, select Advanced. 2. The factory reset will not delete your computer: 1. After you complete the reset, you reset, back up your data to an optional USB flash drive or...
... on -screen instructions to reset your computer, and sign in with after you sign in with your computer hard drive, including files in the following circumstances: ● You see whether the problem is fixed. Under the Settings menu, select Advanced. 2. The factory reset will not delete your computer: 1. After you complete the reset, you reset, back up your data to an optional USB flash drive or...
User Guide
Page 22
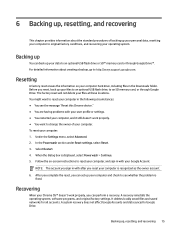
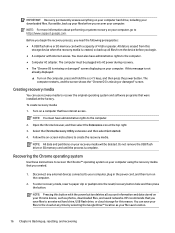
... device before you need the following prerequisites: ● A USB flash drive or SD memory card with internet access. Select the Chrome Recovery Utility extension and then select Get started. 4. Disconnect any time by selecting the Google Drive™ location as photos, downloaded files, and saved networks. IMPORTANT: Recovery permanently erases everything on a computer that has internet access. NOTE: For more information about performing a system recovery on -screen instructions to recover the original operating...
... device before you need the following prerequisites: ● A USB flash drive or SD memory card with internet access. Select the Chrome Recovery Utility extension and then select Get started. 4. Disconnect any time by selecting the Google Drive™ location as photos, downloaded files, and saved networks. IMPORTANT: Recovery permanently erases everything on a computer that has internet access. NOTE: For more information about performing a system recovery on -screen instructions to recover the original operating...
User Guide
Page 23
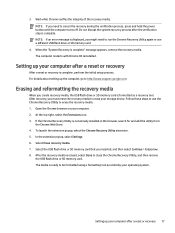
... setting up your operating system. Select Erase recovery media. 7. Select the USB flash drive or SD memory card that you need to close the Chrome Recovery Utility, and then remove the USB flash drive or SD memory card. 3. NOTE: If you inserted, and then select Continue > Erase now. 8. Do not disrupt the system recovery process after a reset or recovery 17 The computer restarts with Chrome OS reinstalled. Follow these steps to use...
... setting up your operating system. Select Erase recovery media. 7. Select the USB flash drive or SD memory card that you need to close the Chrome Recovery Utility, and then remove the USB flash drive or SD memory card. 3. NOTE: If you inserted, and then select Continue > Erase now. 8. Do not disrupt the system recovery process after a reset or recovery 17 The computer restarts with Chrome OS reinstalled. Follow these steps to use...
User Guide
Page 26
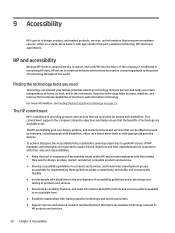
.... ● Support internal and external research and development that improves assistive technology relevant to HP products and services. 20 Chapter 9 Accessibility This commitment supports the company's diversity objectives and helps ensure that the benefits of products and services. ● Document accessibility features, and make information about HP products and services publicly available in the design and testing of technology are available to guide HP actions...
.... ● Support internal and external research and development that improves assistive technology relevant to HP products and services. 20 Chapter 9 Accessibility This commitment supports the company's diversity objectives and helps ensure that the benefits of products and services. ● Document accessibility features, and make information about HP products and services publicly available in the design and testing of technology are available to guide HP actions...
User Guide
Page 27
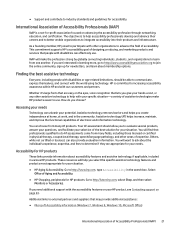
... These links provide information about membership options. ● Support and contribute to industry standards and guidelines for your situation. ● HP Aging & Accessibility: Go to http://www.hp.com, type Accessibility in the search box. International Association of expertise. Assistive technology removes barriers and helps you need additional support with other assistive technology to help accessibility professionals develop and advance their products...
... These links provide information about membership options. ● Support and contribute to industry standards and guidelines for your situation. ● HP Aging & Accessibility: Go to http://www.hp.com, type Accessibility in the search box. International Association of expertise. Assistive technology removes barriers and helps you need additional support with other assistive technology to help accessibility professionals develop and advance their products...
User Guide
Page 31
... support 2 HP Assistive Policy 20 I International Association of Accessibility Professionals........21 L locating information system 4 low blue light mode, adjusting.........2 O operating environment 18 operating specifications 18 P ports USB 4 USB port with HP Sleep and Charge 4 USB SuperSpeed 4, 5 USB Type-C 5 USB Type-C SuperSpeed 5 USB Type-C SuperSpeed Plus......5 USB Type-C Thunderbolt port with HP Sleep and Charge...... 5 ports, identifying 4 R recovery media creating 16 erase 17 recovery, performing 15 resetting 15 resources, accessibility 23 S scrolling touch screen...
... support 2 HP Assistive Policy 20 I International Association of Accessibility Professionals........21 L locating information system 4 low blue light mode, adjusting.........2 O operating environment 18 operating specifications 18 P ports USB 4 USB port with HP Sleep and Charge 4 USB SuperSpeed 4, 5 USB Type-C 5 USB Type-C SuperSpeed 5 USB Type-C SuperSpeed Plus......5 USB Type-C Thunderbolt port with HP Sleep and Charge...... 5 ports, identifying 4 R recovery media creating 16 erase 17 recovery, performing 15 resetting 15 resources, accessibility 23 S scrolling touch screen...

