

HP 2000 Notebook PC Compaq Presario CQ58 Notebook PC Compaq Presario CQ58 Notebook PC
Page 14
... injury, adjust the volume before using headphones, earbuds, or a headset. Connects optional powered stereo speakers, headphones, earbuds, a headset, or a television audio cable. Enables airflow to cool internal components and prevent overheating. NOTE: The computer fan starts up automatically to cool internal components. Left side Component (1) (2) External monitor port Vent (3) RJ-45 (network) jack (4) HDMI port (5) USB 2.0 port (6) Audio-in (microphone) jack (7) Audio-out (headphone) jack (8) Digital Media Slot Description Connects an external VGA monitor or projector...
... injury, adjust the volume before using headphones, earbuds, or a headset. Connects optional powered stereo speakers, headphones, earbuds, a headset, or a television audio cable. Enables airflow to cool internal components and prevent overheating. NOTE: The computer fan starts up automatically to cool internal components. Left side Component (1) (2) External monitor port Vent (3) RJ-45 (network) jack (4) HDMI port (5) USB 2.0 port (6) Audio-in (microphone) jack (7) Audio-out (headphone) jack (8) Digital Media Slot Description Connects an external VGA monitor or projector...
HP 2000 Notebook PC Compaq Presario CQ58 Notebook PC Compaq Presario CQ58 Notebook PC
Page 38
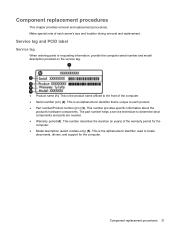
... the computer serial number and model description provided on the service tag. ● Product name (1). This is an alphanumeric identifier that is unique to locate documents, drivers, and support for the computer. ● Model description (select models only) (5). Component replacement procedures 31 Make special note of each product. ● Part number/Product number (p/n) (3). This number provides specific information about the product's hardware components. The part number helps a service technician to...
... the computer serial number and model description provided on the service tag. ● Product name (1). This is an alphanumeric identifier that is unique to locate documents, drivers, and support for the computer. ● Model description (select models only) (5). Component replacement procedures 31 Make special note of each product. ● Part number/Product number (p/n) (3). This number provides specific information about the product's hardware components. The part number helps a service technician to...
HP 2000 Notebook PC Compaq Presario CQ58 Notebook PC Compaq Presario CQ58 Notebook PC
Page 112
... backups you to restore without losing any personal information, Windows System Restore is an option. See Using Windows Refresh for using HP Recovery Manager on page 107. ● If you want to a previous state without the requirements of HP Recovery Manager to reclaim hard drive space, HP Recovery Manager offers the Remove Recovery Partition option. Minimized Image Recovery installs only drivers and hardware-enabling applications. For more information, see Recovering using File History, see Help and Support. For more information, see Recovering using HP Recovery Manager...
... backups you to restore without losing any personal information, Windows System Restore is an option. See Using Windows Refresh for using HP Recovery Manager on page 107. ● If you want to a previous state without the requirements of HP Recovery Manager to reclaim hard drive space, HP Recovery Manager offers the Remove Recovery Partition option. Minimized Image Recovery installs only drivers and hardware-enabling applications. For more information, see Recovering using File History, see Help and Support. For more information, see Recovering using HP Recovery Manager...

HP 2000 Notebook PC Compaq Presario CQ58 Notebook PC Compaq Presario CQ58 Notebook PC
Page 128
... 1 removing 93 spare part number 23, 25 product description audio 3 chipset 2 display panel 2 Ethernet 3 external media cards 4 graphics 2 hard drive 3 keyboard 4 memory module 2 microphone 3 operating system 5 optical drive 3 pointing device 4 ports 4 power requirements 4 processor 1 product name 1 security 5 serviceability 5 video 3 wireless 3 product name 1 R recovery 105, 106 discs 104, 108 HP Recovery Manager 107 media 108 starting 108 supported discs 104 system 107 USB flash drive 108 using HP Recovery media 104 recovery media creating 103 creating using HP Recovery Manager 104 recovery...
... 1 removing 93 spare part number 23, 25 product description audio 3 chipset 2 display panel 2 Ethernet 3 external media cards 4 graphics 2 hard drive 3 keyboard 4 memory module 2 microphone 3 operating system 5 optical drive 3 pointing device 4 ports 4 power requirements 4 processor 1 product name 1 security 5 serviceability 5 video 3 wireless 3 product name 1 R recovery 105, 106 discs 104, 108 HP Recovery Manager 107 media 108 starting 108 supported discs 104 system 107 USB flash drive 108 using HP Recovery media 104 recovery media creating 103 creating using HP Recovery Manager 104 recovery...
User Guide - Windows 8
Page 5
...and software information 3 Locating hardware ...3 Locating software ...3 Front ...3 Right side ...4 Left side ...5 Display ...7 Top ...8 TouchPad ...8 Lights ...9 Buttons ...10 Keys ...11 Bottom ...12 Labels ...13 3 Connecting to a network ...14 Connecting to a wireless network ...14 Using the wireless controls 14 Using the wireless button 14 Using operating system controls 14 Using a WLAN ...15 Using an Internet service provider 15 Setting up a WLAN 16 Configuring a wireless router 16 Protecting your WLAN 16 Connecting to a WLAN 17 Using Bluetooth wireless devices (select models only...
...and software information 3 Locating hardware ...3 Locating software ...3 Front ...3 Right side ...4 Left side ...5 Display ...7 Top ...8 TouchPad ...8 Lights ...9 Buttons ...10 Keys ...11 Bottom ...12 Labels ...13 3 Connecting to a network ...14 Connecting to a wireless network ...14 Using the wireless controls 14 Using the wireless button 14 Using operating system controls 14 Using a WLAN ...15 Using an Internet service provider 15 Setting up a WLAN 16 Configuring a wireless router 16 Protecting your WLAN 16 Connecting to a WLAN 17 Using Bluetooth wireless devices (select models only...
User Guide - Windows 8
Page 8
... wireless network ...60 Backing up your software applications and information 60 Using an optional security cable lock 60 10 Using Setup Utility (BIOS) and System Diagnostics 62 Starting Setup Utility (BIOS) ...62 Updating the BIOS ...62 Determining the BIOS version 62 Downloading a BIOS update 63 Using System Diagnostics ...63 11 Backing up, restoring, and recovering ...65 Creating recovery media and backups 65 Creating HP Recovery media 66 Restore and recovery ...67 Using Windows Refresh for quick and easy recovery 68 Remove everything and reinstall Windows 68 Recovering using HP...
... wireless network ...60 Backing up your software applications and information 60 Using an optional security cable lock 60 10 Using Setup Utility (BIOS) and System Diagnostics 62 Starting Setup Utility (BIOS) ...62 Updating the BIOS ...62 Determining the BIOS version 62 Downloading a BIOS update 63 Using System Diagnostics ...63 11 Backing up, restoring, and recovering ...65 Creating recovery media and backups 65 Creating HP Recovery media 66 Restore and recovery ...67 Using Windows Refresh for quick and easy recovery 68 Remove everything and reinstall Windows 68 Recovering using HP...
User Guide - Windows 8
Page 28
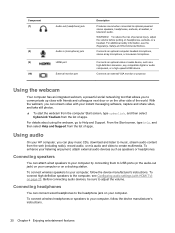
... audio and video to create multimedia. Component (7) (8) (9) (10) Audio-out (headphone) jack Audio-in (microphone) jack HDMI port External monitor port Description Produces sound when connected to adjust the volume. Connecting speakers You can stream video with HDMI TV) on headphones, earbuds, or a headset. To reduce the risk of the world. Connects an optional computer headset microphone, stereo array microphone, or monaural microphone. Connects an external VGA monitor or projector. From the Start screen, type help, and then select Help and Support...
... audio and video to create multimedia. Component (7) (8) (9) (10) Audio-out (headphone) jack Audio-in (microphone) jack HDMI port External monitor port Description Produces sound when connected to adjust the volume. Connecting speakers You can stream video with HDMI TV) on headphones, earbuds, or a headset. To reduce the risk of the world. Connects an optional computer headset microphone, stereo array microphone, or monaural microphone. Connects an external VGA monitor or projector. From the Start screen, type help, and then select Help and Support...

User Guide - Windows 8
Page 49
... USB ports you to read or write to a CD, DVD, or (on this versatile interface allows you store, manage, share, and access information. A USB flash drive, connected to connect the device. Some devices use the computer's power to purchase devices that stores your computer's software, operating system, and also provides storage for the types of damage to a USB connector, use , see Connecting to know your computer, such as a USB keyboard, mouse, external drive, printer, scanner, or USB...
... USB ports you to read or write to a CD, DVD, or (on this versatile interface allows you store, manage, share, and access information. A USB flash drive, connected to connect the device. Some devices use the computer's power to purchase devices that stores your computer's software, operating system, and also provides storage for the types of damage to a USB connector, use , see Connecting to know your computer, such as a USB keyboard, mouse, external drive, printer, scanner, or USB...
User Guide - Windows 8
Page 59
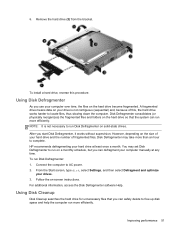
... of fragmented files, Disk Defragmenter may set Disk Defragmenter to run on the hard drive so that you can safely delete to free up disk space and help the computer run more than an hour to complete. For additional information, access the Disk Defragmenter software Help. 6. Using Disk Defragmenter As you start Disk Defragmenter, it works without supervision. HP recommends defragmenting your computer manually at least once a month...
... of fragmented files, Disk Defragmenter may set Disk Defragmenter to run on the hard drive so that you can safely delete to free up disk space and help the computer run more than an hour to complete. For additional information, access the Disk Defragmenter software Help. 6. Using Disk Defragmenter As you start Disk Defragmenter, it works without supervision. HP recommends defragmenting your computer manually at least once a month...
User Guide - Windows 8
Page 60
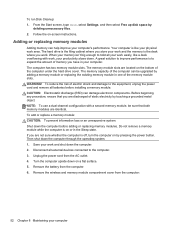
.... 2. A great solution to improve performance is off, turn the computer on -screen instructions. If you are not sure whether the computer is to hold all batteries before adding or replacing memory modules. From the Start screen, type disk, select Settings, and then select Free up disk space by touching a grounded metal object. Remove the battery from the AC outlet. 4. The memory module slots are identical. CAUTION: Electrostatic discharge (ESD) can...
.... 2. A great solution to improve performance is off, turn the computer on -screen instructions. If you are not sure whether the computer is to hold all batteries before adding or replacing memory modules. From the Start screen, type disk, select Settings, and then select Free up disk space by touching a grounded metal object. Remove the battery from the AC outlet. 4. The memory module slots are identical. CAUTION: Electrostatic discharge (ESD) can...
User Guide - Windows 8
Page 75
... remove all personal data, apps, and settings, and reinstall Windows. From the Start screen, type help , and then select Help and Support. ● If you want to restore the system to another drive. From the Start screen, type recovery, select HP Recovery Manager, and then select Drivers and Applications Reinstall, and follow the on-screen instructions. ● If you want to recover the computer's original factory partitioning and content, you can use the Factory Reset option...
... remove all personal data, apps, and settings, and reinstall Windows. From the Start screen, type help , and then select Help and Support. ● If you want to restore the system to another drive. From the Start screen, type recovery, select HP Recovery Manager, and then select Drivers and Applications Reinstall, and follow the on-screen instructions. ● If you want to recover the computer's original factory partitioning and content, you can use the Factory Reset option...
User Guide - Windows 8
Page 81
...monitor port, identifying 20 F firewall software 59 fn key, identifying 11, 32 fun things to do 1 H hard drive bay, identifying 12 hard drive light 6 HDMI configuring audio 23 HDMI port, connecting 22 HDMI port, identifying 5, 20 Hibernation enabling 35 initiated during critical battery level 38 high-definition devices, connecting 22 hot keys description 32 display system information 33 using 32 HP and third-party software updates, installing 60 HP Recovery Manager 69 correcting boot problems 70 starting 69 HP Recovery media creating 66 recovery 70 HP Recovery partition 69 recovery 69 removing...
...monitor port, identifying 20 F firewall software 59 fn key, identifying 11, 32 fun things to do 1 H hard drive bay, identifying 12 hard drive light 6 HDMI configuring audio 23 HDMI port, connecting 22 HDMI port, identifying 5, 20 Hibernation enabling 35 initiated during critical battery level 38 high-definition devices, connecting 22 hot keys description 32 display system information 33 using 32 HP and third-party software updates, installing 60 HP Recovery Manager 69 correcting boot problems 70 starting 69 HP Recovery media creating 66 recovery 70 HP Recovery partition 69 recovery 69 removing...
User Guide - Windows 8
Page 82
...webcam light, identifying 7, 19 internal display switch, identifying 7 internal microphone, identifying 7, 19 Internet connection setup 16 Internet security software, using 59 J jacks audio-in (microphone) 5, 20 audio-out (headphone) 5, 20 network 5 RJ-45 (network) 5 K keyboard hot keys, identifying 32 keys action 11 esc 11 fn 11 Windows applications 11 Windows logo 11 L labels Bluetooth 13 regulatory 13 serial number 13 service 13 wireless certification 13 WLAN 13 latch, battery release 12 lights AC adapter 4 caps lock 9 hard drive 6 optical drive 4 power 6, 9 TouchPad 8 webcam 7, 19 wireless...
...webcam light, identifying 7, 19 internal display switch, identifying 7 internal microphone, identifying 7, 19 Internet connection setup 16 Internet security software, using 59 J jacks audio-in (microphone) 5, 20 audio-out (headphone) 5, 20 network 5 RJ-45 (network) 5 K keyboard hot keys, identifying 32 keys action 11 esc 11 fn 11 Windows applications 11 Windows logo 11 L labels Bluetooth 13 regulatory 13 serial number 13 service 13 wireless certification 13 WLAN 13 latch, battery release 12 lights AC adapter 4 caps lock 9 hard drive 6 optical drive 4 power 6, 9 TouchPad 8 webcam 7, 19 wireless...
User Guide - Windows 8
Page 83
... recovery 69 system restore point creating 65 restoring 67 T temperature 38 TouchPad buttons 8 TouchPad gestures pinching 27 rotating 27 scrolling 26 zooming 27 TouchPad light 8 TouchPad on/off button 8 TouchPad zone, identifying 8 traveling with the computer 13, 38, 55 troubleshooting AC adapter 39 turning off the computer 40 U unresponsive system 40 USB cable, connecting 42 USB devices connecting 41 description 41 removing 42 USB hubs 41 USB ports, identifying 4, 5, 19 using external AC power 39 using passwords 57 using the power meter and power settings...
... recovery 69 system restore point creating 65 restoring 67 T temperature 38 TouchPad buttons 8 TouchPad gestures pinching 27 rotating 27 scrolling 26 zooming 27 TouchPad light 8 TouchPad on/off button 8 TouchPad zone, identifying 8 traveling with the computer 13, 38, 55 troubleshooting AC adapter 39 turning off the computer 40 U unresponsive system 40 USB cable, connecting 42 USB devices connecting 41 description 41 removing 42 USB hubs 41 USB ports, identifying 4, 5, 19 using external AC power 39 using passwords 57 using the power meter and power settings...
User Guide - Windows 7
Page 5
... hardware and software information 3 Front ...3 Right side ...4 Left side ...5 Display ...7 Top ...8 TouchPad ...8 Lights ...9 Buttons ...10 Keys ...11 Bottom ...12 Labels ...13 3 Connecting to a network ...14 Connecting to a wireless network ...14 Using the wireless controls 14 Using the wireless button 14 Using operating system controls 14 Using a WLAN ...15 Using an Internet service provider 15 Setting up a WLAN 16 Configuring a wireless router 16 Protecting your WLAN 16 Connecting to a WLAN 17 Using Bluetooth wireless devices (select models only 17 Connecting to a wired network...
... hardware and software information 3 Front ...3 Right side ...4 Left side ...5 Display ...7 Top ...8 TouchPad ...8 Lights ...9 Buttons ...10 Keys ...11 Bottom ...12 Labels ...13 3 Connecting to a network ...14 Connecting to a wireless network ...14 Using the wireless controls 14 Using the wireless button 14 Using operating system controls 14 Using a WLAN ...15 Using an Internet service provider 15 Setting up a WLAN 16 Configuring a wireless router 16 Protecting your WLAN 16 Connecting to a WLAN 17 Using Bluetooth wireless devices (select models only 17 Connecting to a wired network...
User Guide - Windows 7
Page 8
... specific files ...65 Restoring specific files using Windows Backup and Restore 65 Recovering the original system using HP Recovery Manager 65 What you need to know 65 Recovering using HP Recovery partition (select models only 66 Recovering using the recovery media 66 Changing the computer boot order 66 12 Specifications ...68 Input power ...68 Operating environment ...68 13 Troubleshooting and support ...69 Troubleshooting ...70 Disc drive problems ...70 Wireless connection problems 70 Cannot connect to a WLAN 71 Cannot connect to a preferred network 71 Current network security codes...
... specific files ...65 Restoring specific files using Windows Backup and Restore 65 Recovering the original system using HP Recovery Manager 65 What you need to know 65 Recovering using HP Recovery partition (select models only 66 Recovering using the recovery media 66 Changing the computer boot order 66 12 Specifications ...68 Input power ...68 Operating environment ...68 13 Troubleshooting and support ...69 Troubleshooting ...70 Disc drive problems ...70 Wireless connection problems 70 Cannot connect to a WLAN 71 Cannot connect to a preferred network 71 Current network security codes...

User Guide - Windows 7
Page 27
...-45 (network) jack. NOTE: The functional range (how far your office. Connecting to a wired network A LAN connection uses a network cable, which is a security-enabled WLAN, you are listed, you to manually search for and connect to a network or to , click Open Network and Sharing Center, and then click Set up a personal area network (PAN) of a wireless router or access point. To reduce the risk of the taskbar. 3. If the wireless light is made...
...-45 (network) jack. NOTE: The functional range (how far your office. Connecting to a wired network A LAN connection uses a network cable, which is a security-enabled WLAN, you are listed, you to manually search for and connect to a network or to , click Open Network and Sharing Center, and then click Set up a personal area network (PAN) of a wireless router or access point. To reduce the risk of the taskbar. 3. If the wireless light is made...

User Guide - Windows 7
Page 30
... webcam, select Start > All Programs > Communication and Chat > CyberLink YouCam. Using audio On your instant messaging software, capture and share video, and take still photos. To connect high-definition speakers to your computer, follow the device manufacturer's instructions. 20 Chapter 4 Enjoying entertainment features Component (7) (8) (9) (10) Audio-out (headphone) jack Audio-in (microphone) jack HDMI port External monitor port Description Produces sound when connected to adjust the volume. For additional safety information, see Configuring audio settings (with HDMI...
... webcam, select Start > All Programs > Communication and Chat > CyberLink YouCam. Using audio On your instant messaging software, capture and share video, and take still photos. To connect high-definition speakers to your computer, follow the device manufacturer's instructions. 20 Chapter 4 Enjoying entertainment features Component (7) (8) (9) (10) Audio-out (headphone) jack Audio-in (microphone) jack HDMI port External monitor port Description Produces sound when connected to adjust the volume. For additional safety information, see Configuring audio settings (with HDMI...
User Guide - Windows 7
Page 70
... displayed, follow these steps: 1. NOTE: After a message on -screen instructions. During the download and installation, follow these instructions: Do not disconnect power from the computer by selecting Start > Computer. 2. Follow the on battery power, docked in an optional docking device, or connected to download. 3. You will need this path when you connect your computer. BIOS installation procedures vary. Double-click the file that is functioning properly. 60 Chapter 10 Using Setup Utility (BIOS...
... displayed, follow these steps: 1. NOTE: After a message on -screen instructions. During the download and installation, follow these instructions: Do not disconnect power from the computer by selecting Start > Computer. 2. Follow the on battery power, docked in an optional docking device, or connected to download. 3. You will need this path when you connect your computer. BIOS installation procedures vary. Double-click the file that is functioning properly. 60 Chapter 10 Using Setup Utility (BIOS...
User Guide - Windows 7
Page 76
... an optional external optical drive, and then restart the computer. - Insert the recovery flash drive into the optical drive on your computer, and then restart the computer. See Changing the computer boot order on -screen instructions. ● If the recovery media do not work, you to restore your system without the need for recovery discs: 1. or - Follow the on page 66. 3. Select Internal CD/DVD ROM Drive from the list. - Recovering using HP Recovery partition (select models only) The HP Recovery partition (select models...
... an optional external optical drive, and then restart the computer. - Insert the recovery flash drive into the optical drive on your computer, and then restart the computer. See Changing the computer boot order on -screen instructions. ● If the recovery media do not work, you to restore your system without the need for recovery discs: 1. or - Follow the on page 66. 3. Select Internal CD/DVD ROM Drive from the list. - Recovering using HP Recovery partition (select models only) The HP Recovery partition (select models...


