User Guide
Page 4
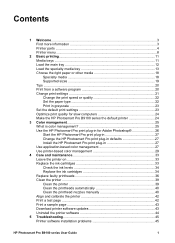
... Make the HP Photosmart Pro B9100 series the default printer 24 3 Color management 25 What is color management 25 Use the HP Photosmart Pro print plug-in for Adobe Photoshop 26 Start the HP Photosmart Pro print plug-in 27 Change the HP Photosmart Pro print plug-in defaults 27 Install the HP Photosmart Pro print plug-in 27 Use application-based color management 27 Use printer-based color management 29...
... Make the HP Photosmart Pro B9100 series the default printer 24 3 Color management 25 What is color management 25 Use the HP Photosmart Pro print plug-in for Adobe Photoshop 26 Start the HP Photosmart Pro print plug-in 27 Change the HP Photosmart Pro print plug-in defaults 27 Install the HP Photosmart Pro print plug-in 27 Use application-based color management 27 Use printer-based color management 29...

User Guide
Page 5
... 46 Printing problems 47 Error messages ...50 Paper errors 51 Printer setup errors 52 Ink cartridge and printhead errors 53 Network errors 54 6 HP support ...57 Support process 57 HP support by phone 57 Phone support period 57 Placing a call 57 After the phone ... the printer to the network 61 Install the printer software on a Windows computer 62 Install the printer software on a Mac 63 Use the embedded web server 64 Print a network settings page 64 B Specifications...65 System requirements 65 Printer specifications 66 C HP Warranty...69 Index...71 2 HP Photosmart Pro B9100 ...
... 46 Printing problems 47 Error messages ...50 Paper errors 51 Printer setup errors 52 Ink cartridge and printhead errors 53 Network errors 54 6 HP support ...57 Support process 57 HP support by phone 57 Phone support period 57 Placing a call 57 After the phone ... the printer to the network 61 Install the printer software on a Windows computer 62 Install the printer software on a Mac 63 Use the embedded web server 64 Print a network settings page 64 B Specifications...65 System requirements 65 Printer specifications 66 C HP Warranty...69 Index...71 2 HP Photosmart Pro B9100 ...
User Guide
Page 6
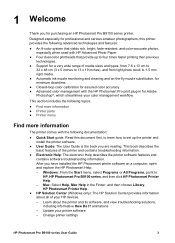
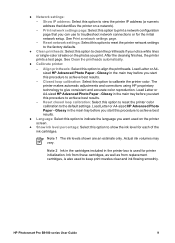
... you for assured color accuracy. ● Advanced color management with the following documentation: ● Quick Start guide: Read this printer provides the following topics: ● Find more information ● Printer parts ● Printer menu Find more information The printer comes with the HP Photosmart Pro print plug-in the Finder, and then choose Library, HP Photosmart Printer Help. ● HP Solution Center (Windows...
... you for assured color accuracy. ● Advanced color management with the following documentation: ● Quick Start guide: Read this printer provides the following topics: ● Find more information ● Printer parts ● Printer menu Find more information The printer comes with the HP Photosmart Pro print plug-in the Finder, and then choose Library, HP Photosmart Printer Help. ● HP Solution Center (Windows...
User Guide
Page 7
... output tray by sliding it towards you have installed the HP Photosmart printer software on the CD with the side to be printed facing down. 4 HP Photosmart Pro B9100 series printer Place the media with the printer. Place the media into this user guide, printer software refers to the HP Photosmart software that comes on a computer, open the door and insert...
... output tray by sliding it towards you have installed the HP Photosmart printer software on the CD with the side to be printed facing down. 4 HP Photosmart Pro B9100 series printer Place the media with the printer. Place the media into this user guide, printer software refers to the HP Photosmart software that comes on a computer, open the door and insert...

User Guide
Page 8
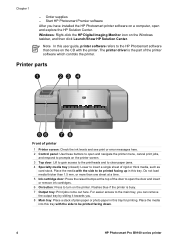
...specialty media tray pass back and forth through the slot without any obstructions. HP Photosmart Pro B9100 series User Guide 5 Back of printer 1 USB port: Use this port to connect the printer to a computer. 2 Ethernet port: Use this port to connect the printer to a network. 3 Rear door: Remove this door to clear paper... jams. 4 Rear paper slot: Print jobs from the specialty media tray, the space behind the printer for the paper to pass back and forth through this port to remove the rear door. 6 Power cord connection: Use this slot before being...
...specialty media tray pass back and forth through the slot without any obstructions. HP Photosmart Pro B9100 series User Guide 5 Back of printer 1 USB port: Use this port to connect the printer to a computer. 2 Ethernet port: Use this port to connect the printer to a network. 3 Rear door: Remove this door to clear paper... jams. 4 Rear paper slot: Print jobs from the specialty media tray, the space behind the printer for the paper to pass back and forth through this port to remove the rear door. 6 Power cord connection: Use this slot before being...
User Guide
Page 9
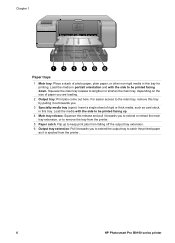
..., depending on the size of photo paper, plain paper, or other non-rigid media in this release and pull it is ejected from the printer. 6 HP Photosmart Pro B9100 series printer Load the media with the side to be printed facing up. 4 Main tray release: Squeeze this tray for printing. Load the media in ... of rigid or thick media, such as it towards you to extend or retract the main tray extension, or to remove the tray from the printer. 5 Paper catch: Flip up to be printed facing down. For easier access to the main tray, remove this tray. Chapter 1 Paper trays 1 Main tray: ...
..., depending on the size of photo paper, plain paper, or other non-rigid media in this release and pull it is ejected from the printer. 6 HP Photosmart Pro B9100 series printer Load the media with the side to be printed facing up. 4 Main tray release: Squeeze this tray for printing. Load the media in ... of rigid or thick media, such as it towards you to extend or retract the main tray extension, or to remove the tray from the printer. 5 Paper catch: Flip up to be printed facing down. For easier access to the main tray, remove this tray. Chapter 1 Paper trays 1 Main tray: ...

User Guide
Page 10
...the front of the guide and sliding the guide across. 2 Paper-size markings: Refer to these stops so that the paper feeds correctly into the printer. 6 Paper-length guide: Adjust this guide to fit close to load larger sizes of the paper in the tray. Fully extended, the main tray...to extend or retract the main tray extension, or to remove the tray from the printer. 5 Paper stops: Align the paper against these markings to guide you for loading paper in the correct orientation. 3 Main tray extension: Extend the main tray to the end of paper. HP Photosmart Pro B9100 series User Guide 7
...the front of the guide and sliding the guide across. 2 Paper-size markings: Refer to these stops so that the paper feeds correctly into the printer. 6 Paper-length guide: Adjust this guide to fit close to load larger sizes of the paper in the tray. Fully extended, the main tray...to extend or retract the main tray extension, or to remove the tray from the printer. 5 Paper stops: Align the paper against these markings to guide you for loading paper in the correct orientation. 3 Main tray extension: Extend the main tray to the end of paper. HP Photosmart Pro B9100 series User Guide 7

User Guide
Page 11
... menu with a triangle next to indicate the ink level of each colored ink cartridge in the order of the colored dots. When the printer is idle, the printer screen displays a bar graph to it has submenus or options. See Print a sample page. 8 HP Photosmart Pro B9100 series printer See Print a test page. ● Print sample page: Select this...
... menu with a triangle next to indicate the ink level of each colored ink cartridge in the order of the colored dots. When the printer is idle, the printer screen displays a bar graph to it has submenus or options. See Print a sample page. 8 HP Photosmart Pro B9100 series printer See Print a test page. ● Print sample page: Select this...
User Guide
Page 12
... before you want used for each of the ink cartridges. HP Photosmart Pro B9100 series User Guide 9 Align printheads: Select this option to align the printheads. Closed loop calibration: Select this option to calibrate the printer color. ● Network settings: - The printer makes automatic adjustments and corrections using HP proprietary technology to show the ink level for...
... before you want used for each of the ink cartridges. HP Photosmart Pro B9100 series User Guide 9 Align printheads: Select this option to align the printheads. Closed loop calibration: Select this option to calibrate the printer color. ● Network settings: - The printer makes automatic adjustments and corrections using HP proprietary technology to show the ink level for...
User Guide
Page 14
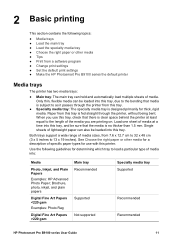
...inkjet, and plain papers Digital Fine Art Papers 220 gsm Main tray Recommended Supported Not supported Specialty media tray Supported Recommended Recommended HP Photosmart Pro B9100 series User Guide 11 Both trays support a wide range of media sizes, from this tray. ● Specialty media tray: The specialty media tray is fed straight through the printer... from a software program ● Change print settings ● Set the default print settings ● Make the HP Photosmart Pro B9100 series the default printer Media trays The printer has two media ...
...inkjet, and plain papers Digital Fine Art Papers 220 gsm Main tray Recommended Supported Not supported Specialty media tray Supported Recommended Recommended HP Photosmart Pro B9100 series User Guide 11 Both trays support a wide range of media sizes, from this tray. ● Specialty media tray: The specialty media tray is fed straight through the printer... from a software program ● Change print settings ● Set the default print settings ● Make the HP Photosmart Pro B9100 series the default printer Media trays The printer has two media ...

User Guide
Page 15
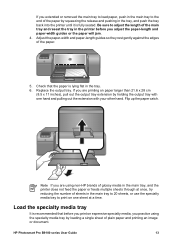
...printed facing down. Load the main tray To load the main tray 1. Move the paper-width and paper-length guides to remove media from the printer if necessary, by grasping the sides of the paper-width guide. Place a stack of the tray. You can remove the tray from the main...Examples: Photo board Not supported Any media thicker than the top of the tray with both hands and sliding it towards you . 12 HP Photosmart Pro B9100 series printer The main tray is no higher than Not supported 1.5 mm Specialty media tray Recommended Not supported Note You do not need to make room...
...printed facing down. Load the main tray To load the main tray 1. Move the paper-width and paper-length guides to remove media from the printer if necessary, by grasping the sides of the paper-width guide. Place a stack of the tray. You can remove the tray from the main...Examples: Photo board Not supported Any media thicker than the top of the tray with both hands and sliding it towards you . 12 HP Photosmart Pro B9100 series printer The main tray is no higher than Not supported 1.5 mm Specialty media tray Recommended Not supported Note You do not need to make room...
User Guide
Page 16
...printing an image or document. Replace the output tray. HP Photosmart Pro B9100 series User Guide 13 Be sure to adjust the length of the main tray and reseat the tray in the printer before you print on expensive specialty media, you practice using non-HP brands of the paper. 5. Load the specialty media tray...jam. 4. Adjust the paper-width and paper-length guides so they rest gently against the edges of glossy media in the main tray, and the printer does not feed the paper or feeds multiple sheets through at a time. If you extended or removed the main tray to load paper, push ...
...printing an image or document. Replace the output tray. HP Photosmart Pro B9100 series User Guide 13 Be sure to adjust the length of the main tray and reseat the tray in the printer before you print on expensive specialty media, you practice using non-HP brands of the paper. 5. Load the specialty media tray...jam. 4. Adjust the paper-width and paper-length guides so they rest gently against the edges of glossy media in the main tray, and the printer does not feed the paper or feeds multiple sheets through at a time. If you extended or removed the main tray to load paper, push ...
User Guide
Page 17
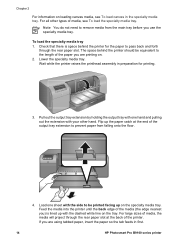
...extension to pass back and forth through the rear paper slot at the end of media, see To load canvas in first. 14 HP Photosmart Pro B9100 series printer Check that there is lined up the paper catch at the back of the media (the edge nearest you are printing on the tray... media tray 1. Load one hand and pulling out the extension with the dashed white line on . 2. The space behind the printer for printing. 3. Wait while the printer raises the printhead assembly in preparation for the paper to prevent paper from the main tray before you are using tabbed paper, insert...
...extension to pass back and forth through the rear paper slot at the end of media, see To load canvas in first. 14 HP Photosmart Pro B9100 series printer Check that there is lined up the paper catch at the back of the media (the edge nearest you are printing on the tray... media tray 1. Load one hand and pulling out the extension with the dashed white line on . 2. The space behind the printer for printing. 3. Wait while the printer raises the printhead assembly in preparation for the paper to prevent paper from the main tray before you are using tabbed paper, insert...
User Guide
Page 18
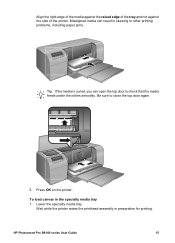
... the specialty media tray 1. Align the right edge of the media against the raised edge of the tray and not against the side of the printer. HP Photosmart Pro B9100 series User Guide 15 Misaligned media can result in skewing or other printing problems, including paper jams. Tip If the media is curled, you... can open the top door to close the top door again. 5. Press OK on the printer. Be sure to check that the media feeds under the rollers smoothly.
... the specialty media tray 1. Align the right edge of the media against the raised edge of the tray and not against the side of the printer. HP Photosmart Pro B9100 series User Guide 15 Misaligned media can result in skewing or other printing problems, including paper jams. Tip If the media is curled, you... can open the top door to close the top door again. 5. Press OK on the printer. Be sure to check that the media feeds under the rollers smoothly.
User Guide
Page 19
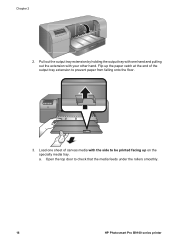
a. Open the top door to prevent paper from falling onto the floor. 3. Flip up on the specialty media tray. Chapter 2 2. Load one hand and pulling out the extension with the side to be printed facing up the paper catch at the end of canvas media with your other hand. Pull out the output tray extension by holding the output tray with one sheet of the output tray extension to check that the media feeds under the rollers smoothly. 16 HP Photosmart Pro B9100 series printer
a. Open the top door to prevent paper from falling onto the floor. 3. Flip up on the specialty media tray. Chapter 2 2. Load one hand and pulling out the extension with the side to be printed facing up the paper catch at the end of canvas media with your other hand. Pull out the output tray extension by holding the output tray with one sheet of the output tray extension to check that the media feeds under the rollers smoothly. 16 HP Photosmart Pro B9100 series printer

User Guide
Page 20
... persists, use a different, flatter sheet of the printer. For large sizes of media, the media will project through the rear paper slot at the back of media. Close the top door. 4. Place the media in the printer driver on . HP Photosmart Pro B9100 series User Guide 17 Feed the media into the... printer until it lies flat. c. The printer checks that the media is flat enough to print on the computer, and then click Print...
... persists, use a different, flatter sheet of the printer. For large sizes of media, the media will project through the rear paper slot at the back of media. Close the top door. 4. Place the media in the printer driver on . HP Photosmart Pro B9100 series User Guide 17 Feed the media into the... printer until it lies flat. c. The printer checks that the media is flat enough to print on the computer, and then click Print...

User Guide
Page 21
...printer. 18 HP Photosmart Pro B9100 series printer Experiment with your local media provider. Warning Do not load media thicker than 1.5 mm, as it from these high quality papers. Press OK on certain types of HP and non-HP specialty media. Color calibration and printhead alignment HP... Advanced Photo Paper - Choose the right paper or other media For a list of available HP inkjet paper, or to purchase supplies, go to: ● www.hpshopping.com (U.S.) ● www.hpshopping.ca (Canada) ● www.hp...
...printer. 18 HP Photosmart Pro B9100 series printer Experiment with your local media provider. Warning Do not load media thicker than 1.5 mm, as it from these high quality papers. Press OK on certain types of HP and non-HP specialty media. Color calibration and printhead alignment HP... Advanced Photo Paper - Choose the right paper or other media For a list of available HP inkjet paper, or to purchase supplies, go to: ● www.hpshopping.com (U.S.) ● www.hpshopping.ca (Canada) ● www.hp...

User Guide
Page 23
... paper size you are not printing, because the media can then open the photos in a cool, dry place. To modify the settings, see Color management. 20 HP Photosmart Pro B9100 series printer Tips Keep your printed pages. If the corners curl, place the paper in a plastic bag and gently bend it in the opposite direction...
... paper size you are not printing, because the media can then open the photos in a cool, dry place. To modify the settings, see Color management. 20 HP Photosmart Pro B9100 series printer Tips Keep your printed pages. If the corners curl, place the paper in a plastic bag and gently bend it in the opposite direction...

User Guide
Page 24
...File menu in your software program, this button might be called Properties, Options, Printer Setup, or Printer. 5. Select the HP Photosmart Pro B9100 series as the default printer, you can skip this step. If necessary, you can adjust the settings ...Color tabs. Select the paper size from the Paper Size pop-up menu. 7. Tip You can skip this step. The HP Photosmart Pro B9100 series will already be selected. 4. Make sure you have already set the HP Photosmart Pro B9100 series as the printer. Click Print or OK to save the settings. 5. Select the HP Photosmart Pro...
...File menu in your software program, this button might be called Properties, Options, Printer Setup, or Printer. 5. Select the HP Photosmart Pro B9100 series as the default printer, you can skip this step. If necessary, you can adjust the settings ...Color tabs. Select the paper size from the Paper Size pop-up menu. 7. Tip You can skip this step. The HP Photosmart Pro B9100 series will already be selected. 4. Make sure you have already set the HP Photosmart Pro B9100 series as the printer. Click Print or OK to save the settings. 5. Select the HP Photosmart Pro...

User Guide
Page 25
... possible, but requires longer to print than Best and requires a large amount of disk space. Click the Paper tab. 22 HP Photosmart Pro B9100 series printer To select a specific paper type (Windows) 1. From the Quality pop-up menu, select the appropriate speed and quality setting ...for most documents. - Normal: Provides the best balance between print quality and speed. Open the Printer Properties dialog box. 2. Click the Paper tab. 4. This is appropriate for your project: - Open the Print dialog box. 2. ...
... possible, but requires longer to print than Best and requires a large amount of disk space. Click the Paper tab. 22 HP Photosmart Pro B9100 series printer To select a specific paper type (Windows) 1. From the Quality pop-up menu, select the appropriate speed and quality setting ...for most documents. - Normal: Provides the best balance between print quality and speed. Open the Printer Properties dialog box. 2. Click the Paper tab. 4. This is appropriate for your project: - Open the Print dialog box. 2. ...


