Setup Poster
Page 1
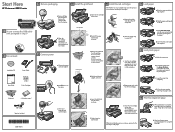
... Hold the printhead upright, as shown. d. e. Remove all ink cartridges. b. Colored icons b. Do not touch the copper colored contacts. Lower the photo and output trays together. 7 Load photo paper c. Slide...must complete step 5a (in the photo tray. Slide the paper-width guide to turn on the printer or other surface. When initialization is complete. Connect the power cord and adapter. Press..., press OK to load paper. Start Here HP Photosmart B8500 series 1 Do not connect the USB cable until it off. Turn the ink cartridge over, slide it into place...
... Hold the printhead upright, as shown. d. e. Remove all ink cartridges. b. Colored icons b. Do not touch the copper colored contacts. Lower the photo and output trays together. 7 Load photo paper c. Slide...must complete step 5a (in the photo tray. Slide the paper-width guide to turn on the printer or other surface. When initialization is complete. Connect the power cord and adapter. Press..., press OK to load paper. Start Here HP Photosmart B8500 series 1 Do not connect the USB cable until it off. Turn the ink cartridge over, slide it into place...

Setup Poster
Page 2
...;20200707HPHDPCDC IMPORTANT: Purchase a USB cable separately if it is installed on your computer, you can try out any of the features using your HP device. Turn on the computer. a. a. X- HP Photosmart Pro HP PhotosmBa88rt0P0roserBie8s800 Series TTuuttQooQrruiiuaiacicllkkiinnSSccttallauurrddtt eedd Product in if necessary, and then wait for the desktop to connect the USB cable. b. d. Check all screens...
...;20200707HPHDPCDC IMPORTANT: Purchase a USB cable separately if it is installed on your computer, you can try out any of the features using your HP device. Turn on the computer. a. a. X- HP Photosmart Pro HP PhotosmBa88rt0P0roserBie8s800 Series TTuuttQooQrruiiuaiacicllkkiinnSSccttallauurrddtt eedd Product in if necessary, and then wait for the desktop to connect the USB cable. b. d. Check all screens...

Creative Guide
Page 11
... Eye Removal button on , the HP Photosmart automatically corrects red eye coloring in all photos. Press OK again to modify, and press OK. 3. Select Brightness, and then press OK. 6. Insert a memory card containing your photos into the printer. English Easy Photo Editing Photo Brightness...Photo Fix automatically enhances your photos into the printer. The Red Eye Removal light turns on. Insert a memory card containing your photos using HP Real Life Technologies that sharpen blurred photos and improve the overall brightness, color, and contrast of photos to get the...
... Eye Removal button on , the HP Photosmart automatically corrects red eye coloring in all photos. Press OK again to modify, and press OK. 3. Select Brightness, and then press OK. 6. Insert a memory card containing your photos into the printer. English Easy Photo Editing Photo Brightness...Photo Fix automatically enhances your photos into the printer. The Red Eye Removal light turns on. Insert a memory card containing your photos using HP Real Life Technologies that sharpen blurred photos and improve the overall brightness, color, and contrast of photos to get the...
User Guide
Page 4
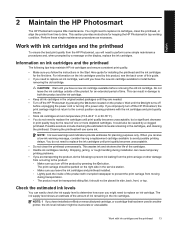
... information...12 2 Maintain the HP Photosmart Work with ink cartridges and the printhead...13 Information on ink cartridges and the printhead...13 Check the estimated ink levels...13 Replace the ink cartridges...14 Print a diagnostic page...16 Turn off the HP Photosmart...16 3 Troubleshooting and support ...Uninstall and reinstall the software...17 Setup troubleshooting...18 The product will not turn on...18 After setting up the product, it does not print...20...
... information...12 2 Maintain the HP Photosmart Work with ink cartridges and the printhead...13 Information on ink cartridges and the printhead...13 Check the estimated ink levels...13 Replace the ink cartridges...14 Print a diagnostic page...16 Turn off the HP Photosmart...16 3 Troubleshooting and support ...Uninstall and reinstall the software...17 Setup troubleshooting...18 The product will not turn on...18 After setting up the product, it does not print...20...

User Guide
Page 6
...The On light is solid blue when the product is turned on the topic you to adjust the crop box for viewing, printing, editing, and saving your card or storage device. Depending on , the HP Photosmart automatically corrects red eye coloring in the photos. The Red Eye Removal light is ...solid green when the Red Eye Removal feature is on the display for printing. Home: Launches the Photosmart Express menu on and a memory card or storage ...
...The On light is solid blue when the product is turned on the topic you to adjust the crop box for viewing, printing, editing, and saving your card or storage device. Depending on , the HP Photosmart automatically corrects red eye coloring in the photos. The Red Eye Removal light is ...solid green when the Red Eye Removal feature is on the display for printing. Home: Launches the Photosmart Express menu on and a memory card or storage ...

User Guide
Page 13
...Make sure the USB configuration setting of copies to print your software application, click Print. 10 HP Photosmart overview The name of copies. • Select Settings to the printer, and then turns solid green. dialog box is highlighted, and then press OK. 4. Select Yes to print ...the camera, the Print DPOF Photos? See the camera documentation for printing on non-HP digital cameras. 4. Printing from a computer gives you more information, see the documentation that you must install the HP Photosmart software and connect a USB cable from a software application (Windows) 1. Make ...
...Make sure the USB configuration setting of copies to print your software application, click Print. 10 HP Photosmart overview The name of copies. • Select Settings to the printer, and then turns solid green. dialog box is highlighted, and then press OK. 4. Select Yes to print ...the camera, the Print DPOF Photos? See the camera documentation for printing on non-HP digital cameras. 4. Printing from a computer gives you more information, see the documentation that you must install the HP Photosmart software and connect a USB cable from a software application (Windows) 1. Make ...
User Guide
Page 16
... • Keep all ink cartridges in the ink cartridges. You might need to replace ink cartridges, clean the printhead, or align the printer from occurring to install before removing the old ink cartridge. This can cause temporary printing problems. • If you have a new ink...printhead installed. ◦ Lightly pack the inside of ink remaining in the original sealed packages until the On light turns off before unplugging the power cord or turning off the HP Photosmart by this guide. • If you need to perform some ink. Dropping, jarring, or rough handling during ...
... • Keep all ink cartridges in the ink cartridges. You might need to replace ink cartridges, clean the printhead, or align the printer from occurring to install before removing the old ink cartridge. This can cause temporary printing problems. • If you have a new ink...printhead installed. ◦ Lightly pack the inside of ink remaining in the original sealed packages until the On light turns off before unplugging the power cord or turning off the HP Photosmart by this guide. • If you need to perform some ink. Dropping, jarring, or rough handling during ...

User Guide
Page 17
... to highlight Display Ink Gauge, and then press OK. Open the ink cartridge access door. 14 Maintain the HP Photosmart Visit www.hp.com/go/learnaboutsupplies for the HP Photosmart, to www.hp.com/ buy/supplies. If you do not need to replace the ink cartridges until you have replacement ink cartridges...clear and ink flowing smoothly. To check the ink levels from the cartridges is used . TIP: You can result in the cartridge after it is turned on the page. If prompted, choose your product, and then click one of time. NOTE: 3 Ink from the control panel 1. This can...
... to highlight Display Ink Gauge, and then press OK. Open the ink cartridge access door. 14 Maintain the HP Photosmart Visit www.hp.com/go/learnaboutsupplies for the HP Photosmart, to www.hp.com/ buy/supplies. If you do not need to replace the ink cartridges until you have replacement ink cartridges...clear and ink flowing smoothly. To check the ink levels from the cartridges is used . TIP: You can result in the cartridge after it is turned on the page. If prompted, choose your product, and then click one of time. NOTE: 3 Ink from the control panel 1. This can...

User Guide
Page 19
... several aspects of your product, including the ink cartridges. Turn off a power strip. 16 Maintain the HP Photosmart Press to highlight Diagnostic Page, and then press OK. If the color blocks still show print quality problems after cleaning the printhead, align the printer. If the color blocks continue to show print quality problems after cleaning and...
... several aspects of your product, including the ink cartridges. Turn off a power strip. 16 Maintain the HP Photosmart Press to highlight Diagnostic Page, and then press OK. If the color blocks still show print quality problems after cleaning the printhead, align the printer. If the color blocks continue to show print quality problems after cleaning and...
User Guide
Page 20
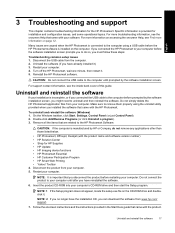
... your computer. English 3 Troubleshooting and support This chapter contains troubleshooting information for installation and configuration issues, and some operational topics. Turn off the HP Photosmart, wait one minute, then restart it . Reinstall the HP Photosmart software. Double-click Add/Remove Programs (or click Uninstall a program). 3. NOTE: It is installed on the CD-ROM drive and...
... your computer. English 3 Troubleshooting and support This chapter contains troubleshooting information for installation and configuration issues, and some operational topics. Turn off the HP Photosmart, wait one minute, then restart it . Reinstall the HP Photosmart software. Double-click Add/Remove Programs (or click Uninstall a program). 3. NOTE: It is installed on the CD-ROM drive and...
User Guide
Page 21
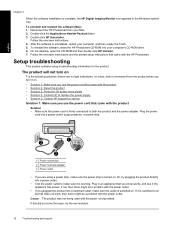
... switched outlet, make sure the power strip is uninstalled, restart your computer, and then empty the Trash. 5. Disconnect the HP Photosmart from the product when you turn on Try the following solutions if there are using a power strip, make sure the outlet is switched to on . After... drive. 6. Cause: The product was not being used with the HP Photosmart. English Chapter 3 When the software installation is firmly connected to both the product and the power adapter. Double-click HP Uninstaller. The product will not turn it is switched on . • Solution 1: Make sure you ...
... switched outlet, make sure the power strip is uninstalled, restart your computer, and then empty the Trash. 5. Disconnect the HP Photosmart from the product when you turn on Try the following solutions if there are using a power strip, make sure the outlet is switched to on . After... drive. 6. Cause: The product was not being used with the HP Photosmart. English Chapter 3 When the software installation is firmly connected to both the product and the power adapter. Double-click HP Uninstaller. The product will not turn it is switched on . • Solution 1: Make sure you ...


