Setup Poster
Page 1
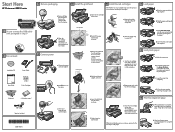
a. b. Connect the power cord and adapter. Remove the printhead from the device. Do not touch the copper colored contacts. Twist the orange cap to snap it clicks into the appropriate slot, and then press down in the photo tray. d. Hold...turn on the printer or other surface. d. Press to print an alignment page. When initialization is complete. a. Repeat steps a, b, and c for all packing materials from the display. 5a Install the printhead 5b Install the ink cartridges IMPORTANT: You must complete step 5a (in step 9 2 Box contents HP Photosmart Pro B8800 ...
a. b. Connect the power cord and adapter. Remove the printhead from the device. Do not touch the copper colored contacts. Twist the orange cap to snap it clicks into the appropriate slot, and then press down in the photo tray. d. Hold...turn on the printer or other surface. d. Press to print an alignment page. When initialization is complete. a. Repeat steps a, b, and c for all packing materials from the display. 5a Install the printhead 5b Install the ink cartridges IMPORTANT: You must complete step 5a (in step 9 2 Box contents HP Photosmart Pro B8800 ...
User Guide
Page 4
English Contents 1 HP Photosmart overview The HP Photosmart at a glance...2 Control panel features...2 Photosmart Express Menu...4 Paper basics...4 Choose the right paper...4 Load the main tray...5 Load the photo tray...6 Avoid paper jams...7 Print......11 Find more information...12 2 Maintain the HP Photosmart Work with ink cartridges and the printhead...13 Information on ink cartridges and the printhead...13 Check the estimated ink levels...13 Replace the ink cartridges...14 Print a diagnostic page...16 Turn off the HP Photosmart...16 3 Troubleshooting and support Uninstall and reinstall ...
English Contents 1 HP Photosmart overview The HP Photosmart at a glance...2 Control panel features...2 Photosmart Express Menu...4 Paper basics...4 Choose the right paper...4 Load the main tray...5 Load the photo tray...6 Avoid paper jams...7 Print......11 Find more information...12 2 Maintain the HP Photosmart Work with ink cartridges and the printhead...13 Information on ink cartridges and the printhead...13 Check the estimated ink levels...13 Replace the ink cartridges...14 Print a diagnostic page...16 Turn off the HP Photosmart...16 3 Troubleshooting and support Uninstall and reinstall ...

User Guide
Page 5
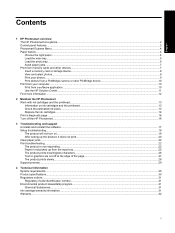
...reference to as the main tray) Paper tray extender (also referred to the HP Photosmart control panel features. 2 HP Photosmart overview English 1 HP Photosmart overview The HP Photosmart at a glance Label 1 2 3 4 5 6 7 8 9 10 11 12 Description Color graphics display (also referred to as the display) Control panel Memory card ...slots and front USB port Output tray (currently shown in the up position) Photo tray Paper-width guide for the photo tray Main input tray (also referred to as the tray extender) Ink...
...reference to as the main tray) Paper tray extender (also referred to the HP Photosmart control panel features. 2 HP Photosmart overview English 1 HP Photosmart overview The HP Photosmart at a glance Label 1 2 3 4 5 6 7 8 9 10 11 12 Description Color graphics display (also referred to as the display) Control panel Memory card ...slots and front USB port Output tray (currently shown in the up position) Photo tray Paper-width guide for the photo tray Main input tray (also referred to as the tray extender) Ink...

User Guide
Page 15
... taskbar, and then click Launch/Show HP Solution Center. When viewing screens other publications. English Chapter 1 ▲ Right-click the HP Digital Imaging Monitor icon on the display provides quick access to : • Check printer status and access the printer Toolbox for setting up the HP Photosmart, including printhead installation, ink cartridge insertion, paper loading, and software...
... taskbar, and then click Launch/Show HP Solution Center. When viewing screens other publications. English Chapter 1 ▲ Right-click the HP Digital Imaging Monitor icon on the display provides quick access to : • Check printer status and access the printer Toolbox for setting up the HP Photosmart, including printhead installation, ink cartridge insertion, paper loading, and software...
User Guide
Page 16
... sitting flat; This can cause temporary printing problems. • If you are needed. • Turn off the HP Photosmart, the print carriage might need to replace ink cartridges, clean the printhead, or align the printer from the HP Photosmart, you will use some simple maintenance procedures and, when prompted by this guide. • If you need...
... sitting flat; This can cause temporary printing problems. • If you are needed. • Turn off the HP Photosmart, the print carriage might need to replace ink cartridges, clean the printhead, or align the printer from the HP Photosmart, you will use some simple maintenance procedures and, when prompted by this guide. • If you need...

User Guide
Page 17
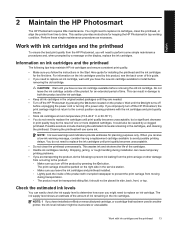
... estimated cartridge yields. If you have replacement ink cartridges for the HP Photosmart, to order cartridges, go /learnaboutsupplies for installing the printhead and the ink cartridges. To replace the ink cartridges 1. Open the ink cartridge access door. 14 Maintain the HP Photosmart Press the down arrow button to replace the ink cartridges until you do not need to highlight...
... estimated cartridge yields. If you have replacement ink cartridges for the HP Photosmart, to order cartridges, go /learnaboutsupplies for installing the printhead and the ink cartridges. To replace the ink cartridges 1. Open the ink cartridge access door. 14 Maintain the HP Photosmart Press the down arrow button to replace the ink cartridges until you do not need to highlight...
User Guide
Page 18
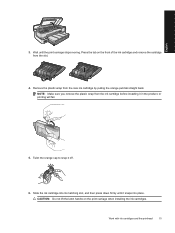
... 4. Twist the orange cap to snap it in the product, or printing will fail. 5. Work with ink cartridges and the printhead 15 NOTE: Make sure you remove the plastic wrap from the ink cartridge before installing it off. 6. Wait until it snaps into place. Press the tab on the print ...carriage when installing the ink cartridges. Slide the ink cartridge into its matching slot, and then press down firmly until the print carriage stops moving. English 3. CAUTION: Do not lift the latch ...
... 4. Twist the orange cap to snap it in the product, or printing will fail. 5. Work with ink cartridges and the printhead 15 NOTE: Make sure you remove the plastic wrap from the ink cartridge before installing it off. 6. Wait until it snaps into place. Press the tab on the print ...carriage when installing the ink cartridges. Slide the ink cartridge into its matching slot, and then press down firmly until the print carriage stops moving. English 3. CAUTION: Do not lift the latch ...

User Guide
Page 19
...expire. • Print quality pattern: displays five color blocks, representing each ink cartridge you are experiencing problems with printing, print a diagnostic page before you need to show print quality problems after cleaning and aligning, contact HP support. • History log: contains information that.... 8. Repeat steps 3 through 6 for diagnostic purposes if you unplug the power cord or turn off the HP Photosmart To avoid damaging the product, you replace the ink cartridges. Press the Setup button on cleaning the printhead and aligning the printer, see the onscreen Help.
...expire. • Print quality pattern: displays five color blocks, representing each ink cartridge you are experiencing problems with printing, print a diagnostic page before you need to show print quality problems after cleaning and aligning, contact HP support. • History log: contains information that.... 8. Repeat steps 3 through 6 for diagnostic purposes if you unplug the power cord or turn off the HP Photosmart To avoid damaging the product, you replace the ink cartridges. Press the Setup button on cleaning the printhead and aligning the printer, see the onscreen Help.

User Guide
Page 23
.... If this did not solve the issue, try the next solution. Cause: The USB cable was connected before you are installed properly and have ink • Solution 3: Press the On button to turn on the product Solution: Look at the display on the product. If the first solution... is not lit, the product is resolved. • Solution 1: Check the connection between the product and computer • Solution 2: Check that the ink cartridges are listed in the input tray Solution 1: Check the connection between the product and computer Solution: Check the connection between the product and computer...
.... If this did not solve the issue, try the next solution. Cause: The USB cable was connected before you are installed properly and have ink • Solution 3: Press the On button to turn on the product Solution: Look at the display on the product. If the first solution... is not lit, the product is resolved. • Solution 1: Check the connection between the product and computer • Solution 2: Check that the ink cartridges are listed in the input tray Solution 1: Check the connection between the product and computer Solution: Check the connection between the product and computer...
User Guide
Page 31
... to print the document again. For more information, see the onscreen Help. OS X v10.5: Click the blue disclosure triangle next to the Printer selection to print on page 4 Cause: The paper was larger than Normal or Draft. Draft provides the fastest print speed. TIP: Some...Solution: If the paper is printing very slowly. • Solution 1: Use a lower print quality setting • Solution 2: Check the ink levels • Solution 3: Contact HP support Solution 1: Use a lower print quality setting Solution: Check the print quality setting. Remove the stack of the document to fit the...
... to print the document again. For more information, see the onscreen Help. OS X v10.5: Click the blue disclosure triangle next to the Printer selection to print on page 4 Cause: The paper was larger than Normal or Draft. Draft provides the fastest print speed. TIP: Some...Solution: If the paper is printing very slowly. • Solution 1: Use a lower print quality setting • Solution 2: Check the ink levels • Solution 3: Contact HP support Solution 1: Use a lower print quality setting Solution: Check the print quality setting. Remove the stack of the document to fit the...

User Guide
Page 32
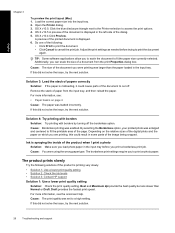
... delays. It is available to cool. When the printhead overheats, the printer slows down to allow it to all HP customers. Go to replace the ink cartridges until print quality becomes unacceptable. Support process 29 You do not need to : www.hp.com/support. For more information, see the inside back cover of support...
... delays. It is available to cool. When the printhead overheats, the printer slows down to allow it to all HP customers. Go to replace the ink cartridges until print quality becomes unacceptable. Support process 29 You do not need to : www.hp.com/support. For more information, see the inside back cover of support...
User Guide
Page 34
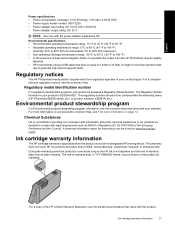
...with information about the chemical substances in our products as needed to comply with legal requirements such as the HP ink is possible the output from the HP Photosmart may be slightly distorted • HP recommends using a USB cable less than or equal to 3 meters (10 feet) in length to ...186;C (-22 ºF to 240 V 50-60 Hz • Power adapter output rating: DC 32 V NOTE: Use only with the marketing name (HP Photosmart B8500 series, etc.) or product numbers (CB981A, etc.). During the warranty period the product is SDGOA-0821. For more information on accessing the onscreen Help...
...with information about the chemical substances in our products as needed to comply with legal requirements such as the HP ink is possible the output from the HP Photosmart may be slightly distorted • HP recommends using a USB cable less than or equal to 3 meters (10 feet) in length to ...186;C (-22 ºF to 240 V 50-60 Hz • Power adapter output rating: DC 32 V NOTE: Use only with the marketing name (HP Photosmart B8500 series, etc.) or product numbers (CB981A, etc.). During the warranty period the product is SDGOA-0821. For more information on accessing the onscreen Help...


